- DL manuals
- Abit
- Video Card
- Siluro GF4 MX Series
- User Manual
Abit Siluro GF4 MX Series User Manual


Summary of Siluro GF4 MX Series
Page 1
Siluro gf4 mx series graphics accelerator (mx-8x, mx-8x lp, mx-se, mx-se t) user’s manual 4200-0368-11 rev. 1.02.
Page 2
Copyright and warranty notice the information in this document is subject to change without notice and does not represent a commitment on part of the vendor, who assumes no liability or responsibility for any errors that may appear in this manual. No warranty or representation, either expressed or i...
Page 3
Siluro gf4 mx series graphics accelerator index schnellinstallationsanleitung................................................................... 1 guide d’installation rapide .................................................................... 3 guida all’installazione rapida ..........................
Page 4
4-2. G eneral ...................................................................................... 4-2 4-3. A dapter ...................................................................................... 4-3 4-4. M onitor ...............................................................................
Page 5
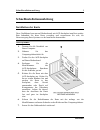
Schnellinstallationsanleitung 1 schnellinstallationsanleitung installation der karte diese grafikkarte kann nur auf motherboards mit agp-steckplatz installiert werden. Bitte behandeln sie diese karte vorsichtig und vergewissern sie sich, die netzversorgung ihres systems vor der installation abzutren...
Page 6
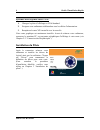
2 schnellinstallationsanleitung systeme mit vorhandener vga-karte: 1. 2. 3. Ändern sie den anzeigetreiber zu “standard vga”. Schalten sie ihren computer aus und trennen alle netzkabel ab. Ersetzen sie die bestehende vga-karte mit dieser neuen karte. Die installation ihrer grafikkarte ist nun vervoll...
Page 7
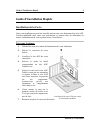
Guide d’installation rapide 3 guide d’installation rapide installation de la carte cette carte graphique ne peut être installée que sur une carte disposant d’un slot agp. Veuillez manipuler cette carte avec précautions et assurez-vous de débrancher la source d’alimentation de votre système avant l’i...
Page 8
4 guide d’installation rapide systèmes avec déjà une carte vga: 1. 2. 3. Changez le pilote d’affichage en vga standard. Eteignez votre ordinateur et débranchez tous les câbles d’alimentation. Remplacez la carte vga actuelle avec la nouvelle. Votre carte graphique est maintenant installée. Avant de r...
Page 9
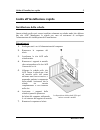
Guida all’installazione rapida 5 guida all’installazione rapida installazione della scheda questa scheda grafica può essere installata solamente su schede madri che abbiano uno slot agp. Maneggiare la scheda con cura ed assicurarsi di scollegare l’alimentazione del sistema prima dell’installazione. ...
Page 10
6 guida all’installazione rapida sistemi con una scheda vga esistente: 1. 2. 3. Cambiare il driver schermo su standard vga. Spegnere il computer e scollegare tutti i cavi d’alimentazione. Sostituire la scheda vga esistente con la scheda nuova. La scheda grafica è installata. Prima di riavviare il co...
Page 11
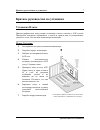
Краткое руководство по установке 7 Краткое руководство по установке Установка Платы Данную графическую плату можно установить только в систему с agp слотом. Пожалуйста, аккуратно обращайтесь с платой и, прежде чем ее устанавливать, убедитесь в том, что питание компьютера выключено. Новые Системы: 1....
Page 12
8 Краткое руководство по установке Системы с установленной vga Платой: 1. 2. 3. Замените драйвер монитора на standard vga. Выключите компьютер и отсоедините все шнуры питания. Замените старую плату vga на новую. Ваш графический адаптер теперь установлен. Перед перезагрузкой компьютера не забудьте по...
Page 13
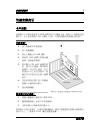
快速安裝指引 9 快速安裝指引 卡片安裝 這張顯示卡只能安裝到具有 agp 插槽設計的主機板上面,請您小心地拿取這張 顯示卡,並且在安裝顯示卡到主機板上之前,先確認電腦的電源線已經拔掉。 全新系統: 1. 2. 3. 4. 5. 6. 7. 拔下電腦的所有電源線。 拆下電腦機蓋。 找出主機板上的 agp 插槽。 移除該 agp 插槽之對應金屬 蓋條。請保留好螺絲。 將本顯示卡與 agp 插槽對齊 好。握住卡片邊緣,將其插到 插槽中,切忌用力過度,也不 要按到卡片上的任何組件。請 確定其已牢固並完全插入插槽 當中。 用原來從固定槽上取下的螺絲 將顯示卡鎖到固定槽上。 蓋回電腦機蓋。 現有顯示卡之...
Page 14
10 快速安裝指引 安裝驅動程式 在連接好顯示裝置後,重新啟動您的 電腦,並安裝驅動及公用程式。點選 “driver” ,即可開始顯示卡的驅動程式 安裝。(關於詳細的安裝程序,請參 考第 3 章 “安裝驅動程式”。) siluro gf4 mx series.
Page 15
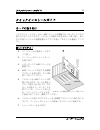
クイックインストールガイド 11 クイックインストールガイド カードの取り付け このグラフィックスカードは、agp スロットを搭載するマザーボードにだけ 取り付けることができます。このカードは細心の注意を払って取り扱い、取り 付ける前にシステムの電源装置からプラブを抜いてあることを確認してくだ さい。 新しいシステム: 1. 2. 3. 4. 5. 6. 7. コンピュータの電源コードをす べて抜く。 コンピュータのシャーシカバー を取り外す。 マザーボードに agp スロットを 配置する。 agp スロットに対応する金属製 ブラケットを取り除く。ネジは保 管しておいてください。 このカードを...
Page 16
12 クイックインストールガイド 既存の vga カードを搭載するシステム: 1. 2. 3. ディスプレイドライバを標準の vga に変更する。 コンピュータの電源をオフにして、すべての電源コードを抜く。 既存の vga カードをこの新しいカードに取り替える。 グラフィックスカードの取り付けがこれで完了しました。コンピュータを再起 動する前に、pc モニタまたはその他の表示デバイスをこのカードに接続して ください(第 2-2 章「デバイス接続」をご覧ください)。 ドライバのインストール 接続が済んだら、コンピュータを再 起動し、ソフトウェアドライバとユ ーティリティをインストールします。 “...
Page 17
빠른 설치 설명서 13 빠른 설치 설명서 카드 설치 이 그래픽 카드는 agp 슬롯을 가진 마더보드에만 설치가 가능합니다. 카드는 항상 주의를 기울여 취급하시고 설치 전에는 시스템 전원 코드를 뽑으십시오. 새 시스템: 1. 2. 3. 4. 5. 6. 7. 컴퓨터의 모든 전원 코드를 뽑습니다. 컴퓨터 새시 커버를 제거합니다. Agp 슬롯을 마더보드에 위치시킵니다. Agp 슬롯에 해당하는 금속 브래킷을 제거합니다. 나사를 조입니다. 이 카드를 agp 슬롯의 중심에 맞춥니다. 카드의 가장자리를 잡고 슬롯에 삽입합니다. 무리한 힘을 가하거나...
Page 18
14 빠른 설치 설명서 기존 vga 카드를 가진 시스템: 1. 2. 3. 디스플레이 드라이버를 표준 vga 로 교체합니다. 컴퓨터를 끄고 모든 전원 코드를 뽑습니다. 기존의 vga 카드를 새 카드로 교체합니다. 이제 그래픽 카드가 설치되었습니다. 컴퓨터를 다시 시작하기 전에, pc 모니터나 기타 디스플레이 장치를 이 카드에 연결하십시오 (2-2 장 "장치 연결"을 참조하십시오). 드라이버 설치 연결 후에는, 컴퓨터를 다시 시작하고 소프트웨어 드라이버 및 유틸리티를 설치합니다. “driver” 를 클릭하여 이 카드의 드라이버 설치를 ...
Page 19
Introduction 1-1 chapter 1. Introduction 1-1. Features thank you for purchasing abit siluro gf4 mx series graphics cards, the most advanced solution for graphics enthusiasts. Powered by nvidia ® geforce tm 4 mx440-se/mx 440 gpu with agp 8x, the most integrated graphics processing unit (gpu), and the...
Page 20
1-2 chapter 1 1-2. Specification siluro gf4 mx-8x: powered by nvidia ® geforce tm 4 mx 440 gpu with agp 8x working on 275mhz with 256-bit graphics core on board 64mb video memory integrated dual 350mhz ramdacs supporting twin-view at 2048 x 1536 @ 75hz 1.1 billion texels/sec fill rate nvidia ® video...
Page 21
Introduction 1-3 siluro gf4 mx-8x lp: powered by nvidia ® geforce tm 4 mx 440 gpu with agp 8x working on 250mhz with 256-bit graphics core on board 64mb video memory integrated dual 350mhz ramdacs supporting twin-view at 2048 x 1536 @ 75hz 1.1 billion texels/sec fill rate nvidia ® video processing e...
Page 22
1-4 chapter 1 siluro gf4 mx-se/mx-se t: powered by nvidia ® geforce tm 4 mx440-se gpu working at 256-bit graphics core on-board 64mb video memory integrated dual 350mhz ramdacs supporting twin-view at 2048 x 1536 @ 75hz 1 billion pixels/sec fill rate nvidia ® video processing engine (vpe) delivers t...
Page 23
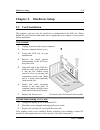
Hardware setup 2-1 chapter 2. Hardware setup 2-1. Card installation this graphics card can only be installed in a motherboard with agp slot. Please handle this card with care and make sure to unplug the power supply of your system before installation. New systems: 1. 2. 3. 4. 5. 6. 7. Unplug all pow...
Page 24
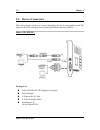
2-2 chapter 2 2-2. Devices connection this section shows you how to connect the display devices to your graphics card. The layout of the vga card may not be exactly the same as the one you have. Siluro gf4 mx-se: package list: siluro gf4 mx-se 3d graphics accelerator user's manual s-video to rca cab...
Page 25
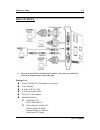
Hardware setup 2-3 siluro gf4 mx-8x: please note that dvi-i to d-sub adapter and tv-out connector could not be selected as output interface at the same time. Package list: siluro gf4 mx-8x 3d graphics accelerator user's manual s-video to rca cable s-video extended cable dvi-i to d-sub adapter bundle...
Page 26
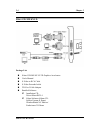
2-4 chapter 2 siluro gf4 mx-8x lp: package list: siluro gf4 mx-8x lp 3d graphics accelerator user's manual s-video to rca cable s-video extended cable dvi-i to d-sub adapter bundled software installation cd: driver/silurodvd 4 siluro software album cd: soldier fortune ii demo/ windowblinds nv editio...
Page 27
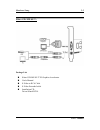
Hardware setup 2-5 siluro gf4 mx-se t: package list: siluro gf4 mx-se t 3d graphics accelerator user's manual s-video to rca cable s-video extended cable installation cd: driver/silurodvd 4 user’s manual.
Page 28
2-6 chapter 2 siluro gf4 mx series.
Page 29
Driver installation 3-1 chapter 3. Driver installation the screen displays in this manual may not exactly reflect the screenshots on your screen (for example, the model name would vary according to different video adapter). The contents of the installation cd that came with this card are subject to ...
Page 30
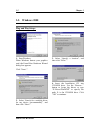
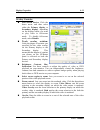
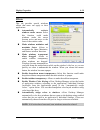
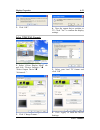
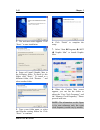
3-2 chapter 3 3-2. Windows 2000 plug and play setup: 1. Start windows. When windows detects your graphics card, the found new hardware wizard dialog box appears. Click “next>”. 2. Select “search for a suitable driver for my device [recommended]”, and then click “next>”. 3. Select “specify a location...
Page 31
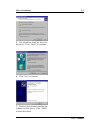
Driver installation 3-3 5. The wizard has found the driver for this device. Click “next>” to continue. 6. Click “yes” to continue. 7. Windows has finished installing the software for this device. Click “finish” to close the wizard. User’s manual.
Page 32
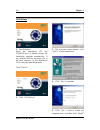
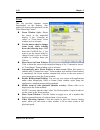
3-4 chapter 3 auto setup: 1. Start windows. Insert the installation cd into cd-rom drive, it should execute the installation program automatically. If not, double-click the execution file at the main directory of this installation cd to enter the installation menu. Click “driver”. 2. Click “vga driv...
Page 33
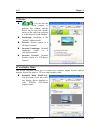
Driver installation 3-5 3-3. Windows xp plug and play setup: 1. Start windows. When windows detects your graphics card, the found new hardware wizard dialog box appears. Click “next>”. 2. Select “search for the best driver in these locations”, use the “browse” button to locate the driver, or type “e...
Page 34
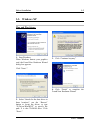
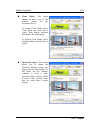
3-6 chapter 3 auto setup: 1. Start windows. Insert the installation cd into cd-rom drive, it should execute the installation program automatically. If not, execute the execution file at the main directory of this installation disk. After it has been executed, the setup screen appears. Click “driver”...
Page 35
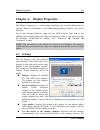
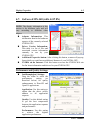
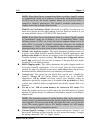
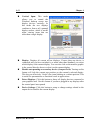
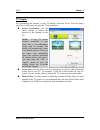
Display properties 4-1 chapter 4. Display properties the display properties is a control panel that helps you to make adjustments on adapter, monitor, performance, color management, display position, and nview functions. To use the display properties, right-click the abit display tray icon on the ta...
Page 36
4-2 chapter 4 primary monitor will display the logon dialog box when you start your computer. In addition, most programs will display windows on the primary monitor when you initially open them. Extend my windows desktop onto this monitor: selects the monitor whose video adapter appears in display. ...
Page 37
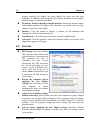
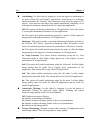
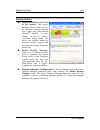
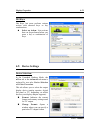
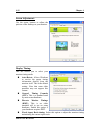
Display properties 4-3 4-3. Adapter this tab shows what type of display adapter you are currently using. Properties: click this button to display device and driver properties for this video adapter. List all modes: click this to view all of the video modes available for this adapter. 4-4. Monitor pr...
Page 38
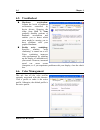
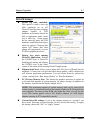
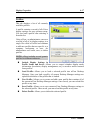
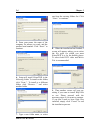
4-4 chapter 4 4-5. Troubleshoot hardware acceleration: adjusts the levels of hardware acceleration controlled by device drivers. Dragging the slider from full to none gradually disables portions of hardware acceleration and enables you to detect which areas might be causing you to have problems with...
Page 39
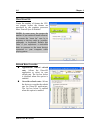
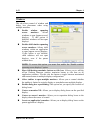
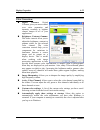
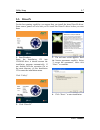
Display properties 4-5 4-7. Geforce4 mx 440 (with agp 8x) note: the display information in this section is for reference only, and will vary according to different video adapter. Adapter information: this information details the hardware aspects of the currently selected nvidia gpu. Driver version i...
Page 40
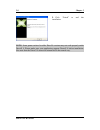
4-6 chapter 4 antialiasing: use this slider by dragging it to set the degree of antialiasing to be used in direct3d and opengl applications. Antialiasing is a technique used to minimize the "stairstep" effect sometimes seen along the edges of 3d objects. Your selection can range from turning antiali...
Page 41
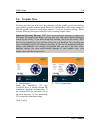
Display properties 4-7 direct3d settings: enable fog table emulation: this option is used to turn fog table emulation on or off. Direct3d specifies that a display adapter capable of d3d hardware acceleration should be able to implement either vertex fog or table fog. Some games do not correctly quer...
Page 42
4-8 chapter 4 more direct3d: limits the number of frames the cpu can prepare before the frames are processed by the graphics processor when vertical sync is disabled. Note: in some cases, the greater the number of pre-rendered frames allowed, the greater the “input lag” may be in response to devices...
Page 43
Display properties 4-9 opengl settings: disable support for enhanced cpu instruction sets: select this option to disable driver support for enhanced instructions used by certain cpus. Some cpus support additional 3d instructions that complement your nvidia graphics processor and improve performance ...
Page 44
4-10 chapter 4 note: when multi-device compatibility mode is in effect, opengl renders in "compatibility" mode for all displays. In this mode, when different classes of gpus are in use, the lowest common feature set of all active gpus is exposed to opengl applications. The opengl rendering performan...
Page 45
Display properties 4-11 overlay controls: full screen device: click the down arrow and then select either the primary display or secondary display, depending on the display where you want to play video in full-screen mode. To disable full-screen mode, select disable. Track overlay rotation: links th...
Page 46
4-12 chapter 4 nvrotate: : you can use the left/right arrow button to perform the rotation options below. Or you can click circular arrow on the right top and drag it in the direction of the rotation. Landscape: landscape is the “default” desktop mode. Portrait: portrait results in a 90-degree rotat...
Page 47
Display properties 4-13 clone mode: this mode outputs an exact copy of the primary display on the secondary device. To enable clone mode, select clone mode and click ok or apply. Both display monitors now display the same image. To disable clone mode, select standard mode and click ok or apply. Hori...
Page 48
4-14 chapter 4 vertical span: this mode allows you to extend the windows desktop across two display devices vertically. In this mode the two displays combine to form a tall, spanned display surface, which is useful when viewing items that are taller than a single display. Display: displays all curre...
Page 49
Display properties 4-15 desktop utilities: display the media center icon in the taskbar: this option adds the media center icon to the windows taskbar, allowing you to apply any of the custom direct3d, opengl or color settings “on the fly” from a convenient popup menu. The menu also contains items f...
Page 50
4-16 chapter 4 4-8. Nview desktop manager this tab contains information about the nview desktop manager. The setup wizard can also be accessed from this tab. Info: enable nview desktop manager: loads or unloads nview desktop manager desktop management. Also controls if nview desktop manager automati...
Page 51
Display properties 4-17 profiles: this tab displays a list of all currently available profiles. A profile contains a record of all nview display settings for easy software setup. You can load a profile after selecting it from the list. Using nview, an administrator can save a record of all of its di...
Page 52
4-18 chapter 4 windows: this tab allows control of window and dialog box placement when using multiple monitors. Enable window spanning across monitors: allows windows to span [appear across] displays. If this option is disabled, windows will not span displays. Enable child window spanning across mo...
Page 53
Display properties 4-19 effects: this tab provides special windows effects that users can apply to their applications. Automatically activate windows under cursor: select this function could make windows under the cursor become active and move to the front of the window order. Make windows minimize ...
Page 54
4-20 chapter 4 zoom: this tab provides dynamic zooms functionality on the desktop. Also enable full screen video playback via the video mirroring control. Zoom window style: shows the cursor in the magnified display if the “centered on cursor” or “fixed frame” zoom window style is selected. Use the ...
Page 55
Display properties 4-21 hot keys: hot keys lets users perform various actions with shortcut keys or key combinations. Select an action: lists actions that can be performed when you press a key or combination of keys. 4-9. Device settings device selection: in the extended desktop mode, the nview tab ...
Page 56
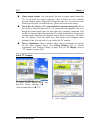
4-22 chapter 4 video output format: lets you specify the type of output signal sent to the tv. If you have the proper connector cable, s-video out will generally provide a higher quality output than composite video out. If you are not sure which type of signal you should specify, choose the auto-sel...
Page 57
Display properties 4-23 click “ok”. 3. 4. Now the output device switches to tv. Click “yes” to confirm the display settings. Select ntsc/pal format: 1. Select “nview display mode” tab and click “device settings>>” “select output device” “advanced...”. 2. Click “change format...”. 3. Select your loca...
Page 58
4-24 chapter 4 tv output: for customizing the settings of your tv display, enter the device selection panel, click device adjustment to open the tv output panel. Screen positioning: use the arrow buttons to adjust the position of the desktop on the tv. Note: if the tv picture becomes scrambled or go...
Page 59
Display properties 4-25 color correction: digital vibrance: digital vibrance gives you more control over color separation and intensity, resulting in brighter cleaner images in all of your applications. Brightness, contrast, gamma: the slider controls allow you to adjust the brightness, contrast or ...
Page 60
4-26 chapter 4 screen adjustment: use the arrow buttons to adjust the position of the desktop on your monitor. Display timing: this tab allows you to select your monitor timing mode: auto-detect: allows windows to receive the proper timing information directly from the monitor itself. This is the de...
Page 61
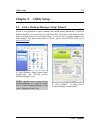
Utility setup 5-1 chapter 5. Utility setup 5-1. Nview desktop manager setup wizard nview is an application to create, manage and switch among maximum 32 different desktop displays. You can keep your e-mail and web browsing on one desktop while using a second desktop for word processing, or even set ...
Page 62
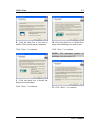
5-2 chapter 5 3. Click “next >”. 4. Click “next >”. 5. Click the check box if you want to automatically enable nview when starting windows. Click “next >” to continue. 6. By selecting a profile from the list you can configure all nview display settings in a single step. Click “next >” to continue. 7...
Page 63
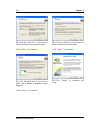
Utility setup 5-3 8. Click the check box if you want to enable nview system menu extensions. Click “next >” to continue. 9. Click the check box to decide the dialog boxes placement. Click “next >” to continue. 10. Click the check box to decide how many initial desktops you want to use. Click “next >...
Page 64
5-4 chapter 5 12. Click the check box if you want to use the explorer to navigate desktops. Click “next >” to continue. 13. Click the check box if you want to make the windows transparent when dragged. Click “next >” to continue. 14. Click the check box if you want to make windows maximize faster. C...
Page 65
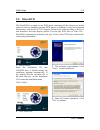
Utility setup 5-5 5-2. Silurodvd the silurodvd is a simple-to-use dvd player combining all the features you would expect to find in a standard consumer dvd player, in addition to some very advanced functionality, such as full vcd 2.0 support, full precision video decoding, a choice of user interface...
Page 66
5-6 chapter 5 5. Enter your name, the name of the company for whom you work, and the product serial number. Click “next>” to continue. 6. Setup will install silurodvd in the following folder. To install to this folder, click “next>”. To install to a different folder, click “browse…” and select anoth...
Page 67
Utility setup 5-7 5-3. Directx for the best gaming capability, we suggest that you install the latest directx driver. Some newer games will also ask you to install the directx driver before you start them. 1. Start windows. Insert the installation cd into cd-rom drive, it should execute the installa...
Page 68
5-8 chapter 5 5. Click “finish” to end the installation. Note: some games written for older directx versions may not work properly under directx 9. Please make sure your application support directx 9 before installation. Also note that the directx 9 cannot be uninstalled in the normal way. Siluro gf...
Page 69
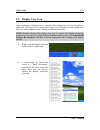
Utility setup 5-9 5-4. Graphic max we have provided you with a tool for adjusting both the graphic processors working speed and the graphic memory speed. Please be reminded that it may cause damage to both the graphic processor and graphic memory if you use incorrect settings. Please read the follow...
Page 70
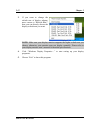
5-10 chapter 5 3. The welcome screen appears. Click “next>” to start installation. 4. Setup will install graphic max in the following folder. To install to this folder, click “next>”. To install to a different folder, click “browse…” and select another folder. 5. Type a new folder name, or select on...
Page 71
Utility setup 5-11 5-5. Display tray icon after installation of display drivers, you will find a display tray icon on the taskbar’s status area. Clicking this icon opens this display tray, showing a menu composed of shortcuts of the graphics board’s enhanced and other functions. Note: besides clicki...
Page 72
5-12 chapter 5 if you want to change the refresh rate of display adapter, move cursor to “refresh rate”, here you can directly choose the display refresh rate you want. 3. Note: make sure your display monitor supports the higher refresh rate you choose; otherwise, your monitor may not display normal...
Page 73
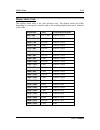
Utility setup 5-13 display modes table this display mode table is for your reference only. The display mode will differ depending on your specific monitor, and so the resulting display may not be identical to this table. Resolution colors vertical refresh rate 640 x 480 8/16/32 bits 60hz to 240hz 80...
Page 74
5-14 chapter 5 5-6. Bios flashing utility you may update the newest drivers or bios files from your dealer or directly download from our web site at http://www.Abit.Com.Tw . Note: when you use the flash utility to flash the bios, the screen will be blank for about 10 seconds. This is a normal situat...
Page 75
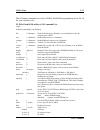
Utility setup 5-15 the following commands are for the nvidia flash rom programming utility v4.38, for your reference only. Nvidia flash rom utility v4.38 command list: usage: nvflash [commands] [rom filename] file f flash the rom using (no confirmation), then do compare and ~crc32. Save b read rom a...
Page 77
How to get technical support a-1 appendix a. How to get technical support (from our website) http://www.Abit.Com.Tw (in north america) http://www.Abit-usa.Com (in europe) http://www.Abit.Nl thank you for choosing abit products. Abit sells all our products through distributors, resellers and system i...
Page 78
A-2 appendix a 4. Internet newsgroups. They are a great source of information and many people there can offer help. Abit's internet news group, alt.Comp.Periphs.Mainboard.Abit , is an ideal forum for the public to exchange information and discuss experiences they have had with abit products. Many ti...
Page 79
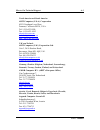
How to get technical support a-3 north america and south america: abit computer (u.S.A.) corporation 45531 northport loop west, fremont, california 94538, u.S.A. Tel: 1-510-623-0500 fax: 1-510-623-1092 sales@abit-usa.Com technical@abit-usa.Com http://www.Abit-usa.Com u.K. And ireland: abit computer ...
Page 80
A-4 appendix a japan: abit computer (japan) co. Ltd. Fax: 81-3-5396-5110 http://www.Abit4u.Jp shanghai: abit computer (shanghai) co. Ltd. Tel: 86-21-6235-1829 fax: 86-21-6235-1832 http://www.Abit.Com.Cn russia: abit computer (russia) co. Ltd. Fax: 7-095-937-2837 techrussia@abit.Com.Tw http://www.Abi...
Page 81
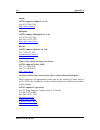
How to get technical support a-5 7. Rma service. If your system has been working but it just stopped, but you have not installed any new software or hardware recently, it is likely that you have a defective component. Please contact the reseller from whom you bought the product. You should be able t...
Page 82
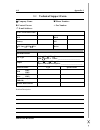
A-6 appendix a technical support form company name: phone number: contact person: fax number: e-mail address: vga card product name * gpu * bios * memory * o/s * □tv-out □dvi □vio driver * m/b maker/model * cpu type intel: □pii □piii □p4 amd: □socket a other: _________________________ chipset □intel...