- DL manuals
- Fairbanks
- Scales
- HR5000
- Service Manual
Fairbanks HR5000 Service Manual
Summary of HR5000
Page 1
Service manual eclipse scale series model: ppi-hr5000 hr5000 50517 issue #8 7/03 © 2003 by fairbanks scales inc. All rights reserved.
Page 2: Amendment Record
Amendment record eclipse scale series ppi-hr5000, hr-5000 50517 / sj4609 manufactured by fairbanks scales inc. 821 locust kansas city, missouri 64106 created issue #1 issue #2 issue #3 issue #4 issue #5 1/99 addition of the 24” x 24”, 200, 500, 1000 lb. Issue #6 10/99 new pcb, software, checkweighin...
Page 3
Table of contents forward: . . . . . . . . . . . . . . . . . . . . . . . . . . . . . . . . . . . . . . . . . . . . . . 5 section 1: introduction . . . . . . . . . . . . . . . . . . . . . . . . . . . . . . . . . . 6 section 2: description . . . . . . . . . . . . . . . . . . . . . . . . . . . . . . . ...
Page 4
Section 7: parts replacement a. Toggle switch replacement . . . . . . . . . . . . . . . . . . . . . 33 b. Main pc board replacement . . . . . . . . . . . . . . . . . . . . 33 c. Display pc board replacement . . . . . . . . . . . . . . . . . . 34 d. Load cell replacement, except 24x24 (before 06/01) ...
Page 5
Foreword: the eclipse series of scales/indicators continues to evolve. Original units were partially assembled integral units of platform and indicator, and pillar if chosen. They were factory wired and calibrated. Intermediate units (aprox. 10/99) were the same platform, indicator, and pillar compl...
Page 6
A. The information in this manual applies to the hr5000 series indicator, including those with rs-232 output unless otherwise indicated. Caution: this product is shipped from the factory set for 110- 120 vac operation. For 220-240 vac operation, settings must be changed before powering up. See setup...
Page 7
The hr5000 series scales are designed for light capacity, high- speed weighing operations. The indicators have a bright, 6-digit vacuum florescent display with annunciators for center-of-zero, net weight, and weight units. The hr5000 series indicators have a sealed toggle switch for zero and autotar...
Page 8
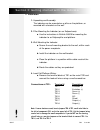
A. Installation 1. Unpacking and assembly: the indicator can be mounted on a pillar on the platform, or mounted with a bracket on the wall. 2. Pillar mounting the indicator (on an eclipse base): a. Use the instructions in bulletin 50628 for mounting the indicator to an eclipse pillar and platform. 3...
Page 9
B. Keys: 1. Units - triple function key function 1: switches the displayed weight between avoirdupois and metric weighing units. Function 2: when the units key is pressed and held for about 3 seconds, the indicator enters the front panel programming mode. Function 3: when a value is shown on the dis...
Page 10
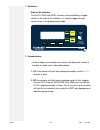
C. Switches : side of the indicator: the auto tare and zero functions are controlled by a toggle switch on the side of the indicator. It is used to toggle through values when in the programming mode. D. Annunciators: • various display annunciators are used in the display to indicate a function or mo...
Page 11
E. Leds • under: a steady yellow "under" led indicates that the weight on the scale is within a certain distance of the accept range on the low side (under range). The under (yellow) led will flash when the weight on the scale is much less than the the "under" range (out-of-range-low). • accept: a s...
Page 12
A. Programming functions may be accessed from the front panel or pc board switches. 1. To use front panel programming (with a "0" security level for full access): press and hold the units key for approximately 3 seconds. 2. To enter programming using the pcb switches, remove all screws holding the r...
Page 13
C. Program steps: note : the steps marked with an "*" will show a display value, but can not be changed by the operator or from the front panel. Other steps may or may not be programmable based on the security level. Refer to step 12 for more information. *1. Program number display: this display wil...
Page 14
6. Grad size: this display will read " gsxxxx ", where the " xxxx " is the grad size. The grad size displayed is for the primary units selected in program step 4. Grad sizes of other weight units are dependent on the primary unit grad size and are not independently programmable. Grad sizes from 0.00...
Page 15
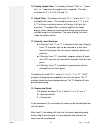
10. Display update rate: the display will read " sec x.X ", where the " x.X " represents the update rate in seconds. The rates available are 0.1, 0.3, 0.5, 0.8 and 1.0. 11. Digital filter: the display will read " ff x ", where the " x " is the digital filter factor. The available values are 0,1 , 2,...
Page 16
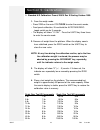
A. Standard a/d calibration: prom # 20010 rev x starting october 1999 1. From the weigh mode: • press sw3 on the main pcb twice to enter the counts mode, • front panel calibration, lift and hold the autotare/zero toggle switch up for 3 seconds. • the display will show " e cal". Press the units key t...
Page 17
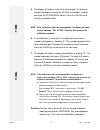
5. The display will show a value for the test weight. If necessary, change the display to show the actual test weight used by using the autotare/zero switch. Press the units key to store the calibration data. Note : if the calibration values are unacceptable, the display will show an error message, ...
Page 18
B. Standard a/d calibration: prom # 11750 (40300-250) rev x , before october 1999 the a/d counts are the indicator internal counts to convert the weight on the platform to digital information in the display. The counts are set by manipulating the gain and offset switches to reach the desire range. T...
Page 19
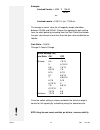
Example: liveload counts = 4290 x 100.00 25.00 -or- liveload counts = 4290 x 4 (or) 17160 cts. The change in count value for full capacity weight should be between 30,000 and 39,000. Choose the appropriate gain setting from the chart below by selecting from the gain ratio chart below, the gain ratio...
Page 20
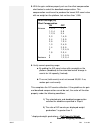
5. With the gain switches properly set use the offset compensation chart below to select the deadload compensation. This compensation must be set to produce the lowest a/d count value with no weight on the platform, but not less than 1,000. 6. Verify correct operating range: a. By adding the a/d cou...
Page 21
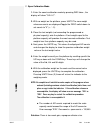
C. Span calibration mode 1. Enter the counts calibration mode by pressing sw3 twice , the display will show "cal lc". 2. With no weight on the platform, press units.The zero weight reference counts are displayed.Toggle the zero switch down to set counts to "0" (+ / - 3). 3. Place the test weights (n...
Page 22
B. There is less than the minimum number of counts required per division. Error message "e2l". The minimum number of counts per division is 3 for commercial applications (security levels 1 and 2) and, 1 for non -commercial applications (security level 0). Solution: division size is too small. Exit t...
Page 23
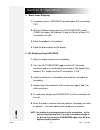
A. Basic gross weighing 1. If necessary, press gross/net to select gross (nt annunciator off). 2. With the platform empty, press the autotare/zero switch down, the display will indicate 0.0 and the center-of-zero (cz) annunciator will light. 3. Place the product on the platform. 4. Read the gross we...
Page 24
C. Batching/blending 1. Select the gross mode and place the empty container on the platform. Then press the autotare/zero toggle switch down. 2. Add the first ingredient until its required weight is reached. Then press the autotare/zero toggle switch up; display indicates "0.0" weight. Nt annunciato...
Page 25
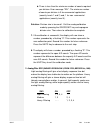
4. Place the item to be checkweighed on the platform. If the weight is correct, the display will read "0.0". If the weight is over, the display will read the overweight amount. If the weight is under, the display will read the underweight amount with minus sign. E. Using the checkweigh leds, ps 3 mo...
Page 26
F. Checkweighing setup hold the g/n key for about 3 seconds. The display will momentarily show "ch cal", followed by "ch x". Use the autotare or zero switch to select the desired mode. Mode 0 = checkweigh mode off mode 1 = checkweigh following gross weight only mode 2 = checkweigh following gross or...
Page 27
A. Checkweigh programming example #1 (using preferred sequence #1). Target weight of 10.0 lbs, under tolerance of 1.0 lbs over tolerance of 1.50 lbs (i.E. Accept light is on from 9 to 11.5 lbs) with the "ps 1" prompt displayed, press units to accept this as your preferred sequence. The accept (green...
Page 28
B. Checkweigh programming example #2 (using preferred sequence #2). Target weight of 10.0 lbs, accept range of 9.0 lbs to 11.5 lbs, same parameters as example 1. (i.E. Accept light is on from 9 to 11.5 lbs) with the "ps 2" prompt displayed, press units to accept this as your preferred sequence. The ...
Page 29
C. Checkweigh programming example #3 (using preferred sequence #3). Target weight of 10.0 lbs, accept range of 9.0 lbs to 11.5 lbs, same parameters as example 1. (i.E. Accept light is on from 9 to 11.5 lbs. Under on from 6.5 to 9.0 lbs over on from 11.5 to 14.0 lbs) with the "ps 3" prompt displayed,...
Page 30
Toggle the increment size used by the scroll function from fine to coarse. The display will momentarily flash when the size is toggled. Press the units key to accept. The indicator will return to the weigh mode and the appropriate led's will be llluminated. Apply a weight and begin checkweighing. Wh...
Page 31
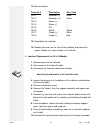
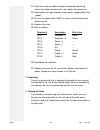
The display will show: "xxxxx" where "xxxx" is the baud rate. Use the toggle switch to scroll through the available baud rates, 300, 600, 1200, 2400, 4800, 9600, and 19200. With the appropriate baud rate displayed, press the units key. D. The display will show the selected device code. The codes are...
Page 32
E. If auto print was selected, the display will show: "ola xx" where "xx" is the time delay for weight on the platform to be stable, before the weight is printed. Use the toggle switch to display a time delay from 0 to 10 seconds. With the appropriate time delay displayed, press the units key. F. Th...
Page 33
A. Toggle switch replacement to replace the autotare/zero toggle switch on the side of the pillar: 1. Remove power to the indicator. 2. Remove the back cover. 3. Disconnect the toggle switch from the main pc board at j2. 4. Remove the "booted" nut on the side of the pillar using a 5/8" wrench. 5. Re...
Page 34
C. Display pc board replacement to replace the display pc board: 1. Remove power to the indicator. 2. Remove the bolts securing the back cover to the indicator. 3. Remove the main pc board. See the previous section for instructions. 4. Remove the four screws holding the display board in place. 5. Us...
Page 35
16. Wire as follows: terminal # description wire color tb1-1 excitation (-) black tb1-2 excitation (+) green tb1-3 sense (+) --- tb1-4 sense (-) --- tb1-5 n/c --- tb1-6 shield shield tb1-7 output (+) white tb1-8 output (-) red 18. Recalibrate the indicator. 19. Replace the cover on the rear of the i...
Page 36
11. Route the load cell cable through the base gland bushing, secure the cable using wire ties, then tighten the gland nut. 12. Reassemble the top assembly using spacer, support plate, then "spider". 13. Be sure the ground clip (15057) is secure and will contact the platform cover 14. Replace the co...
Page 37
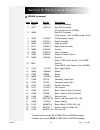
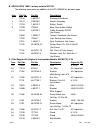
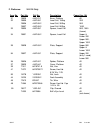
A. Hr5000 instrument item part no. Ref no. Description 1 14952 4-59014-1 enclosure weldment *2 13412 2-56222-1 main pcb assembly (e arlier versions to 10/1999) **2 18356 main pcb assembly (later version from 10/1999 includes prom) 3 13453 2-56326-1 pcb assembly, display 4 13930 3-57115-1 switch asse...
Page 38
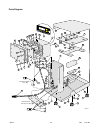
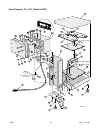
Parts diagram: 50517 38 7/03 issue #8 31 50 38 40 35 34 37 42 25 20 3 9 1 7 8 22 2 5 4 15 14 10 28 12 21 29 16 18 30 19 43 26 27 11 13 33 47 56 55 6 32 51 41 40 45 44 44 44 54 39 41 49 36 50517-1 45 17 46 47 48 41 53 cz n t l b kg oz g unde r accept over unit s gros s net auto tar e zero ▲ ▲ togg le...
Page 39
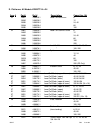
B. Hr5000 with 18931, factory installed rs 232. The following spare parts are additions to the ppi-hr5000 list, previous page. Item part no. Ref no. Description 1 15150 4-59429-1 enclosure weldment 4 15147 3-59426-1 switch assembly 7 12703 1-54132-1 button, switch 8 17283 720542 boot, push button sw...
Page 40
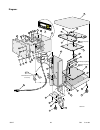
Parts diagram: 50517 40 7/03 issue #8 31 50 38 40 35 34 37 42 25 20 3 9 1 7 8 22 2 5 4 15 14 10 28 12 21 29 16 18 30 19 43 26 27 11 13 33 47 56 55 6 32 51 41 40 45 44 44 44 54 39 41 49 36 50517-1 45 17 46 47 48 41 53 cz nt l b kg oz g unde r accept over unit s gros s net auto tare zero ▲ ▲ togg le s...
Page 41
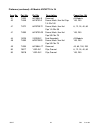
D. Platforms: all models except 24 x 24 item # part# ref # description capacities (lb) 32 15081 3-59329-1 load cell aluminum 6 15082 3-59329-2 12 15083 3-59329-3 24, 40 15084 3-59329-4 60 15085 3-59329-5 100 32 14961 3-59020-1 load cell stainless steel 6 14962 3-59020-2 12 14963 3-59020-3 24, 40 149...
Page 42
Platforms (continued): all models except 24 x 24 item no. Part no. Ref no. Description capacities (lb) 31 11033 6a10844-9 grommet all models 40 11048 6a15739-2 screw, mach, hex hd cap 100, 200 1/4-20x1.00 41 11072 6a15739-72 screw, mach, hex hd 6, 12, 24, 40, 60 cap 1/4-20x.38 41 11059 6a15739-23 sc...
Page 43
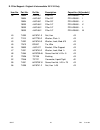
E. Pillar/support: original & intermediate 24 x 24 only item no. Part no. Ref no. Description capacities (lb)[models] 38 15834 4-62168-1 pillar 35" ppi-hr5000 - h 15834 4-62168-1 pillar 35" ppi-hr5000 - i 15834 4-62168-1 pillar 35" ppi-hr5000 - j 18333 4-62168-2 pillar 24" ppi-hr5000 - k 18333 4-621...
Page 44
Parts diagram: 24: x 24” platform only 50517 44 7/03 issue #8 35 54 54 35 34 44 48 33 200 lb capacity only 200 lb capacity only 200 lb capacity only 36 48 50 41 32 39 31 50517-2 34 37 43 45 25 20 3 9 1 22 2 5 4 15 14 10 28 12 21 29 16 26 27 11 13 6 17 41 53 cz nt l b kg oz g unde r accept over units...
Page 45
F. Platforms: 24 x 24 only item no. Part no. Ref no. Description capacities (lb) 31 15825 4-62161-1 base, platform all 32 15835 4-62169-1 load cell, 150kg 200 15836 4-62169-2 load cell, 300kg 500 15837 4-62169-3 load cell, 500kg 1000 33 15830 4-62165-1 spacer, load cell 500, 1000 (lower) 34 15831 4-...
Page 46
Diagram: 50517 46 7/03 issue #8 35 54 54 35 34 44 48 33 200 lb capacity only 200 lb capacity only 200 lb capacity only 36 48 50 41 32 39 31 50517-2 34 37 43 45 25 20 3 9 1 22 2 5 4 15 14 10 28 12 21 29 16 26 27 11 13 6 17 41 53 cz nt l b kg oz g unde r accept over units gross net auto tare zero ▲ ▲ ...
Page 47
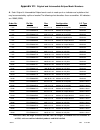
Appendix i : quick reference chart front panel steps factory setting prompt 1. Scrolls program number/revision number - *p-250-x **20010-x 2. Displays a/d counts for test purposes - "cxxxxx" 3. Weight units selection lb, kg, oz, g in any combination all units enabled "u" 4. Primary weight units sele...
Page 48: 350
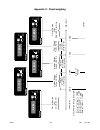
Appendix ii : checkweighing 50517 48 7/03 issue #8 o u t o f r a n g e low all leds off u n d e r r a n g e y e ll o w l e d o n accept range green led on over range r e d l e d o n o u t o f r a n g e high r e d l e d f la s h in g wi d th of "under" c a libratio n wi d th of "accept" c a libratio ...
Page 49
Appendix iii : remote wiring a. Remote switch wiring : remote switch cover assembly 20472. Description : three(3) remote or external switches can be used to operate the zero, autotare, and print functions. All remote switches must be momentary dry contact (no power) type and are hard wired to tb3 on...
Page 50
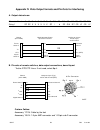
Appendix iv :data output formats and pin-outs for interfacing a. Output data stream character number 1 2 3 4 5 6 7 8 9 10 11 12 13 14 15 16 17 18 string 1 sp sp x x x x x x sp l b sp g/n r/t cr lf cr lf b. Pin-outs of remote switches, data output connections, board layout * active rts/cts lines. If ...
Page 51
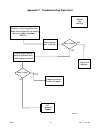
Appendix v : troubleshooting flow chart 50517 51 7/03 issue #8 indicator not working perform a visual inspection and begin asking specific's to identify the cause and/or symptoms basics place indicator on a simulator does it work? Repair the indicator check wiring at load cell perform load cell test...
Page 52
Appendix v i: troubleshooting a. In case of difficulty: 1. No display: check that the ac power cord is properly connected and that there is power at the outlet. See flow chart in appendix v, page 51. 2. Incorrect weight: check that nothing is interfering with movement of the platform. 3. Gross/net k...
Page 53
50517 53 7/03 issue #8 appendix vi i: original and intermediate eclipse model numbers a. Each original & intermediate eclipse bench scale is made up of an indicator and a platform that may be connected by a pillar or bracket.The following chart describes those assemblies. All indicators are 15063 (5...
Page 54
B. Technical specifications 1. Coc-94-099: 2. Recommended capacity and grad sizes: lb oz kg g 2 x .0005 32 x .01 .91 x .002 910 x .2 5 x .001 80 x .02 2.26 x .0005 2260 x .5 6 x .002 96 x .05 2.72 x .001 2720 x 1 10 x .002 160 x .05 4.53 x .001 4530 x 1 12 x .005 192 x .1 5.44 x .002 5440 x 2 24 x ....
Page 55
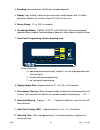
3. Rounding: nearest division (0.5 division rounded upwards) 4. Display: high visibility 6 digit vacuum fluorescent weight display with 0.5" digits. Separate indicators for: center of zero (cz), net, lb, kg, oz, g. 5. Rezero range: 2% or 100% of capacity 6. Checkweigh modes: under, accept and over l...
Page 56
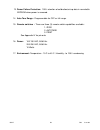
13. Power failure protection: 100% retention of calibration/set-up data in nonvolatile eeprom when power is removed. 14. Auto tare range: programmable for off or full range. 15. Remote switches : there are three (3) remote switch capabilities available : 1. Zero 2. Autotare 3. Print see appendix iv ...

