- DL manuals
- Salutron
- Test Equipment
- SRTPro
- Instruction Manual
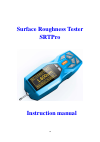
Salutron SRTPro Instruction Manual
Summary of SRTPro
Page 1
30 surface roughness tester srtpro instruction manual.
Page 3
Content 1 roughness tester overview ....................................................................................................... 3 1.1 f eatures of instrument ........................................................................................................................... 3 1.2 ...
Page 4
5.5 t roubleshooting .................................................................................................................................. 24 6 references .......................................................................................................................................
Page 5: Roughness Tester Overview
3 1 roughness tester overview the surfaces roughness tester is suitable for shop floor use and mobile measure to need of a small handheld instrument, it operation simple, function overall, measure fast, accuracy stability, take convenience. This tester applies to production site and can be used to m...
Page 6: 1.3 Name Of Each Part
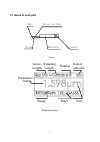
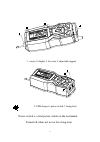
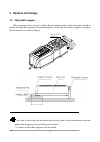
4 1.3 name of each part skid stylus protective tube main body socket sensor sampling length number battery indicator parameters range filter unit assess length display interface.
Page 7
5 1. Sensor 2. Display 3. Key area 4. Adjustable support 5. Usb charge 6. Power switch 7. Fixing hole power switch is a total power switch on the instrument. Turned off when not in use for a long time..
Page 8
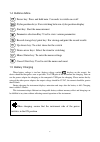
6 1.4 buttons define power key: press and hold min. 2 seconds to switch on or off stylus position keys: for switching between stylus position display start key: start the measurement parameter selection key: used to view various parameters record storage key/ print key: for storing and print the rec...
Page 9
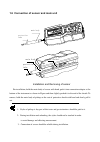
7 1.6 connection of sensor and main unit main body protective tube protective tube main body sensor socket installation and removing of sensor for installation, hold the main body of sensor with hand, push it into connection adapter at the bottom of the instrument as shown in figure and then slightl...
Page 10
8.
Page 11: 2 Measuring Operation
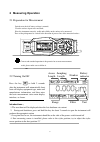
9 battery indicator number sampling length assess length unit filter range 2 measuring operation 2.1 preparation for measurement switch-on to check if battery voltage is normal; clear the surface of part to be measured; place the instrument correctly, stably and reliably on the surface to be measure...
Page 12: 2.3
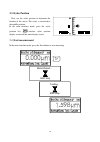
10 2.3 stylus position first, use the stylus position to determine the location of the sensor. The stylus as measured in the middle position. In the main interface mode, press the stylus position key switches stylus position display screen and the main display screen. 2.4 start measurement in the ma...
Page 13: Measurement Result Display
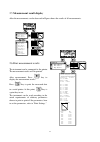
11 2.5 measurement result display after the measurement, can be observed in figure shows the results of all measurements. 10.3% 6.5% 5.1% 4.1% 100% 95% 80% 75% 100% c(rt) 100% rmr 0 rmr c(rt) c(rt) rmr 0 rmr 100% c(rt) 100% 25% 30% 35% 40% 4.1% 5.1% 6.5% 10.3% 10.3% 6.5% 5.1% 4.1% 20% 15% 10% 5% 100...
Page 14
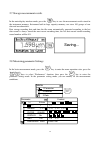
12 2.7 storage measurement results in the main display interface mode, press the key to save the measurement results stored in the instrument memory. Instrument built-in large capacity memory, can store 100 groups of raw data and waveform data. Data storage recording date and time the file name auto...
Page 15
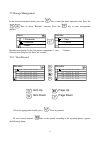
13 2.9 storage management in the basic measurement mode, press the key to enter the menu operation state, press the keys to select "recoder" function, press the key to enter management projects. 2. Format 1. View recoder menu 3.Date 2.Recoder 1.Parameter recoder management by the two project compone...
Page 16
14 rz= 3.016 μm rq= 1.768 μ m rsm= 0.08mm rku= 0.96 r3y= 6.238 μm rzjis= 5.08 μm rsk= -0.11 0.8mmx5 ±40μm gauss rt= 6.236 μm rp= 3.298 μm rv= 3.012 μm r3z= 6.168 μm c(rt) rmr 0 rmr 100% c(rt) 100% 5% 10% 15% 20% 4.1% 5.1% 6.5% 10.3% 10.3% 6.5% 5.1% 4.1% 40% 35% 30% 25% 100% c(rt) 100% rmr 0 rmr c(rt...
Page 17
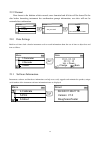
15 2.9.2 format data format is the deletion of data records, once formatted and all data will be cleared. In the data before formatting instrument has confirmation prompt information, user data will not be restored after confirmation. 1. View 2. Format recoder do not shutdown power format... Farmat ...
Page 18
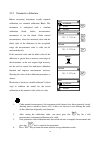
16 2.12 parameter calibration before measuring instrument, usually required calibration use standard calibration block. The instrument is configured with a standard calibration block, before measurement, instruments to test the block. Under normal circumstances, when the measured value and the block...
Page 19
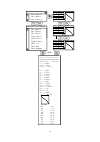
17 2.13 print setup the instrument can be used according to the actual requirements of any parameter selection print or print all, the steps shown in figure. 6.About 5.Print 4.Calibrate menu print 6.About 5.Print 4.Calibrate menu 4.Rt ok 2.Rz ok 14.Rmr 3.Rq ok 2.Rz ok 1.Ra ok print.
Page 20: 3 Options And Usage
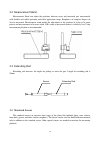
18 3 options and usage 3.1 adjustable support when measured surface of part is smaller than the bottom surface of the instrument, sheath of pickup and adjustable supporter of instrument options can be used for auxiliary support to complete the measurement (as shown in figure). Adjustable support 1.T...
Page 21: 3.4
19 3.2 measurement stand measurement stand can adjust the positions between tester and measured part conveniently with flexible and stable operation and wider application range. Roughness of complex shapes can also be measured. Measurement stand enable the adjustment of the position of stylus to be ...
Page 22
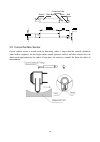
20 skid stylus protective tube main body socket 3.5 curved surface sensor curved surface sensor is mainly used for measuring radius is larger than the smooth cylindrical 3mm surface roughness, for the larger radius smooth spherical surface and other surface also can obtain good approximation, the ra...
Page 23
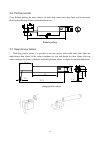
21 3.6 pinhole sensor using pinhole pickup, the inner surfaces of holes with radius more than 2mm can be measured. Refer to the following figure for detailed dimension. Pinhole pickup 3.7 deep groove sensor with deep groove sensor, it is possible to measure groove with width wider than 3mm and depth...
Page 24
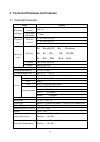
22 4 technical parameter and features 4.1 technical parameter name content measurem ent range the z axis (vertical) 160μm the x axis (horizontal) 17.5mm resolution ratio the z axis (vertical) 0.01μm/±20μm 0.02μm/±40μm 0.04μm/±80μm measureme nt item parameter ra rz== ry(jis) rq rt== rmax rp rv r3z r3...
Page 25: 4.2
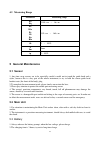
23 4.2 measuring range parameter measuring range ra rq 0.005μm ~ 16μm rz r3z ry rt rp rm 0.02μm ~ 160μm sk 0 ~ 100% s sm 1mm tp 0 ~ 100% 5 general maintenance 5.1 sensor 1. Any time swap sensors are to be especially careful, careful not to touch the guide head and a stylus, because this is a key par...
Page 26: 5.5 Troubleshooting
24 5.4 standard sample plate 1. The surface of a standard sample plate must be kept clean. 2. To avoid scratches on the surface of sample area. 5.5 troubleshooting when the tester breaks down, handle the troubles according to measures described on fault information. If troubles still exist, please r...
Page 27: 6.1.1 Terms
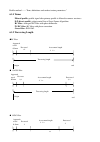
25 profile method —— term, definitions and surface texture parameters." 6.1.1 terms filtered profile: profile signal after primary profile is filtered to remove waviness. D-p (direct-profile): adopt central line of least square algorithm. Rc filter: analogue 2rc filter with phase difference. Pc-rc f...
Page 28: 6.2
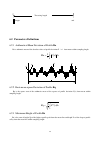
26 6.2 parameters definitions 6.2.1 arithmetical mean deviation of profile ra ra is arithmetic mean of the absolute values of profile deviation z( x)from mean within sampling length. ( ) dx x z l ra l ∫ = 0 1 z 1 z 2 zi zn 6.2.2 root-mean-square deviation of profile rq rq is the square root of the a...
Page 29
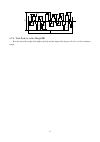
27 rz 中线 z p 1 z p 2 z p 3 z p 4 z p 5 z p 6 z v 1 z v 2 z v 3 z v 4 z v 5 z v 6 zv 1 6.2.4 total peak-to-valley height rt rt is the sum of the height of the highest peak zp and the depth of the deepest valley zv over the evaluation length..
Page 30
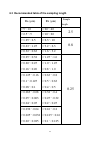
28 6.3 recommended table of the sampling length ra (µm) rz (µm) sample length >5~10 >20~40 2.5 >2.5~5 >10~20 >1.25~2.5 >6.3~10 0.8 >0.63~1.25 >3.2~6.3 >0.32~0.63 >1.6~3.2 >0.25~0.32 >1.25~1.6 0.25 >0.20~0.25 >1.0~1.25 >0.16~0.20 >0.8~1.0 >0.125~0.16 >0.63~0.8 >0.1~0.125 >0.5~0.63 >0.08~0.1 >0.4~0.5 ...
Page 32: Salutron Messtechnik Gmbh
Salutron messtechnik gmbh dr.-gottfired-cremer-allee 30/7 · d-50226 frechen tel. +49 (0) 2234 99 99 96 0 · fax. +49 (0) 2234 99 99 96 2 e-mail: info@salutron.De · www.Salutron.De.

