Waste King 560C396P01 Owner's Manual

Manual is about: Food Waste Disposer

Summary of 560C396P01

  • Page 1

    Food waste disposer owner's guide important - read all instructions thoroughly. Keep this guide for future reference. Caution - be sure to review safety instructions pertaining to a risk of fire, electrical shock or injury to persons before installing disposer. Congratulations. You have purchased th...

  • Page 2

    Instructions pertaining to risk of fire, electric shock or injury to persons. Save these instructions. 1. Read all instructions before using the appliance. 2. To reduce the risk of injury, close supervision is necessary when an appliance is used near children. 3. Do not put fingers or hands into a w...

  • Page 3

    Installation of ez mount assembly stopper removable splash guard sink flange rubber sink flange gasket sink support ring note: arrows indicating up cushion mount groove dishwasher discharge inlet hopper elbow gasket end bell (electrical connections) elbow flange screws discharge elbow serial number ...

  • Page 4

    Installation of ez mount assembly cont. Support ring sink fiber gasket mount ring should be free to move up & down open area, no obstruction sink flange bead of cushion mount 1a 1b 1c rubber gasket sink flange h. Place mount ring over sink flange and hold in place while installing cushion mount (lar...

  • Page 5: Electrical Connections

    To make a good seal. Do not move or rotate the sink flange once seated or the seal may be broken. D. Take the remaining portion of the mount assembly, as it was set aside and make sure that the rubber gasket is on top of the protector ring. From under the sink, while holding the sink flange firmly w...

  • Page 6

    A. Connect waste elbow to disposer (see 4a or 4b), proceed to step 5 and then connect bottom of elbow by tightening slip nut. B. Make sure all plumbing connections are tight. A. Line up disposer under mount assembly. Guide hopper projections into mount ring slots (see 5a). Turn mount ring about 6mm ...

  • Page 7: Operating Instructions

    This disposer utilizes anti-jam swivel impellers that make a clicking sound as they swing into place. This indicates normal operation. Batch feed models: large small medium 6 operating instructions 6a 6b 6c 6d connecting disposer to 3-bolt mount assembly a. Remove sink stopper. Turn on cold water us...

  • Page 8: Troubleshooting

    Before seeking repair or replacement, we recommend that you review the following: loud noises (other than those during grinding of bones and fruit pits): these are usually caused by accidental entry of a spoon, bottle cap or other foreign object. To correct this, turn off disposer and water. After d...

  • Page 9: Cleaning And Maintenance

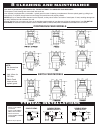
    8 cleaning and maintenance the motor is permanently lubricated for life. Do not attempt to lubricate your disposer! The disposer is self cleaning and scours itself with each use. Your disposer is equipped with a removable **splash guard for ease of cleaning or replacement. Remove splash guard by pul...