- DL manuals
- H3C
- Switch
- S5120-SI Series
- Operation Manual
H3C S5120-SI Series Operation Manual
Summary of S5120-SI Series
Page 1
H3c s5120-si series ethernet switches operation manual hangzhou h3c technologies co., ltd. Http://www.H3c.Com manual version: 6w101-20090625 product version: release 1101.
Page 2
Copyright © 2009, hangzhou h3c technologies co., ltd. And its licensors all rights reserved no part of this manual may be reproduced or transmitted in any form or by any means without prior written consent of hangzhou h3c technologies co., ltd. Trademarks h3c, , aolynk, , h 3 care, , top g, , irf, n...
Page 3
About this manual organization h3c s5120-si series switches configuration manual – release 1101 is organized as follows: chapter contents 00-1 product overview introduces the characteristics and implementations of the ethernet switch. 01-login introduces the command hierarchy, command view and cli f...
Page 4
Chapter contents 25-habp introduces the configuration of habp. 26-acl introduces the configuration of acl. 27-device management introduces the configuration of rebooting a device, upgrading device software and identifying and diagnosing pluggable transceivers 28-ntp introduces the configuration of n...
Page 5
Convention description times. # a line starting with the # sign is comments. Gui conventions convention description boldface window names, button names, field names, and menu items are in boldface. For example, the new user window appears; click ok. > multi-level menus are separated by angle bracket...
Page 6
Obtaining documentation you can access the most up-to-date h3c product documentation on the world wide web at this url: http://www.H3c.Com. The following are the columns from which you can obtain different categories of product documentation: [products & solutions]: provides information about produc...
Page 7: Table of Contents
I table of contents 1 obtaining the documentation ··················································································································1-1 h3c website ························································································································...
Page 8: Obtaining The Documentation
1-1 1 obtaining the documentation h3c technologies co., ltd. Provides various ways for you to obtain documentation, through which you can obtain the product documentations and those concerning newly added new features. The documentations are available in one of the following ways: z h3c website z so...
Page 9: Software
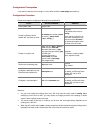
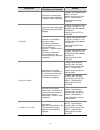
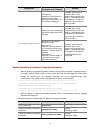
2-1 2 correspondence between documentation and software software version h3c s5120-si series ethernet switches operation manual and h3c s5120-si series ethernet switches command manual are for the software version of release 1101 of the s5120-si series products. Manual list table 2-1 配套手册清单 手册名称 资料版...
Page 10: Product Features
3-1 3 product features introduction to product the h3c s5120-si series ethernet switches (hereinafter referred to as the s5120-si series) are layer 2 gigabit ethernet switches developed by hangzhou h3c technology co., ltd. They are intelligent manageable switches designed for network environments wh...
Page 11
3-2 table 3-2 features features description 01-login z how to log in to your ethernet switch z introduction to the user interface and common configurations z logging in through the console port z logging in through telnet z logging in using modem z logging in through web-based network management sys...
Page 12
3-3 features description 11-ip performance optimization z enabling reception and forwarding of directed broadcasts to a directly connected network z configuring tcp attributes z configuring icmp to send error packets 12-arp z configuring arp z configuring gratuitous arp z configuring arp packet rate...
Page 13
3-4 features description 26-acl z configuring basic acl z configuring advanced acl z configuring ethernet frame header acl z configuring acl application for packet filtering 27-device management z device management overview z configuring the exception handling method z rebooting a device z configuri...
Page 14: Networking Applications
4-1 4 networking applications the s5120-si series are gigabitethernet switches. They are designed as distribution and access devices for small- and medium-sized enterprise networks. An s5120-si switch provides 16, 24, or 48 autosensing downstream ge interfaces, and thus can be used in networking fle...
Page 15
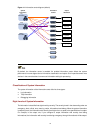
4-2 access switches the s5120-si series can serve as access switches to provide large access bandwidth and high port density. Figure 4-2 application of the s5120-si series at the access layer s9500/s7500e s5120-si access core/aggregation s5120-si.
Page 16: Table of Contents
I table of contents 1 logging in to an ethernet switch ············································································································1-1 logging in to an ethernet switch ····································································································...
Page 17
Ii 5 logging in through nms··························································································································5-1 introduction ······································································································································...
Page 18
1-1 1 logging in to an ethernet switch when logging in to an ethernet switch, go to these sections for information you are interested in: z logging in to an ethernet switch z introduction to user interface z specifying source for telnet packets z controlling login users logging in to an ethernet swi...
Page 19
1-2 z vty user interfaces: numbered after aux user interfaces and increases in the step of 1 2) a relative user interface index can be obtained by appending a number to the identifier of a user interface type. It is generated by user interface type. The relative user interface indexes are as follows...
Page 20
1-3 to do… use the command… remarks set the timeout time for the user interface idle-timeout minutes [ seconds ] optional the default timeout time of a user interface is 10 minutes. With the timeout time being 10 minutes, the connection to a user interface is terminated if no operation is performed ...
Page 21
2-1 2 logging in through the console port when logging in through the console port, go to these sections for information you are interested in: z introduction z setting up the connection to the console port z console port login configuration z console port login configuration with authentication mod...
Page 22
2-2 setting up the connection to the console port z connect the serial port of your pc/terminal to the console port of the switch, as shown in figure 2-1 . Figure 2-1 diagram for setting the connection to the console port z if you use a pc to connect to the console port, launch a terminal emulation ...
Page 23
2-3 figure 2-4 set port parameters terminal window z turn on the switch. The user will be prompted to press the enter key if the switch successfully completes post (power-on self test). The prompt (such as ) appears after the user presses the enter key. Z you can then configure the switch or check t...
Page 24
2-4 configuration description aux user interface configuration configure the command level available to the users logging in to the aux user interface optional by default, commands of level 3 are available to the users logging in to the aux user interface. Define a shortcut key for aborting tasks op...
Page 25
2-5 authentication mode console port login configuration description specify to perform local authentication or radius authentication aaa configuration specifies whether to perform local authentication or radius authentication optional local authentication is performed by default. Refer to the aaa c...
Page 27
2-7 table 2-4 determine the command level (a) scenario authentication mode user type command command level the user privilege level level command not executed level 3 none (authentication-mod e none) users logging in through console ports the user privilege level level command already executed deter...
Page 28
2-8 # specify commands of level 2 are available to the user logging in to the aux user interface. [sysname-ui-aux0] user privilege level 2 # set the baud rate of the console port to 19200 bps. [sysname-ui-aux0] speed 19200 # set the maximum number of lines the screen can contain to 30. [sysname-ui-a...
Page 30
2-10 note that if you configure to authenticate the users in the password mode, the command level available to users logging in to a switch depends on both the authentication-mode password and the user privilege level level command, as listed in the following table. Table 2-5 determine the command l...
Page 31
2-11 [sysname] user-interface aux 0 # specify to authenticate the user logging in through the console port using the local password. [sysname-ui-aux0] authentication-mode password # set the local password to 123456 (in plain text). [sysname-ui-aux0] set authentication password simple 123456 # specif...
Page 34
2-14 network diagram figure 2-7 network diagram for aux user interface configuration (with the authentication mode being scheme) configuration procedure # enter system view. System-view # create a local user named guest and enter local user view. [sysname] local-user guest # set the authentication p...
Page 35
3-1 3 logging in through telnet/ssh when logging in through telnet, go to these sections for information you are interested in: z introduction z telnet configuration with authentication mode being none z telnet configuration with authentication mode being password z telnet configuration with authent...
Page 36
3-2 telnet connection establishment telnetting to a switch from a terminal you can telnet to a switch and then configure the switch if the interface of the management vlan of the switch is assigned with an ip address. (by default, vlan 1 is the management vlan.) following are procedures to establish...
Page 37
3-3 figure 3-2 launch telnet step 5: enter the password when the telnet window displays “login authentication” and prompts for login password. The cli prompt (such as ) appears if the password is correct. If all vty user interfaces of the switch are in use, you will fail to establish the connection ...
Page 38
3-4 mode being scheme for details. By default, telnet users need to pass the password authentication to login. Step 2: telnet to the switch operating as the telnet client. Step 3: execute the following command on the switch operating as the telnet client: telnet xxxx where xxxx is the ip address or ...
Page 39
3-5 z the auto-execute command command may cause you unable to perform common configuration in the user interface, so use it with caution. Z before executing the auto-execute command command and save your configuration, make sure you can log in to the switch in other modes and cancel the configurati...
Page 40
3-6 to do… use the command… remarks enter system view system-view — enter one or more vty user interface views user-interface vty first-number [ last-number ] — configure not to authenticate users logging in to vty user interfaces authentication-mode none required by default, vty users are authentic...
Page 41
3-7 note that if you configure not to authenticate the users, the command level available to users logging in to a switch depends on both the authentication-mode none command and the user privilege level level command, as listed in table 3-4 . Table 3-4 determine the command level when users logging...
Page 42
3-8 # configure telnet protocol is supported. [sysname-ui-vty0] protocol inbound telnet # set the maximum number of lines the screen can contain to 30. [sysname-ui-vty0] screen-length 30 # set the maximum number of commands the history command buffer can store to 20. [sysname-ui-vty0] history-comman...
Page 43
3-9 to do… use the command… remarks set the maximum number of lines the screen can contain screen-length screen-length optional by default, the screen can contain up to 24 lines. You can use the screen-length 0 command to disable the function to display information in pages. Set the history command ...
Page 44
3-10 z commands of level 2 are available to users logging in to vty 0. Z telnet protocol is supported. Z the screen can contain up to 30 lines. Z the history command buffer can contain up to 20 commands. Z the timeout time of vty 0 is 6 minutes. Network diagram figure 3-5 network diagram for telnet ...
Page 46
3-12 to do… use the command… remarks make terminal services available shell optional terminal services are available in all use interfaces by default. Set the maximum number of lines the screen can contain screen-length screen-length optional by default, the screen can contain up to 24 lines. You ca...
Page 47
3-13 z the screen can contain up to 30 lines. Z the history command buffer can store up to 20 commands. Z the timeout time of vty 0 is 6 minutes. Network diagram figure 3-6 network diagram for telnet configuration (with the authentication mode being scheme) configuration procedure # enter system vie...
Page 48: Management System
4-1 4 logging in through web-based network management system introduction an s5120-si series switch has a web server built in. You can log in to an s5120-si series switch through a web browser and manage and maintain the switch intuitively by interacting with the built-in web server. To log in to an...
Page 49
4-2 to do… use the command… remarks specify the service types for the local user service-type telnet optional by default, no service is authorized to a user. Start the web server ip http enable required execute this command in system view. Displaying web users after the above configurations, execute...
Page 50
4-3 step 4: log in to the switch through ie. Launch ie on the web-based network management terminal (your pc) and enter the ip address of the management vlan interface of the switch (here it is http://10.153.17.82). (make sure the route between the web-based network management terminal and the switc...
Page 51: Logging In Through Nms
5-1 5 logging in through nms when logging in through nms, go to these sections for information you are interested in: z introduction z connection establishment using nms introduction you can also log in to a switch through an nms (network management station), and then configure and manage the switch...
Page 52
6-1 6 specifying source for telnet packets when specifying source ip address/interface for telnet packets, go to these sections for information you are interested in: z introduction z specifying source ip address/interface for telnet packets z displaying the source ip address/interface specified for...
Page 54: Controlling Login Users
7-1 7 controlling login users when controlling login users, go to these sections for information you are interested in: z introduction z controlling telnet users z controlling network management users by source ip addresses introduction multiple ways are available for controlling different types of ...
Page 56
7-3 controlling telnet users by source mac addresses this configuration needs to be implemented by layer 2 acl; a layer 2 acl ranges from 4000 to 4999. For the definition of acl, refer to acl configuration. Follow these steps to control telnet users by source mac addresses: to do… use the command… r...
Page 57
7-4 network diagram figure 7-1 network diagram for controlling telnet users using acls switch 10.110.100.46 host a ip network host b 10.110.100.52 configuration procedure # define a basic acl. System-view [sysname] acl number 2000 match-order config [sysname-acl-basic-2000] rule 1 permit source 10.1...
Page 59
7-6 network diagram figure 7-2 network diagram for controlling snmp users using acls switch 10.110.100.46 host a ip network host b 10.110.100.52 configuration procedure # define a basic acl. System-view [sysname] acl number 2000 match-order config [sysname-acl-basic-2000] rule 1 permit source 10.110...
Page 61
7-8 [sysname] ip http acl 2030
Page 62: Table of Contents
I table of contents 1 ethernet port configuration ·····················································································································1-1 general ethernet port configuration ·····························································································...
Page 63: Ethernet Port Configuration
1-1 1 ethernet port configuration when configuring ethernet ports, go to these sections for information you are interested in: z general ethernet port configuration z displaying and maintaining an general ethernet port configuration basic ethernet port configuration configuring an ethernet port thre...
Page 66
1-4 to do… use the command… remarks enter system view system-view — create a manual port group and enter manual port group view port-group manual port-group-name required add ethernet ports to the manual port group group-member interface-list required configuring an auto-negotiation transmission rat...
Page 67
1-5 z this function is available for auto-negotiation-capable gigabit layer-2 ethernet electrical ports only. Z if you repeatedly use the speed and the speed auto commands to configure the transmission rate on an interface, only the latest configuration takes effect. Configuring storm suppression yo...
Page 68
1-6 as for an ethernet port belongs to a port group, if you set a storm suppression ratio for the interface in both ethernet port view and port group view, the one configured the last takes effect. Setting the interval for collecting ethernet port statistics follow these steps to configure the inter...
Page 69
1-7 enabling loopback detection on an ethernet port if an interface receives a packet that it sent out, a loop occurs. Loops may cause broadcast storms. The purpose of loopback detection is to detect loops on an interface. When loopback detection is enabled on an ethernet port, the device periodical...
Page 70
1-8 two types of ethernet cables can be used to connect ethernet devices: crossover cable and straight-through cable. To accommodate these two types of cables, an ethernet port on a device can operate in one of the following three medium dependent interface (mdi) modes: z across mode z normal mode z...
Page 71
1-9 testing the cable on an ethernet port z the optical interface of a sfp port does not support this feature. Z a link in the up state goes down and then up automatically if you perform the operation described in this section on one of the ethernet ports forming the link. Follow these steps to test...
Page 72
1-10 follow these steps to configure the storm constrain function on an ethernet port: to do… use the command… remarks enter system view system-view — set the interval for generating traffic statistics storm-constrain interval seconds optional 10 seconds by default enter ethernet port view interface...
Page 73
1-11 displaying and maintaining an ethernet port to do… use the command… remarks display the current state of an interface and the related information display interface [ interface-type [ interface-number ] ] available in any view display the summary of an interface display brief interface [ interfa...
Page 74: Table of Contents
I table of contents 1 loopback interface and null interface configuration············································································1-1 loopback interface·································································································································...
Page 75: Configuration
1-1 1 loopback interface and null interface configuration when configuring loopback interfaces and null interfaces, go to these sections for information you are interested in: z loopback interface z null interface z displaying and maintaining loopback and null interfaces loopback interface introduct...
Page 76
1-2 configuring a loopback interface follow these steps to configure a loopback interface: to do… use the command… remarks enter system view system-view — create a loopback interface and enter loopback interface view interface loopback interface-number — set a description for the loopback interface ...
Page 77
1-3 configuring null 0 interface follow these steps to enter null interface view: to do… use the command… remarks enter system view system-view — enter null interface view interface null 0 required the null 0 interface is the default null interface on your device. It cannot be manually created or re...
Page 78: Table of Contents
I table of contents 1 link aggregation configuration ··············································································································1-1 overview ····························································································································...
Page 79
1-1 1 link aggregation configuration when configuring link aggregation, go to these sections for information you are interested in: z overview z link aggregation configuration task list z configuring an aggregation group z configuring an aggregation group z displaying and maintaining link aggregatio...
Page 80
1-2 the current device only supports layer 2 aggregation groups. States of the member ports in an aggregation group a member port in an aggregation group can be in one of the following two states: z selected: a selected port can forward user traffic. Z unselected: an unselected port cannot forward u...
Page 81
1-3 z some configurations are called class-one configurations. Such configurations, for example, mstp, can be configured on aggregate interfaces and member ports but will not affect the select state of link aggregation member ports. Z the change of a class-two configuration setting may affect the se...
Page 82
1-4 dynamic aggregation mode lacp is enabled on member ports in a dynamic aggregation group. In a dynamic aggregation group, z a selected port can receive and transmit lacpdus. Z an unselected port can receive and send lacpdus only if it is up and with the same configurations as those on the aggrega...
Page 83
1-5 load sharing mode of an aggregation group the link aggregation groups created on the s5120-si series ethernet switches always operate in load sharing mode, even when they contain only one member port. Link aggregation configuration task list complete the following tasks to configure link aggrega...
Page 84
1-6 z removing a layer 2 aggregate interface also removes the corresponding aggregation group. At the same time, the member ports of the aggregation group, if any, leave the aggregation group. Z to guarantee a successful static aggregation, ensure that the ports at the two ends of each link to be ag...
Page 85
1-7 z removing a dynamic aggregate interface also removes the corresponding aggregation group. At the same time, the member ports of the aggregation group, if any, leave the aggregation group. Z to guarantee a successful dynamic aggregation, ensure that the peer ports of the ports aggregated at one ...
Page 87
1-9 to do... Use the command... Remarks display the summary information of all aggregation groups display link-aggregation summary available in any view display detailed information of aggregation groups display link-aggregation verbose [ bridge-aggregation [ interface-number ] ] available in any vi...
Page 88
1-10 figure 1-1 network diagram for layer 2 static aggregation configuration procedure 1) configure device a # create layer 2 aggregate interface bridge-aggregation 1. System-view [devicea] interface bridge-aggregation 1 [devicea-bridge-aggregation1] quit # assign layer 2 ethernet interfaces gigabit...
Page 89
1-11 figure 1-2 network diagram for layer 2 dynamic aggregation configuration procedure 1) configure device a # create a layer 2 aggregate interface bridge-aggregation 1 and configure the interface to work in dynamic aggregation mode. System-view [devicea] interface bridge-aggregation 1 [devicea-bri...
Page 90: Table of Contents
I table of contents 1 port isolation configuration ·····················································································································1-1 introduction to port isolation ·································································································...
Page 91: Port Isolation Configuration
1-1 1 port isolation configuration when configuring port isolation, go to these sections for information you are interested in: z introduction to port isolation z configuring an isolation group for a multiple-isolation-group device z displaying and maintaining isolation groups z port isolation confi...
Page 92
1-2 to do… use the command… remarks add the port/ports to an isolation group as an isolated port/isolated ports port-isolate enable group group-number required no ports are added to an isolation group by default. Displaying and maintaining isolation groups to do… use the command… remarks display the...
Page 93
1-3 [device-gigabitethernet1/0/1] port-isolate enable group 2 [device-gigabitethernet1/0/1] quit [device] interface gigabitethernet 1/0/2 [device-gigabitethernet1/0/2] port-isolate enable group 2 [device-gigabitethernet1/0/2] quit [device] interface gigabitethernet 1/0/3 [device-gigabitethernet1/0/3...
Page 94: Table of Contents
I table of contents 1 port mirroring configuration ····················································································································1-1 introduction to port mirroring ··································································································...
Page 95: Port Mirroring Configuration
1-1 1 port mirroring configuration when configuring port mirroring, go to these sections for information you are interested in: z introduction to port mirroring z configuring local port mirroring z displaying and maintaining port mirroring z port mirroring configuration examples introduction to port...
Page 96
1-2 as shown in figure 1-1 , packets on the mirroring port are mirrored to the monitor port for the data monitoring device to analyze. Figure 1-1 local port mirroring implementation configuring local port mirroring configuring local port mirroring is to configure local mirroring groups. A local mirr...
Page 97
1-3 z a local mirroring group takes effect only after you configure a monitor port and mirroring ports for it. Z to ensure the smooth operation of your device, do not enable stp, mstp, or rstp on the monitor port. Z you are recommended to use a monitor port only for port mirroring. This is to ensure...
Page 98
1-4 configuration procedure 1) configuration scheme 1 # create a local mirroring group. System-view [devicec] mirroring-group 1 local # configure ports gigabitethernet 1/0/1 and gigabitethernet 1/0/2 as mirroring ports and port gigabitethernet 1/0/3 as the monitor port in the mirroring group. [devic...
Page 99: Table of Contents
I table of contents 1 lldp configuration···································································································································1-1 overview ····················································································································...
Page 100: Lldp Configuration
1-2 to do… use the command… remarks set the transmission rate speed { 10
Page 101
1-2 figure 1-1 lldpdu encapsulated in ethernet ii the fields in the frame are described in table 1-1 : table 1-1 description of the fields in an ethernet ii encapsulated lldpdu field description destination mac address the mac address to which the lldpdu is advertised. It is fixed to 0x0180-c200-000...
Page 102
1-3 field description source mac address the mac address of the sending port. If the port does not have a mac address, the mac address of the sending bridge is used. Type the snap type for the upper layer protocol. It is 0xaaaa-0300-0000-88cc for lldp. Data lldp data unit. Fcs frame check sequence, ...
Page 103
1-4 type description remarks port description port description of the sending port. System name assigned name of the sending device. System description description of the sending device. System capabilities identifies the primary functions of the sending device and the primary functions that have be...
Page 104
1-5 management. In addition, lldp-med tlvs make deploying voice devices in ethernet easier. Lldp-med tlvs are shown in table 1-6 . Table 1-6 lldp-med tlvs type description lldp-med capabilities allows a med endpoint to advertise the supported lldp-med tlvs and its device type. Network policy allows ...
Page 105
1-6 how lldp works transmitting lldpdus an lldp-enabled port operating in txrx mode or tx mode sends lldpdus to its directly connected devices both periodically and when the local configuration changes. To prevent the network from being overwhelmed by lldpdus at times of frequent local device inform...
Page 106
1-7 lldp-related configurations made in ethernet interface view takes effect only on the current port, and those made in port group view takes effect on all ports in the current port group. Performing basic lldp configuration enabling lldp to make lldp take effect on certain ports, you need to enabl...
Page 107
1-8 setting the lldp re-initialization delay when lldp operating mode changes on a port, the port initializes the protocol state machines after a certain delay. By adjusting the lldp re-initialization delay, you can avoid frequent initializations caused by frequent lldp operating mode changes on a p...
Page 109
1-10 setting other lldp parameters the ttl tlv carried in an lldpdu determines how long the device information carried in the lldpdu can be saved on a recipient device. You can configure the ttl of locally sent lldpdus to determine how long information about the local device can be saved on a neighb...
Page 110
1-11 to do… use the command… remarks enter system view system-view — enter ethernet interface view interface interface-type interface-number enter ethernet interface view or port group view enter port group view port-group manual port-group-name required use either command. Set the encapsulation for...
Page 111
1-12 configuring cdp compatibility cdp-compatible lldp operates in one of the follows two modes: z txrx, where cdp packets can be transmitted and received. Z disable, where cdp packets can neither be transmitted nor be received. To make cdp-compatible lldp take effect on certain ports, first enable ...
Page 112
1-13 to do… use the command… remarks enter system view system-view — enter ethernet interface view interface interface-type interface-number enter ethernet interface view or port group view enter port group view port-group manual port-group-name required use either command. Enable lldp trap sending ...
Page 113
1-14 figure 1-4 network diagram for basic lldp configuration configuration procedure 1) configure switch a. # enable lldp globally. System-view [switcha] lldp enable # enable lldp on gigabitethernet 1/0/1 and gigabitethernet 1/0/2, setting the lldp operating mode to rx. [switcha] interface gigabitet...
Page 114
1-15 reinit delay : 2s transmit delay : 2s trap interval : 5s fast start times : 3 port 1 [gigabitethernet1/0/1]: port status of lldp : enable admin status : rx_only trap flag : no roll time : 0s number of neighbors : 1 number of med neighbors : 1 number of cdp neighbors : 0 number of sent optional ...
Page 115
1-16 number of neighbors : 1 number of med neighbors : 1 number of cdp neighbors : 0 number of sent optional tlv : 0 number of received unknown tlv : 5 port 2 [gigabitethernet1/0/2]: port status of lldp : enable admin status : rx_only trap flag : no roll time : 0s number of neighbors : 0 number of m...
Page 116
1-17 [switcha] interface gigabitethernet 1/0/2 [switcha-gigabitethernet1/0/2] port link-type trunk [switcha-gigabitethernet1/0/2] voice vlan 2 enable [switcha-gigabitethernet1/0/2] quit 2) configure cdp-compatible lldp on switch a. # enable lldp globally and enable lldp to be compatible with cdp glo...
Page 117: Table of Contents
I table of contents 1 vlan configuration ··································································································································1-1 introduction to vlan ········································································································...
Page 118: Vlan Configuration
1-1 1 vlan configuration when configuring vlan, go to these sections for information you are interested in: z introduction to vlan z configuring basic vlan settings z configuring basic settings of a vlan interface z port-based vlan configuration z displaying and maintaining vlan z vlan configuration...
Page 119
1-2 3) improving lan security. By assigning user groups to different vlans, you can isolate them at layer 2. To enable communication between vlans, routers or layer 3 switches are required. 4) flexible virtual workgroup creation. As users from the same workgroup can be assigned to the same vlan rega...
Page 120
1-3 z the ethernet ii encapsulation format is used here. Besides the ethernet ii encapsulation format, other encapsulation formats, including 802.2 llc, 802.2 snap, and 802.3 raw, are also supported by ethernet. The vlan tag fields are also added to frames encapsulated in these formats for vlan iden...
Page 121
1-4 z as the default vlan, vlan 1 cannot be created or removed. Z you cannot manually create or remove vlans reserved for special purposes. Z dynamic vlans cannot be removed with the undo vlan command. Z a vlan with a qos policy applied cannot be removed. Configuring basic settings of a vlan interfa...
Page 122
1-5 port-based vlan configuration introduction to port-based vlan port-based vlans group vlan members by port. A port forwards traffic for a vlan only after it is assigned to the vlan. Port link type you can configure the link type of a port as access, trunk, or hybrid. The three link types use diff...
Page 123
1-6 ports of different link types handle frames as follows: actions (in the inbound direction) port type untagged frame tagged frame actions (in the outbound direction) access tag the frame with the default vlan tag. Z receive the frame if its vlan id is the same as the default vlan id. Z drop the f...
Page 124
1-7 to do… use the command… remarks enter ethernet interface view interface interface-type interface-number enter layer-2 aggregate interface view interface bridge-aggregation interface-number enter interface view or port group view enter port group view port-group manual port-group-name required us...
Page 127
1-10 figure 1-4 network diagram for port-based vlan configuration configuration procedure 1) configure device a # create vlan 2, vlan 6 through vlan 50, and vlan 100. System-view [devicea] vlan 2 [devicea-vlan2] quit [devicea] vlan 100 [devicea-vlan100] vlan 6 to 50 please wait... Done. # enter giga...
Page 128
1-11 the maximum frame length is 10240 broadcast max-ratio: 100% unicast max-ratio: 100% multicast max-ratio: 100% pvid: 100 mdi type: auto link delay is 0(sec) port link-type: trunk vlan passing : 2, 6-50, 100 vlan permitted: 2, 6-50, 100 trunk port encapsulation: ieee 802.1q port priority: 0 last ...
Page 129: Voice Vlan Configuration
2-1 2 voice vlan configuration when configuring a voice vlan, go to these sections for information you are interested in: z overview z configuring a voice vlan z displaying and maintaining voice vlan z voice vlan configuration overview a voice vlan is configured specially for voice traffic. After as...
Page 130
2-2 z in general, as the first 24 bits of a mac address (in binary format), an oui address is a globally unique identifier assigned to a vendor by ieee. Oui addresses mentioned in this document, however, are different from those in common sense. Oui addresses in this document are used by the system ...
Page 131
2-3 voice vlan assignment mode voice traffic type port link type access: not supported trunk: supported if the default vlan of the connecting port exists and is not the voice vlan and the connecting port belongs to the default vlan tagged voice traffic hybrid: supported if the default vlan of the co...
Page 132
2-4 vlans are vulnerable to traffic attacks. Vicious users can forge a large amount of voice packets and send them to voice vlan-enabled ports to consume the voice vlan bandwidth, affecting normal voice communication. Z security mode: in this mode, only voice packets whose source mac addresses compl...
Page 133
2-5 to do... Use the command... Remarks add a recognizable oui address voice vlan mac-address oui mask oui-mask[ description text] optional by default, each voice vlan has default oui addresses configured. Refer to table 2-1 for the default oui addresses of different vendors. Enter ethernet interfac...
Page 134
2-6 to do... Use the command... Remarks voice vlan hybrid port refer to assigning a hybrid port to a vlan . Vlan becomes the default vlan of the port automatically. Trunk port refer to section assigning a trunk port to a vlan . Configure the voice vlan as the default vlan of the port hybrid port ref...
Page 135
2-7 figure 2-1 network diagram for automatic voice vlan assignment mode configuration device a device b ge1/0/1 ip phone b 010-1002 mac: 0011-2200-0001 mask: ffff-ff00-0000 0755-2002 ge1/0/2 internet pc b mac: 0022-2200-0002 vlan 3 configuration procedure # create vlan 3. System-view [devicea] vlan ...
Page 136
2-8 verification # display the oui addresses, oui address masks, and description strings supported currently. Display voice vlan oui oui address mask description 0001-e300-0000 ffff-ff00-0000 siemens phone 0003-6b00-0000 ffff-ff00-0000 cisco phone 0004-0d00-0000 ffff-ff00-0000 avaya phone 0011-2200-...
Page 137
2-9 configuration procedure # configure the voice vlan to operate in security mode. (optional. A voice vlan operates in security mode by default.) system-view [devicea] voice vlan security enable # add a recognizable oui address 0011-2200-0000. [devicea] voice vlan mac-address 0011-2200-0000 mask ff...
Page 138
2-10 port vlan mode ----------------------------------------------- gigabitethernet1/0/1 2 manual.
Page 139: Table of Contents
I table of contents 1 mstp configuration ··································································································································1-1 overview ····················································································································...
Page 140
Ii configuration prerequisites ···········································································································1-32 configuration procedure················································································································1-32 configuration exa...
Page 141: Mstp Configuration
1-1 1 mstp configuration when configuring mstp, go to these sections for information you are interested in: z overview z introduction to stp z introduction to rstp z introduction to mstp z mstp configuration task list z configuring the root bridge z configuring leaf nodes z configuring the vlan igno...
Page 142
1-2 stp-enabled network devices exchange bpdus to establish a spanning tree. Bpdus contain sufficient information for the network devices to complete spanning tree calculation. In stp, bpdus come in two types: z configuration bpdus, used for calculating a spanning tree and maintaining the spanning t...
Page 143
1-3 figure 1-1 a schematic diagram of designated bridges and designated ports all the ports on the root bridge are designated ports. Path cost path cost is a reference value used for link selection in stp. By calculating path costs, stp selects relatively robust links and blocks redundant links, and...
Page 144
1-4 for simplicity, the descriptions and examples below involve only four fields of configuration bpdus: z root bridge id (represented by device priority) z root path cost (related to the rate of the link connected to the port) z designated bridge id (represented by device priority) z designated por...
Page 145
1-5 z selection of the root bridge initially, each stp-enabled device on the network assumes itself to be the root bridge, with the root bridge id being its own device id. By exchanging configuration bpdus, the devices compare their root bridge ids to elect the device with the smallest root bridge i...
Page 146
1-6 figure 1-2 network diagram for the stp algorithm ap1 ap2 device a with priority 0 device b with priority 1 device c with priority 2 bp1 bp2 cp1 cp2 5 10 4 z initial state of each device table 1-4 shows the initial state of each device. Table 1-4 initial state of each device device port name bpdu...
Page 147
1-7 device comparison process bpdu of port after comparison z port bp1 receives the configuration bpdu of device a {0, 0, 0, ap1}. Device b finds that the received configuration bpdu is superior to the configuration bpdu of the local port {1, 0, 1, bp1}, and updates the configuration bpdu of bp1. Z ...
Page 148
1-8 device comparison process bpdu of port after comparison after comparison: z because the root path cost of cp2 (9) (root path cost of the bpdu (5) plus path cost corresponding to cp2 (4)) is smaller than the root path cost of cp1 (10) (root path cost of the bpdu (0) + path cost corresponding to c...
Page 149
1-9 z if a path becomes faulty, the root port on this path will no longer receive new configuration bpdus and the old configuration bpdus will be discarded due to timeout. In this case, the device will generate a configuration bpdu with itself as the root and send out the bpdus and tcn bpdus. This t...
Page 150
1-10 introduction to mstp why mstp weaknesses of stp and rstp stp does not support rapid state transition of ports. A newly elected root port or designated port must wait twice the forward delay time before transiting to the forwarding state, even if it is a port on a point-to-point link or an edge ...
Page 151
1-11 basic concepts in mstp figure 1-4 basic concepts in mstp cst region a0 vlan 1 mapped to instance 1 vlan 2 mapped to instance 2 other vlans mapped to cist region b0 vlan 1 mapped to instance 1 vlan 2 mapped to instance 2 other vlans mapped to cist region c0 vlan 1 mapped to instance 1 vlan 2 and...
Page 152
1-12 vlan-to-msti mapping table as an attribute of an mst region, the vlan-to-msti mapping table describes the mapping relationships between vlans and mstis. In figure 1-4 , for example, the vlan-to-msti mapping table of region a0 is as follows: vlan 1 is mapped to msti 1, vlan 2 to msti 2, and the ...
Page 153
1-13 during mstp calculation, a boundary port’s role on an msti is consistent with its role on the cist. But that is not true with master ports. A master port on mstis is a root port on the cist. Roles of ports mstp calculation involves these port roles: root port, designated port, master port, alte...
Page 154
1-14 port states in mstp, port states fall into the following three: z forwarding: the port learns mac addresses and forwards user traffic; z learning: the port learns mac addresses but does not forward user traffic; z discarding: the port neither learns mac addresses nor forwards user traffic. When...
Page 155
1-15 z within an mst region, the packet is forwarded along the corresponding msti. Z between two mst regions, the packet is forwarded along the cst. Implementation of mstp on devices mstp is compatible with stp and rstp. Stp and rstp protocol packets can be recognized by devices running mstp and use...
Page 156
1-16 task remarks enabling the mstp feature required configuring an mst region required configuring the work mode of an mstp device optional configuring the timeout factor optional configuring the maximum port rate optional configuring ports as edge ports optional configuring path costs of ports opt...
Page 157
1-17 to do... Use the command... Remarks enter system view system-view — enter mst region view stp region-configuration — configure the mst region name region-name name optional the mst region name is the mac address by default. Instance instance-id vlan vlan-list configure the vlan-to-msti mapping ...
Page 158
1-18 [sysname-mst-region] revision-level 1 [sysname-mst-region] active region-configuration specifying the root bridge or a secondary root bridge mstp can determine the root bridge of a spanning tree through mstp calculation. Alternatively, you can specify the current device as the root bridge using...
Page 159
1-19 fails, mstp will select the secondary root bridge with the lowest mac address as the new root bridge. Z alternatively, you can also specify the current device as the root bridge by setting the priority of the device to 0. For the device priority configuration, refer to configuring the priority ...
Page 160
1-20 configuration procedure follow these steps to configure the priority of the current device in a specified msti: to do... Use the command... Remarks enter system view system-view — configure the priority of the current device in a specified msti stp [ instance instance-id ] priority priority opt...
Page 161
1-21 a larger maximum hops setting means a larger size of the mst region. Only the maximum hops configured on the regional root bridge can restrict the size of the mst region. Configuration example # set the maximum hops of the mst region to 30. System-view [sysname] stp max-hops 30 configuring the ...
Page 162
1-22 configuration procedure follow these steps to configure the timers of mstp: to do... Use the command... Remarks enter system view system-view — configure the forward delay timer stp timer forward-delay centi-seconds optional 1,500 centiseconds (15 seconds) by default configure the hello timer s...
Page 163
1-23 configuration example # set the forward delay to 1,600 centiseconds, hello time to 300 centiseconds, and max age to 2,100 centiseconds. System-view [sysname] stp timer forward-delay 1600 [sysname] stp timer hello 300 [sysname] stp timer max-age 2100 configuring the timeout factor after the netw...
Page 164
1-24 to do... Use the command... Remarks enter system view system-view — enter ethernet interface view, or layer 2 aggregate interface view interface interface-type interface-number enter interface view or port group view enter port group view port-group manual port-group-name required use either co...
Page 165
1-25 to do... Use the command... Remarks configure the port(s) as edge port(s) stp edged-port enable required all ethernet ports are non-edge ports by default. Z with bpdu guard disabled, when a port set as an edge port receives a bpdu from another port, it will become a non-edge port again. To rest...
Page 166
1-26 z a layer 2 aggregate interface can be configured to connect to a point-to-point link. If a port works in auto-negotiation mode and the negotiation result is full duplex, this port can be configured as connecting to a point-to-point link. Z if a port is configured as connecting to a point-to-po...
Page 167
1-27 z mstp provides the mstp packet format incompatibility guard function. In mstp mode, if a port is configured to recognize/send mstp packets in a mode other than auto, and if it receives a packet in a format different from the specified type, the port will become a designated port and remain in ...
Page 168
1-28 to do... Use the command... Remarks enter ethernet interface view, or layer 2 aggregate interface view interface interface-type interface-number enter interface view or port group view enter port group view port-group manual port-group-name required use either command. Configurations made in in...
Page 169
1-29 configuring ports as edge ports refer to configuring ports as edge ports in the section about root bridge configuration. Configuring path costs of ports path cost is a parameter related to the rate of a port. On an mstp-enabled device, a port can have different path costs in different mstis. Se...
Page 170
1-30 when calculating path cost for an aggregate interface, 802.1d-1998 does not take into account the number of member ports in its aggregation group as 802.1t does. The calculation formula of 802.1t is: path cost = 200,000,000/link speed (in 100 kbps), where link speed is the sum of the link speed...
Page 171
1-31 to do... Use the command... Remarks enter system view system-view — enter ethernet interface view, or layer 2 aggregate interface view interface interface-type interface-number enter interface view or port group view enter port group view port-group manual port-group-name required use either co...
Page 172
1-32 performing mcheck ports on an mstp-enabled device have three working modes: stp compatible mode, rstp mode, and mstp mode. If a port on a device running mstp (or rstp) connects to a device running stp, this port will automatically migrate to the stp-compatible mode. However, it will not be able...
Page 173
1-33 system-view [sysname] interface gigabitethernet 1/0/1 [sysname-gigabitethernet1/0/1] stp mcheck configuring the vlan ignore feature traffic on a vlan in a complex network may be blocked by the spanning tree. Figure 1-6 vlan connectivity blocked by mstp as shown above, port a on device a allows ...
Page 174
1-34 figure 1-7 vlan ignore configuration ge1/0/1 device a device b vlan 1 vlan 2 ge1/0/2 ge1/0/2 ge1/0/1 configuration procedure 1) enable vlan ignore on device b # enable vlan ignore on vlan 2. System-view [deviceb] stp ignored vlan 2 2) verify the configuration # display the vlan ignore enabled v...
Page 175
1-35 to do... Use the command... Remarks enter system view system-view — enter ethernet interface view, or layer 2 aggregate interface view interface interface-type interface-number enter interface view or port group view enter port group view port-group manual port-group-name required use either co...
Page 176
1-36 figure 1-8 digest snooping configuration configuration procedure 1) enable digest snooping on device a. # enable digest snooping on gigabitethernet 1/0/1. System-view [devicea] interface gigabitethernet 1/0/1 [devicea-gigabitethernet1/0/1] stp config-digest-snooping [devicea-gigabitethernet1/0/...
Page 177
1-37 figure 1-9 rapid state transition of an mstp designated port figure 1-10 shows rapid state transition of an rstp designated port. Figure 1-10 rapid state transition of an rstp designated port root port designated port root port blocks other non- edge ports, changes to forwarding state and sends...
Page 178
1-38 to do... Use the command... Remarks enter system view system-view — enter ethernet interface view, or layer 2 aggregate interface view interface interface-type interface-number enter interface or port group view enter port group view port-group manual port-group-name required use either command...
Page 179
1-39 among loop guard, root guard and edge port settings, only one function can take effect on the same port at the same time. Configuration prerequisites mstp has been correctly configured on the device. Enabling bpdu guard we recommend that you enable bpdu guard on your device. For access layer de...
Page 180
1-40 enabling root guard we recommend that you enable root guard on your device. The root bridge and secondary root bridge of a panning tree should be located in the same mst region. Especially for the cist, the root bridge and secondary root bridge are generally put in a high-bandwidth core region ...
Page 181
1-41 by keeping receiving bpdus from the upstream device, a device can maintain the state of the root port and blocked ports. However, due to link congestion or unidirectional link failures, these ports may fail to receive bpdus from the upstream devices. In this case, the downstream device will res...
Page 182
1-42 we recommend that you keep this feature enabled. Displaying and maintaining mstp to do... Use the command... Remarks view information about abnormally blocked ports display stp abnormal-port available in any view view information about ports blocked by stp protection functions display stp down-...
Page 183
1-43 figure 1-12 network diagram for mstp configuration “permit:“ beside each link in the figure is followed by the vlans the packets of which are permitted to pass this link. Configuration procedure 1) configuration on device a # enter mst region view. System-view [devicea] stp region-configuration...
Page 184
1-44 instance vlans mapped 0 1 to 9, 11 to 19, 21 to 29, 31 to 4094 1 10 2 20 3 30 2) configuration on device b # enter mst region view. System-view [deviceb] stp region-configuration # configure the region name, vlan-to-msti mappings and revision level of the mst region. [deviceb-mst-region] region...
Page 185
1-45 [devicec-mst-region] instance 3 vlan 30 [devicec-mst-region] revision-level 0 # activate mst region configuration manually. [devicec-mst-region] active region-configuration [devicec-mst-region] quit # define device c as the root bridge of msti 2. [devicec] stp instance 2 root primary # enable m...
Page 186
1-46 instance vlans mapped 0 1 to 9, 11 to 19, 21 to 29, 31 to 4094 1 10 2 20 3 30
Page 187: Table of Contents
I table of contents 1 ip addressing configuration····················································································································1-1 ip addressing overview·············································································································...
Page 188: Ip Addressing Configuration
1-1 1 ip addressing configuration when assigning ip addresses to interfaces on your device, go to these sections for information you are interested in: z ip addressing overview z configuring ip addresses z displaying and maintaining ip addressing ip addressing overview this section covers these topi...
Page 189
1-2 table 1-1 ip address classes and ranges class address range remarks a 0.0.0.0 to 127.255.255.255 the ip address 0.0.0.0 is used by a host at bootstrap for temporary communication. This address is never a valid destination address. Addresses starting with 127 are reserved for loopback test. Packe...
Page 190
1-3 in the absence of subnetting, some special addresses such as the addresses with the net id of all zeros and the addresses with the host id of all ones, are not assignable to hosts. The same is true for subnetting. When designing your network, you should note that subnetting is somewhat a tradeof...
Page 191
1-4 displaying and maintaining ip addressing to do… use the command… remarks display information about a specified or all layer 3 interfaces display ip interface [ interface-type interface-number ] available in any view display brief information about a specified or all layer 3 interfaces display ip...
Page 192: Table of Contents
I table of contents 1 ip performance optimization configuration···························································································1-1 ip performance optimization overview ··································································································1-1 ena...
Page 193
1-1 1 ip performance optimization configuration when optimizing ip performance, go to these sections for information you are interested in: z ip performance optimization overview z enabling reception and forwarding of directed broadcasts to a directly connected network z configuring tcp attributes z...
Page 194
1-2 enabling forwarding of directed broadcasts to a directly connected network if a device is enabled to receive directed broadcasts, the device will determine whether to forward them according to the configuration on the outgoing interface. Follow these steps to enable the device to forward directe...
Page 195
1-3 follow these steps to enable the syn cookie feature: to do... Use the command... Remarks enter system view system-view — enable the syn cookie feature tcp syn-cookie enable required disabled by default. Z if md5 authentication is enabled, the syn cookie feature will not function after enabled. T...
Page 196
1-4 z with the protection against naptha attack enabled, the device will periodically check and record the number of tcp connections in each state. Z with the protection against naptha attack enabled, if the device detects that the number of tcp connections in a state exceeds the maximum number, the...
Page 197
1-5 configuring icmp to send error packets sending error packets is a major function of icmp. In case of network abnormalities, icmp packets are usually sent by the network or transport layer protocols to notify corresponding devices so as to facilitate control and management. Advantages of sending ...
Page 198
1-6 to do… use the command… remarks enter system view system-view — enable sending of icmp timeout packets ip ttl-expires enable required disabled by default. Enable sending of icmp destination unreachable packets ip unreachables enable required disabled by default. The device stops sending “ttl tim...
Page 199: Table of Contents
I table of contents 1 arp configuration·····································································································································1-1 arp overview················································································································...
Page 200: Arp Configuration
1-1 1 arp configuration when configuring arp, go to these sections for information you are interested in: z arp overview z configuring arp z configuring gratuitous arp z displaying and maintaining arp arp overview arp function the address resolution protocol (arp) is used to resolve an ip address in...
Page 201
1-2 z sender protocol address: this field specifies the protocol address of the device sending the message. Z target hardware address: this field specifies the hardware address of the device the message is being sent to. Z target protocol address: this field specifies the protocol address of the dev...
Page 202
1-3 arp table after obtaining the mac address for the destination host, the device puts the ip-to-mac mapping into its own arp table. This mapping is used for forwarding packets with the same destination in future. An arp table contains arp entries, which fall into one of two categories: dynamic or ...
Page 203
1-4 to do… use the command… remarks configure a permanent static arp entry arp static ip-address mac-address vlan-id interface-type interface-number required no permanent static arp entry is configured by default. Configure a non-permanent static arp entry arp static ip-address mac-address required ...
Page 204
1-5 enabling the arp entry check the arp entry check function disables the device from learning multicast mac addresses. With the arp entry check enabled, the device cannot learn any arp entry with a multicast mac address, and configuring such a static arp entry is not allowed; otherwise, the system...
Page 205
1-6 [switch] interface gigabitethernet 1/0/1 [switch-gigabitethernet1/0/1] port access vlan 10 [switch-gigabitethernet1/0/1] quit # create interface vlan-interace 10 and configure its ip address. [switch] interface vlan-interface 10 [switch-vlan-interface10] ip address 192.168.1.2 8 [switch-vlan-int...
Page 207
2-1 2 arp attack defense configuration although arp is easy to implement, it provides no security mechanism and thus is prone to network attacks. Currently, arp attacks and viruses are threatening lan security. The device can provide multiple features to detect and prevent such attacks. Configuring ...
Page 208
2-2 configuration procedure enabling source mac address based arp attack detection after this feature is enabled for a device, if the number of arp packets it receives from a mac address within five seconds exceeds the specified value, it generates an alarm and filters out arp packets sourced from t...
Page 209
2-3 displaying and maintaining source mac address based arp attack detection to do… use the command… remarks display attacking entries detected display arp anti-attack source-mac [ interface interface-type interface-number] available in any view a protected mac address is no longer excluded from det...
Page 210
2-4 man-in-the-middle attack according to the arp design, after receiving an arp reply, a host adds the ip-to-mac mapping of the sender to its arp mapping table. This design reduces the arp traffic on the network, but also makes arp spoofing possible. As shown in figure 2-1 , host a communicates wit...
Page 211
2-5 mac addresses, port index, and vlan id) are consistent, the arp packet passes the check; if not, the arp packet cannot pass the check. Z upon receiving an arp packet from an arp trusted port, the device does not check the arp packet. Z if arp detection is not enabled for the vlan, the arp packet...
Page 212
2-6 to do… use the command… remarks return to system view quit — enter ethernet interface view interface interface-type interface-number — configure the port as a trusted port arp detection trust optional the port is an untrusted port by default. Return to system view quit — specify an arp attack de...
Page 213
2-7 before performing the following configuration, make sure you have configured the arp detection enable command. Follow these steps to configure arp detection based on specified objects: to do… use the command… remarks enter system view system-view — specify objects for arp detection arp detection...
Page 214
2-8 figure 2-2 network diagram for arp detection configuration dhcp client host a switch a host b gateway dhcp server ge1/0/1 ge1/0/3 ge1/0/2 vlan 10 dhcp snooping 10.1.1.6 0001-0203-0607 configuration procedure 1) add all the ports on switch a to vlan 10 (the configuration procedure is omitted). 2)...
Page 215
2-9 after the preceding configurations are completed, when arp packets arrive at interfaces gigabitethernet 1/0/1 and gigabitethernet 1/0/2, their mac and ip addresses are checked, and then the packets are checked against the ip-to-mac binding and finally dhcp snooping entries. Arp detection configu...
Page 216
2-10 # enable arp detection for vlan 10. [switcha] vlan 10 [switcha-vlan10] arp detection enable # configure the upstream port as a trusted port and the downstream ports as untrusted ports (a port is an untrusted port by default). [switcha-vlan10] interface gigabitethernet 1/0/3 [switcha-gigabitethe...
Page 217: Table of Contents
I table of contents 1 dhcp relay agent configuration ············································································································1-1 introduction to dhcp relay agent ······································································································...
Page 218
Ii displaying and maintaining bootp client configuration·······································································4-2 bootp client configuration example····································································································4-3.
Page 219
1-1 this document is organized as follows: z dhcp relay agent configuration z dhcp client configuration z dhcp snooping configuration z bootp client configuration 1 dhcp relay agent configuration when configuring the dhcp relay agent, go to these sections for information you are interested in: z int...
Page 220
1-2 no matter whether a relay agent exists or not, the dhcp server and client interact with each other in a similar way . The following describes the forwarding process on the dhcp relay agent. Figure 1-2 dhcp relay agent work process as shown in figure 1-2 , the dhcp relay agent works as follows: 1...
Page 221
1-3 if a client’s requesting message has… handling strategy padding format the dhcp relay agent will… — normal forward the message after adding the option 82 padded in normal format. — verbose forward the message after adding the option 82 padded in verbose format. No option 82 — user-defined forwar...
Page 222
1-4 to do… use the command… remarks enable the dhcp relay agent on the current interface dhcp select relay required with dhcp enabled, interfaces work in the dhcp server mode. If the dhcp client obtains an ip address via the dhcp relay agent, the address pool of the subnet to which the ip address of...
Page 223
1-5 configuring the dhcp relay agent security functions creating static bindings and enabling ip address check the dhcp relay agent can dynamically record clients’ ip-to-mac bindings after clients get ip addresses. It also supports static bindings, that is, you can manually configure ip-to-mac bindi...
Page 224
1-6 z if the server returns a dhcp-ack message or does not return any message within a specified interval, which means the ip address is assignable now, the dhcp relay agent will age out the client entry with this ip address. Z if the server returns a dhcp-nak message, which means the ip address is ...
Page 225
1-7 follow these steps to configure the dhcp relay agent in system view to send a dhcp-release request: to do… use the command… remarks enter system view system-view — configure the dhcp relay agent to send a dhcp-release request dhcp relay release ip client-ip required configuring the dhcp relay ag...
Page 226
1-8 to do… use the command… remarks configure the padding content for the circuit id sub-option dhcp relay information circuit-id string circuit-id optional by default, the padding content depends on the padding format of option 82. Configure user-defined option 82 configure the padding content for ...
Page 227
1-9 dhcp relay agent configuration examples dhcp relay agent configuration example network requirements as shown in figure 1-3 , dhcp clients reside on network 10.10.1.0/24. The ip address of the dhcp server is 10.1.1.1/24. Because the dhcp clients reside on a different network with the dhcp server,...
Page 228
1-10 because the dhcp relay agent and server are on different subnets, you need to configure a static route or dynamic routing protocol to make them reachable to each other. Dhcp relay agent option 82 support configuration example network requirements z as shown in figure 1-3 , enable option 82 on t...
Page 229
1-11 troubleshooting dhcp relay agent configuration symptom dhcp clients cannot obtain any configuration parameters via the dhcp relay agent. Analysis some problems may occur with the dhcp relay agent or server configuration. Enable debugging and execute the display command on the dhcp relay agent t...
Page 230: Dhcp Client Configuration
2-1 2 dhcp client configuration when configuring the dhcp client, go to these sections for information you are interested in: z introduction to dhcp client z enabling the dhcp client on an interface z displaying and maintaining the dhcp client z dhcp client configuration example when multiple vlan i...
Page 231
2-2 z an interface can be configured to acquire an ip address in multiple ways, but these ways are mutually exclusive. The latest configuration will overwrite the previous one. Z after the dhcp client is enabled on an interface, no secondary ip address can be configured for the interface. Z if the i...
Page 232: Dhcp Snooping Configuration
3-1 3 dhcp snooping configuration when configuring dhcp snooping, go to these sections for information you are interested in: z dhcp snooping overview z configuring dhcp snooping basic functions z configuring dhcp snooping to support option 82 z displaying and maintaining dhcp snooping z dhcp snoopi...
Page 233
3-2 recording ip-to-mac mappings of dhcp clients dhcp snooping reads dhcp-request messages and dhcp-ack messages from trusted ports to record dhcp snooping entries, including mac addresses of clients, ip addresses obtained by the clients, ports that connect to dhcp clients, and vlans to which the po...
Page 234
3-3 figure 3-2 configure trusted ports in a cascaded network table 3-1 describes roles of the ports shown in figure 3-2 . Table 3-1 roles of ports device untrusted port trusted port disabled from recording binding entries trusted port enabled to record binding entries switch a gigabitethernet 1/0/1 ...
Page 235
3-4 if a client’s requesting message has… handling strategy padding format the dhcp snooping device will… normal forward the message after replacing the original option 82 with the option 82 padded in normal format. Verbose forward the message after replacing the original option 82 with the option 8...
Page 236
3-5 z you need to specify the ports connected to the authorized dhcp servers as trusted to ensure that dhcp clients can obtain valid ip addresses. The trusted port and the port connected to the dhcp client must be in the same vlan. Z currently, you can specify layer 2 ethernet interfaces and layer 2...
Page 239
3-8 z on gigabitethernet 1/0/2, configure the padding content for the circuit id sub-option as company001 and for the remote id sub-option as device001. Z on gigabitethernet 1/0/3, configure the padding format as verbose, access node identifier as sysname, and code type as ascii for option 82. Z swi...
Page 240: Bootp Client Configuration
4-1 4 bootp client configuration while configuring a bootp client, go to these sections for information you are interested in: z introduction to bootp client z configuring an interface to dynamically obtain an ip address through bootp z displaying and maintaining bootp client configuration if severa...
Page 241
4-2 obtaining an ip address dynamically a dhcp server can take the place of the bootp server in the following dynamic ip address acquisition. A bootp client dynamically obtains an ip address from a bootp server in the following steps: 1) the bootp client broadcasts a bootp request, which contains it...
Page 242
4-3 bootp client configuration example network requirement switch a’s port belonging to vlan 1 is connected to the lan. Vlan-interface 1 obtains an ip address from the dhcp server by using bootp. Figure 4-1 network diagram for bootp client configuration example dhcp server gateway a wins server 10.1...
Page 243: Table of Contents
I table of contents 1 ftp configuration ·····································································································································1-1 ftp overview ··············································································································...
Page 244: Ftp Configuration
1-1 1 ftp configuration when configuring ftp, go to these sections for information you are interested in: z ftp overview z configuring the ftp client z configuring the ftp server z displaying and maintaining ftp ftp overview introduction to ftp the file transfer protocol (ftp) is an application laye...
Page 245
1-2 table 1-1 configuration when the device serves as the ftp client device configuration remarks device (ftp client) use the ftp command to establish the connection to the remote ftp server if the remote ftp server supports anonymous ftp, the device can log in to it directly; if not, the device mus...
Page 246
1-3 only users with the manage level can use the ftp command to log in to an ftp server, enter ftp client view, and execute directory and file related commands. However, whether the commands can be executed successfully depends on the authorizations of the ftp server. Establishing an ftp connection ...
Page 248
1-5 download a file from the ftp server under the authorized directory of the ftp server by following these steps: 1) use the dir or ls command to display the directory and the location of the file on the ftp server. 2) delete useless files for effective use of the storage space. 3) set the file tra...
Page 249
1-6 follow the step below to use another username to log in to the ftp server: to do… use the command… remarks use another username to relog in after successfully logging in to the ftp server user username [ password ] optional maintaining and debugging an ftp connection after a device serving as th...
Page 250
1-7 z device downloads a startup file from pc for device upgrade, and uploads the configuration file to pc for backup. Z on pc, an ftp user account has been created for the ftp client, with the username being abc and the password being pwd. Figure 1-2 network diagram for ftping a startup file from a...
Page 251
1-8 boot-loader file newest.Bin main # reboot the device, and the startup file is updated at the system reboot. Reboot the startup file used for the next startup must be saved under the root directory of the storage medium. You can copy or move a file to the root directory of the storage medium. For...
Page 252
1-9 to do… use the command… remarks manually release the ftp connection established with the specified username free ftp user username optional available in user view configuring authentication and authorization on the ftp server to allow an ftp user to access certain directories on the ftp server, ...
Page 253
1-10 ftp server configuration example network requirements z as shown in figure 1-3 , use device as an ftp server, and the pc as the ftp client. Their ip addresses are 1.2.1.1/16 and 1.1.1.1/16 respectively. An available route exists between device and pc. Z pc keeps the updated startup file of the ...
Page 254
1-11 c:\> ftp 1.1.1.1 connected to 1.1.1.1. 220 ftp service ready. User(1.1.1.1:(none)):ftp 331 password required for ftp. Password: 230 user logged in. # download the configuration file config.Cfg of the device to the pc for backup. Ftp> get config.Cfg back-config.Cfg # upload the configuration fil...
Page 255
1-12.
Page 256: Tftp Configuration
2-1 2 tftp configuration when configuring tftp, go to these sections for information you are interested in: z tftp overview z configuring the tftp client z displaying and maintaining the tftp client z tftp client configuration example tftp overview introduction to tftp the trivial file transfer prot...
Page 257
2-2 when the device serves as the tftp client, you need to perform the following configuration: table 2-1 configuration when the device serves as the tftp client device configuration remarks device (tftp client) z configure the ip address and routing function, and ensure that the route between the d...
Page 258
2-3 the source address specified with the tftp client source command is valid for all tftp connections and the source address specified with the tftp command is valid only for the current tftp connection. Follow these steps to configure the tftp client: to do… use the command… remarks enter system v...
Page 259
2-4 z device downloads a startup file from pc for upgrading and uploads a configuration file named config.Cfg to pc for backup. Figure 2-2 smooth upgrading using the tftp client function configuration procedure 1) configure pc (tftp server), the configuration procedure is omitted. Z on the pc, enabl...
Page 260: Table of Contents
I table of contents 1 ip routing basics configuration ·············································································································1-1 ip routing and routing table·········································································································...
Page 261
1-1 1 ip routing basics configuration go to these sections for information you are interested in: z ip routing and routing table z displaying and maintaining a routing table the term “router” in this document refers to a router in a generic sense or a layer 3 switch. Ip routing and routing table rou...
Page 262
1-2 made of a certain number of consecutive 1s. It can be expressed in dotted decimal format or by the number of the 1s. Z outbound interface: specifies the interface through which the ip packets are to be forwarded. Z ip address of the next hop: specifies the address of the next router on the path....
Page 264: Table of Contents
I table of contents 1 static routing configuration····················································································································1-1 introduction ·····················································································································...
Page 265: Static Routing Configuration
1-1 1 static routing configuration when configuring a static route, go to these sections for information you are interested in: z introduction z configuring a static route z displaying and maintaining static routes z static route configuration example the term “router” in this document refers to a r...
Page 266
1-2 application environment of static routing before configuring a static route, you need to know the following concepts: 1) destination address and mask in the ip route-static command, an ipv4 address is in dotted decimal format and a mask can be either in dotted decimal format or in the form of ma...
Page 267
1-3 to do… use the command… remarks configure the default preference for static routes ip route-static default-preference default-preference-value optional 60 by default z when configuring a static route, the static route does not take effect if you specify the next hop address first and then config...
Page 268
1-4 figure 1-1 network diagram for static route configuration configuration procedure 1) configuring ip addresses for interfaces (omitted) 2) configuring static routes # configure a default route on switch a. System-view [switcha] ip route-static 0.0.0.0 0.0.0.0 1.1.4.2 # configure two static routes...
Page 269
1-5 127.0.0.1/32 direct 0 0 127.0.0.1 inloop0 # display the ip routing table of switch b. [switchb] display ip routing-table routing tables: public destinations : 10 routes : 10 destination/mask proto pre cost nexthop interface 1.1.2.0/24 static 60 0 1.1.4.1 vlan500 1.1.3.0/24 static 60 0 1.1.5.6 vl...
Page 270: Table of Contents
I table of contents 1 multicast overview ····································································································································1-1 introduction to multicast ·································································································...
Page 271
Ii configuring igmp report suppression ························································································ 2-17 configuring maximum multicast groups that can be joined on a port······································· 2-17 configuring multicast group replacement··················...
Page 272: Multicast Overview
1-1 1 multicast overview this manual chiefly focuses on the ip multicast technology and device operations. Unless otherwise stated, the term “multicast” in this document refers to ip multicast. Introduction to multicast as a technique coexisting with unicast and broadcast, the multicast technique ef...
Page 273
1-2 figure 1-1 unicast transmission source receiver receiver receiver host a host b host c host d host e packets for host b packets for host d packets for host e ip network assume that host b, host d and host e need the information. A separate transmission channel needs to be established from the in...
Page 274
1-3 figure 1-2 broadcast transmission assume that only host b, host d, and host e need the information. If the information is broadcast to the subnet, host a and host c also receive it. In addition to information security issues, this also causes traffic flooding on the same subnet. Therefore, broad...
Page 275
1-4 figure 1-3 multicast transmission the multicast source (source in the figure) sends only one copy of the information to a multicast group. Host b, host d and host e, which are receivers of the information, need to join the multicast group. The routers on the network duplicate and forward the inf...
Page 276
1-5 manage multicast group memberships on stub subnets with attached group members. A multicast router itself can be a multicast group member. For a better understanding of the multicast concept, you can assimilate multicast transmission to the transmission of tv programs, as shown in table 1-1 . Ta...
Page 277
1-6 multicast models based on how the receivers treat the multicast sources, there are three multicast models: any-source multicast (asm), source-filtered multicast (sfm), and source-specific multicast (ssm). Asm model in the asm model, any sender can send information to a multicast group as a multi...
Page 278
1-7 multicast addresses to allow communication between multicast sources and multicast group members, network-layer multicast addresses, namely, multicast ip addresses must be provided. In addition, a technique must be available to map multicast ip addresses to link-layer multicast mac addresses. Ip...
Page 279
1-8 address description 224.0.0.7 shared tree (st) routers 224.0.0.8 st hosts 224.0.0.9 routing information protocol version 2 (ripv2) routers 224.0.0.11 mobile agents 224.0.0.12 dynamic host configuration protocol (dhcp) server/relay agent 224.0.0.13 all protocol independent multicast (pim) routers...
Page 280
1-9 z generally, we refer to ip multicast working at the network layer as layer 3 multicast and the corresponding multicast protocols as layer 3 multicast protocols, which include igmp, pim, msdp, and mbgp; we refer to ip multicast working at the data link layer as layer 2 multicast and the correspo...
Page 281
1-10 z an inter-domain multicast routing protocol is used for delivery of multicast information between two ass. So far, mature solutions include multicast source discovery protocol (msdp) and multicast border gateway protocol (mbgp). Msdp is used to propagate multicast source information among diff...
Page 282
1-11 z to ensure multicast packet transmission in the network, unicast routing tables or multicast routing tables (for example, the mbgp routing table) specially provided for multicast must be used as guidance for multicast forwarding. Z to process the same multicast information from different peers...
Page 283: Igmp Snooping Configuration
2-1 2 igmp snooping configuration when configuring igmp snooping, go to the following sections for information you are interested in: z igmp snooping overview z igmp snooping configuration task list z displaying and maintaining igmp snooping z igmp snooping configuration examples z troubleshooting i...
Page 284
2-2 z reducing layer 2 broadcast packets, thus saving network bandwidth. Z enhancing the security of multicast traffic. Z facilitating the implementation of per-host accounting. Basic concepts in igmp snooping igmp snooping related ports as shown in figure 2-2 , router a connects to the multicast so...
Page 285
2-3 aging timers for dynamic ports in igmp snooping and related messages and actions table 2-1 aging timers for dynamic ports in igmp snooping and related messages and actions timer description message before expiry action after expiry dynamic router port aging timer for each dynamic router port, th...
Page 286
2-4 when receiving a membership report a host sends an igmp report to the igmp querier in the following circumstances: z upon receiving an igmp query, a multicast group member host responds with an igmp report. Z when intended to join a multicast group, a host sends an igmp report to the igmp querie...
Page 287
2-5 does not immediately remove the port from the outgoing port list of the forwarding table entry for that group; instead, it resets the aging timer for the port. Upon receiving the igmp leave message from a host, the igmp querier resolves the multicast group address in the message and sends an igm...
Page 288
2-6 table 2-2 describes how an igmp snooping proxy processes igmp messages. Table 2-2 igmp message processing on an igmp snooping proxy igmp message actions general query when receiving an igmp general query, the proxy forwards it to all ports but the receiving port. In addition, the proxy generates...
Page 289
2-7 task remarks proxying configuring a source ip address for the igmp messages sent by the proxy optional configuring a multicast group filter optional configuring the function of dropping unknown multicast data optional configuring igmp report suppression optional configuring maximum multicast gro...
Page 290
2-8 to do... Use the command... Remarks enter system view system-view — enable igmp snooping globally and enter igmp-snooping view igmp-snooping required disabled by default return to system view quit — enter vlan view vlan vlan-id — enable igmp snooping in the vlan igmp-snooping enable required dis...
Page 291
2-9 configuring igmp snooping port functions configuration prerequisites before configuring igmp snooping port functions, complete the following tasks: z enable igmp snooping in the vlan z configure the corresponding port groups. Before configuring igmp snooping port functions, prepare the following...
Page 292
2-10 configuring static ports if all the hosts attached to a port are interested in the multicast data addressed to a particular multicast group or the multicast data that a particular multicast source sends to a particular group, you can configure static (*, g) or (s, g) joining on that port, namel...
Page 293
2-11 z after a port is configured as a simulated member host, the switch responds to igmp general queries by sending igmp reports through that port. Z when the simulated joining function is disabled on a port, the switch sends an igmp leave message through that port. Follow these steps to configure ...
Page 294
2-12 to do... Use the command... Remarks enter system view system-view — interface interface-typeinterface-number enter ethernet interface/layer 2 aggregate interface view or port group view port-group manual port-group-name required use either approach enable fast leave processing igmp-snooping fas...
Page 295
2-13 to do... Use the command... Remarks enter vlan view vlan vlan-id — enable igmp snooping querier igmp-snooping querier required disabled by default it is meaningless to configure an igmp snooping querier in a multicast network running igmp. Although an igmp snooping querier does not take part in...
Page 296
2-14 configuring igmp queries and responses in a vlan follow these steps to configure igmp queries and responses in a vlan: to do... Use the command... Remarks enter system view system-view — enter vlan view vlan vlan-id — configure igmp general query interval igmp-snooping query-interval interval o...
Page 297
2-15 configuring igmp snooping proxying configuration prerequisites before configuring igmp snooping proxying in a vlan, enable igmp snooping in the vlan and prepare the following data: z source ip address for the igmp reports sent by the proxy z source ip address for the igmp leave messages sent by...
Page 298
2-16 z acl rule for multicast group filtering z the maximum number of multicast groups that can pass the ports z 802.1p precedence for igmp messages configuring a multicast group filter on an igmp snooping–enabled switch, the configuration of a multicast group allows the service provider to define r...
Page 299
2-17 z with the function of dropping unknown multicast data disabled, the switch floods unknown multicast data in the vlan which the unknown multicast data belongs to. Follow these steps to configure the function of dropping unknown multicast data in a vlan: to do... Use the command... Remarks enter...
Page 300
2-18 to do... Use the command... Remarks port group view port-group manual port-group-name use either approach configure the maximum number of multicast groups allowed on the port(s) igmp-snooping group-limit limit [ vlan vlan-list ] optional by default, the maximum number of multicast groups allowe...
Page 301
2-19 configuring multicast group replacement on a port or a group of ports follow these steps to configure multicast group replacement on a port or a group of ports: to do... Use the command... Remarks enter system view system-view — interface interface-type interface-number enter ethernet interface...
Page 302
2-20 displaying and maintaining igmp snooping to do... Use the command... Remarks display igmp snooping multicast group information (on a centralized device) display igmp-snooping group [ vlan vlan-id ] [ verbose ] available in any view display the statistics information of igmp messages learned by ...
Page 303
2-21 figure 2-4 network diagram for group policy simulated joining configuration configuration procedure 1) configure ip addresses configure an ip address and subnet mask for each interface as per figure 2-4 . The detailed configuration steps are omitted. 2) configure router a # enable ip multicast ...
Page 304
2-22 # configure a multicast group filter so that the hosts in vlan 100 can join only the multicast group 224.1.1.1. [switcha] acl number 2001 [switcha-acl-basic-2001] rule permit source 224.1.1.1 0 [switcha-acl-basic-2001] quit [switcha] igmp-snooping [switcha-igmp-snooping] group-policy 2001 vlan ...
Page 305
2-23 static port configuration example network requirements z as shown in figure 2-5 , router a connects to a multicast source (source) through gigabitethernet 1/0/2, and to switch a through gigabitethernet 1/0/1. Z igmpv2 is to run on router a, and igmpv2 snooping is to run on switch a, switch b an...
Page 306
2-24 configure an ip address and subnet mask for each interface as per figure 2-5 . The detailed configuration steps are omitted. 2) configure router a # enable ip multicast routing, enable pim-dm on each interface, and enable igmp on gigabitethernet 1/0/1. System-view [routera] multicast routing-en...
Page 307
2-25 [switchc] igmp-snooping [switchc-igmp-snooping] quit # create vlan 100, assign gigabitethernet 1/0/1 through gigabitethernet 1/0/5 to this vlan, and enable igmp snooping in the vlan. [switchc] vlan 100 [switchc-vlan100] port gigabitethernet 1/0/1 to gigabitethernet 1/0/5 [switchc-vlan100] igmp-...
Page 308
2-26 total 1 ip group(s). Total 1 ip source(s). Total 1 mac group(s). Port flags: d-dynamic port, s-static port, c-copy port subvlan flags: r-real vlan, c-copy vlan vlan(id):100. Total 1 ip group(s). Total 1 ip source(s). Total 1 mac group(s). Router port(s):total 1 port. Ge1/0/2 (d) ( 00:01:23 ) ip...
Page 309
2-27 figure 2-6 network diagram for igmp snooping querier configuration configuration procedure 1) configure switch a # enable igmp snooping globally. System-view [switcha] igmp-snooping [switcha-igmp-snooping] quit # create vlan 100 and assign gigabitethernet 1/0/1 through gigabitethernet 1/0/3 to ...
Page 310
2-28 [switchb-vlan100] port gigabitethernet 1/0/1 to gigabitethernet 1/0/4 # enable igmp snooping and the function of dropping unknown multicast traffic in vlan 100. [switchb-vlan100] igmp-snooping enable [switchb-vlan100] igmp-snooping drop-unknown [switchb-vlan100] quit configurations on switch c ...
Page 311
2-29 figure 2-7 network diagram for igmp snooping proxying configuration source router a igmp querier switch a proxy & querier receiver host b host a host c 1.1.1.1/24 ge1/0/4 ge1/0/2 ge1/0/3 ge1/0/1 ge1/0/1 10.1.1.1/24 ge1/0/2 1.1.1.2/24 receiver configuration procedure 1) configure ip addresses fo...
Page 312
2-30 4) verify the configuration after the configuration is completed, host a and host b send igmp join messages for group 224.1.1.1. Receiving the messages, switch a sends a join message for the group out port gigabitethernet 1/0/1 (a router port) to router a. Use the display igmp-snooping group co...
Page 313
2-31 total 1 ip group(s). Total 1 ip source(s). Total 1 mac group(s). Port flags: d-dynamic port, s-static port, c-copy port subvlan flags: r-real vlan, c-copy vlan vlan(id):100. Total 1 ip group(s). Total 1 ip source(s). Total 1 mac group(s). Router port(s):total 1 port. Ge1/0/1 (d) ( 00:01:23 ) ip...
Page 314
2-32 z the function of dropping unknown multicast data is not enabled, so unknown multicast data is flooded. Solution 1) use the display acl command to check the configured acl rule. Make sure that the acl rule conforms to the multicast group policy to be implemented. 2) use the display this command...
Page 315: Multicast Vlan Configuration
2-1 3 multicast vlan configuration when configuring multicast vlan, go to these sections for information you are interested in: z introduction to multicast vlan z multicast vlan configuration task list z configuring multicast vlan z displaying and maintaining multicast vlan z multicast vlan configur...
Page 316
2-2 figure 3-2 port-based multicast vlan after the configuration, upon receiving an igmp message on a user port, switch a tags the message with the multicast vlan id and relays it to the igmp querier, so that igmp snooping can uniformly manage the router ports and member ports in the multicast vlan....
Page 317
2-3 z a user port can be configured as a multicast vlan port only if it is of the ethernet, or layer 2 aggregate interface type. Z configurations made in ethernet interface view are effective only for the current port; configurations made in layer 2 aggregate interface view are effective only for th...
Page 318
2-4 for details about the port link-type, port hybrid pvid vlan, and port hybrid vlan commands, refer to vlan commands. Configuring multicast vlan ports in this approach, you need to configure a vlan as a multicast vlan and then assign user ports to this multicast vlan by either adding the user port...
Page 319
2-5 z the vlan to be configured as a multicast vlan must exist. Z a port can belong to only one multicast vlan. Displaying and maintaining multicast vlan to do… use the command… remarks display information about a multicast vlan display multicast-vlan [ vlan-id ] available in any view multicast vlan...
Page 320
2-6 network diagram figure 3-3 network diagram for port-based multicast vlan configuration configuration procedure 1) configure ip addresses configure the ip address and subnet mask for each interface as per figure 3-3. The detailed configuration steps are omitted here. 2) configure router a # enabl...
Page 321
2-7 # create vlan 2 and enable igmp snooping in the vlan. [switcha] vlan 2 [switcha-vlan2] igmp-snooping enable [switcha-vlan2] quit the configuration for vlan 3 and vlan 4 is similar. The detailed configuration steps are omitted. # configure gigabitethernet 1/0/2 as a hybrid port. Configure vlan 2 ...
Page 322
2-8 total 1 ip source(s). Total 1 mac group(s). Router port(s):total 1 port. Ge1/0/1 (d) ip group(s):the following ip group(s) match to one mac group. Ip group address:224.1.1.1 (0.0.0.0, 224.1.1.1): host port(s):total 3 port. Ge1/0/2 (d) ge1/0/3 (d) ge1/0/4 (d) mac group(s): mac group address:0100-...
Page 323: Table of Contents
I table of contents 1 qos overview ············································································································································1-1 introduction to qos ·····································································································...
Page 324
Ii 4 line rate configuration ····························································································································4-1 line rate······································································································································...
Page 325: Qos Overview
1-1 1 qos overview this chapter covers the following topics: z introduction to qos z networks without qos guarantee z qos requirements of new applications z congestion: causes, impacts, and countermeasures z qos technology implementations introduction to qos quality of service (qos) reflects the abi...
Page 326
1-2 the emerging applications demand higher service performance of ip networks. Better network services during packets forwarding are required, such as providing dedicated bandwidth, reducing packet loss ratio, managing and avoiding congestion, and regulating network traffic. To meet these requireme...
Page 327
1-3 countermeasures a simple solution for congestion is to increase network bandwidth, however, it cannot solve all the problems that cause congestion because you cannot increase network bandwidth infinitely. A more effective solution is to provide differentiated services for different applications ...
Page 328
1-4 z congestion avoidance monitors the usage status of network resources and is usually applied in the outbound direction of a port. As congestion becomes worse, it actively reduces the amount of traffic by dropping packets. Among these qos technologies, traffic classification is the basis for prov...
Page 329
1-5 as shown in figure 1-3 , the tos field of the ip header contains eight bits: the first three bits (0 to 2) represent ip precedence from 0 to 7; the subsequent four bits (3 to 6) represent a tos value from 0 to 15. According to rfc 2474, the tos field of the ip header is redefined as the differen...
Page 330
1-6 dscp value (decimal) dscp value (binary) description 26 011010 af31 28 011100 af32 30 011110 af33 34 100010 af41 36 100100 af42 38 100110 af43 8 001000 cs1 16 010000 cs2 24 011000 cs3 32 100000 cs4 40 101000 cs5 48 110000 cs6 56 111000 cs7 0 000000 be (default) 2) 802.1p precedence 802.1p preced...
Page 331
1-7 the priority in the 802.1q tag header is called 802.1p precedence, because its use is defined in ieee 802.1p. Table 1-3 presents the values for 802.1p precedence. Table 1-3 description on 802.1p precedence 802.1p precedence (decimal) 802.1p precedence (binary) description 0 000 best-effort 1 001...
Page 332: Qos Policy Configuration
2-1 2 qos policy configuration when configuring a qos policy, go to these sections for information you are interested in: z qos policy overview z configuring a qos policy z applying the qos policy z displaying and maintaining qos policies qos policy overview a qos policy involves three components: c...
Page 334
2-3 form description source-mac mac-address specifies to match the packets with a specified source mac address. The matching criteria listed below must be unique in a traffic class with the operator being and. Therefore, even though you can define multiple if-match clauses for these matching criteri...
Page 335
2-4 in a policy, multiple class-to-traffic-behavior mappings can be configured, and these mappings are executed according to the order configured. Follow these steps to define a policy: to do… use the command… remarks enter system view system-view — create a policy and enter policy view qos policy p...
Page 336
2-5 applying the qos policy you can apply the qos policy to an interface. You can modify the classification rules, traffic behaviors, and classifier-behavior associations of a qos policy already applied. Applying the qos policy to an interface a policy can be applied to multiple interfaces. Only one...
Page 337
2-6 to do… use the command… remarks display traffic behavior configuration information display traffic behavior user-defined [ behavior-name ] available in any view display the configuration of user-defined qos policies display qos policy user-defined [ policy-name [ classifier tcl-name ]] available...
Page 338
3-1 3 priority mapping configuration when configuring priority mapping, go to these sections for information you are interested in: z priority mapping overview z configuring a priority mapping table z configuring the priority for a port z configuring the trusted precedence type for a port z displayi...
Page 339
3-2 in this mode, the switch searches for the set of precedence values corresponding to the trusted type (802.1p precedence or dscp precedence) of priority of the packet in the corresponding priority mapping tables and assigns the set of matching precedence values to the packet. Z trusting port prio...
Page 340
3-3 table 3-1 the default dot1p-lp and dot1p-dscp mappings input priority value dot1p-lp mapping dot1p-dscp mapping 802.1p precedence (dot1p) local precedence (lp) dscp value (dscp) 0 2 0 1 0 8 2 1 16 3 3 24 4 4 32 5 5 40 6 6 48 7 7 56 table 3-2 the default dscp-lp and dscp-dot1p mappings input prio...
Page 342
3-5 # enter the dot1p-lp priority mapping table view. [sysname] qos map-table dot1p-lp # modify dot1p-lp priority mapping parameters. [sysname-maptbl-dot1p-lp] import 0 1 export 0 [sysname-maptbl-dot1p-lp] import 2 3 export 1 [sysname-maptbl-dot1p-lp] import 4 5 export 2 [sysname-maptbl-dot1p-lp] im...
Page 343
3-6 configuring the trusted precedence type for a port you can configure whether to trust the priority of packets. On a device supporting port trusted precedence type, the priority mapping process for packets is shown in priority mapping overview . You can configure one of the following trusted prec...
Page 344
3-7 [sysname] interface gigabitethernet 1/0/1 # configure port gigabitethernet 1/0/1 to trust the 802.1p precedence of received packets. [sysname-gigabitethernet1/0/1] qos trust dot1p displaying and maintaining priority mapping to do… use the command… remarks display priority mapping table configura...
Page 345: Line Rate Configuration
4-1 4 line rate configuration when configuring traffic classification, traffic policing, and traffic shaping, go to these sections for information you are interested in: z line rate z line rate configuration line rate the line rate of a physical interface specifies the maximum rate for forwarding pa...
Page 346
4-2 line rate configuration configuration procedure the line rate of a physical interface specifies the maximum rate of incoming packets or outgoing packets. Follow these steps to configure the line rate: to do… use the command… remarks enter system view system-view — enter interface view interface ...
Page 347
5-1 5 congestion management configuration when configuring congestion management, go to these sections for information you are interested in: z overview z congestion management configuration methods overview congestion occurs on the interface where the arrival rate of packets is faster than the send...
Page 348
5-2 figure 5-1 schematic diagram for sp queuing as shown in figure 5-1 , sp queuing classifies eight queues on a port into eight classes, numbered 7 to 0 in descending priority order. Sp queuing schedules the eight queues strictly according to the descending order of priority. It sends packets in th...
Page 349
5-3 figure 5-2 schematic diagram for wrr queuing assume there are eight output queues on a port. Wrr assigns each queue a weight value (represented by w7, w6, w5, w4, w3, w2, w1, or w0) to decide the proportion of resources assigned to the queue. On a 100 mbps port, you can configure the weight valu...
Page 350
5-4 configuring sp queuing configuration procedure follow these steps to configure sp queuing: to do… use the command… remarks enter system view system-view — enter interface view interface interface-type interface-number enter interface view or port group view enter port group view port-group manua...
Page 351
5-5 to do… use the command… remarks display wrr queuing configuration information on interface(s) display qos wrr interface [ interface-type interface-number ] optional available in any view configuration example 1) network requirements z enable wrr queuing on the interface. Z assign queue 0 and que...
Page 352
5-6 z configure queue 1 on gigabitethernet1/0/1 to be in wrr queue scheduling group 1, with the weight being 20. Z configure queue 2 and queue 3 on gigabitethernet1/0/1 to be in wrr queue scheduling group 2, with the weight being 10 and 50 respectively. 2) configuration procedure # enter system view...
Page 353: Table of Contents
I table of contents 1 802.1x configuration·································································································································1-1 802.1x overview··············································································································...
Page 354: 802.1X Configuration
1-1 1 802.1x configuration when configuring 802.1x, go to these sections for information you are interested in: z 802.1x overview z 802.1x configuration task list z 802.1x configuration example z guest vlan and vlan assignment configuration example z acl assignment configuration example 802.1x overv...
Page 355
1-2 launched on client. The client program must support extensible authentication protocol over lan (eapol). Z device, residing at the other end of the lan segment, is the entity that authenticates connected clients. Device is usually an 802.1x-enabled network device and provides access ports for cl...
Page 356
1-3 figure 1-2 authorized/unauthorized status of a controlled port you can set the authorization mode of a specified port to control the port authorization status. The authorization modes include: z authorized-force: places the port in the authorized state, allowing users of the ports to access the ...
Page 357
1-4 figure 1-3 eapol packet format z pae ethernet type: protocol type. It takes the value 0x888e. Z protocol version: version of the eapol protocol supported by the eapol packet sender. Z type: type of the eapol packet. Table 1-1 lists the types that the device currently supports. Table 1-1 types of...
Page 358
1-5 an eap packet of the type of request or response has a data field in the format shown in figure 1-5 . The type field indicates the eap authentication type. A value of 1 represents identity, indicating that the packet is for querying the identity of the client. A value of 4 represents md5-challen...
Page 359
1-6 unsolicited triggering of a client a client initiates authentication by sending an eapol-start packet to the device. The destination address of the packet is 01-80-c2-00-00-03, the multicast address specified by the ieee 802.1x protocol. Some devices in the network may not support multicast pack...
Page 360
1-7 figure 1-8 802.1x authentication procedure in eap relay mode eapol eapor eapol-start eap-request / identity eap-response / identity eap-request / md5 challenge eap-success eap-response / md5 challenge radius access-request (eap-response / identity) radius access-challenge (eap-request / md5 chal...
Page 361
1-8 9) after receiving the eap-response/md5 challenge packet, the device relays the packet in a radius access-request packet to the authentication server. 10) when receiving the radius access-request packet, the radius server compares the password information encapsulated in the packet with that gen...
Page 362
1-9 figure 1-9 message exchange in eap termination mode eapol eapor eapol-start eap-request / identity eap-response / identity eap-request / md5 challenge eap-success eap-response / md5 challenge handshake request [ eap-request / identity ] handshake response [ eap-response / identity ] eapol-logoff...
Page 363
1-10 z username request timeout timer (tx-period): this timer is triggered by the device in two cases. The first case is when the client requests for authentication. The device starts this timer when it sends an eap-request/identity packet to a client. If it receives no response before this timer ex...
Page 364
1-11 the assigned vlan neither changes nor affects the configuration of a port. However, as the assigned vlan has higher priority than the initial vlan of the port, it is the assigned vlan that takes effect after a user passes authentication. After the user goes offline, the port returns to the init...
Page 365
1-12 similar to a guest vlan, an auth-fail vlan can be a port-based auth-fail vlan (pafv) or a mac-based auth-fail vlan (mafv), depending on the port access control method. Currently, on the switch, an auth-fail vlan can be only a port-based auth-fail vlan (pafv). Pafv refers to the auth-fail vlan c...
Page 366
1-13 task remarks enabling the quiet timer function optional enabling the re-authentication function optional configuring a guest vlan optional configuring an auth-fail vlan optional 802.1x basic configuration configuration prerequisites 802.1x provides a method for implementing user identity authen...
Page 369
1-16 z you need to disable proxy detection before disabling the online user handshake function. Z some 802.1x clients do not support exchanging handshake packets with the device. In this case, you need to disable the online user handshake function on the device; otherwise the device will tear down t...
Page 370
1-17 to do… use the command… remarks enter system view system-view — enable the quiet timer dot1x quiet-period required disabled by default enabling the re-authentication function if periodic re-authentication is enabled on a port, the device will re-authenticate online users on the port at the inte...
Page 371
1-18 configuration procedure follow these steps to configure a guest vlan: to do… use the command… remarks enter system view system-view — in system view dot1x guest-vlan guest-vlan-id [ interface interface-list ] interface interface-type interface-number configure the guest vlan for one or more por...
Page 372
1-19 to do… use the command… remarks configure the auth-fail vlan for the port dot1x auth-fail vlan authfail-vlan-id required by default, a port is configured with no auth-fail vlan. Different ports can be configured with different auth-fail vlans, but a port can be configured with only one auth-fai...
Page 373
1-20 figure 1-10 network diagram for 802.1x configuration configuration procedure the following configuration procedure covers most aaa/radius configuration commands for the device, while configuration on the 802.1x client and radius server are omitted. For information about aaa/radius configuration...
Page 374
1-21 # set the interval for the device to retransmit packets to the radius server and the maximum number of transmission attempts. [switch-radius-radius1] timer response-timeout 5 [switch-radius-radius1] retry 5 # set the interval for the device to send real time accounting packets to the radius ser...
Page 375
1-22 guest vlan and vlan assignment configuration example network requirements as shown in figure 1-11 : z a host is connected to port gigabitethernet 1/0/2 of the device and must pass 802.1x authentication to access the internet. Gigabitethernet 1/0/2 is in vlan 1. Z the authentication server runs ...
Page 376
1-23 figure 1-12 network diagram with the port in the guest vlan figure 1-13 network diagram when the client passes authentication configuration procedure z the following configuration procedure uses many aaa/radius commands. For detailed configuration of these commands, refer to aaa configuration. ...
Page 377
1-24 [switch-radius-2000] primary authentication 10.11.1.1 1812 [switch-radius-2000] primary accounting 10.11.1.1 1813 [switch-radius-2000] key authentication abc [switch-radius-2000] key accounting abc [switch-radius-2000] user-name-format without-domain [switch-radius-2000] quit # configure authen...
Page 378
1-25 z configure the radius server to assign acl 3000. Z enable 802.1x authentication on port gigabitethernet 1/0/1 of the switch, and configure acl 3000. After the host passes 802.1x authentication, the radius server assigns acl 3000 to port gigabitethernet 1/0/1. As a result, the host can access t...
Page 379
1-26 after logging in successfully, a user can use the ping command to verify whether the acl 3000 assigned by the radius server functions. [switch] ping 10.0.0.1 ping 10.0.0.1: 56 data bytes, press ctrl_c to break request time out request time out request time out request time out request time out ...
Page 380: Table of Contents
I table of contents 1 aaa configuration ····································································································································1-1 introduction to aaa ········································································································...
Page 381
Ii troubleshooting radius ··············································································································1-32.
Page 382: Aaa Configuration
1-1 1 aaa configuration when configuring aaa, go to these sections for information you are interested in: z introduction to aaa z introduction to radius z protocols and standards z aaa configuration task list z configuring aaa z configuring radius z aaa configuration examples z troubleshooting aaa i...
Page 383
1-2 z authorization: grants different users different rights. For example, a user logging into the server can be granted the permission to access and print the files in the server. Z accounting: records all network service usage information of users, including the service type, start and end time, a...
Page 384
1-3 figure 1-2 radius server components z users: stores user information such as the usernames, passwords, applied protocols, and ip addresses. Z clients: stores information about radius clients, such as the shared keys and ip addresses. Z dictionary: stores information about the meanings of radius ...
Page 385
1-4 2) the host initiates a connection request carrying the username and password to the radius client. 3) having received the username and password, the radius client sends an authentication request (access-request) to the radius server, with the user password encrypted by using the message-digest ...
Page 386
1-5 code packet type description 2 access-accept from the server to the client. If all the attribute values carried in the access-request are acceptable, that is, the authentication succeeds, the server sends an access-accept response. 3 access-reject from the server to the client. If any attribute ...
Page 387
1-6 no. Attribute no. Attribute 6 service-type 50 acct-multi-session-id 7 framed-protocol 51 acct-link-count 8 framed-ip-address 52 acct-input-gigawords 9 framed-ip-netmask 53 acct-output-gigawords 10 framed-routing 54 (unassigned) 11 filter-id 55 event-timestamp 12 framed-mtu 56-59 (unassigned) 13 ...
Page 388
1-7 no. Attribute no. Attribute 42 acct-input-octets 89 (unassigned) 43 acct-output-octets 90 tunnel-client-auth-id 44 acct-session-id 91 tunnel-server-auth-id the attribute types listed in table 1-2 are defined by rfc 2865, rfc 2866, rfc 2867, and rfc 2868. Extended radius attributes the radius pro...
Page 389
1-8 aaa configuration task list the basic procedure to configure aaa is as follows: 1) configure the required aaa schemes. Z local authentication: configure local users and related attributes, including usernames and passwords of the users to be authenticated. Z remote authentication: configure the ...
Page 390
1-9 radius configuration task list task remarks creating a radius scheme required specifying the radius authentication/authorization servers required specifying the radius accounting servers and relevant parameters optional setting the shared key for radius packets required setting the upper limit o...
Page 391
1-10 for the nas, each user belongs to an isp domain. Up to 16 isp domains can be configured on a nas. If a user does not provide the isp domain name, the system considers that the user belongs to the default isp domain. Follow these steps to create an isp domain: to do… use the command… remarks ent...
Page 392
1-11 a self-service radius server, for example intelligent management center (imc), is required for the self-service server localization function to work. With the self-service function, a user can manage and control his or her accounting information or card number. A server with self-service softwa...
Page 394
1-13 1) determine the access mode or service type to be configured. With aaa, you can configure an authorization scheme specifically for each access mode and service type, limiting the authorization protocols that can be used for access. 2) determine whether to configure an authorization method for ...
Page 395
1-14 aaa supports the following accounting methods: z no accounting: the system does not perform accounting for the users. Z local accounting: local accounting is implemented on the access device. It is for collecting statistics on the number of users and controlling the number of local user connect...
Page 396
1-15 z with the accounting optional command configured, a user that would be otherwise disconnected can still use the network resources even when no accounting server is available or communication with the current accounting server fails. Z the local accounting is not used for accounting implementat...
Page 398
1-17 depends on the level of the user interface. For an ssh user using public key authentication, the commands that can be used depend on the level configured on the user interface. For details about authentication method and commands accessible to user interface, refer to login configuration. Z bin...
Page 399
1-18 access device can obtain the nas id by the access vlan of the user and then send the nas id to the radius server through the nas-identifier attribute. Follow these steps to configure a nas id-vlan binding: to do… use the command… remarks enter system view system-view — create a nas id profile a...
Page 400
1-19 when there are users online, you cannot modify radius parameters other than the number of retransmission attempts and the timers. Creating a radius scheme before performing other radius configurations, follow these steps to create a radius scheme and enter radius scheme view: to do… use the com...
Page 401
1-20 z it is recommended to specify only the primary radius authentication/authorization server if backup is not required. Z if both the primary and secondary authentication/authorization servers are specified, the secondary one is used when the primary one is unreachable. Z in practice, you may spe...
Page 402
1-21 z it is recommended to specify only the primary radius accounting server if backup is not required. Z if both the primary and secondary accounting servers are specified, the secondary one is used when the primary one is not reachable. Z in practice, you can specify two radius servers as the pri...
Page 403
1-22 to retransmit the radius request. If the number of transmission attempts exceeds the specified limit but it still receives no response, it considers that the authentication has failed. Follow these steps to set the upper limit of radius request retransmission attempts: to do… use the command… r...
Page 404
1-23 when both the primary and secondary servers are available, the device sends request packets to the primary server. Once the primary server fails, the primary server turns into the state of block, and the device turns to the secondary server. In this case: z if the secondary server is available,...
Page 406
1-25 follow these steps to specify the source ip address for radius packets to be sent: to do… use the command… remarks enter system view system-view — radius nas-ip ip-address specify the source ip address for radius packets to be sent radius scheme radius-scheme-name nas-ip ip-address required use...
Page 407
1-26 to do… use the command… remarks set the quiet timer for the primary server timer quiet minutes optional 5 minutes by default set the real-time accounting interval timer realtime-accounting minutes optional 12 minutes by default z the maximum number of retransmission attempts of radius packets m...
Page 408
1-27 to do… use the command… remarks set the retransmission interval of accounting-on packets accounting-on enable interval seconds optional 3 seconds by default the accounting-on feature needs to cooperate with the h3c imc network management system. Enabling the listening port of the radius client ...
Page 409
1-28 aaa configuration examples aaa for telnet users by separate servers network requirements as shown in figure 1-6 , configure the switch to provide local authentication, local authorization, and radius accounting services to telnet users. The user name and the password for telnet users are both h...
Page 410
1-29 [switch-radius-rd] quit # create a local user named hello. [switch] local-user hello [switch-luser-hello] service-type telnet [switch-luser-hello] password simple hello [switch-luser-hello] authorization-attribute level 3 [switch-luser-hello] quit [switch] domain default enable bbb # configure ...
Page 411
1-30 this example assumes that the radius server runs imc plat 3.20-r2602 or imc uam 3.60-e6102. # add an access device. Log into the imc management platform, select the service tab, and select access service > service configuration from the navigation tree to enter the service configuration page. T...
Page 412
1-31 figure 1-9 add an account for device management 2) configure the switch # configure the ip address of vlan interface 2, through which the ssh user accesses the switch. System-view [switch] interface vlan-interface 2 [switch-vlan-interface2] ip address 192.168.1.70 255.255.255.0 [switch-vlan-int...
Page 413
1-32 [switch-ui-vty0-4] protocol inbound ssh [switch-ui-vty0-4] quit # create radius scheme rad. [switch] radius scheme rad # specify the primary authentication server. [switch-radius-rad] primary authentication 10.1.1.1 1812 # specify the primary accounting server. [switch-radius-rad] primary accou...
Page 414
1-33 5) the radius server and the nas are configured with different shared key. Solution: check that: 1) the nas and the radius server can ping each other. 2) the username is in the userid@isp-name format and a default isp domain is specified on the nas. 3) the user is configured on the radius serve...
Page 415: Table of Contents
I table of contents 1 pki configuration ······································································································································1-1 introduction to pki·······································································································...
Page 416: Pki Configuration
1-1 1 pki configuration when configuring pki, go to these sections for information you are interested in: z introduction to pki z pki configuration task list z displaying and maintaining pki z pki configuration examples z troubleshooting pki introduction to pki this section covers these topics: z pk...
Page 417
1-2 cas are trusted by different users in a pki system, the cas will form a ca tree with the root ca at the top level. The root ca has a ca certificate signed by itself while each lower level ca has a ca certificate signed by the ca at the next higher level. Crl an existing certificate may need to b...
Page 418
1-3 ca a ca is a trusted authority responsible for issuing and managing digital certificates. A ca issues certificates, specifies the validity periods of certificates, and revokes certificates as needed by publishing crls. Ra a registration authority (ra) is an extended part of a ca or an independen...
Page 419
1-4 2) the ra reviews the identity of the entity and then sends the identity information and the public key with a digital signature to the ca. 3) the ca verifies the digital signature, approves the application, and issues a certificate. 4) the ra receives the certificate from the ca, sends it to th...
Page 420
1-5 the configuration of an entity dn must comply with the ca certificate issue policy. You need to determine, for example, which entity dn parameters are mandatory and which are optional. Otherwise, certificate request may be rejected. Follow these steps to configure an entity dn: to do… use the co...
Page 421
1-6 configuring a pki domain before requesting a pki certificate, an entity needs to be configured with some enrollment information, which is referred to as a pki domain. A pki domain is intended only for convenience of reference by other applications like ike and ssl, and has only local significanc...
Page 424
1-9 z if a pki domain already has a local certificate, creating an rsa key pair will result in inconsistency between the key pair and the certificate. To generate a new rsa key pair, delete the local certificate and then issue the public-key local create command. For information about the public-key...
Page 425
1-10 z if a pki domain already has a ca certificate, you cannot retrieve another ca certificate for it. This is in order to avoid inconsistency between the certificate and registration information due to related configuration changes. To retrieve a new ca certificate, use the pki delete-certificate ...
Page 426
1-11 to do… use the command… remarks enter system view system-view — enter pki domain view pki domain domain-name — disable crl checking crl check disable required enabled by default return to system view quit — retrieve the ca certificate refer to retrieving a certificate manually required verify t...
Page 429
1-14 in this example, you need to configure these basic attributes on the ca server at first: z nickname: name of the trusted ca. Z subject dn: dn information of the ca, including the common name (cn), organization unit (ou), organization (o), and country (c). The other attributes may be left using ...
Page 430
1-15 it will take a few minutes. Press ctrl+c to abort. Input the bits in the modulus [default = 1024]: generating keys... ++++++++++++++++++++++++++++++++++++++++++++++++++++++++++ ++++++++++++++++++++++++++++++++++++++ +++++++++++++++++++++++++++++++++++++++++++++++ +++++++++++++++++++++++ z apply...
Page 431
1-16 ou=test cn=myca validity not before: jan 8 09:26:53 2007 gmt not after : jan 8 09:26:53 2008 gmt subject: cn=switch subject public key info: public key algorithm: rsaencryption rsa public key: (1024 bit) modulus (1024 bit): 00d67d50 41046f6a 43610335 ca6c4b11 f8f89138 e4e905bd 43953ba2 623a54c0...
Page 432
1-17 network requirements configure pki entity switch to request a local certificate from the ca server. Figure 1-3 request a certificate from a ca running windows 2003 server configuration procedure 1) configure the ca server z install the certificate server suites from the start menu, select contr...
Page 433
1-18 # configure the name of the trusted ca as myca. [switch-pki-domain-torsa] ca identifier myca # configure the url of the registration server in the format of http://host:port/ certsrv/mscep/mscep.Dll, where host:port indicates the ip address and port number of the ca server. [switch-pki-domain-t...
Page 434
1-19 # use the following command to view information about the local certificate acquired. Display pki certificate local domain torsa certificate: data: version: 3 (0x2) serial number: 48fa0fd9 00000000 000c signature algorithm: sha1withrsaencryption issuer: cn=ca server validity not before: nov 21 ...
Page 435
1-20 (omitted) you can also use some other display commands to view detailed information about the ca certificate. Refer to the display pki certificate ca domain command in pki commands. Configuring a certificate attribute-based access control policy network requirements z the client accesses the re...
Page 436
1-21 [switch-pki-cert-attribute-group-mygroup1] quit # create certificate attribute group mygroup2 and add two attribute rules. The first rule defines that the fqdn of the alternative subject name does not include the string of apple, and the second rule defines that the dn of the certificate issuer...
Page 437
1-22 failed to request a local certificate symptom failed to request a local certificate. Analysis possible reasons include these: z the network connection is not proper. For example, the network cable may be damaged or loose. Z no ca certificate has been retrieved. Z the current key pair has been b...
Page 438: Table of Contents
I table of contents 1 ssl configuration ·····································································································································1-1 ssl overview ··············································································································...
Page 439: Ssl Configuration
1-1 1 ssl configuration when configuring ssl, go to these sections for information you are interested in: z ssl overview z ssl configuration task list z displaying and maintaining ssl z troubleshooting ssl ssl overview secure sockets layer (ssl) is a security protocol that provides secure connection...
Page 440
1-2 z for details about symmetric key algorithms, asymmetric key algorithm rsa and digital signature, refer to public key configuration. Z for details about pki, certificate, and ca, refer to pki configuration. Ssl protocol stack as shown in figure 1-2 , the ssl protocol consists of two layers of pr...
Page 441
1-3 configuring an ssl server policy an ssl server policy is a set of ssl parameters for a server to use when booting up. An ssl server policy takes effect only after it is associated with an application layer protocol, http protocol, for example. Configuration prerequisites when configuring an ssl ...
Page 442
1-4 z if you enable client authentication here, you must request a local certificate for the client. Z currently, ssl mainly comes in these versions: ssl 2.0, ssl 3.0, and tls 1.0, where tls 1.0 corresponds to ssl 3.1. When the device acts as an ssl server, it can communicate with clients running ss...
Page 443
1-5 # create a pki domain and configure it. [device] pki domain 1 [device-pki-domain-1] ca identifier ca1 [device-pki-domain-1] certificate request url http://10.1.2.2/certsrv/mscep/mscep.Dll [device-pki-domain-1] certificate request from ra [device-pki-domain-1] certificate request entity en [devic...
Page 444
1-6 configuration prerequisites if the ssl server is configured to authenticate the ssl client, when configuring the ssl client policy, you need to specify the pki domain to be used for obtaining the certificate of the client. Therefore, before configuring an ssl client policy, you must configure a ...
Page 445
1-7 analysis ssl handshake failure may result from the following causes: z no ssl server certificate exists, or the certificate is not trusted. Z the server is expected to authenticate the client, but the ssl client has no certificate or the certificate is not trusted. Z the cipher suites used by th...
Page 446: Table of Contents
I table of contents 1 ssh2.0 configuration································································································································2-1 ssh2.0 overview···············································································································...
Page 447: Ssh2.0 Configuration
2-1 1 ssh2.0 configuration when configuring ssh2.0, go to these sections for information you are interested in: z ssh2.0 overview z configuring the device as an ssh server z configuring the device as an ssh client z displaying and maintaining ssh z ssh server configuration examples z ssh client conf...
Page 448
2-2 stages description session request after passing authentication, the client sends a session request to the server. Interaction after the server grants the request, the client and server start to communicate with each other. Version negotiation 1) the server opens port 22 to listen to connection ...
Page 449
2-3 before the negotiation, the server must have already generated a dsa or rsa key pair, which is not only used for generating the session key, but also used by the client to authenticate the identity of the server. For details about dsa and rsa key pairs, refer to public key configuration. Authent...
Page 450
2-4 session request after passing authentication, the client sends a session request to the server, while the server listens to and processes the request from the client. After successfully processing the request, the server sends back to the client an ssh_smsg_success packet and goes on to the inte...
Page 452
2-6 to do… use the command… remarks enter system view system-view — enter user interface view of one or more user interfaces user-interface vty number [ ending-number ] — set the login authentication mode to scheme authentication-mode scheme [ command-authorization ] required by default, the authent...
Page 453
2-7 z you are recommended to configure a client public key by importing it from a public key file. Z you can configure at most 20 client pubic keys on an ssh server. Configuring a client public key manually follow these steps to configure the client public key manually: to do… use the command… remar...
Page 455
2-9 setting the ssh management parameters ssh management includes: z enabling the ssh server to be compatible with ssh1 client z setting the server key pair update interval, applicable to users using ssh1 client z setting the ssh user authentication timeout period z setting the maximum number of ssh...
Page 456
2-10 specifying a source ip address/interface for the ssh client this configuration task allows you to specify a source ip address or interface for the client to access the ssh server, improving service manageability. To do… use the command… remarks enter system view system-view — specify a source i...
Page 457
2-11 to do... Use the command… remarks configure the server public key refer to configuring a client public key required the method of configuring server public key on the client is similar to that of configuring client public key on the server. Specify the host public key name of the server ssh cli...
Page 458
2-12 for information about the display public-key local and display public-key peer commands, refer to public key commands. Ssh server configuration examples when switch acts as server for password authentication network requirements z as shown in figure 1-1 , a local ssh connection is established b...
Page 459
2-13 [switch-luser-client001] service-type ssh [switch-luser-client001] authorization-attribute level 3 [switch-luser-client001] quit # specify the service type for user client001 as stelnet, and the authentication mode as password. This step is optional. [switch] ssh user client001 service-type ste...
Page 460
2-14 when switch acts as server for publickey authentication network requirements z as shown in figure 1-3 , a local ssh connection is established between the host (the ssh client) and the switch (the ssh server) for secure data exchange. Z publickey authentication is used, the algorithm is rsa. Fig...
Page 461
2-15 # specify the authentication type for user client002 as publickey, and assign the public key switch001 to the user. [switch] ssh user client002 service-type stelnet authentication-type publickey assign publickey switch001 2) configure the ssh client # generate an rsa key pair. Run puttygen.Exe,...
Page 462
2-16 figure 1-5 generate a client key pair 2) after the key pair is generated, click save public key and specify the file name as key.Pub to save the public key. Figure 1-6 generate a client key pair 3) likewise, to save the private key, click save private key. A warning window pops up to prompt you...
Page 463
2-17 figure 1-7 generate a client key pair 4) after generating a key pair on a client, you need to transmit the saved public key file to the server through ftp or tftp and have the configuration on the server done before continuing configuration of the client. # specify the private key file and esta...
Page 464
2-18 figure 1-9 ssh client configuration interface 2) in the window shown in figure 1-9 , click open. If the connection is normal, you will be prompted to enter the username. After entering the correct username (client002), you can enter the configuration interface. Ssh client configuration examples...
Page 465
2-19 [switchb] public-key local create dsa [switchb] ssh server enable # create an ip address for vlan interface 1, which the ssh client will use as the destination for ssh connection. [switchb] interface vlan-interface 1 [switchb-vlan-interface1] ip address 10.165.87.136 255.255.255.0 [switchb-vlan...
Page 466
2-20 z if the client does not support first-time authentication, you need to perform the following configurations. # disable first-time authentication. [switcha] undo ssh client first-time # configure the host public key of the ssh server. You can get the server host public key by using the display ...
Page 467
2-21 when switch acts as client for publickey authentication network requirements z as shown in figure 1-11 , switch a (the ssh client) needs to log into switch b (the ssh server) through the ssh protocol. Z publickey authentication is used, and the public key algorithm is dsa. Figure 1-11 switch ac...
Page 468
2-22 # specify the authentication type for user client002 as publickey, and assign the public key switch001 to the user. [switchb] ssh user client002 service-type stelnet authentication-type publickey assign publickey switch001 2) configure the ssh client # configure an ip address for vlan interface...
Page 469: Sftp Service
2-1 2 sftp service when configuring sftp, go to these sections for information you are interested in: z sftp overview z configuring an sftp server z configuring an sftp client z sftp client configuration example z sftp server configuration example sftp overview the secure file transfer protocol (sft...
Page 470
2-2 when the device functions as the sftp server, only one client can access the sftp server at a time. If the sftp client uses winscp, a file on the server cannot be modified directly; it can only be downloaded to a local place, modified, and then uploaded to the server. Configuring the sftp connec...
Page 472
2-4 working with sftp files sftp file operations include: z changing the name of a file z downloading a file z uploading a file z displaying a list of the files z deleting a file follow these steps to work with sftp files: to do… use the command… remarks enter sftp client view sftp server [ port-num...
Page 474
2-6 figure 2-1 network diagram for sftp client configuration (on a switch) configuration procedure 1) configure the sftp server (switch b) # generate rsa and dsa key pairs and enable the ssh server. System-view [switchb] public-key local create rsa [switchb] public-key local create dsa [switchb] ssh...
Page 475
2-7 # configure an ip address for vlan interface 1. System-view [switcha] interface vlan-interface 1 [switcha-vlan-interface1] ip address 192.168.0.2 255.255.255.0 [switcha-vlan-interface1] quit # generate rsa key pairs. [switcha] public-key local create rsa # export the host public key to file pubk...
Page 476
2-8 sftp-client> dir -rwxrwxrwx 1 noone nogroup 1759 aug 23 06:52 config.Cfg -rwxrwxrwx 1 noone nogroup 225 aug 24 08:01 pubkey2 -rwxrwxrwx 1 noone nogroup 283 aug 24 07:39 pubkey drwxrwxrwx 1 noone nogroup 0 sep 01 06:22 new -rwxrwxrwx 1 noone nogroup 225 sep 01 06:55 pub # add a directory named ne...
Page 477
2-9 sftp-client> quit bye connection closed. Sftp server configuration example network requirements as shown in figure 2-2 , an ssh connection is established between the host and the switch. The host, an sftp client, logs into the switch for file management and file transfer. An ssh user uses passwo...
Page 478
2-10 [switch-luser-client002] quit # configure the user authentication type as password and service type as sftp. [switch] ssh user client002 service-type sftp authentication-type password 2) configure the sftp client z there are many kinds of sftp client software. The following takes the psftp of p...
Page 479: Table of Contents
I table of contents 1 public key configuration··························································································································1-1 public key algorithm overview···································································································...
Page 480: Public Key Configuration
1-1 1 public key configuration when configuring public keys, go to these sections for information you are interested in: z public key algorithm overview z configuring the local asymmetric key pair z configuring the public key of a peer z displaying and maintaining public keys z public key configurat...
Page 481
1-2 z encryption: the information encrypted with a receiver's public key can be decrypted by the receiver possessing the corresponding private key. This is used to ensure confidentiality. Z digital signature: the information encrypted with a sender's private key can be decrypted by anyone who has ac...
Page 482
1-3 z configuration of the public-key local create command can survive a reboot. Z the public-key local create rsa command generates two key pairs: one server key pair and one host key pair. Each key pair consists of a public key and a private key. Z the length of an rsa key modulus is in the range ...
Page 483
1-4 to configure the public key of the peer, you can: z configure it manually: you can input on or copy the public key of the peer to the local host. The copied public key must have not been converted and be in the distinguished encoding rules (der) encoding format. Z import it from the public key f...
Page 484
1-5 public key configuration examples configuring the public key of a peer manually network requirements device a is authenticated by device b when accessing device b, so the public key of device a should be configured on device b in advance. In this example: z rsa is used. Z the host public key of ...
Page 485
1-6 4ad597d0fb3aa9f7202c507072b19c3c50a0d7ad3994e14abc62db125035ea326470034dc078b2baa3bc3bca 80aab5ee01986bd1ef64b42f17ccae4a77f1ef999b2bf9c4a10203010001 ===================================================== time of key pair created: 09:50:07 2007/08/07 key name: server_key key type: rsa encryption ...
Page 486
1-7 in this example: z rsa is used. Z the host public key of device a is imported from the public key file to device b. Figure 1-3 network diagram for importing the public key of a peer from a public key file configurtion procedure 1) create key pairs on device a and export the host public key # cre...
Page 487
1-8 307c300d06092a864886f70d0101010500036b003068026100999089e7aee9802002d9eb2d0433b87bb6158e 35000afb3ff310e42f109829d65bf70f7712507be1a3e0bc5c2c03faaf00dfddc63d004b4490dacba3cfa9e8 4b9151bdc7eece1c8770d961557d192de2b36caf9974b7b293363bb372771c2c1f0203010001 # export the rsa host public key to a fil...
Page 488
1-9 30819f300d06092a864886f70d010101050003818d0030818902818100d90003fa95f5a44a2a2cd3f814f985 4c4421b57cac64cffe4782a87b0360b600497d87162d1f398e6e5e51e5e353b3a9ab16c9e766bd995c669a78 4ad597d0fb3aa9f7202c507072b19c3c50a0d7ad3994e14abc62db125035ea326470034dc078b2baa3bc3bca 80aab5ee01986bd1ef64b42f17cca...
Page 489: Table of Contents
I table of contents 1 habp configuration ··································································································································1-1 introduction to habp·········································································································...
Page 490: Habp Configuration
1-1 1 habp configuration when configuring habp, go to these sections for the information you are interested in: z introduction to habp z configuring habp z displaying and maintaining habp z habp configuration example introduction to habp the hw authentication bypass protocol (habp) is used to enable...
Page 491
1-2 habp is a link layer protocol that works above the mac layer. It is built on the client-server model. Generally, the habp server is assumed by the management device (such as switch a in the above example), and the attached switches function as the habp clients, such as switch b through switch e ...
Page 492
1-3 to do… use the command… remarks configure habp to work in client mode undo habp server optional habp works in client mode by default. Displaying and maintaining habp to do… use the command… remarks display habp configuration information display habp available in any view display habp mac address...
Page 493
1-4 # configure the ip addresses of the involved interfaces. (omitted) # enable habp. System-view [switcha] habp enable # configure habp to work in server mode, allowing habp packets to be transmitted in vlan 2. [switcha] habp server vlan 2 # set the interval to send habp request packets to 50 secon...
Page 494: Table of Contents
I table of contents 1 acl overview ············································································································································1-1 introduction to acl ·····································································································...
Page 495: Acl Overview
1-1 1 acl overview an access control list (acl) is a set of rules (that is, a set of permit or deny statements) for identifying traffic based on matching criteria such as source address, destination address, and port number. The selected traffic will then be permitted or rejected by predefined secur...
Page 496
1-2 an acl can have only one name. Whether to specify a name for an acl is up to you. After creating an acl, you cannot specify a name for it, nor can you change or remove its name. The name of an acl must be unique among acls. Acl match order an acl may consist of multiple rules, which specify diff...
Page 497
1-3 3) if the numbers of zeros in the source ip address wildcards are the same, look at the destination ip address wildcards. Then, compare packets against the rule configured with more zeros in the destination ip address wildcard. 4) if the numbers of zeros in the destination ip address wildcards a...
Page 498
1-4 a referenced time range can be one that has not been created yet. The rule, however, can take effect only after the time range is defined and becomes active. Ip fragments filtering with acl traditional packet filtering performs match operation on, rather than all ip fragments, the first ones onl...
Page 499: Acl Configuration
2-1 2 acl configuration when configuring an acl, go to these sections for information you are interested in: z creating a time range z configuring a basic acl z configuring an advanced acl z configuring an ethernet frame header acl z copying an acl z displaying and maintaining acls creating a time r...
Page 500
2-2 that is active from 12:00 to 14:00 on wednesdays between january 1, 2004 00:00 and december 31, 2004 23:59, you may use the time-range test 12:00 to 14:00 wednesday from 00:00 01/01/2004 to 23:59 12/31/2004 command. You may create individual time ranges identified with the same name. They are re...
Page 501
2-3 z you can only modify the existing rules of an acl that uses the match order of config. When modifying a rule of such an acl, you may choose to change just some of the settings, in which case the other settings remain the same. Z you cannot create a rule with, or modify a rule to have, the same ...
Page 503
2-5 configuration prerequisites if you want to reference a time range in a rule, define it with the time-range command first. Configuration procedure follow these steps to configure an ethernet frame header acl: to do… use the command… remarks enter system view system-view –– create an ethernet fram...
Page 505
3-1 3 acl application for packet filtering when applying an acl for packet filtering, go to these sections for information you are interested in: z filtering ethernet frames z filtering ipv4 packets z acl application example you can apply an acl to the inbound direction of an interface to filter rec...
Page 506
3-2 figure 3-1 network diagram for applying an acl to an interface for filtering configuration procedure # create a time range named study, setting it to become active from 08:00 to 18:00 everyday. System-view [devicea] time-range study 8:00 to 18:00 daily # create basic acl 2009. [devicea] acl numb...
Page 507: Table of Contents
I table of contents 1 device management ··································································································································1-1 device management overview ···································································································...
Page 508: Device Management
1-1 1 device management when configuring device management, go to these sections for information you are interested in: z device management overview z device management configuration task list z configuring the exception handling method z rebooting a device z configuring the scheduled automatic exec...
Page 510
1-3 z device reboot may result in the interruption of the ongoing services. Use these commands with caution. Z before device reboot, use the save command to save the current configurations. For details about the save command, refer to file system configuration. Z before device reboot, use the comman...
Page 511
1-4 z the system does not require any interactive information when it is executing the specified command. If there is information for you to confirm, the system automatically inputs y or yes; if characters need to be input, the system automatically inputs a default character string, or inputs an emp...
Page 512
1-5 1) copy the boot rom program to the root directory of the device's storage medium using ftp or tftp. 2) use a command to specify the boot rom program for the next boot. 3) reboot the device to make the specified boot rom program take effect. Follow these steps to upgrade the boot rom program: to...
Page 513
1-6 for the purpose of the stability of an interface index, the system will save the 16-bit interface index when a logical interface is removed. If you repeatedly to create or delete a large number of logical interfaces, the interface indexes will be used up, which will result in interface creation ...
Page 514
1-7 identifying pluggable transceivers as pluggable transceivers are of various types and from different vendors, you can use the following commands to view the key parameters of the pluggable transceivers, including transceiver type, connector type, central wavelength of the laser sent, transfer di...
Page 515
1-8 to do… use the command… remarks display the statistics of the cpu usage display cpu-usage [ entry-number [ offset ] [ verbose ] [ from-device ] ] available in any view display history statistics of the cpu usage in a chart display cpu-usage history [ task task-id ] available in any view display ...
Page 516
1-9 figure 1-2 network diagram for remote scheduled automatic upgrade ftp client ftp server user telnet device 1.1.1.1/24 2.2.2.2/24 internet configuration procedure 1) configuration on the ftp server (note that configurations may vary with different types of servers) z set the access parameters for...
Page 517
1-10 [ftp] get auto-update.Txt # download file new-config.Cfg on the ftp server. [ftp]get new-config.Cfg # download file soft-version2.Bin on the ftp server. [ftp] binary [ftp] get soft-version2.Bin [ftp] bye # modify the extension of file auto-update.Txt as .Bat. Rename auto-update.Txt auto-update....
Page 518: Table of Contents
I table of contents 1 ntp configuration ·····································································································································1-1 ntp overview ··············································································································...
Page 519: Ntp Configuration
1-1 1 ntp configuration when configuring ntp, go to these sections for information you are interested in: z ntp overview z ntp configuration task list z configuring the operation modes of ntp z configuring optional parameters of ntp z configuring access-control rights z configuring ntp authenticatio...
Page 520
1-2 z ntp can unicast, multicast or broadcast protocol messages. How ntp works figure 1-1 shows the basic workflow of ntp. Device a and device b are interconnected over a network. They have their own independent system clocks, which need to be automatically synchronized through ntp. For an easy unde...
Page 521
1-3 this is only a rough description of the work mechanism of ntp. For details, refer to rfc 1305. Ntp message format ntp uses two types of messages, clock synchronization message and ntp control message. An ntp control message is used in environments where network management is needed. As it is not...
Page 522
1-4 z poll: 8-bit signed integer indicating the poll interval, namely the maximum interval between successive messages. Z precision: an 8-bit signed integer indicating the precision of the local clock. Z root delay: roundtrip delay to the primary reference source. Z root dispersion: the maximum erro...
Page 523
1-5 figure 1-4 symmetric peers mode a device working in the symmetric active mode periodically sends clock synchronization messages, with the mode field in the message set to 1 (symmetric active); the device that receives this message automatically enters the symmetric passive mode and sends a reply...
Page 524
1-6 figure 1-6 multicast mode network client server after receiving the first multicast message, the client sends a request clock synchronization message exchange (mode 3 and mode 4) periodically multicasts clock synchronization messages (mode 5) calculates the network delay between client and the s...
Page 525
1-7 z client/server mode z symmetric mode z broadcast mode z multicast mode for the client/server mode or symmetric mode, you need to configure only clients or symmetric-active peers; for the broadcast or multicast mode, you need to configure both servers and clients. A single device can have a maxi...
Page 526
1-8 z in the ntp-service unicast-server command, ip-address must be a unicast address, rather than a broadcast address, a multicast address or the ip address of the local clock. Z a device can act as a server to synchronize the clock of other devices only after its clock has been synchronized. If th...
Page 527
1-9 configuring ntp broadcast mode the broadcast server periodically sends ntp broadcast messages to the broadcast address 255.255.255.255. After receiving the messages, the device working in ntp broadcast client mode sends a reply and synchronizes its local clock. For devices working in the broadca...
Page 528
1-10 configuring a multicast client to do… use the command… remarks enter system view system-view — enter interface view interface interface-type interface-number enter the interface used to receive ntp multicast messages. Configure the device to work in the ntp multicast client mode ntp-service mul...
Page 529
1-11 to do… use the command… remarks specify the source interface for ntp messages ntp-service source-interface interface-type interface-number required by default, no source interface is specified for ntp messages, and the system uses the ip address of the interface determined by the matching route...
Page 530
1-12 configuring access-control rights with the following command, you can configure the ntp service access-control right to the local device. There are four access-control rights, as follows: z query: control query permitted. This level of right permits the peer devices to perform control query to ...
Page 531
1-13 configuring ntp authentication the ntp authentication feature should be enabled for a system running ntp in a network where there is a high security demand. This feature enhances the network security by means of client-server key authentication, which prohibits a client from synchronizing with ...
Page 533
1-15 the procedure of configuring ntp authentication on a server is the same as that on a client, and the same authentication key must be configured on both the server and client sides. Displaying and maintaining ntp to do… use the command… remarks view the information of ntp service status display ...
Page 534
1-16 root dispersion: 0.00 ms peer dispersion: 0.00 ms reference time: 00:00:00.000 utc jan 1 1900 (00000000.00000000) # specify device a as the ntp server of device b so that device b is synchronized to device a. System-view [deviceb] ntp-service unicast-server 1.0.1.11 # view the ntp status of dev...
Page 535
1-17 figure 1-8 network diagram for ntp symmetric peers mode configuration configuration procedure 1) configuration on device b: # specify device a as the ntp server of device b. System-view [deviceb] ntp-service unicast-server 3.0.1.31 2) view the ntp status of device b after clock synchronization....
Page 536
1-18 actual frequency: 100.0000 hz clock precision: 2^18 clock offset: -21.1982 ms root delay: 15.00 ms root dispersion: 775.15 ms peer dispersion: 34.29 ms reference time: 15:22:47.083 utc sep 19 2005 (c6d95647.153f7ced) as shown above, device c has been synchronized to device b and the clock strat...
Page 537
1-19 [switchc] interface vlan-interface 2 [switchc-vlan-interface2] ntp-service broadcast-server 2) configuration on switch d: # configure switch d to work in the broadcast client mode and receive broadcast messages on vlan-interface 2. System-view [switchd] interface vlan-interface 2 [switchd-vlan-...
Page 538
1-20 z switch c works in the multicast server mode and sends out multicast messages from vlan-interface 2. Z switch a and switch d work in the multicast client mode and receive multicast messages through vlan-interface 3 and vlan-interface 2 respectively. In this example, switch b is a l3 switch and...
Page 539
1-21 actual frequency: 100.0000 hz clock precision: 2^18 clock offset: 0.0000 ms root delay: 31.00 ms root dispersion: 8.31 ms peer dispersion: 34.30 ms reference time: 16:01:51.713 utc sep 19 2005 (c6d95f6f.B6872b02) as shown above, switch d has been synchronized to switch c, and the clock stratum ...
Page 540
1-22 clock status: synchronized clock stratum: 3 reference clock id: 3.0.1.31 nominal frequency: 100.0000 hz actual frequency: 100.0000 hz clock precision: 2^18 clock offset: 0.0000 ms root delay: 40.00 ms root dispersion: 10.83 ms peer dispersion: 34.30 ms reference time: 16:02:49.713 utc sep 19 20...
Page 541
1-23 # specify device a as the ntp server. [deviceb] ntp-service unicast-server 1.0.1.11 authentication-keyid 42 before device b can synchronize its clock to that of device a, you need to enable ntp authentication for device a. Perform the following configuration on device a: # enable ntp authentica...
Page 542
1-24 figure 1-12 network diagram for configuration of ntp broadcast mode with authentication configuration procedure 1) configuration on switch c: # configure ntp authentication. [switchc] ntp-service authentication enable [switchc] ntp-service authentication-keyid 88 authentication-mode md5 123456 ...
Page 543
1-25 clock offset: 0.0000 ms root delay: 31.00 ms root dispersion: 8.31 ms peer dispersion: 34.30 ms reference time: 16:01:51.713 utc sep 19 2005 (c6d95f6f.B6872b02) as shown above, switch d has been synchronized to switch c, and the clock stratum level of switch d is 4, while that of switch c is 3....
Page 544: Table of Contents
I table of contents 1 snmp configuration··································································································································1-1 snmp overview·················································································································...
Page 545: Snmp Configuration
1-1 1 snmp configuration when configuring snmp, go to these sections for information you are interested in: z snmp overview z snmp configuration z configuring snmp logging z configuring snmp trap z displaying and maintaining snmp z snmpv1/snmpv2c configuration example z snmpv3 configuration example ...
Page 546
1-2 z inform operation: the nms sends traps to other nmss through this operation. Snmp protocol version currently, snmp agents support snmpv3 and are compatible with snmpv1 and snmpv2c. Z snmpv1 uses community names for authentication, which defines the relationship between an snmp nms and an snmp a...
Page 547
1-3 figure 1-2 mib tree a 2 6 1 5 2 1 1 2 1 b snmp configuration as configurations for snmpv3 differ substantially from those for snmpv1 and snmpv2c, their snmp functionalities are introduced separately as follows. Follow these steps to configure snmpv3: to do… use the command… remarks enter system ...
Page 549
1-5 to do… use the command… remarks configure the maximum size of an snmp packet that can be received or sent by an snmp agent snmp-agent packet max-size byte-count optional 1,500 bytes by default. The validity of a usm user depends on the engine id of the snmp agent. If the engine id generated when...
Page 550
1-6 z a large number of logs occupy storage space of the device, thus affecting the performance of the device. Therefore, it is recommended to disable snmp logging. Z the size of snmp logs cannot exceed that allowed by the information center, and the total length of the node field and value field of...
Page 551
1-7 to enable an interface to send linkup/linkdown traps when its state changes, you need to enable the trap function of interface state changes on an interface and globally. Use the enable snmp trap updown command to enable the trap function on an interface, and use the snmp-agent trap enable [ sta...
Page 552
1-8 z an extended linkup/linkdown trap is the standard linkup/linkdown trap (defined in rfc) appended with interface description and interface type information. If the extended messages are not supported on the nms, disable this function to let the device send standard linkup/linkdown traps. Z if th...
Page 553
1-9 figure 1-3 network diagram for snmpv1/v2c configuration procedure 1) configuring the snmp agent # configure the ip address of the agent as 1.1.1.1/24 and make sure that there is a route between the agent and the nms. (the configuration procedure is omitted here) # configure the snmp basic inform...
Page 554
1-10 snmpv3 configuration example network requirements z as shown in figure 1-4 , the nms connects to the agent through an ethernet. Z the ip address of the nms is 1.1.1.2/24. Z the ip address of the agent is 1.1.1.1/24. Z the nms monitors and manages the interface status of the agent using snmpv3. ...
Page 555
1-11 the configurations on the agent and the nms must match. 3) verify the configuration z after the above configuration, an snmp connection is established between the nms and the agent. The nms can get and configure the values of some parameters on the agent through mib nodes. Z execute the shutdow...
Page 556
1-12 system-view [sysname] info-center source snmp channel console log level informational # enable snmp logging on the agent to log the get and set operations of the nms. [sysname] snmp-agent log get-operation [sysname] snmp-agent log set-operation z the following log information is displayed on th...
Page 557: Mib Style Configuration
2-1 2 mib style configuration when configuring mib style, go to these sections for information you are interested in: z setting the mib style z displaying and maintaining mib h3c private mib involves two styles, h3c compatible mib and h3c new mib. In the h3c compatible mib style, the device sysoid i...
Page 558: Table of Contents
I table of contents 1 rmon configuration ·································································································································1-1 rmon overview ················································································································...
Page 559: Rmon Configuration
1-1 1 rmon configuration when configuring rmon, go to these sections for information you are interested in: z rmon overview z configuring the rmon statistics function z configuring the rmon alarm function z displaying and maintaining rmon z rmon configuration example (logging information) z rmon con...
Page 560
1-2 working mechanism rmon allows multiple monitors (management devices). A monitor provides two ways of data gathering: z using rmon probes. Management devices can obtain management information from rmon probes directly and control network resources. In this approach, management devices can obtain ...
Page 561
1-3 if the value of a sampled alarm variable overpasses the same threshold multiple times, only the first one can cause an alarm event. That is, the rising alarm and falling alarm are alternate. Private alarm group the private alarm group calculates the values of alarm variables and compares the res...
Page 562
1-4 z a statistics object of the ethernet statistics group is a variable defined in the ethernet statistics table, and the recorded content is a cumulative sum of the variable from the time the statistics entry is created to the current time. For detailed configuration, refer to configuring the rmon...
Page 563
1-5 z the entry-number must be globally unique and cannot be used on another interface; otherwise, the operation fails. Z you can configure multiple history entries on one interface, but the values of the entry-number arguments must be different, and the values of the sampling-interval arguments mus...
Page 564
1-6 z a new entry cannot be created if its parameters are identical with the corresponding parameters of an existing entry refer to table 1-1 for the parameters to be compared for different entries. Z the system limits the total number of each type of entries (refer to table 1-1 for the detailed num...
Page 565
1-7 rmon configuration example (logging information) network requirements as shown in figure 1-1 , agent is connected to a configuration terminal through its console port and to server through ethernet cables. Create an entry in the rmon ethernet statistics table to gather statistics on gigabitether...
Page 566
1-8 [sysname] display rmon alarm 1 alarm table 1 owned by 1-rmon is valid. Samples type : delta variable formula : 1.3.6.1.2.1.16.1.1.1.4.1 sampling interval : 10(sec) rising threshold : 1000(linked with event 1) falling threshold : 100(linked with event 1) when startup enables : risingorfallingalar...
Page 567
1-9 [sysname-gigabitethernet1/0/1] quit # create an rmon alarm entry that when the delta sampling value of node 1.3.6.1.2.1.16.1.1.1.4.1 exceeds 100, event 1 is triggered to send traps; when the delta sampling value of the node is lower than 50, event 2 is triggered to send traps. [sysname] rmon eve...
Page 568: Table of Contents
I table of contents 1 file system management··························································································································1-1 file system ······················································································································...
Page 569
Ii backing up the startup configuration file······························································································2-7 deleting the startup configuration file for the next startup ··································································2-8 restoring the startup confi...
Page 570: File System Management
1-1 1 file system management when managing a file system, go to these sections for information you are interested in: z file system z directory operations z file operations z batch operations z storage medium operations z setting file system prompt modes z file system operations example file system ...
Page 571
1-2 directory operations directory operations include creating/removing a directory, displaying the current working directory, displaying the specified directory or file information, and so on. Displaying directory information to do… use the command… remarks display directory or file information dir...
Page 572
1-3 z the directory to be removed must be empty, meaning that before you remove a directory, you must delete all the files and the subdirectory under this directory. For file deletion, refer to the delete command; for subdirectory deletion, refer to the rmdir command. Z after you execute the rmdir c...
Page 573
1-4 copying a file to do… use the command… remarks copy a file copy fileurl-source fileurl-dest required available in user view moving a file to do… use the command… remarks move a file move fileurl-source fileurl-dest required available in user view deleting a file to do… use the command… remarks m...
Page 575
1-6 to do… use the command… remarks restore the space of a storage medium fixdisk device optional available in user view format a storage medium format device optional available in user view when you format a storage medium, all the files stored on it are erased and cannot be restored. In particular...
Page 576
1-7 to do… use the command… remarks display data on the specified physical page display nandflash page-data page-value setting file system prompt modes the file system provides the following two prompt modes: z alert: in this mode, the system warns you about operations that may bring undesirable con...
Page 577
1-8 # return to the upper directory. Cd .. # display the current working directory. Pwd flash:.
Page 578
2-1 2 configuration file management the device provides the configuration file management function with a user-friendly command line interface (cli) for you to manage the configuration files conveniently. This section covers these topics: z configuration file overview z saving the current configurat...
Page 579
2-2 coexistence of multiple configuration files multiple configuration files can be stored on a storage medium of a device. You can save the configuration used in different environments as different configuration files. In this case, when the device moves between these networking environments, you j...
Page 580
2-3 z safe mode. This is the mode when you use the save command with the safely keyword. The mode saves the file more slowly but can retain the configuration file in the device even if the device reboots or the power fails during the process. The fast saving mode is suitable for environments where p...
Page 581
2-4 z the application environment has changed and the device has to run in a configuration state based on a previous configuration file without being rebooted. Set configuration rollback following these steps: 1) specify the filename prefix and path for saving the current configuration. 2) save the ...
Page 582
2-5 the number of saved configuration files has an upper limit. After the maximum number of files is saved, the system deletes the oldest files when the next configuration file is saved. Follow these steps to configure parameters for saving the current running configuration: to do… use the command… ...
Page 583
2-6 to do… use the command… remarks enable the automatic saving of the current running configuration, and set the interval archive configuration interval minutes optional disabled by default the path and filename prefix of a saved configuration file must be specified before you configure the automat...
Page 584
2-7 do not unplug and plug during configuration rollback (that is, the system is executing the configuration replace file command). In addition, configuration rollback may fail if one of the following situations is present (if a command cannot be rolled back, the system skips it and processes the ne...
Page 585
2-8 the backup operation backs up the startup configuration file to the tftp server for devices supporting main/backup startup configuration file. Follow the step below to back up the startup configuration file to be used at the next system startup: to do… use the command… remarks back up the config...
Page 586
2-9 this command will permanently delete the configuration file from the device. Use it with caution. Restoring the startup configuration file the restore function allows you to copy a configuration file from a tftp server to the device and specify the file as the startup configuration file to be us...
Page 588: Table of Contents
1-1 table of contents 1 system maintaining and debugging········································································································1-1 system maintaining and debugging ·······································································································...
Page 589
1-1 1 system maintaining and debugging when maintaining and debugging the system, go to these sections for information you are interested in: z system maintaining and debugging z ping z tracert z system debugging z ping and tracert configuration example system maintaining and debugging you can use t...
Page 590
1-2 z for a low-speed network, you are recommended to set a larger value for the timeout timer (indicated by the -t parameter in the command) when configuring the ping command. Z only the directly connected segment address can be pinged if the outgoing interface is specified with the -i argument pin...
Page 591
1-3 ping 1.1.2.2: 56 data bytes, press ctrl_c to break reply from 1.1.2.2: bytes=56 sequence=1 ttl=254 time=53 ms record route: 1.1.2.1 1.1.2.2 1.1.1.2 1.1.1.1 reply from 1.1.2.2: bytes=56 sequence=2 ttl=254 time=1 ms record route: 1.1.2.1 1.1.2.2 1.1.1.2 1.1.1.1 reply from 1.1.2.2: bytes=56 sequenc...
Page 592
1-4 5) upon receiving the reply, the source device adds the ip address (1.1.1.1) of its inbound interface to the rr option. Finally, you can get the detailed information of routes from device a to device c: 1.1.1.1 {1.1.1.2; 1.1.2.1} 1.1.2.2. Tracert introduction by using the tracert command, you ca...
Page 593
1-5 to do… use the command… remarks enable sending of icmp timeout packets ip ttl-expires enable required disabled by default. Enable sending of icmp destination unreachable packets ip unreachables enable required disabled by default. Display the routes from source to destination tracert [ -a source...
Page 594
1-6 configuring system debugging output of the debugging information may reduce system efficiency. The debugging commands are usually used by administrators in diagnosing network failure. After completing the debugging, disable the corresponding debugging function, or use the undo debugging all comm...
Page 595
1-7 figure 1-4 ping and tracert network diagram configuration procedure # use the ping command to display whether an available route exists between device a and device c. Ping 1.1.2.2 ping 1.1.2.2: 56 data bytes, press ctrl_c to break request time out request time out request time out request time o...
Page 596: Table of Contents
1-1 table of contents 1 basic configurations·································································································································1-1 configuration display ·····································································································...
Page 597: Basic Configurations
1-1 1 basic configurations while performing basic configurations of the system, go to these sections for information you are interested in: z configuration display z basic configurations z cli features configuration display to avoid duplicate configuration, you can use the display commands to view t...
Page 598
1-2 basic configurations this section covers the following topics: z entering system view z configuring the device name z configuring the system clock z enabling/disabling the display of copyright information z configuring a banner z configuring cli hotkeys z configuring user privilege levels and co...
Page 599
1-3 to do… use the command… remarks exit to user view return required available in any view except user view configuring the device name the device name is used to identify a device in a network. Inside the system, the device name corresponds to the prompt of the cli. For example, if the device name...
Page 600
1-4 displayed in the ways shown in table 1-1 . The meanings of the parameters in the configuration column are as follows: z 1 indicates date-time has been configured with the clock datetime. Z 2 indicates time-zone has been configured with the clock timezone command and the offset time is zone-offse...
Page 601
1-5 configuration system clock displayed by the display clock command example if date-time is in the daylight saving time range, “date-time” + “summer-offset” is displayed. Configure: clock datetime 8:00 2007/1/1 and clock summer-time ss one-off 1:00 2007/1/1 1:00 2007/8/8 2 display: 10:00:00 ss mon...
Page 602
1-6 configuration system clock displayed by the display clock command example if the value of "date-time"±"zone-offset" is in the summer-time range, "date-time"±"zone-offset"+”su mmer-offset” is displayed. Configure: clock timezone zone-time add 1, clock summer-time ss one-off 1:00 2008/1/1 1:00 200...
Page 603
1-7 configuring a banner introduction to banners banners are prompt information displayed by the system when users are connected to the device, perform login authentication, and start interactive configuration. The administrator can set corresponding banners as needed. At present, the system support...
Page 604
1-8 to do… use the command… remarks configure the authorization information before login header legal text optional configure the banner to be displayed when a user enters user view (non modem login users) header shell text optional configure the banner to be displayed before login header motd text ...
Page 605
1-9 hotkey function ctrl+n displays the next command in the history command buffer. Ctrl+p displays the previous command in the history command buffer. Ctrl+r redisplays the current line information. Ctrl+v pastes the content in the clipboard. Ctrl+w deletes all the characters in a continuous string...
Page 606
1-10 table 1-3 default command levels level privilege description 0 visit involves commands for network diagnosis and commands for accessing an external device. Commands at this level are not allowed to be saved after being configured. After the device is restarted, the commands at this level will b...
Page 607
1-11 to do… use the command… remarks using local authentication z use the local-user command to create a local user and enter local user view. Z use the level keyword in the authorization-attribute command to configure the user level. Configure the user privilege level by using aaa authentication pa...
Page 608
1-12 follow these steps to configure the user privilege level under a user interface (ssh publickey authentication type): to do… use the command… remarks configure the authentication type for ssh users as publickey for the details, refer to ssh2.0 configuration. Required if users adopt the ssh login...
Page 609
1-13 z perform no authentication to the users telnetting to the device, and specify the user privilege level as 1. (this configuration brings potential security problem. Therefore, you are recommended to use it only in a lab environment.) system-view [sysname] user-interface vty 0 4 [sysname-ui-vty0...
Page 610
1-14 log in to the device through telnet, they need to input password 123, and then they can use commands of levels 0, 1, and 2. Switching user privilege level users can switch their user privilege level temporarily without logging out and disconnecting the current connection; after the switch, user...
Page 611
1-15 modifying command level all the commands in a view are defaulted to different levels, as shown in table 1-3 . The administrator can modify the command level based on users’ needs to make users of a lower level use commands with a higher level or improve device security. Follow these steps to mo...
Page 612
1-16 z for the detailed description of the display users command, refer to login commands. Z the display commands discussed above are for the global configuration. Refer to the corresponding section for the display command for specific protocol and interface. Cli features this section covers the fol...
Page 613
1-17 ? User view commands: backup backup next startup-configuration file to tftp server boot-loader set boot loader bootrom update/read/backup/restore bootrom cd change current directory clock specify the system clock cluster run cluster command copy copy from one file to another debugging enable sy...
Page 614
1-18 synchronous information output synchronous information output refers to the feature that if the user’s input is interrupted by system output, then after the completion of system output the system will display a command line prompt and your input so far, and you can continue your operations from...
Page 615
1-19 when editing the command line, you can use other shortcut keys (for details, see table 1-2 ) besides the shortcut keys defined in table 1-4 , or you can define shortcut keys by yourself. (for details, see configuring cli hotkeys .) cli display with the output information filtering function, you...
Page 617
1-21 character meaning remarks \bcharacter2 used to match character1character2. Character1 can be any character except number, letter or underline, and \b equals [^a-za-z0-9_]. For example, \ba can match -a, with - represents character1, and a represents character2; while \ba cannot match “2a” or “b...
Page 618
1-22 when the information displayed exceeds one screen, you can pause using one of the methods shown in table 1-6 . Table 1-6 display functions action function press space when information display pauses continues to display information of the next screen page. Press enter when information display p...
Page 619
1-23 you may use arrow keys to access history commands in windows 200x and xp terminal or telnet. However, the up-arrow and down-arrow keys are invalid in windows 9x hyperterminal, because they are defined in a different way. You can press ctrl+p or ctrl+n instead. Command line error information the...
Page 620: Table of Contents
I table of contents 1 information center configuration············································································································1-1 information center overview ··········································································································...
Page 621
1-1 1 information center configuration when configuring information center, go to these sections for information you are interested in: z information center configuration z configuring information center z displaying and maintaining information center z information center configuration examples info...
Page 622
1-2 figure 1-1 information center diagram (default) 1 2 3 4 5 6 7 8 9 console 0 channel6 monitor loghost trapbuffer logbuffer snmpagent channel7 channel8 channel9 log information trap information debug information console monitor log host trap buffer log buffer snmp agent system information informat...
Page 623
1-3 table 1-1 severity description severity severity value description emergency 0 the system is unusable. Alert 1 action must be taken immediately critical 2 critical conditions error 3 error conditions warning 4 warning conditions notice 5 normal but significant condition informational 6 informati...
Page 624
1-4 information channel number default channel name default output destination description debugging information. 9 channel9 not specified receives log, trap, and debugging information. Configurations for the seven output destinations function independently and take effect only after the information...
Page 625
1-5 log trap debug output destinati on modules allowed enabled/ disabled severity enabled/ disabled severity enabled/ disabled severity log host default (all modules) enabled informatio nal enabled debug disabled debug trap buffer default (all modules) disabled informatio nal enabled warning disable...
Page 626
1-6 int_16 (priority) the priority is calculated using the following formula: facility*8+severity, in which facility represents the logging facility name and can be configured when you set the log host parameters. The facility ranges from local0 to local7 (16 to 23 in decimal integers) and defaults ...
Page 627
1-7 z if the timestamp starts with a *, the information is debugging information source this field indicates the source of the information, such as the source ip address of the log sender. This field is optional and is displayed only when the output destination is the log host. Content this field pr...
Page 632
1-12 outputting system information to the snmp module the snmp module receives the trap information only, and discards the log and debugging information even if you have configured to output them to the snmp module. To monitor the device running status, trap information is usually sent to the snmp n...
Page 633
1-13 use this feature to control whether to output system information to the web interface and which system information can be output to the web interface. The web interface provides abundant search and sorting functions, therefore, if you configure to output the system information to the web interf...
Page 634
1-14 follow these steps to enable synchronous information output: to do… use the command… remarks enter system view system-view — enable synchronous information output info-center synchronous required disabled by default z if system information, such as log information, is output before you input an...
Page 636
1-16 # specify the host with ip address 1.2.0.1/16 as the log host, use channel loghost to output log information (optional, loghost by default), and use local4 as the logging facility. [sysname] info-center loghost 1.2.0.1 channel loghost facility local4 # disable the output of log, trap, and debug...
Page 637
1-17 be aware of the following issues while editing file /etc/syslog.Conf: z comments must be on a separate line and begin with the # sign. Z no redundant spaces are allowed after the file name. Z the logging facility name and the information level specified in the /etc/syslog.Conf file must be iden...
Page 638
1-18 as the default system configurations for different channels are different, you need to disable the output of log, trap, and debugging information of all modules on the specified channel (loghost in this example) first and then configure the output rule as needed so that unnecessary information ...
Page 639
1-19 ensure that the syslogd process is started with the -r option on a linux log host. After the above configurations, the system will be able to record log information into the log file. Outputting log information to the console network requirements z log information with a severity higher than in...
Page 640
1-20 terminal monitor info: current terminal monitor is on. Terminal logging info: current terminal logging is on. After the above configuration takes effect, if the specified module generates log information, the information center automatically sends the log information to the console, which then ...
Page 641: Table of Contents
I table of contents 1 mac address table configuration ··········································································································1-1 overview ·······························································································································...
Page 642
1-1 1 mac address table configuration when configuring mac address tables, go to these sections for information you are interested in: z overview z configuring a mac address table z displaying and maintaining mac address table z mac address table configuration example currently, interfaces involved ...
Page 643
1-2 to adapt to network changes, mac address table entries need to be constantly updated. Each dynamically learned mac address table entry has a life time, that is, an aging timer. If an entry has not updated when the aging timer expires, it is deleted. If it updates before the aging timer expires, ...
Page 644
1-3 figure 1-1 forward frames using the mac address table configuring a mac address table the mac address table configuration tasks include: z configuring mac address table entries z configuring the aging timer for dynamic mac address entries z configuring the mac learning limit these configuration ...
Page 645
1-4 when using the mac-address command to add a mac address entry, the interface specified by the interface keyword must belong to the vlan specified by the vlan keyword, and the vlan must already exist. Otherwise, you will fail to add this mac address entry. Follow these steps to add, modify, or re...
Page 646
1-5 z the mac address aging timer takes effect globally on dynamic mac address entries (learned or administratively configured) only. Z in a stable network, when there has been no traffic activity for a long time, all the dynamic entries in the mac address table maintained by the device will be dele...
Page 648
1-7 --- 1 mac address(es) found --- # view the aging time of dynamic mac address entries. [sysname] display mac-address aging-time mac address aging time: 500s.
Page 649: Table of Contents
I table of contents 1 cluster management configuration·········································································································1-1 cluster management overview··············································································································...
Page 650
1-1 1 cluster management configuration when configuring cluster management, go to these sections for information you are interested in: z cluster management overview z cluster configuration task list z configuring the management device z configuring the member devices z configuring access between th...
Page 651
1-2 cluster. Different from a member device, its topology information has been collected by the management device but it has not been added to the cluster. Figure 1-1 network diagram for a cluster as shown in figure 1-1 , the device configured with a public ip address and performing the management f...
Page 652
1-3 configuration according to the candidate device information collected through ntdp. Introduction to ndp ndp is used to discover the information about directly connected neighbors, including the device name, software version, and connecting port of the adjacent devices. Ndp works in the following...
Page 653
1-4 z on the same device, except the first port, each ntdp-enabled port waits for a period of time and then forwards the ntdp topology collection request after its prior port forwards the ntdp topology collection request. Cluster management maintenance 1) adding a candidate device to a cluster you s...
Page 654
1-5 information holdtime, it changes its state to active; otherwise, it changes its state to disconnect. Z if the communication between the management device and a member device is recovered, the member device which is in disconnect state will be added to the cluster. After that, the state of the me...
Page 655
1-6 task remarks configuring ndp parameters optional enabling ntdp globally and for specific ports optional configuring ntdp parameters optional manually collecting topology information optional enabling the cluster function optional establishing a cluster required configuring communication between ...
Page 656
1-7 configuring the management device enabling ndp globally and for specific ports for ndp to work normally, you must enable ntdp both globally and on specific ports. Follow these steps to enable ndp globally and for specific ports: to do… use the command… remarks enter system view system-view — ena...
Page 657
1-8 enabling ntdp globally and for specific ports for ntdp to work normally, you must enable ntdp both globally and on specific ports. Follow these steps to enable ntdp globally and for specific ports: to do… use the command… remarks enter system view system-view — enable ntdp globally ntdp enable o...
Page 658
1-9 to do… use the command… remarks configure the interval to collect topology information ntdp timer interval optional 1 minute by default. Configure the delay to forward topology-collection request packets on the first port ntdp timer hop-delay delay-time optional 200 ms by default. Configure the ...
Page 659
1-10 you can establish a cluster in two ways: manually and automatically. With the latter, you can establish a cluster according to the prompt information. The system: 1) prompts you to enter a name for the cluster you want to establish; 2) lists all the candidate devices within your predefined hop ...
Page 660
1-11 cluster member management you can manually add a candidate device to a cluster, or remove a member device from a cluster. If a member device needs to be rebooted for software upgrade or configuration update, you can remotely reboot it through the management device. Adding a member device to do…...
Page 661
1-12 manually collecting topology information refer to manually collecting topology information . Enabling the cluster function refer to enabling the cluster function . Deleting a member device from a cluster to do… use the command… remarks enter system view system-view — enter cluster view cluster ...
Page 662
1-13 may fail because of an authentication failure. Z if the member specified in this command does not exist, the system prompts error when you execute the command; if the switching succeeds, your user level on the management device is retained. Z if the telnet users on the device to be logged in re...
Page 663
1-14 you can back up and restore the whitelist in the following two ways: z backing them up on the ftp server shared by the cluster. You can manually restore the whitelist and blacklist from the ftp server. Z backing them up in the flash of the management device. When the management device restarts,...
Page 666
1-17 figure 1-4 network diagram for cluster management configuration configuration procedure 1) configure the member device switch a # enable ndp globally and for port gigabitethernet 1/0/1. System-view [switcha] ndp enable [switcha] interface gigabitethernet 1/0/1 [switcha-gigabitethernet1/0/1] ndp...
Page 667
1-18 [switchb-gigabitethernet1/0/3] ndp enable [switchb-gigabitethernet1/0/3] quit # configure the period for the receiving device to keep ndp packets as 200 seconds. [switchb] ndp timer aging 200 # configure the interval to send ndp packets as 70 seconds. [switchb] ndp timer hello 70 # enable ntdp ...
Page 668
1-19 [abc_0.Switchb-cluster] holdtime 100 # configure the interval to send handshake packets as 10 seconds. [abc_0.Switchb-cluster] timer 10 # configure the ftp server, tftp server, log host and snmp host for the cluster. [abc_0.Switchb-cluster] ftp-server 63.172.55.1 [abc_0.Switchb-cluster] tftp-se...
Page 669: Table of Contents
I table of contents 1 http configuration···································································································································1-1 http overview················································································································...
Page 670: Http Configuration
1-1 1 http configuration when configuring http, go to these sections for information you are interested in: z http overview z enabling the http service z http configuration z associating the http service with an acl z displaying and maintaining http http overview the hypertext transfer protocol (htt...
Page 671
1-2 follow these steps to enable the http service: to do… use the command… remarks enter system view system-view — enable the http service ip http enable required enabled by default configuring the port number of the http service configuration of the port number of the http service can reduce the at...
Page 672
1-3 displaying and maintaining http to do… use the command… remarks display information about http display ip http available in any view.
Page 673: Https Configuration
2-1 2 https configuration when configuring https, go to these sections for information you are interested in: z https overview z https configuration task list z associating the https service with an ssl server policy z enabling the https service z associating the https service with a certificate att...
Page 674
2-2 associating the https service with an ssl server policy you need to associate the https service with a created ssl server policy before enabling the https service. Follow these steps to associate the https service with an ssl server policy: to do… use the command… remarks enter system view syste...
Page 675
2-3 z after the https service is enabled, you can use the display ip https command to view the state of the https service and verify the configuration. Z enabling of the https service will trigger an ssl handshake negotiation process. During the process, if the local certificate of the device alread...
Page 676
2-4 to do… use the command… remarks enter system view system-view — configure the port number of the https service ip https port port-number optional by default, the port number of the https service is 443. If you execute the ip https port command for multiple times, the last configured port number ...
Page 677
2-5 in this configuration example, windows server serves as ca and you need to install simple certificate enrollment protocol (scep) component. Figure 2-1 network diagram for https configuration configuration procedure perform the following configurations on device: 1) apply for a certificate for de...
Page 678
2-6 [device-ssl-server-policy-myssl] pki-domain 1 [device-ssl-server-policy-myssl] client-verify enable [device-ssl-server-policy-myssl] quit 3) configure a certificate access control policy # configure a certificate attribute group. [device] pki certificate attribute-group mygroup1 [device-pki-cert...
Page 679: Table of Contents
I table of contents 1 stack configuration···································································································································1-1 stack configuration overview································································································...
Page 680: Stack Configuration
1-1 1 stack configuration when configuring stack, go to these sections for information you are interested in: z stack configuration overview z stack configuration task list z configuring the master device of a stack z configuring stack ports of a slave device z logging in to the cli of a slave from ...
Page 681
1-2 establishing a stack an administrator can establish a stack as follows: z configure a private ip address pool for a stack and create the stack on the network device which is desired to be the master device. Z configure ports between the stack devices as stack ports. Z the master device automatic...
Page 682
1-3 z if a device is already configured as the master device of a stack or is already a slave device of a stack, you cannot configure a private ip address pool on the device. Z when you configure a private ip address pool for a stack, the number of ip addresses in the address pool needs to be equal ...
Page 683
1-4 to do… use the command… remarks enter system view system-view — configure the specified ports as stack ports stack stack-port stack-port-num port interface-list required by default, a port is not a stack port. After a device joins a stack and becomes a slave device of the stack, the prompt chang...
Page 684
1-5 z create a stack, where switch a is the master device, switch b, switch c, and switch d are slave devices. An administrator can log in to switch b, switch c and switch d through switch a to perform remote configurations. Figure 1-2 network diagram for stack management ge1/0/1 ge1/0/3 switchb: sl...
Page 685
1-6 switch type: h3c s5120 mac address: 000f-e200-1000 number : 1 role : slave sysname : stack_1. Switchb device type: h3c s5120 mac address: 000f-e200-1001 number : 2 role : slave sysname : stack_2. Devicec device type: h3c s5120 mac address: 000f-e200-1002 number : 3 role : slave sysname : stack_3...
Page 686: Appendix A Acronyms
A-1 appendix a acronyms # a b c d e f g h i k l m n o p q r s t u v w x z acronyms full spelling # return 10ge ten-gigabitethernet a return aaa authentication, authorization and accounting abc activity based costing abr area border router ac alternating current ack acknowledgement acl access control...
Page 687
A-2 acronyms full spelling bgp border gateway protocol bims branch intelligent management system bootp bootstrap protocol bpdu bridge protocol data unit bri basic rate interface bsr bootstrap router bt bittorrent bt burst tolerance c return ca call appearance ca certificate authority car committed a...
Page 688
A-3 acronyms full spelling cv connectivity verification d return dar deeper application recognition dce data circuit-terminal equipment dd database description ddn digital data network dhcp dynamic host configuration protocol dis designated is dlci data link connection identifier dldp device link de...
Page 689
A-4 acronyms full spelling fdi forward defect indication fec forwarding equivalence class ffd fast failure detection fg forwarding group fib forwarding information base fifo first in first out fqdn full qualified domain name fr frame relay frr fast reroute frtt fairness round trip time ft functional...
Page 690
A-5 acronyms full spelling ibm international business machines icmp internet control message protocol icmpv6 internet control message protocol for ipv6 id identification/identity ieee institute of electrical and electronics engineers ietf internet engineering task force igmp internet group managemen...
Page 691
A-6 acronyms full spelling lacpdu link aggregation control protocol data unit lan local area network lcp link control protocol ldap lightweight directory access protocol ldp label distribution protocol ler label edge router lfib label forwarding information base lib label information base llc link l...
Page 692
A-7 acronyms full spelling mld-snooping multicast listener discovery snooping mmc meet-me conference modem modulator-demodulator mp multilink ppp mp-bgp multiprotocol extensions for bgp-4 mpe middle-level pe mp-group multilink point to point protocol group mpls multiprotocol label switching mplsfw m...
Page 693
A-8 acronyms full spelling npdu network protocol data unit npe network provider edge nqa network quality analyzer nsap network service access point nsc netstream collector n-sel nsap selector nssa not-so-stubby area ntdp neighbor topology discovery protocol ntp network time protocol o return oam ope...
Page 694
A-9 acronyms full spelling pop point of presence pos packet over sdh ppp point-to-point protocol pptp point to point tunneling protocol ppvpn provider-provisioned virtual private network pq priority queuing prc primary reference clock pri primary rate interface ps protection switching pse power sour...
Page 695
A-10 acronyms full spelling rpt rendezvous point tree rrpp rapid ring protection protocol rsb reservation state block rsoh regenerator section overhead rstp rapid spanning tree protocol rsvp resource reservation protocol rtcp real-time transport control protocol rte route table entry rtp real-time t...
Page 696
A-11 acronyms full spelling spt shortest path tree ssh secure shell ssm synchronization status marker ssm source-specific multicast st shared tree stm-1 sdh transport module -1 stm-16 sdh transport module -16 stm-16c sdh transport module -16c stm-4c sdh transport module -4c stp spanning tree protoco...
Page 697
A-12 acronyms full spelling vci virtual channel identifier ve virtual ethernet vfs virtual file system vlan virtual local area network vll virtual leased lines vod video on demand voip voice over ip vos virtual operate system vpdn virtual private dial-up network vpdn virtual private data network vpi...


