- DL manuals
- Kurzweil
- Synthesizer
- K2661
- Musician's Manual
Kurzweil K2661 Musician's Manual
K
2661
Musician’s Guide
©2003 All rights reserved. Kurzweil ® is a product line of Young Chang Co., Ltd. Young Chang®, Kurzweil ® , V. A. S. T. ®, KDFX®,
Pitcher®, and LaserVerb®, KSP8 ™, K2661™, K2600™, K2500™, and K2000™ are trademarks of Young Chang Co., Ltd. SmartMedia™ is a
trademark of Toshiba Corporation. ADAT® is a registered trademark of Alesis Corporation. All other products and brand names are
trademarks or registered trademarks of their respective companies. Product features and specifications are subject to change without notice.
You may legally print up to two (2) copies of this document for personal use. Commercial use of any copies of this document
is prohibited. Young Chang Co. retains ownership of all intellectual property represented by this document.
Part Number: 910389 Rev. A
Summary of K2661
Page 1
K 2661 musician’s guide ©2003 all rights reserved. Kurzweil ® is a product line of young chang co., ltd. Young chang®, kurzweil ® , v. A. S. T. ®, kdfx®, pitcher®, and laserverb®, ksp8 ™, k2661™, k2600™, k2500™, and k2000™ are trademarks of young chang co., ltd. Smartmedia™ is a trademark of toshiba...
Page 2: Save These Instructions
Ii important safety & installation instructions instructions pertaining to the risk of fire, electric shock, or injury to persons warning: when using electric products, basic precautions should always be followed, including the following: 1. Read all of the safety and installation instructions and e...
Page 3
Iii important safety instructions 1) read these instructions 2) keep these instructions. 3) heed all warnings. 4) follow all instructions. 5) do not use this apparatus near water. 6) clean only with dry cloth. 7) do not block any of the ventilation openings. Install in accordance with the manufactur...
Page 4: World Wide Web Home Page:
Iv kurzweil international contacts contact the nearest kurzweil office listed below to locate your local kurzweil representative. Kurzweil co., ltd. Daerung technotown 6th, 306 493-6 gasan, gumcheon, seoul, korea tel: (+82) 2-2108-5700 fax: (+82) 2-2108-5729 a n d music corp. P.O. Box 99995 lakewood...
Page 5
Contents kurzweil international contacts..................................................................................................................................... Iv world wide web home page: ....................................................................................................
Page 6
K2661 musician’s guide vi the cursor buttons.................................................................................................................................................. 3-3 the chan/bank buttons ......................................................................................
Page 7
K2661 musician’s guide vii kb3 mode ......................................................................................................................................................................... 6-4 kb3 channel .................................................................................
Page 8
K2661 musician’s guide viii alternative switch (altcontrol and altmethod)............................................................................................... 6-26 the pitch page ..................................................................................................................
Page 9
K2661 musician’s guide ix the function (fun) page ............................................................................................................................................ 6-43 the velocity trigger (vtrig) page .........................................................................
Page 10
K2661 musician’s guide x retrigthresh........................................................................................................................................................... 6-55 note attack .............................................................................................
Page 11
K2661 musician’s guide xi entry pan, exit pan ................................................................................................................................................ 7-17 the bend page .............................................................................................
Page 12
K2661 musician’s guide xii spring....................................................................................................................................................................... 7-43 center...........................................................................................
Page 13
K2661 musician’s guide xiii controlling effects with sysex messages ........................................................................................................... 9-20 a tour of effects mode ...................................................................................................
Page 14
K2661 musician’s guide xiv panic....................................................................................................................................................................... 10-18 chapter 11 master mode the master mode page......................................................
Page 15
K2661 musician’s guide xv recording multi-timbral sequences via midi ........................................................................................................ 12-23 song mode: the main page...................................................................................................
Page 16
K2661 musician’s guide xvi chainto.................................................................................................................................................................. 12-42 gm..................................................................................................
Page 17
K2661 musician’s guide xvii disk drive information ......................................................................................................................................... 13-5 macro on indicator...........................................................................................
Page 18
K2661 musician’s guide xviii editing macros ..................................................................................................................................................... 13-53 macro insert ..........................................................................................
Page 19
K2661 musician’s guide xix recording samples ................................................................................................................................................ 14-5 sampling the k2661’s output.................................................................................
Page 20
K2661 musician’s guide xx real-time control of kdfx........................................................................................................................................ 15-20 linking to programs and setups ..............................................................................
Page 21
K2661 musician’s guide xxi chapter 17 funs the mechanics of control sources.............................................................................................................................. 17-1 unipolar and bipolar control sources............................................................
Page 22
K2661 musician’s guide xxii.
Page 23: Chapter 1
Introduction welcome! 1-1 chapter 1 introduction welcome! Congratulations, and thanks for purchasing a kurzweil/young chang k2661 instrument. The k2661 is packed with great acoustic, electric, and synth sounds—combined with some of the most advanced synthesis features available, which you can use to...
Page 24
1-2 introduction overview of the k2661 for sample memory, your k2661 has one simm (single, in-line memory module) installed in a socket that you can reach through the access panel on the bottom of the instrument. If your k2661 does not already have the maximum of 128 megabytes of sample ram installe...
Page 25: Vast Synthesis
Introduction vast synthesis 1-3 vast synthesis variable architecture synthesis technology gives the k2661 its unprecedented flexibility. While many other synthesizers offer a fixed set of dsp tools (typically filtering, pitch, and amplitude modulation) the k2661’s variable architecture lets you arra...
Page 26: How to Use This Manual
1-4 introduction how to use this manual how to use this manual this manual includes the following: • how to connect and power up your k2661, getting around the front panel, and a brief description of the operating modes • basic editing, including the normal operations of each operating mode • the ad...
Page 27: The Accessory Files
Introduction the accessory files 1-5 the accessory files the accessory files included with your k2661 (on smartmedia and compact disc) include the following. Additional files may be included; see the appropriate readme files for these. K2661 base rom objects these provide a backup of the rom objects...
Page 28
1-6 introduction the accessory files the k2500frm directory contains over 1000 extra programs, organized in files by type of sound. This set of programs was originally developed for the k2500, hence the name. The kdfxfarm directory contains two subdirectories. Livemode contains a set of files contai...
Page 29: Chapter 2
Startup quick startup checklist 2-1 chapter 2 startup if hooking up new gear is familiar to you, and you just want to get going, here’s a quick description of all the basic things you need to cover to get started with your k2661. If you need more information, thorough descriptions of each step follo...
Page 30: Startup—The Details
2-2 startup startup—the details startup—the details this section walks you through the hookup of your k2661. We’ll take a look at the rear panel, then describe the power, audio, and other cable connections. Before you start... Don’t connect anything until you make sure your k2661 is properly and saf...
Page 31
Startup startup—the details 2-3 connecting scsi you may not have a hard disk or other scsi device to connect to your k2661 right away, but if you do, you can connect it to the scsi port. Please read the following information carefully; it’s very important. Also, there’s a collection of scsi tips in ...
Page 32: Playing The Presets
2-4 startup playing the presets playing the presets there are three things you’ll want to check out right away: programs, setups and quick access banks. In performance situations, you’ll be selecting your sounds using one of these three methods. There’s a mode (and a mode button) corresponding to ea...
Page 33
Startup playing the presets 2-5 vast programs with more than three layers are known as drum programs, as shown in the following diagram. Drum programs can use any sound you like, but the most common use for programs with more than three layers is to create a number of different sounds across the key...
Page 34
2-6 startup playing the presets in the following diagram, channel 2 is the current channel, but channel 1 is the kb3 channel. The info box tactfully lets you know what the kb3 channel is, and parentheses appear around the names of all kb3 programs, to further remind you that kb3 programs aren’t avai...
Page 36: The Other Modes
2-8 startup the other modes the other modes there are six other modes, five of which have mode buttons on the front panel (sample mode doesn’t have a front-panel button). See page 3-1 and chapter 4 for more detailed descriptions of each mode. Effects mode create and modify effects presets, and defin...
Page 37: Chapter 3
User interface basics mode selection 3-1 chapter 3 user interface basics this chapter will show you how to get around the front panel of your k2661. Your interactions can be divided into three primary operations: mode selection, navigation, and data entry. There is also an assignable control section...
Page 38: Navigation
3-2 user interface basics navigation song mode use the k2661’s sequencer to record and play back your keyboard performance, play type 0 and type 1 midi sequences, and record multi- timbral sequences received via midi. Disk mode interface with the k2661’s smartmedia drive, or an external scsi device ...
Page 39
User interface basics navigation 3-3 the top line on the top line of most pages, there’s a reminder of which mode you’re in and which page you’re on. Many pages display additional information in the top line, as well. The program-mode page above, for example, shows you the current amount of midi tra...
Page 40: Data Entry
3-4 user interface basics data entry the edit button the edit button activates each of the k2661’s editors, and acts as a shortcut to many pages within the program editor. Pressing the edit button tells the k2661 that you want to change some aspect of the object marked by the cursor. For example, wh...
Page 41
User interface basics data entry 3-5 the alphanumeric pad as its name implies, this set of 14 buttons lets you enter numeric values, and to enter names one character at a time. Depending on where you are, the k2661 automatically enters letters or numerals as appropriate (you don’t have to select bet...
Page 42: Intuitive Data Entry
3-6 user interface basics intuitive data entry intuitive data entry many parameters have values that correspond to standard physical controllers. In many cases, you can select these values “intuitively,” rather than having to scroll through the control source list. This is done by selecting the desi...
Page 43: Search
User interface basics search 3-7 changing the current layer in multi-layer programs when editing a multi-layer program (including drum programs), you can quickly switch between layers by holding the enter button, then striking a key. The k2661 will change the current layer to that key’s layer. If th...
Page 44
3-8 user interface basics renaming multiple objects 3. Use the alpha wheel or plus/minus buttons to highlight objects. When an object whose name you want to change is highlighted, press the select soft button to select the object. Note the asterisk that appears between the object’s id and its name. ...
Page 45
User interface basics mixdown and midi faders pages 3-9 mixdown and midi faders pages there are two buttons below the solo button, labeled mixdown and midi faders. These call up pages that let you use the sliders to control midi pan and volume, or any midi controller that you choose. This is useful ...
Page 46
3-10 user interface basics quick song recording and playback the available values for the channel parameter on this page are 1–16 (local and midi), 1l–16l (local only, no midi), and 1m–16m (midi only, no local). Quick song recording and playback there are three buttons—labeled record, play/pause, an...
Page 47: Chapter 4
The operating modes what the modes are 4-1 chapter 4 the operating modes in this chapter we’ll discuss the theory behind the mode concept, and we’ll describe the basic operating features of each mode. What the modes are the modes exist to make the k2661 logical to work with. With as many performance...
Page 48
4-2 the operating modes selecting modes the following table lists the procedures for moving between modes and editors. Note that the exit button won’t always take you where the table says it will; it often depends on how you got where you are. The table assumes that you’ve entered a given editor via...
Page 49: Using The Modes
The operating modes using the modes 4-3 nested editors starting at the program-mode level, there are three “nested” editors, each related to the parameters that make up different components of a program. The first is the program editor, which you enter when you press edit while in program mode. Prog...
Page 50
4-4 the operating modes using the modes if you’re using a different midi controller, you can make use of setup mode even if your midi controller can transmit on only one midi channel at a time. To do this, go to the receive page in midi mode (by pressing the recv soft button while in midi mode), and...
Page 51: Chapter 5
Editing conventions introduction to editing 5-1 chapter 5 editing conventions introduction to editing programming (editing) the k2661 always involves three basic operations: mode selection, navigation, and data entry. First, select the mode that relates to the object you want to edit—a program, a se...
Page 52: Object Type and Id
5-2 editing conventions object type and id pressure maps factory preset or user-programmed curves that affect the k2661’s response to, and midi transmission of, pressure (aftertouch) values. Intonation tables factory preset or user-programmed tables that affect the intervals between the twelve notes...
Page 53: Saving and Naming
Editing conventions saving and naming 5-3 saving and naming when you’ve edited an object to your satisfaction, you’ll want to store it in ram. There’s a standard procedure for saving and naming, which applies to all objects. You can press the save soft button, of course, but it’s easier to press the...
Page 54
5-4 editing conventions saving and naming press the cancel soft button if you decide not to name the object. Press ok when the name is set the way you want to save it. In addition to the letters and numerals, there are three sets of punctuation characters. The easiest way to get to them is to press ...
Page 55
Editing conventions saving and naming 5-5 keyboard naming the keyboard naming feature makes naming objects convenient (and musical!). With keyboard naming enabled, you can use the keyboard (or your midi controller) to enter the name of the object you’re modifying. There are three keyboard naming sta...
Page 56: Deleting Objects
5-6 editing conventions deleting objects deleting objects within most editors, there are soft buttons for deleting objects. When you want to delete an object, press the delete soft button, and the k2661 will ask you if you want to delete the object. (at this point in the dialog, you can select anoth...
Page 57: Memory Banks
Editing conventions memory banks 5-7 memory banks to help organize the storage of your edited objects, the k2661’s memory is divided into ten banks, each of which stores objects having ids within a certain range. Objects within the same range of ids are stored in the same memory bank, regardless of ...
Page 58: Special Button Functions
5-8 editing conventions special button functions special button functions the mode buttons and the chan/bank down button have additional functions, depending on the mode or editor you’re in. When you’re in the program or setup editor, they function according to the orange labeling under each button....
Page 59: Chapter 6
Program mode and the program editor background 6-1 chapter 6 program mode and the program editor programs are the k2661’s performance-level sound objects. They’re preset sounds equivalent to the patches, presets, voices, or multis that you find on other synths. Program mode is the heart of the k2661...
Page 60: Vast Program Structure
6-2 program mode and the program editor vast program structure vast program structure you might want to take a look at figure 6-1 on page 6-3, which depicts the hierarchy of a vast program, from individual samples all the way up to setups, which can contain up to eight programs. Every vast program c...
Page 61
Program mode and the program editor vast program structure 6-3 figure 6-1 vast program structure zone 1 zone 2 zone 3 zone 4 zone 5 zone 6 zone 7 zone 8 eight keyboard zones— each with independent program, midi channel, and control assignments selected for performance and editing in program mode; up...
Page 62: Kb3 Program Structure
6-4 program mode and the program editor kb3 program structure kb3 program structure there’s nothing quite like the sound of the classic hammond™ b-3 tone wheel organ, especially when played through a leslie™ rotating speaker system. We’ve done extensive testing and analysis with several tone wheel o...
Page 63
Program mode and the program editor kb3 mode 6-5 real-time controls in kb3 mode you have real-time control over many components of kb3 programs directly from the front panel. The sliders emulate the drawbars that are so essential to the tone wheel sound, while the buttons above them (they’re called ...
Page 64
6-6 program mode and the program editor kb3 mode can change the effects in real time by pressing the buttons (or by sending the appropriate midi controller values from your midi controller). In normal operational modes, using the mute buttons to change a program’s kb3 effects doesn’t affect the prog...
Page 65
Program mode and the program editor kb3 mode 6-7 local keyboard channel the local keyboard channel enables the k2661 to receive midi information on a single channel, then rechannelize that information so you can play and control all eight zones of a setup, even if your midi source transmits on only ...
Page 66
6-8 program mode and the program editor kb3 mode things are a bit different for playing setups. In this case, you must use the local keyboard channel to be able to play and control all of the setup’s zones. Set localkbdch to match the channel your external midi source is using (so if, for example, y...
Page 68
6-10 program mode and the program editor the program mode page you can play any program on the kb3 channel, but you can play kb3 programs only on the kb3 channel. If you’ve used a k2000 or k2500, you’ll remember that you would occasionally see parentheses around the names of drum programs, as well. ...
Page 69: Editing Vast Programs
Program mode and the program editor editing vast programs 6-11 press the sample soft button to enter the k2661’s sampler. Refer to chapter 14 for complete information on the sampler. Use the chan– and chan+ soft buttons to change the current midi channel. This changes the midi channel the k2661 uses...
Page 70
6-12 program mode and the program editor editing vast programs the soft buttons in the program editor the program editor’s soft buttons are labeled by the words that appear in the bottom line of the display. These buttons have two important jobs in the program editor: selecting pages, and selecting ...
Page 71
Program mode and the program editor editing vast programs 6-13 the five downward-pointing arrows indicate the five real-time control inputs to the dsp functions. There are usually five inputs, each of which has its own page within the program editor. (algorithms 26-31, which use hard sync oscillatio...
Page 72
6-14 program mode and the program editor common dsp control parameters common dsp control parameters the type of dsp function available for any function block depends on the algorithm. Some of the specialized functions like the panner are always located just before the final amp function. Others, li...
Page 74
6-16 program mode and the program editor common dsp control parameters key tracking this is a quick way to get additional control based on the midi note number of each note you trigger. Key tracking applies a different control signal value for each note number. In the case of pitch, key tracking ena...
Page 75: The Algorithm (Alg) Page
Program mode and the program editor the algorithm (alg) page 6-17 since the mod wheel is a continuous control, you can achieve any amount of depth control between the minimum and maximum. If you had set the depth control to sustain, for example, then you’d get only two levels of depth control: the m...
Page 76
6-18 program mode and the program editor the algorithm (alg) page note: changing a layer’s algorithm can affect the layer’s sound drastically. It’s a good idea to bring down the volume of your k2661 or your sound system before changing algorithms. The five downward-pointing arrows represent inputs t...
Page 78
6-20 program mode and the program editor the layer page low velocity (lovel) with this parameter you define the lowest attack velocity at which the layer will be enabled (generate a sound). The values for this parameter and the next are expressed in the standard musical dynamics markings, similar to...
Page 79
Program mode and the program editor the layer page 6-21 enable this assigns a control source to activate or deactivate the layer. When the value of the assigned control source is between the minimum and maximum thresholds set by the sense (s) parameter, the layer is active. When the value of the ass...
Page 80
6-22 program mode and the program editor the layer page opaque an opaque layer blocks all higher-numbered layers in its range, allowing only the opaque layer to play. This is an easy way to change a small range of notes in a program, leaving the original sound playing above and below the new sound. ...
Page 81: The Keymap Page
Program mode and the program editor the keymap page 6-23 hold until decay (tildec) when on, this parameter causes all notes in the layer to sustain through all three attack segments in their amplitude envelopes even if the notes have been released. Looped amplitude envelopes will not loop, however, ...
Page 82
6-24 program mode and the program editor the keymap page key tracking (keytrk) this is one of the six common dsp control parameters. On the keymap page, key tracking affects the interval between notes. The default value of 100 cents (a cent is a hundredth of a semitone) gives you the normal semitone...
Page 83
keytrk:100ct...
Page 84
6-26 program mode and the program editor the keymap page playback mode this gives you numerous options for manipulating the samples in the current layer as you trigger them. Normal leaves the samples unaffected, while reverse plays them in reverse. At a value of reverse, the samples will continue to...
Page 85: The Pitch Page
Program mode and the program editor the pitch page 6-27 for more information, refer to the discussion of the trim page’s alt point on page 14-16. The pitch page press the pitch soft button, and the pitch page will appear. These parameters adjust the pitch (playback rate) of the samples after the roo...
Page 86: The F4 Amp Page
6-28 program mode and the program editor the f4 amp page by the downward-pointing arrows on the alg page. See the musician’s reference for a complete list of the algorithms and their available dsp functions. The f4 amp page press the f4 amp soft button to call up this page, which features five of th...
Page 87: The Output Page
Program mode and the program editor the output page 6-29 velocity tracking this uses the midi attack velocity value of the notes you play as a control source affecting the individual amplitudes of each note in the current layer. This is the primary parameter to use for adjusting the dynamics of a la...
Page 88
m...
Page 89
Program mode and the program editor the output page 6-31 gain boost (or cut) the amplitude of the current layer. For layers using double-output algorithms, the gain is divided evenly between the two signal paths. Since this gain is not affected by the layer’s amplitude envelope, you can use it to ad...
Page 90: The Common Page
6-32 program mode and the program editor the common page when a stereo keymap layer uses a double-output algorithm, both keymaps are split between the upper and lower wires. In other words, both wires carry the signal from each of the keymaps. The output group (pair), output mode, and gain level of ...
Page 91
Program mode and the program editor the common page 6-33 pitch bend range use this parameter to define how much the pitch will change when you move your pitch wheel. Positive values will cause the pitch to bend up when the pitch wheel is pushed up, while negative values will cause the inverse. Large...
Page 92
6-34 program mode and the program editor the common page when you’re applying large amounts of portamento to multi-sampled sounds (acoustic guitar, for example), the k2661 will play more than one sample root as the pitch glides from the starting pitch to the ending pitch. This may cause a small clic...
Page 93
Program mode and the program editor the amplitude envelope (ampenv) page 6-35 you’ll use global control sources when you want to affect each note in a given layer uniformly, and local control sources when you want to affect each layer’s note independently. For example, you’d use a global lfo control...
Page 94
6-36 program mode and the program editor the amplitude envelope (ampenv) page many programs feature user envelopes with appropriate envelope settings. This is usually the case for programs that use samples of acoustic instruments, since it provides a convenient starting point for you to adjust the e...
Page 95
Program mode and the program editor the amplitude envelope (ampenv) page 6-37 attack segment times these indicate how long it takes for the current layer’s amplitude to reach its final level from its starting level. Attack segment levels these are the final levels that each segment achieves at compl...
Page 96
6-38 program mode and the program editor the envelope 2 (env2) and envelope 3 (env3) pages number of loops a value of inf makes the amplitude envelope loop until a note off is generated. Values of 1 through 31 indicate how many times the loop will repeat after the amplitude envelope has played once ...
Page 97
Program mode and the program editor the envelope control (envctl) page 6-39 the envelope control (envctl) page envelopes are control sources with outputs that evolve over time without repeating (unless you want them to). You can make the envelopes even more powerful by using envelope control. This g...
Page 98: The Lfo Page
6-40 program mode and the program editor the lfo page adjust this is the familiar coarse adjust found on many other pages. Use it here to change the rate of one of the envelope sections without reprogramming the envelope itself. This parameter doesn’t give you realtime control over the envelope. It ...
Page 99
Program mode and the program editor the lfo page 6-41 lfo1 is always local, meaning that it’s triggered with each note on event, and runs independently for each note in the layer. Lfo2 is local by default, but can be made global. This is done on the common page, by setting the globals parameter to o...
Page 100: The Asr Page
6-42 program mode and the program editor the asr page for src1 to 400 cents or so. Then go to the lfo page, set the min and max rates for lfo1 at 0.00 hz and 4.00 hz or so, and set the rate control to mwheel. Now play your midi controller and you’ll hear the lfo’s rate change when you move its mod w...
Page 101: The Function (Fun) Page
Program mode and the program editor the function (fun) page 6-43 mode this parameter sets the sustain section of the asr. The asr’s mode determines what the asr does when it finishes its attack section. If the mode parameter is set to normal, the asr will run directly from its attack section to its ...
Page 102: The Kdfx Page
6-44 program mode and the program editor the velocity trigger (vtrig) page chapter 17 describes each of these functions, and provides a few diagrams to give you a hint of the immense control (as well as some chaos) that these functions make possible. The velocity trigger (vtrig) page the velocity tr...
Page 103
bus...
Page 104: The Fxmod2–Fxmod4 Pages
6-46 program mode and the program editor the fxmod2–fxmod4 pages the fxmod2–fxmod4 pages these pages are a continuation of the kdfx page. Unlike the kdfx page, these pages each list five fxmods, and they don’t indicate the current studio. Otherwise, they’re identical to the kdfx page, listing the fi...
Page 105: Function Soft Buttons
Program mode and the program editor function soft buttons 6-47 function soft buttons the remainder of this chapter describes the soft buttons that perform specific functions, as opposed to selecting programming pages. The descriptions below are arranged in the order in which you would see the soft b...
Page 106: Editing Kb3 Programs
6-48 program mode and the program editor editing kb3 programs duplicate layer (duplyr) create a copy of the current layer, duplicating the settings of all its parameters. The copy becomes the current layer, and is the highest-numbered layer in the program. Import layer (implyr) copy a specific layer...
Page 107
up...
Page 108
6-50 program mode and the program editor the tonewl page emulations. This would leave you eight voices for other programs. You can specify up to 95 tone wheels. Here’s how to do the math to calculate polyphony: the number of k2500 voices used by a kb3 program is (number of tone wheels+1)/2, rounded ...
Page 110: The Pitch Page
6-52 program mode and the program editor the pitch page the pitch page the pitch page for kb3 programs is much like the pitch page for vast programs. The only difference is that for kb3 programs, there are no finehz, keytrk, or veltrk parameters. For a full description of the pitch-page parameters, ...
Page 111
Program mode and the program editor the perc page 6-53 key is held down get no percussion. On keyboard models, you can turn percussion on or off by pressing assignable controller button 5 (mute button 5). Volume this parameter switches between loud and soft percussion settings. The actual amplitude ...
Page 113
Program mode and the program editor the keyclk page 6-55 keyclick this is where you turn key click on or off. Volume this parameter sets the level of the keyclick; the noise decays from the level you set here. This level is scaled by the drawbar levels, as well as the expression pedal level. Decay s...
Page 114: The Amp Page
6-56 program mode and the program editor the amp page note attack controls the attack characteristic of notes. Normal provides a smoothed attack, while a setting of hard has an instant attack and will produce an audible click, in addition to any amount of key click specified with the other parameter...
Page 115: The Misc Page
bendrang...
Page 116
6-58 program mode and the program editor the misc page speedctl select either fast or slow to choose the speed of the rotary speaker emulation. On keyboard models, you can toggle between fast and slow speed using assignable controller button 1 (mute button 1). When you select a kb3 program, the k266...
Page 117: The Eq Page
Program mode and the program editor the eq page 6-59 the eq page when you press the eq soft button, you’ll see a page that at first glance looks quite similar to the alg page for a vast program. The four blocks on this page, however, represent two shelving bands of equalization and two parametric ba...
Page 118
6-60 program mode and the program editor programming tips middle period organs. To model one of these instruments, set 82 tone wheels and a low note of a 1. Use the mellow wheel volume map and eric’s organ map. Set key click to a moderate level. The classic b-3. For this sound, choose 79 tone wheels...
Page 119
Program mode and the program editor programming tips 6-61 using the vast program editor on a kb3 program kb3 mode lets you use certain vast-related parameters— such as the !Amp dsp function mentioned above—that are not found within the kb3 editor. There’s a “back door” that takes you to these non-kb...
Page 120
6-62 program mode and the program editor programming tips.
Page 121: Chapter 7
Setup mode and the setup editor setup mode 7-1 chapter 7 setup mode and the setup editor setup mode in setup mode, the k2661 can take on the identity of eight distinct instruments and eight distinct midi transmitters, each of which can use the setup’s physical controller assignments (or any subset o...
Page 123
Setup mode and the setup editor setup mode 7-3 the default control setup is 97 control setup, but you can choose any control setup you want. To do this, go to the midi-mode transmit page and use any normal data entry method to change the ctlsetup parameter. When you reenter program mode, all program...
Page 124
7-4 setup mode and the setup editor setup mode setup editor, set the value of the press parameter to off for zone 1). Now whenever you want to record without aftertouch, just select this setup as the control setup. Zone-status leds in setup mode take a minute to scroll through some of the factory se...
Page 125: The Setup Editor
Setup mode and the setup editor the setup editor 7-5 table 7-2 gives you a quick visual reminder of how zones behave depending on their status. Remember that any changes you make to zone status in setup mode are temporary; as soon as you select another setup, that setup’s programmed zone status take...
Page 126
7-6 setup mode and the setup editor the channel/program (ch/prog) page the channel/program (ch/prog) page this is the first page you see when you enter the setup editor. Here, you can select programs, midi channels, and midi bank numbers for each of the setup’s eight zones. You can also solo or mute...
Page 127
Setup mode and the setup editor the channel/program (ch/prog) page 7-7 nevertheless, there will be occasions when “stacking” zones on the same midi channel might come in handy. Suppose you want a physical controller on the k2661 to send data for two different numbered midi controllers on the same ch...
Page 128
7-8 setup mode and the setup editor the channel/program (ch/prog) page midi program (midiprog) midi program defines which program number is transmitted out the midi out port on the current zone’s midi channel. When you change the value of the localprg parameter, the value of midiprog automatically c...
Page 129
Setup mode and the setup editor the channel/program (ch/prog) page 7-9 destination this parameter determines whether the currently selected zone transmits only to the k2661 (local), gets sent only via midi (midi), controls both the k2661 and connected midi instruments (local+midi), or is disabled (o...
Page 130
7-10 setup mode and the setup editor the key/velocity (key/vel) page zone arpeggiation (zonearpeg) zone arpeggiation determines whether the arpeggiator will affect notes played in the current zone. The arpeggiator affects only those zones that have this parameter set to a value of on. For any given ...
Page 131
Setup mode and the setup editor the key/velocity (key/vel) page 7-11 keyboard, but being silent in the range between the two limits. This lets you create a layer with a “hole” in the middle, which you can then fill with a different sound on another zone. Note that using the setrng soft button won’t ...
Page 132
7-12 setup mode and the setup editor the key/velocity (key/vel) page velocity scale (velscale) this lets you amplify or diminish velocity response. Normal response is 100%. Higher values make the keyboard more sensitive (you don’t need to play as hard to get higher midi velocities) while lower value...
Page 133
Setup mode and the setup editor the key/velocity (key/vel) page 7-13 velocity offset. Note that velocity offset is the only parameter changed in this example; the other parameters are set to their defaults (scale = 100%, curve = linear, min = 1, max = 127). Offset and scale work together. If scaling...
Page 134
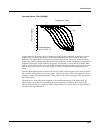
7-14 setup mode and the setup editor the key/velocity (key/vel) page velocity curve (velcurve) velcurve lets you taper the velocity response. The default setting is linear, which means that the output velocity changes directly proportionally to the played velocity. Expand produces a curve that is le...
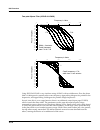
Page 135
Setup mode and the setup editor the key/velocity (key/vel) page 7-15 the next five velocity curves are reverse linear (revrslin), reverse expand (revrsexp), reverse compress (revrscmp), reverse crossfade (revrsxfd), and reverse bump (revrsbmp). These taper velocity in reverse of the five curves we j...
Page 136
7-16 setup mode and the setup editor the key/velocity (key/vel) page low velocity (lovel), highvelocity (hivel) lovel and hivel set the minimum and maximum velocity limits that the current zone transmits. A keystroke in the current zone whose velocity — after it has been scaled and offset — is below...
Page 137
entryvolume:none...
Page 139: Controllers
Setup mode and the setup editor controllers 7-19 aux bend 1up and aux bend 1 down like bend range, aux bend 1 defines the range for pitch bend messages, but does so for those physical controllers assigned to midi 21. There are two parameters related to auxbend 1: an upward value (aux bend 1 up) and ...
Page 140
7-20 setup mode and the setup editor controllers to get an idea of the expressive capabilities of setup mode, explore the factory setups that come with the k2661. The k2661’s physical controllers include the following: • the eight sliders (a, b, c, d, e, f, g, h) in the assignable controllers sectio...
Page 141
Setup mode and the setup editor controllers 7-21 switch controllers after you’ve selected which zone and which physical controller to work with, use the destination parameter to choose what this controller will do. Some of the controllers have default settings that are preprogrammed in all of the fa...
Page 142
7-22 setup mode and the setup editor controllers 10 pan midi pan–programs which use the panner algorithm will respond to real-time pan adjustments; all other programs will respond on the next note start 11 express midi expression–an attenuator for fading in and out. It scales between minimum (0) and...
Page 143
Setup mode and the setup editor continuous controller parameters 7-23 continuous controller parameters the continuous (physical) controllers are those that have a range of values: the two wheels, the ribbon, eight sliders, two continuous control pedals, and mono pressure (aftertouch). As the 65 port...
Page 144
7-24 setup mode and the setup editor continuous controller parameters table on page 7-20 shows, all of them use the same parameters. Each parameter’s function is described below. Destination (dest) use this parameter to select a destination from the midi control source list (see page 7-21). Scale af...
Page 145: The Slider and Slid/2 Pages
Setup mode and the setup editor the slider and slid/2 pages 7-25 to get an idea of how these curves affect controller response, refer to the velocity curve charts, which begin on page 7-12. Entry (ent) and exit values entry value allows you to specify an initial value for a controller in a setup tha...
Page 147: The Ribbon Page
Setup mode and the setup editor the continuous control pedal (cpedal) page 7-27 the continuous control pedal (cpedal) page if you look at the back of the instrument, you will see that there are jacks for plugging in two cc (continuous control) pedals. There is also a jack labeled breath controller. ...
Page 150: Switch Controller Parameters
7-30 setup mode and the setup editor switch controller parameters switch controller parameters switch (physical) controllers have only two states: on and off. The k2661 switch controllers are: • panel switches 1 and 2 (psw1 and psw2) • footswitch pedals 1, 2, 3, and 4 (ftsw1, ftsw2, ftsw3, and ftsw4...
Page 151: The Footswitch (Footsw) Page
Setup mode and the setup editor the footswitch (footsw) page 7-31 on value on value sets the value of the controller when the switch is on. In the case of conventionally- switched functions, such as sustain, the on value will be 127. (for example, the default for switch pedal 1 (ftsw1) iscontroller ...
Page 152: The Switch Page
...
Page 153: The Kdfx and Fxmod Pages
Setup mode and the setup editor the kdfx and fxmod pages 7-33 the kdfx and fxmod pages these are the same seven effects-control pages that we discussed in chapter 6 (beginning on page 6-44). They enable you to define the studio and fxmods for all zones in the setup. As long as the fx mode parameter ...
Page 154
7-34 setup mode and the setup editor the common page press edit while the song parameter is highlighted to use the song editor. See chapter 12 for more information on the song editor’s functions. When the current setup has a song linked to it, the stop, play/pause, or record buttons enable you to st...
Page 155: The Arpeggiator (Arpeg) Page
Setup mode and the setup editor the arpeggiator (arpeg) page 7-35 the arpeggiator (arpeg) page the arpeggiator takes input from the k2661 keyboard (or via midi) and turns it into a constant rhythmic pattern. You can control the speed and nature of the pattern in real time. The arpeggiator resembles ...
Page 157
Setup mode and the setup editor the arpeggiator (arpeg) page 7-37 latch latch determines how the arpeggiator responds to notes when they are triggered. Keys means that the arpeggiator plays only while you are holding one or more keys down (or note triggers on). As you play different notes, they get ...
Page 158
7-38 setup mode and the setup editor the arpeggiator (arpeg) page order this parameter determines the order in which the k2661 plays arpeggiated notes. Played causes them to play back in the chronological order in which you played and latched them. Up means that notes play in ascending pitch order, ...
Page 159
Setup mode and the setup editor the arpeggiator (arpeg) page 7-39 limit option this parameter determines what the arpeggiator does when it has shifted the currently latched notes up (or down) to the shift limit. Stop causes the arpeggiator to stop when it reaches the shift limit. Reset causes the ar...
Page 160
7-40 setup mode and the setup editor the arpeggiator (arpeg) page difference to the original starting note (c4) and plays that note next—c # 4. The next note (f4) is within the shift limit, but the next note (a4) isn’t, so it gets translated into d4—and so on. Flt uni uses the same concept and appli...
Page 161
Setup mode and the setup editor the arpeggiator (arpeg) page 7-41 real-time control of arpeggiator parameters you can have real-time control over several arpeggiator parameters, by assigning physical controllers to special arpeggiator controller destinations. Any input (or entry value) from a physic...
Page 163: The Utility Soft Buttons
Setup mode and the setup editor the utility soft buttons 7-43 parameter to put the zero point elsewhere. In absolute mode, just touching the ribbon affects the sound (unless you touch it at exactly the zero point). Every movement you make along the ribbon sends control values based on how far you ar...
Page 164
7-44 setup mode and the setup editor the utility soft buttons as with programs, setups can be saved to and deleted from ram only. The names of all setups in ram have an asterisk (*) next to them. If you try delete a setup from rom, the k2661 will ignore the delete command, and the setup will remain ...
Page 165
Setup mode and the setup editor editing hints and suggestions 7-45 the table below shows where you can paste copied parameters. Note that the first seven paste buffers each store an entire page, while the last two each store only one line of parameters. Clear pressing clear resets the selected page ...
Page 166
7-46 setup mode and the setup editor editing hints and suggestions equal to 64, and means less than 64. >0 means you can use any value that’s greater than zero. X means you can use any value. Do i need all those pedals? It’s important to realize that you don’t have to have an actual pedal plugged in...
Page 167: Chapter 8
Quick access mode and the quick access editor 8-1 chapter 8 quick access mode and the quick access editor in quick access mode, you can select programs or setups with a single press of an alphanumeric button (or with the other data entry methods). For example, in the illustration below, you would si...
Page 168
8-2 quick access mode and the quick access editor the first step in editing quick access banks is to select quick access mode. Then use the chan/ bank buttons to select the bank you wish to edit. The currently selected bank is shown in the top line of the quick access-mode page. Press the edit butto...
Page 169: Chapter 9
Basic effects mode introduction 9-1 chapter 9 basic effects mode introduction effects mode puts the power of an entire studio—equalizers, signal processors, and mixers— inside your k2661. It allows you to define processing functions, signal paths, and balances, on sounds created by the k2661 and, in...
Page 170: Terminology
9-2 basic effects mode terminology figure 9-1 a typical kdfx studio alternatively, in a live performance setting, you can use the kdfx in setup mode as an entire orchestra, with different instruments layered on top of each other and mapped to different parts of the keyboard, all with their own signa...
Page 171
Basic effects mode terminology 9-3 fxbus (also called insert fxbus) a signal path with some kind of processing —a delay, reverb, flanger, etc.—on it. It has stereo inputs and outputs, and contains an fx preset that determines the kind of processing to be applied. A studio has four insert fxbuses, ea...
Page 172
9-4 basic effects mode terminology fxmods fxmods give you real-time control over many of the parameters within a studio. Parameters on any of the pages of the studio editor can be controlled by midi commands—such as physical controller input or sequencer data—or by internal k2661 functions like lfos...
Page 173: Main Page
Basic effects mode main page 9-5 the fx preset editor, which is nested within the studio editor, and which contains three pages. The fx preset editor is where you select algorithms and set parameters for the fx presets, as well as doing administrative things like naming and saving. You can get to th...
Page 174: Soft Buttons In Effects Mode
9-6 basic effects mode main page the next five lines show the ids and names of the fx presets assigned to the five effects buses (insert fxbuses 1–4 and the auxfx bus). You can’t change these assignments on the kdfxmode:main page; to do that you would highlight the studio name (line two of this page...
Page 178
9-10 basic effects mode the ctrl page effects channel (fx chan) this parameter is closely linked to the fxctrl parameter—the values available for fx chan depend on the setting for fxctrl. Fx chan affects both studio selection and real-time control of kdfx—again, depending on the value of fxctrl. Whe...
Page 179
Basic effects mode the ctrl page 9-11 studio when fxctrl is master, the studio parameter selects the studio for the entire k2661. When fxctrl is program or setup, this parameter is unavailable, since setup selection and fxmods are determined by program or setup selection. When fxctrl is auto, setup ...
Page 180: Bypass and Mute Pages
9-12 basic effects mode bypass and mute pages bypass and mute pages you can bypass effects buses, inside or outside of an editor, by pressing the effects button followed by either the bypall soft button or one of the chan/bank buttons. Although similar, the two methods are slightly different: • the ...
Page 181
...
Page 184
9-16 basic effects mode the structure of kurzweil digital effects (kdfx) use the left and right cursor buttons to select each block. When a block is selected, move the alpha wheel or press the + or - buttons to select a different fx preset (you can also change the preset by cursoring to the full nam...
Page 185
Basic effects mode the structure of kurzweil digital effects (kdfx) 9-17 each of the fxbuses contains its own signal-processing program, called an fx preset. Each fx preset has a set of parameters: for example the rt 60 value on a reverb, or the feedback level on a delay line. These parameters can b...
Page 186
9-18 basic effects mode the structure of kurzweil digital effects (kdfx) figure 9-2 kdfx structure output a output b output c output d eqs fx presets program outputs physical outputs output a output b output c output d aux effect mixer pre fxbus1 fxbus1 pre fxbus2 fxbus2 pre fxbus3 fxbus3 pre fxbus4...
Page 187: Software Organization
Basic effects mode software organization 9-19 normal studio structure many of the studios provided in rom follow an overall organizational plan, which uses effects mode’s resources efficiently and clearly. While you’re by no means required to follow this structure when creating your own studios, it’...
Page 188
9-20 basic effects mode controlling effects figure 9-3 kdfx software organization controlling effects with a sequencer a useful technique for sequencer users is to set up the program controlling the studio parameters to be a dummy program with no keymaps but with all of the fx mods you need in place...
Page 189: A Tour of Effects Mode
Basic effects mode a tour of effects mode 9-21 a tour of effects mode let’s take a tour through several studios. After you do this, you should have a pretty good idea of what it’s like to work with effects mode. Load the tutorial files from the cd-rom or smartmedia card that came with your k2661, lo...
Page 190
...
Page 191
Basic effects mode a simple studio 9-23 you shall see. The aux bus has its own set of 3 paus, which are completely independent and are not shared with the insert fxbus paus. You can preassign a pau value to an fxbus, in which case any fx presets that require more paus than you have given the bus can...
Page 192
9-24 basic effects mode a simple studio frequency. In the input section for this example, the high frequencies are boosted 6.0 db above 1568 hz. Sends the third and fourth blocks determine the destinations of the input a signal: each block can be set to route the signal to any of the four insert fxb...
Page 193
Basic effects mode a simple studio 9-25 the auxfx page press the auxfx soft button. This page appears: this is the global auxfx page, and shows us what is happening on the auxiliary effects bus. The aux bus is a second processor, which follows the four insert fxbuses. It has its own fx preset, with ...
Page 194: A More Complex Studio
9-26 basic effects mode a more complex studio here’s a diagram of what this studio looks like: figure 9-4 structure of studio 200* a more complex studio press exit as many times as necessary to get to program mode. Call up program 200 elecpno/ flute. This is a split keyboard program: on layer 1, whi...
Page 195
Basic effects mode a more complex studio 9-27 these overrides (that is, which parameters are available, and their values) are stored as part of the studio, not as part of the fx preset, and therefore you don’t have to create new fx presets just because you want to change a couple of parameters. Ther...
Page 196
9-28 basic effects mode a more complex studio this input is configured to be stereo. It has a large bass boost: 12.0 db of everything at 370 hz and below, which adds a strong low-frequency emphasis to the signal being ring-modulated. Its signal is being sent only to the first fxbus. The stereo separ...
Page 197
Basic effects mode a more complex studio 9-29 outputs finally, press the output soft button to get to the output page. Here we see that the four physical output pairs are each passing different parts of the studio. If the outputs are connected to an external mixer, you can treat each of them separat...
Page 198: Chaining Effects
9-30 basic effects mode chaining effects chaining effects now we’ll see how you can employ multiple effects on a single bus using the chaining feature. Start in program mode by highlighting program 199 default program, then pressing the effects button. From the kdfxmode:main page, select studio 199 ...
Page 199
!!!!!!!!!!!!!!!!!!@
Page 200
9-32 basic effects mode chaining effects chain, since you have now maximized your pau usage. If you’d like to have four effects on the chain, you’ll have to select only effects that use a single pau. (you’ll also have to remove the empty effects block from fxbus 3 so that it will be available for fx...
Page 201
!!!!!!!!!!!!!!!!!!@
Page 202
9-34 basic effects mode a complex studio with real-time control looking at the studio starting from setupmode, press edit, then more> three times. Now press the kdfx soft button to view the studio. The name of the studio associated with this setup, 202*complex, appears. Highlight the studio’s name a...
Page 203
Basic effects mode a complex studio with real-time control 9-35 setting up fxmods how do you set up fxmods? That’s back on the kdfx page in the setup editor. Exit the studio editor (if you have made any changes, don’t save them—that will only confuse things!), then press the kdfx soft button. Listed...
Page 204
9-36 basic effects mode a complex studio with real-time control if you now go inside the fx preset (by pressing edit), you’ll see that the left and right feedback levels (“fdbk lvl”) are under fxmod control: press param2, you’ll see that the left and right lfo rates are also under fxmod control. Go ...
Page 206
9-38 basic effects mode a complex studio with real-time control and in conclusion... Here’s a summary of the fxmods in our complex studio with real-time control: • soft pedal puts compression on the bass and drums. • slider f controls the feedback on the chorus on the piano/string pad. Slider e cont...
Page 207: Building Your Own
Basic effects mode building your own 9-39 building your own now that we’ve walked you through a complex studio, here are some hints on how to go about building your own. First, you want to decide whether you want the studio to be static, or to be dynamic under fxmod control from the k2661 keyboard a...
Page 208
9-40 basic effects mode building your own.
Page 209: Chapter 10
Midi mode the transmit page 10-1 chapter 10 midi mode press the midi-mode button to enter midi mode. There are three pages in midi mode: • transmit (xmit soft button) • receive (recv soft button) • channels (chanls soft button) you’ll use these pages to determine what midi messages the k2661 transmi...
Page 210
10-2 midi mode the transmit page control setup this is where you select the current control setup, zone 1 of which sets the physical controller assignments for all programs while you’re in program mode. Refer to chapters 6 and 7 for more information on the control setup. Note: the control setup is r...
Page 211
Midi mode the transmit page 10-3 overload. You won’t have problems, however, as long as the channels transmitted by the k2661 are all different from the incoming midi channel. A value of local disables the midi out port. Use this setting when you want to play the k2661, but not to send any midi info...
Page 212
10-4 midi mode the transmit page buttons (bttns) if you set the value of the buttons parameter to on, the system exclusive (sysex) messages generated by your button presses are sent to the midi out port. This enables you to do two things: control a remote k2661 (or earlier model), and record sequenc...
Page 214
10-6 midi mode the receive page all notes off if this parameter’s value is set to normal, the k2661 responds to all notes off messages received over midi. Ignore causes these messages to be ignored. If you’re using a roland product as a midi controller for your k2661, you’ll want to set the value of...
Page 215
Midi mode the receive page 10-7 bend smooth this parameter can improve your k2661’s performance when you’re driving it from a midi guitar controller. Its default value is on. You may find that pitch bending seems to carry over from the previous note to the next note, causing it to start on the wrong...
Page 216
10-8 midi mode the receive page when the large ribbon is configured in one section, you cannot remap incoming midi controller messages through it. Here’s a more specific example. Suppose your midi controller transmits on midi channel 1, and you’ve set the localkbdch parameter to a value of 1. You’ve...
Page 217: The Channels Page
Midi mode the channels page 10-9 ctl 0 responds to 0 or 32. Ctl 32 responds to 0 or 32. Power mode power mode has two possible values: user and demo. When set to user, the user’s parameter settings are retained. When set to demo several parameters are returned to default values when the unit is powe...
Page 218
10-10 midi mode the channels page enable use this parameter to turn the currently selected channel on or off. When on, the channel will receive midi information, and the settings of the parameters on the midi channels page will be in effect. When off, the channel will ignore all midi information. Pr...
Page 219: Program Change Formats
Midi mode program change formats 10-11 program lock, pan lock, volume lock when the parameter locks are set to on, the three parameters they control do not respond to their respective midi controller messages. In that case, you could change the program, pan, and volume settings from the front panel,...
Page 220
10-12 midi mode program change formats to call up the program within the bank (as described below). The k2661 can respond to either the bank change controller or the double-program-change method. In a nutshell, the difference between the extended setting and the kurzweil setting is this: in extended...
Page 221
Midi mode program change formats 10-13 bank, as the following examples demonstrate. You’ll want to use this format if you’re controlling your k2661 from a kurzweil 1000- or 1200-series instrument. 0-127 program change type you may be controlling your k2661 from an “old” midi device—one that was buil...
Page 222
!!!!!!!!!!!!!!!!!!@
Page 223
Midi mode program change formats 10-15 if the zeros memory bank is currently selected remember that in the zeros memory bank, the quick access bank ids go through 75. So if the zeros memory bank is the current memory bank, you can send mc 0 or 32 values as high as 7 for the bank range command. And y...
Page 224
10-16 midi mode program change formats qa formats and midi transmission if you’re in quick access mode and you’re using one of the qa formats for the program change type, selecting qa banks or bank entries from the k2661 (with the alphanumeric buttonpad, the cursor buttons, the alpha wheel, the plus...
Page 225
Midi mode the soft buttons in midi mode 10-17 the soft buttons in midi mode the first three soft buttons select the three midi-mode pages. The prgchg soft button lets you send a program change command on any midi channel. The rsetch soft button lets you return all channel parameters to their default...
Page 226
10-18 midi mode the soft buttons in midi mode reset channels (rsetch) when you press this soft button, the k2661 will ask you if you want to reset all channels, and a pair of yes/no soft buttons will appear. If you press the yes soft button, all settings on the channels page will return to their def...
Page 227: Chapter 11
Master mode the master mode page 11-1 chapter 11 master mode press the master mode button to enter master mode, which contains parameters affecting the k2661’s overall performance. The master mode page on the master-mode page you’ll find parameters for setting the overall tuning and transposition of...
Page 228
11-2 master mode the master mode page transpose like the tune parameter above, transpose affects every k2661 program, but not those notes sent to the midi out port. You can adjust the midi transposition on the transmit page in midi mode. Kb3 channel the architecture of kb3 programs is completely dif...
Page 229
Master mode the master mode page 11-3 determining the version number of your rom objects (intonation tables 18–22) as you’re scrolling through the list of intonation tables, you may notice a listing for an eighteenth intonation table with a name such as 18 obj vn.Nn. This isn’t really another intona...
Page 230: The Mast2 Page
11-4 master mode the mast2 page confirm confirmations are special displays that the k2661 shows you when you are about to alter memory permanently. The confirmations ask if you really want to do what you’re about to do, and give you another chance to cancel the operation you’re about to execute. Wit...
Page 231
Master mode the mast2 page 11-5 the vocoder vocoding is a special feature that allows you to use an input signal to control another audio (slave) signal. Typically you would use a synthesizer for the input signal, although in fact you can use any sound source. You must have the sampling option to be...
Page 232
11-6 master mode the mast2 page 2. Set the input parameter to a value of analog. 3. Set the value of the source (src) parameter to external (ext). 4. Set the value of the mode parameter to livein. 5. Verify that mic signal is on the left side only. Adjust the gain parameter as needed, to get a good ...
Page 233
Master mode the mast2 page 11-7 editor, output b is set to fxbus2, thereby sending the signal from the slave program to the b outputs and from b right into the right side of the sample input. The slave program has its output panned hard right within the program, so if you decide to try using a diffe...
Page 234
11-8 master mode the mast2 page layers are grouped in pairs, with the master signal going to the first layer, and the slave to the second. All odd numbered layers are master and all even numbered layers are slave. If you look at the algorithms in the vocoding programs, you will see that the first tw...
Page 235
Master mode the mast2 page 11-9 just as a timbral control can be just as interesting. You can get very expressive results by using your voice to control a lead line, doing the articulation and filter control by talking, singing, or just making various vocal sounds. You can get some of the same types...
Page 236
11-10 master mode the mast2 page • if you are using the k2661 for the slave signal and need more polyphony, you can delete some of the layers in the vocoding programs. Make sure to delete matching sets of master and slave layers. You will probably want to readjust the frequencies and widths of the r...
Page 237
Master mode the soft buttons in master mode 11-11 digital output format change this parameter to set the k2661's digital output stream to your preferred format. The default is adat 8-channel digital. Other values are aes pro, also known as aes/ebu, and aes cons, also known as s/pdif. This global par...
Page 238
11-12 master mode the soft buttons in master mode util with this button you call up the utility page, which gives you access to four analytic and diagnostic tools. Double pressing the two center soft buttons from any editor is another way to get to the utility page. The utility page looks like this:...
Page 239
...
Page 240: Guitar/wind Controller Mode
11-14 master mode guitar/wind controller mode • program changes sent to the k2661 when it is in gm mode will only select programs from the gm program set. Setups, songs, and qa banks created outside of gm mode will not point to the correct programs within gm mode (although you may find the results “...
Page 241: Object Utilities
Master mode object utilities 11-15 object utilities object utility functions are useful for moving or copying objects into various banks, naming or renaming objects, deleting objects, and dumping objects over midi. To access these functions, press the object soft button while in master mode. You wil...
Page 242
11-16 master mode object utilities all of the features of the save object dialog are accessible here: you can use the multiple object selector (described on page 13-35) to select ranges of objects according to object types, ids, strings in the object names, or dependent relationships. You can quickl...
Page 244
11-18 master mode object utilities programs, programs 200, 210, and 303. If you copy all of these objects at once into the 700s bank, using fillmode, you will see the copies at song 700 and at programs 700, 701, and 702. Song 700 will reference the copies of the programs (at 700, 701, and 702). In c...
Page 246
11-20 master mode object utilities using the object utilities from the editor you can get to the object utilities while editing any object. This is provided as a convenience, for example to be able to do certain housekeeping work such as deleting samples to free up room in your sample ram, or making...
Page 247: Chapter 12
Song mode and the song editor getting started with the sequencer 12-1 chapter 12 song mode and the song editor getting started with the sequencer the k2661’s sequencer is a powerful and versatile tool for songwriters, composers, and anyone else who wants to record and play back songs. As with any to...
Page 248
12-2 song mode and the song editor getting started with the sequencer patch through there’s one more use for local keyboard channel. With any model of the k2661, the local keyboard channel parameter lets you patch through (also known as soft through) to external sound modules. When local keyboard ch...
Page 249
Song mode and the song editor getting started with the sequencer 12-3 follow these steps to assign the programs to separate channels: 1. Press the song mode button to enter song mode. The display will look something like this: notice that the sequencer is ready for you to record a new song, and the ...
Page 251
Song mode and the song editor getting started with the sequencer 12-5 you can change the length of the countoff by changing the value of the countoff parameter on the misc page. Since we are recording four measures of silence, press the stop soft button as soon as locat reads 5:1. Note: the sequence...
Page 252
12-6 song mode and the song editor getting started with the sequencer the last event listed is the endpoint, which should correspond to the first beat of the bar following the last bar in the song. For our four measures of silence, then, the endpoint should be 5:1. The display below, however, shows ...
Page 253
Song mode and the song editor getting started with the sequencer 12-7 while you’re on the misc page, take a look at the quantize parameters (quant, grid, and swing) in the middle column of the page. Quantization is a very useful feature, especially if you’re having a bad rhythm day. When you quantiz...
Page 254
12-8 song mode and the song editor getting started with the sequencer record a bass line when you are satisfied with your drum loop, you can begin using it as the foundation for a song. What we’ll do here is set recmode to unloop while leaving playmode set to loop. This means that the drum loop will...
Page 255
Song mode and the song editor getting started with the sequencer 12-9 remember that by default there is a four-beat count off, during which time the locat value is preceded by a minus sign (-). No material is recorded during the count off, though anything you play during the countoff gets quantized ...
Page 256
12-10 song mode and the song editor getting started with the sequencer mix your song the mix page lets you change the panning and volume levels for the tracks in your song. Needless to say, this is one of the most important steps in the completion of your song production, and potentially one of the ...
Page 257
Song mode and the song editor getting started with the sequencer 12-11 (program, setup, etc.) double as track-mute buttons while you’re on the mix page; press one or more of them and the corresponding tracks are muted press them again to bring the track back into the mix. Use the tr 1-8 / tr 9-16 so...
Page 258: Tutorial: Arrangements
12-12 song mode and the song editor tutorial: arrangements tutorial: arrangements the arrangement editor gives you a variety of ways to record and play songs. The following tutorial is designed to walk you through the steps of creating songs using the arrangement editor. Here are some typical tasks:...
Page 259
Song mode and the song editor tutorial: arrangements 12-13 5. Press add to add another step to the arrangement. Select the song you want for the second step. Continue adding steps and selecting songs as needed. If you need to get rid of a step, select the step and press the delete soft button. If yo...
Page 260
12-14 song mode and the song editor tutorial: arrangements arrangement parameters: the common page start step this determines the step number where the song will start. Normally this is 1, but it can be any step in the arrangement. Tempo control you can choose whether the tempo is controlled by the ...
Page 261
Song mode and the song editor tutorial: arrangements 12-15 timing problems can also occur between steps due to improperly-located endpoints. If you have a timing problem, you should check in the event editor to make sure the end point of each step falls on the first beat of the bar after the last ba...
Page 262
12-16 song mode and the song editor tutorial: arrangements other characters—above the numbers represent the tracks. The dashes and characters are the values for the track parameter.) you can assign any track to any midi channel. The second way you can use more than 16 tracks is if you have an extern...
Page 263: Ram Tracks
Song mode and the song editor ram tracks 12-17 triggerctl: this determine if the keys will trigger the steps. Set this parameter to on, so when you hit the appropriate note on the trigger channel, the step will start playing. If you set it to a midi controller number that has a physical controller a...
Page 264
12-18 song mode and the song editor ram tracks a matter of timing the song must already be playing when you start sampling. There are several ways you can do this: • start the song, then at the appropriate location in the song, press record on the samplemode page, and start the sample input. • set t...
Page 265: Using Song Mode
Song mode and the song editor using song mode 12-19 k2661 will eventually create a new program for the sample, and that program must be on its own midi channel. Press ok when you’ve selected a track. 9. The k2661 creates a program, and shows you the new program’s id. It then prompts you to strike a ...
Page 266
12-20 song mode and the song editor using song mode k2661 sends program changes, on all relevant channels, to its sound engine and to the midi out port if the pchng parameter on the midi-mode transmit page is turned on. If you want to use a different program for playback than the one originally reco...
Page 267
Song mode and the song editor using song mode 12-21 if you set the clock parameter to external (ext), the k2661 expects to receive midi clock at its midi in port. Make sure that the sync parameter on the misc page in song mode is set to recv or both, to enable the k2661 to receive sync messages as w...
Page 268
12-22 song mode and the song editor using song mode 10. Save the program (we recommend renaming it as well), then press exit to return to the main page in song mode. So far, so good. Your song uses channel 15 for effects control, and the effects for the song are determined by the studio used in the ...
Page 269
Song mode and the song editor recording multi-timbral sequences via midi 12-23 memory limits while there’s no actual time limit to the length of the songs you record, their size is limited to 64k (or to the maximum amount of available free ram space you have, if it’s less than 64k). However, you can...
Page 270: Song Mode: The Main Page
12-24 song mode and the song editor song mode: the main page song mode: the main page the song-mode main page allows real time recording and playback, song and track selection. From this page you can view and edit the tracks’ channel, program, volume and pan settings, as well as other useful items. ...
Page 271
Song mode and the song editor song mode: the main page 12-25 song status,also on the top line of the display, is always one of the following: stopped the default sequencer status; also appears when you press the stop or pause button. Playing appears when the play button is pressed, but only if the f...
Page 272
12-26 song mode and the song editor song mode: the main page fractional tempos you can use fractional tempos (120.5, etc.) in your sequence. However, the initial tempo can not be fractional, and you cannot enter a fractional number in the tempo parameter on the main or common pages. You must first r...
Page 273
Song mode and the song editor song mode: the main page 12-27 to change a track’s program quickly, press record, select the program, then press stop. Or you could press mixer to go to the mix page, change the program as desired, then press keep. This preserves all changes you have made to any other t...
Page 274
12-28 song mode and the song editor song mode: the main page volume (vol) you can set an initial volume level for the playback and recording of each track as a value between 0 and 127. If the channel of the rectrk (or the control channel, if rectrk is set to multi or none) contains any recorded volu...
Page 275
Song mode and the song editor song mode: the main page 12-29 activity indicators ( [ ) a small square ([) above the track status indicator of a track set to play (p) or mute (m) means the track contains data. During playback and recording, the indicators above tracks containing any midi data will fl...
Page 276
12-30 song mode and the song editor song mode: the main page when the song status is rec ready, pressing the play soft button will begin recording. Pause and play share the same soft button. Pause appears only when the song status is playing or recording. Pressing pause while the song is playing wil...
Page 277
...
Page 278: Song Mode: The Misc Page
12-32 song mode and the song editor song mode: the misc page there are only 20 ids available for song objects per bank in banks 100 - 900. In the zeros bank, there are 75, ids 1–75. In the 200s bank there are ids 200–219, in the 300s bank, ids 300–319, and so on. Object accesses some useful database...
Page 279
Song mode and the song editor song mode: the misc page 12-33 the top linedisplays the amount of free event space and the current sequencer state, which is one of the following: stopped, playing, rec ready, recording, key wait, or ext. Clock. Recmode when recording the first track of a new song, you ...
Page 280
12-34 song mode and the song editor song mode: the misc page 4. A new end point is entered on the events page. 5. Using the track-edit functions copy, insert, and delete to alter the song’s length. The end point of a song is used as a loop point in loop and unloop modes, and it defines the fixed len...
Page 281
Song mode and the song editor song mode: the misc page 12-35 memory has played through to its end point, the sequencer will stop and that song will be the new cursong. Chain: for every song, there is a parameter called chainto found on the common page that determines what other song, if any, will im...
Page 282
12-36 song mode and the song editor song mode: the misc page quantize is used to quantize your performance as you record it in. However, you may wish to record without quantization and go back and quantize at a later point. To do this, use the quantize function in the track editor, as described on p...
Page 283
Song mode and the song editor song mode: the misc page 12-37 there when you press play. The k2661 also responds to song position pointer messages received from an external source. When you have the k2661 synced to another sequencer, the song position pointer message shifts the auxiliary sequencer’s ...
Page 284
12-38 song mode and the song editor song mode: the misc page clickvel clickvel determines the attack velocity to be used by the metronome click. The first beat of each measure gets played at exactly this velocity level while the other beats scaled to about 90% of this value as a way to provide an ac...
Page 285: Song Mode: The Mix Page
Song mode and the song editor song mode: the mix page 12-39 song mode: the mix page the mix page allows you to set and keep new initial settings for all sixteen tracks’ program changes, volumes, and pan positions. You can set these three parameters for each track, then press the keep button, prompti...
Page 286
12-40 song mode and the song editor song mode: the mix page track status indicators using the up, down, left, and right cursor buttons to position the cursor onto a track status indicator, you can toggle an empty track (-) into record (r) with the alpha wheel or plus or minus buttons. Once a track c...
Page 287: The Song Editor
Song mode and the song editor the song editor 12-41 the song editor in general, you’ll get to the song-editor pages by pressing the edit button any time you’re in song mode. There’s one exception: if the program parameter is currently highlighted on the display, you’ll enter the program editor when ...
Page 288
12-42 song mode and the song editor song editor: the common page the top line of this page displays the selected track or tracks. Select the available current track for editing by using the chan/bank buttons. Press both of the chan/bank buttons together to select all tracks. Although the current tra...
Page 289
Song mode and the song editor gm 12-43 gm when you set gm on (if the k2661 is not already in gm mode), the unit will put itself into gm mode when the song starts, and get out of gm when the song stops. The gm mode setting will be saved with the song file. Gm mode can also be turned on from an extern...
Page 290
12-44 song mode and the song editor gm tempocontrol when the current song is composed of other songs entered as steps in the arrangement editor, the tempocontrol parameter determines whether the current song’s tempo setting or the arranged songs’ tempo settings will be the tempo(s) used for the play...
Page 291: Song Editor: The Event Page
Song mode and the song editor song editor: the event page 12-45 keys, and you want the sounds produced by each note number in that program to be preserved in each transposition. If in the song being used as a step in an arrangement (not the arrangement song itself), there is a (d) designating the tr...
Page 292
12-46 song mode and the song editor song editor: the event page results. For example, if you have program changes at bar 1 and bar 8, then if you jump from bar 1 to bar 9 any notes you scroll through will be played with the program change from bar 1. The channel of the selected event is displayed on...
Page 293
Song mode and the song editor song editor: the event page 12-47 table 12-2 lists the ranges of the editable event values. Soft buttons on the event page cut: removes the currently selected event from the event list and temporarily stores it in a memory buffer so that you can immediately paste it int...
Page 294
12-48 song mode and the song editor song editor: the track page the view page determines which events you see when you’re on the event page. If you set a parameter on the view page to off, you won’t see any of the corresponding events on the event page, and the events won’t be executed as they norma...
Page 295
Song mode and the song editor song editor: the track page 12-49 below is an example of the track page for the bounce function. You will notice that the page is divided into two halves, with the right half being a separate box this is called the region/criteria box. The parameters in this box are use...
Page 296
12-50 song mode and the song editor song editor: the track page region / criteria box parameters from and to from and to are available in most track edit functions to define a range of time on the selected track(s). The from value defines the first bar and beat in a range of time selected for editin...
Page 297
Song mode and the song editor song editor: the track page 12-51 when events is set to controller if your song contains any midi controller data, the ctl parameter is used to select particular controller data to be edited. Refer to the control source list in chapter 6 of the reference guide. Loval yo...
Page 298
12-52 song mode and the song editor song editor: track functions song editor: track functions erase this function erases specified events from a region of time, but it doesn’t delete the region of time. The result is like erasing a section of recording tape. If you want to completely remove a segmen...
Page 299
Song mode and the song editor song editor: track functions 12-53 mode: merge / erase the mode setting determines whether the copied events merge with, or erase existing events on the destination track from the location point to the end of the copied region. Times: 1 – 127 the value selected for the ...
Page 300
12-54 song mode and the song editor song editor: track functions insert the insert function is used to add blank time to the current song, modifying the song’s end point appropriately. The insert function will affect all tracks. This is similar to splicing a piece of blank tape to an existing segmen...
Page 301
function:qu...
Page 302
12-56 song mode and the song editor song editor: track functions reference quantize the reference quantize function is similar to the quantize function in that it aligns note events to a grid. The difference is that the grid locations are not mathematically perfect divisions of a bar. Instead, refer...
Page 303
Song mode and the song editor song editor: track functions 12-57 shift the shift function allows you to offset the existing midi events forward or backward in time any number of ticks (1/480th of a beat) up to approximately 26 beats. This function does not affect the end point. Events can not be shi...
Page 305
Song mode and the song editor song editor: track functions 12-59 thin use the thin function to reduce the number of actual controller events used for any controller type on the current track. Sometimes a controller can produce the same noticeable effect by using fewer events to describe its change, ...
Page 306
2:1 ...
Page 307: Song Editor: The Step Page
velo...
Page 308
12-62 song mode and the song editor song editor: the step page duration. For example, if you have a duration of 1/8 and a gate time of 75%, then striking a note will produce a duration of 180 (75% of 240). But if you hold the note and press step>, then the duration will be 420 (180 + 240), instead o...
Page 309
Song mode and the song editor song editor: the step page 12-63 modifier the modifier parameter allows you to change the duration value with three standard modifiers. Set to none if you do not chose to use a modifier. Use the triplet modifier for a resulting duration 2/3 of the value set in the durat...
Page 310
12-64 song mode and the song editor song editor: the arrange page song editor: the arrange page this page allows you to create a song by arranging other songs together in the order you specify. The other songs become sections (called steps) of the current song, which can be repeated, transposed, etc...
Page 311
Song mode and the song editor song editor: the arrange page 12-65 when a song containing an arrangement is selected as the cursong on the main page, three dashes (---) appear above the track parameter name to indicate that the current song has been saved with arrangement information. When an arrange...
Page 312
12-66 song mode and the song editor song editor: the arrange page the first number displayed in the step field on the top line is the current step. The second number is the total amount of steps in the arrangement. The current step in the display above, for example, is the fourth step in an arrangem...
Page 313
Song mode and the song editor song editor: the arrange page 12-67 played, or you can specify an infinite loop (inf), in which case the arrangement will play that step until stop is pressed. Mode the mode setting found in the arrangement editor determines whether an arrangement plays the next step or...
Page 314
12-68 song mode and the song editor song editor: the arrange page soft buttons on the arrange page add adds another step to the arrangement. The new step will be inserted as the step number directly after the current step. You would add a step to place a new section into a song arrangement or to def...
Page 315: Chapter 13
Disk mode 13-1 chapter 13 disk mode disk mode lets you load, save, back up, and copy files of objects between the k2661 and the outside world, through smartmedia or the k2661’s scsi port. The k2661 works with 3.3v smartmedia cards (the most common type) having a minimum size of 4 mb. Most scsi (smal...
Page 317: Scsi Termination
Disk mode scsi termination 13-3 press the disk button to enter disk mode. Make sure the current disk parameter says smedia, so you don’t accidentally format any scsi devices you might have connected! Press the soft button labeled format. The k2661 will ask you if you want to format, and a pair of ye...
Page 318: Directories
13-4 disk mode directories if you’re planning to buy an external scsi hard disk to use with your k2661, it’s a good idea to buy one with two scsi ports. Most new hard disks have two ports, and can be terminated or unterminated relatively easily. This gives you added flexibility, since you can instal...
Page 320
13-6 disk mode directories macro on indicator when (macro on) is visible, the k2661 records all file-loading operations in its macro table. See macros on page 13-41. Disk mode soft buttons here is a brief description of each of disk mode’s soft button: load load selected file(s) or object(s) from th...
Page 321: File List Dialog
...
Page 322
in the center of this line is an indicator of the number...
Page 323
Disk mode file list dialog 13-9 in addition to remembering the current directory on the most recently used disk, the k2661 also remembers the index within the file list for the current directory. For example, if you were to hit cancel on the above page, go to setup mode to check the current setup, t...
Page 324
13-10 disk mode file list dialog • left/right cursor double-press: select all files • up/down cursor double-press: clear all selections pressing either the left or right cursor individually performs a separate function for finding directories, described below. You can select multiple files only with...
Page 325: Creating Directories
Disk mode creating directories 13-11 quick scrolling to subdirectories it is sometimes difficult to locate a subdirectory entry in the file list for the current directory, if there are many files in the current directory. To make this easier, individually pressing either the left or right cursor but...
Page 326
...
Page 327
Disk mode the directory selection dialog 13-13 the directory selection dialog when making a new directory, as well as in many of the disk functions, you will be presented with the opportunity to change the current directory, or the default directory for a disk operation. A good example is the “use c...
Page 328: Disk Mode Functions
13-14 disk mode disk mode functions disk mode functions now that you are familiar with the basics of creating directories and moving around in the k2661 file system, it is time to discuss some of the features provided in the disk functions themselves. Loading files the load button instructs the k266...
Page 329
...
Page 330
13-16 disk mode disk mode functions for samples, the letter s after the root key indicates a stereo sample. Due to display space constraints, if the sample’s root key happens to be in the lowest midi octave range (that is, c -1 through b -1), it will be displayed in a truncated form. For example, if...
Page 333: Load Function Dialog
Disk mode load function dialog 13-19 there must be sufficient sample ram in the k2661 to load one second of the sound for auditioning. This amount varies according to the sample rate of the sample, but for most samples this will be less than 100k bytes. If the auditioned sample does not play, check ...
Page 334
...
Page 335
Disk mode load function dialog 13-21 for loading as “everything,” the id number for an object stored in a file is taken literally, and not rebanked (except if fill or ovfill mode is chosen, in which case the k2661 will use id numbers starting from 200). The following example shows how each different...
Page 336
13-22 disk mode load function dialog selecting multiple files to load as stated previously, you can select multiple files for loading into the k2661 from within a single directory, in one operation. This is done from the file list dialog with the select button. After you have selected one or more fi...
Page 337
Disk mode load function dialog 13-23 aborting a multiple file load is done by pressing and holding down either of the plus (+) or the minus (-) buttons that are located just below the alpha wheel. This should be done at least one- half second before you anticipate the current file to finish loading,...
Page 339
Disk mode saving files 13-25 everything files consist of the master file parameters and every other ram object. Saving an everything file will literally save everything in ram, including samples, into a single file. Soft buttons in the save selection dialog the meaning of the soft buttons in the “sa...
Page 340
13-26 disk mode saving files • up/down cursor double-press: clear all selections if you want to save most but not all of the items from a file (for example, if there are some songs in ram that you don’t want to be saved in the file), it may be fastest to first select all objects using the left/right...
Page 341
Disk mode saving files 13-27 adding files to the disk that have similar names or appended revision numbers. You can save time by not having to enter the entire filename on the k2661’s alphanumeric buttonpad. The open soft button is visible in the “choose file name” dialog only when a subdirectory is...
Page 342
13-28 disk mode saving files this can be a quick way to edit the sample without having to edit a program and a keymap. Keymaps are reproduced accurately, and are played according to the parameters in program 199 default program. This default program in rom is set up to have a 0% effects level (dry)....
Page 343
Disk mode saving files 13-29 once you have selected objects for saving (either individually as just described or by bank selection), the k2661 will determine if any of the items chosen to save have any dependent objects in ram that were not chosen. For example, if you select a program to be saved an...
Page 344
13-30 disk mode saving files 2. The dependents to be relinked must already be loaded. Otherwise they will not be found and relinked when the file containing the parent objects is loaded. This constraint on the order of file loading can be made easier to work with by using the macro file feature (des...
Page 345
Disk mode saving files 13-31 you would then return to the save object dialog and save just program 317 in a separate file in the same directory, let’s say stwave2.K26…only this time, you will be asked the “save dependent objects” question pictured above. Answer this by pressing names. After saving, ...
Page 346
13-32 disk mode saving files now that the two files stwave1.K26 and stwave2.K26 have been created using the name table, they can be reloaded and correctly relinked. The files can be loaded into any bank— they do not need to go back into the bank they were originally in—since the stwave2.K26 file wil...
Page 347
Disk mode saving files 13-33 the dependent object structure of the songs would look something like this: in this case you might want to save all of the songs in one file, and be able to automatically relink the dependent programs used by the song tracks. All of the programs are presumably already sa...
Page 348
13-34 disk mode storing objects in the memory banks if you happen to have multiple copies of the necessary programs already loaded into different banks, you can control which bank of programs will be linked to the songs by choosing a certain bank to load the song file into. The relinked programs wil...
Page 349
Disk mode the multiple object selector page 13-35 the multiple object selector page the multiple object selector gives you several ways to select multiple objects for various operations—for example, to load all setups with ids between 250 and 299, to save all programs in the 400s bank, including the...
Page 350
13-36 disk mode the multiple object selector page search string (searchstrg) restricts the selection range to objects whose names contain a string of characters that you specify (for example, all objects whose names include “clav”). The first two operating modes in the multiple object selector have ...
Page 351
Disk mode the multiple object selector page 13-37 in searchstrg mode, the k2661 selects every object whose name contains a user-defined string of characters. In this case, when you press set, the k2661 prompts you to enter a string of characters using the alphanumeric buttonpad. Enter the characters...
Page 352
13-38 disk mode the multiple object selector page example: toggle toggle is useful when you want to select all objects in the list except those that meet certain conditions. For example, you may want to free up some ram by deleting all objects that are not being used by a song that you’re working on...
Page 353
Disk mode the multiple object selector page 13-39 entering selection criteria in the multiple object selector this section describes the operation of the selection modes provided on the multiple object selector page. These are accessed by scrolling the select: parameter to different values, as pictu...
Page 354
13-40 disk mode the multiple object selector page dependents mode this mode is used to select a group of objects that are dependents of other objects. This is not available when loading objects in disk mode. Everything mode everything includes all objects in the list. You may prefer to use the all b...
Page 355: Macros
Disk mode macros 13-41 example, if you end up doing a lot of selecting of samples, or of dependents at various levels, the parameters will stay set up the way you left them as you move from function to function (for example, from copy to delete to save, etc.). “select dependents” mode is very useful...
Page 357
...
Page 358
13-44 disk mode macros macro mode and the macro table are remembered between power-cycles of the k2661 via the battery-backed memory. A macro can hold as many entries as there is space for in your k2661’s nonvolatile ram. How to make a macro file this section will take you through creating, saving, ...
Page 359
Disk mode macros 13-45 once you have pressed either macro or ok, the loading-mode buttons appear (ovfill, overwrt, merge, append, and fill). Choose a mode based on what you want to happen when you load the macro, because the mode gets saved as part of the macro table. You should do this because the ...
Page 360
13-46 disk mode macros to open three directories to select the file for loading. This gives you quick access to the file while preserving the organization of your program files. If you know that you want to save all of the entries into the macro file (as we do for this example,) just press all. The ...
Page 361
Disk mode macros 13-47 there are a couple of things to notice here. The first is a new choice in the bank list: specified. “load this macro as specified” means load all the files in the macro following the exact instructions for the bank and load mode for each file. In our example, all the files wer...
Page 362
13-48 disk mode macros macro support for multiple removable disks you can use a single macro to load files from different removable disks. 1. In disk mode, press load to begin the load dialog. You’ll see a prompt asking you to select a file to load. 2. Select the macro file to load, and press ok. Th...
Page 363
Disk mode macros 13-49 using fill mode. “obj” means that individual objects within the file are selected for loading, and only those objects will be loaded from this file. Using the bank and mode fields the bank and mode fields in a macro entry are relevant only if a macro file is loaded as specifie...
Page 364
13-50 disk mode macros viewing the object list for a macro entry if a macro entry contains an object list, it can be examined by scrolling the macro table display until the item with the obj indicator is highlighted, and then by pressing either the left or right cursor button on the front panel. You...
Page 365
Disk mode macros 13-51 ids to unspecified you won’t have to edit your macro files if you happen to change your disk’s scsi id. The modify macro page is where you can set unspecified disk ids (in disk mode, press the macro soft button, then the modify soft button). See editing macros on page 13-53 fo...
Page 366
13-52 disk mode macros the k2661 remembers the setting of the library parameter across power-cycles, via the battery backed memory. Set up the library disk once, and it stays that way until you change it. The modify macro page is where you can edit macro entries to use the library disk (in disk mode...
Page 367
...
Page 368
13-54 disk mode macros does not need to be explicitly selected with the select soft button). You can use the following double-presses to select and deselect all entries in the list: • left/right cursor double-press: select all macro entries • up/down cursor double-press: clear all selections with al...
Page 369
Disk mode macros 13-55 with the same entries still selected. Any modifications to the parameters will be visibly apparent. Selecting multiple entries for editing allows you to change those entries in a uniform way. In our example above, you could change the macro so that all the files were loaded in...
Page 370
...
Page 372
...
Page 373: Disk Utilities
Disk mode disk utilities 13-59 to add the loadmacro command to a sequence (after dumping the macro object to the sequencer), leave the macro object highlighted on the master-mode object page, then press the left or right cursor button. The k2661 will display: “send sysex load macro command?” press t...
Page 374
13-60 disk mode disk utilities if you change partitions while the free-space information is visible, the k2661 automatically calculates and displays the free-space information for the new partition. Exiting the diskutil page disables this automatic updating until the next time you use the free utili...
Page 375
Disk mode disk utilities 13-61 you can use the choose button to grab the text of a filename from the current disk, as described previously. If you press ok, the k2661 will begin to search the disk for any files or directories that contain the search string in their names. The search starts in the ro...
Page 377
Disk mode disk utilities 13-63 the next disk function you choose will display the current directory with the found file already highlighted. If a directory was found, then the first file in the directory list will be highlighted. Cancel exit to the disk-mode page. The current directory is unchanged....
Page 380: Backup and Copy Functions
13-66 disk mode backup and copy functions deleting files and directories press the delete soft button (from disk mode) to delete files and directories. The delete function supports multiple selection of files for deletion. Select one or more files and/or directories to be deleted, and press ok (or c...
Page 381
Disk mode backup and copy functions 13-67 select a directory to be backed up (see the directory selection dialog on page 13-13). Backup allows you to copy all of the files within a directory from one disk to another. All of the files within the directory that you choose (plus all of its subdirectori...
Page 383
Disk mode backup and copy functions 13-69 copy is similar to backup, with a few differences: • you can’t copy directories. • the replace or increment mode dialog does not appear. Instead, if you’re copying a file that already exists in the destination directory, the k2661 asks “replace existing file...
Page 384: Creating A Startup File
13-70 disk mode creating a startup file creating a startup file you can create a macro file that will be automatically loaded when you power up your k2661. This file, called the startup file, or boot macro, can be on a smartmedia card or on a disk at any scsi id. See the section on macros for backgr...
Page 385
Disk mode ms-dos file system compatibility 13-71 create a file somewhere on (preferably) your startup disk, by saving an empty bank from the k2661. Call the file null.K26. Now, insert this file at the beginning of a boot macro you are creating: load the file, specify the bank you want to delete in t...
Page 386
13-72 disk mode importing and exporting data using standard file formats importing and exporting data using standard file formats the k2661 supports three common data interchange file formats, audio interchange file format (aiff), microsoft riff wave, and midi type 0 and type 1. The first two are us...
Page 387
Disk mode importing and exporting data using standard file formats 13-73 aiff and aiff-c files the k2661 can read 8 or 16 bit aiff files, mono or stereo. The sample rate, sustain loop, loop mode, base note, sample name, and sample detuning are supported. Aiff-c files that do not use compression can ...
Page 388
13-74 disk mode importing samples from other manufacturers importing samples from other manufacturers the k2661 will load samples from akai, roland, and ensoniq eps and eps-16 plus scsi disks (including asr-10 “ensoniq” format), using the load operation. The displays you see will vary depending on t...
Page 389
Disk mode importing samples from other manufacturers 13-75 the bank dialog will appear, enabling you to select the bank that will receive the volume. Press ok again, and you’ll be prompted to press either the progs soft button, which will load program information in addition to the samples, or the s...
Page 390: Disk Partitioning
13-76 disk mode disk partitioning disk partitioning the k2661 can address up to 8 g of hard-disk space, in 2-g partitions. This is true for any hard disk formatted with the dos-compatible fat-16 format. Hard disks larger than 8 g can be formatted to make 8 g (in four partitions) accessible to the k2...
Page 391: Doing A Hard Format
Disk mode disk partitioning 13-77 doing a hard format there are two kinds of formatting: we’ll call them normal formatting and “hard” formatting. Normal formatting is what usually happens when you format a disk. Although normal formatting makes an entire hard disk accessible for data storage, it doe...
Page 393: Partitioning Large Disks
Disk mode working with partitions 13-79 to create one or more logical drives within the extended partition (as described in step 7). The k2661 recognizes each of these logical drives as a separate partition). 7. When the extended partition is complete, you’ll see a prompt asking you to specify the s...
Page 394
13-80 disk mode working with partitions managing a scsi chain that includes a computer if you create a scsi chain that contains both a k2661 and a computer, you’ll need to use caution to prevent file corruption. We’ll explain how this risk of file corruption occurs, then describe how to avoid it. Wh...
Page 395
Disk mode working with partitions 13-81 the k2661 requires no scsi drivers for disk operations, but windows 95 and 98 require them nonetheless. You can satisfy this requirement by specifying a generic “unsupported device” windows driver for each of the k2661’s entries in the device manager. The foll...
Page 396: Other Macintosh Issues
13-82 disk mode working with partitions there’s a page on our website where you can find more information about including a k2661 and a pc in a scsi chain: http://www.Kurzweilmusicsystems.Com/html/scsi_help.Html if a partition is inaccessible on the pc you’re not likely to have problems addressing k...
Page 397: Basic Operations
Disk mode partition support in disk mode 13-83 partition support in disk mode basic operations this is how the disk mode page looks when you’re viewing a hard disk. Note the partition id (0, which indicates the first partition), which is included in the path information. The partition id for unparti...
Page 398
13-84 disk mode partition support in disk mode backups and copies you can use the backup and copy operations to copy files to different partitions on the same disk, or even to some directories within the same partition. You can always back up or copy files to a different partition, regardless of loc...
Page 399: Chapter 14
Sampling and sample editing setting up for sampling 14-1 chapter 14 sampling and sample editing setting up for sampling before you begin sampling, you’ll need to connect the proper cables from your sample source to your k2661. The cables and input jacks you use depend on the sample format you choose...
Page 400: Sampling Analog Signals
14-2 sampling and sample editing sampling analog signals from program, setup, master, or quick access mode the simplest way to get to the samplemode page is from program, setup, master, or quick access mode. Press the soft button labelled sample on any of these pages. This is a good method to use if...
Page 401
Sampling and sample editing sampling analog signals 14-3 input on the samplemode page, you’ll set the conditions for your sample recording. Depending on the input type you select, a different set of parameters will appear on this page. When you’ve selected analog input, the page appears as in the di...
Page 402
14-4 sampling and sample editing sampling analog signals another consideration in selecting sample rate is the k2661’s transposition range during sample playback. The k2661 transposes samples by changing the sample playback rate; the higher the playback rate, the higher the pitch of the sample. The ...
Page 403
Sampling and sample editing sampling analog signals 14-5 outputs). Set mode to livein to use live mode. See page 14-42 for more information about live mode. Threshold (thresh) the thresh parameter controls when the k2661 actually begins sampling incoming signals. If you set it to a value of off, sam...
Page 404
14-6 sampling and sample editing sampling analog signals seconds indicated by the time parameter. The display will indicate that recording is in process. Any other value for the thresh parameter will cause the k2661 to wait until the specified threshold is exceeded, then recording will proceed norma...
Page 405
Sampling and sample editing sampling analog signals 14-7 the incoming signal exceeds the thresh level. If thresh is set to key, sampling begins when you strike a key. The preview soft button when you’ve finished taking a sample, you can press the preview soft button to automatically create a keymap ...
Page 406: Sampling Digital Signals
14-8 sampling and sample editing sampling the k2661’s output pressing no at the “tuned keymap layout” prompt is useful for previewing large numbers of samples, or percussion samples. When you press no, you’ll see the bank dialog. Press ok, and the k2661 takes the list of sample objects you selected ...
Page 407
Sampling and sample editing sampling digital signals 14-9 format use the format parameter to tell the k2661 the format of the incoming sample. Most consumer products use spdif (sony/philips digital interface format), while most professional machines use the aes/ebu (audio engineering society/europea...
Page 408: Editing Samples
14-10 sampling and sample editing editing samples editing samples most of the functions within the sample editor follow a general pattern. There are two ways to enter the sample editor. If you start from master mode and press the sample soft button, then select a sample and press edit, you can hear ...
Page 409
Sampling and sample editing editing samples 14-11 zoom- and zoom+ these buttons are active only when you’re viewing the trim and loop pages. They increase or decrease the resolution of the waveform display, enabling you to see a larger or smaller segment of the waveform of the currently selected sam...
Page 410
14-12 sampling and sample editing editing samples join you can create sample objects that contain multiple sample roots. Many of the rom samples are like this—multiple samples stored in memory as a single sample object. Joining samples is a great way to cut down on the number of ids that you use for...
Page 411
Sampling and sample editing editing samples 14-13 least one more point. If you select the alt parameter and press the link soft button, the start and alt points will be linked. Now if you move the start point to 1.0 seconds, the alt point will automatically move to 1.5 seconds, preserving the half-s...
Page 413
Sampling and sample editing editing samples 14-15 decay rate this parameter defines how long the sample takes to decay (fade) to zero amplitude (silence). Decay rate affects each sample individually, and is in effect only when the amplitude envelope for the program (the mode parameter on the ampenv ...
Page 414
14-16 sampling and sample editing editing samples sample size and sample rate these are not editing parameters. They’re on this page to give you a convenient place to check the size in kilobytes of the current sample, and the rate at which it was sampled. The trim page the trim page lets you set the...
Page 415
Sampling and sample editing editing samples 14-17 is above its halfway point.) the alt can be set before, after, or at the same point as the start or end. If you set the alt after the end, you can extend the play of looped samples. Normally, looped samples will play through to the end, then will loo...
Page 416
14-18 sampling and sample editing editing samples loop, and end parameters are different.) to the right of the dividing bar you see the entire loop segment of the sample. In the center of the loop segment is a dotted vertical bar that represents the loop transition point—that is, the point at which ...
Page 417
Sampling and sample editing editing samples 14-19 the dsp page (ram samples only) select the dsp page with the dsp soft button. This gives you access to a long list of nonreal-time dsp functions, with which you can modify your ram samples. The first time you select a dsp function, you’ll see the nor...
Page 418
14-20 sampling and sample editing editing samples defined, press the ok soft button to return to the dsp page where you can continue your editing. Once you’ve selected a sample on the samp2 page, it remains selected until you return to the samp2 page and select another sample. You can always use the...
Page 419
Sampling and sample editing editing samples 14-21 the changes. You can audition your changes and decide whether to keep them, then press yes or no. Done press the done soft button to return to the previously selected sample-editor page when you’re finished with the dsp functions. Dsp functions once ...
Page 420
14-22 sampling and sample editing editing samples the truncate function will automatically reset the start (s) and end (e) points of the sample. This can be quicker than trimming the sample manually on the trim page. Use the start and end parameters to select a specific sample range. Set the thresh ...
Page 421
Sampling and sample editing editing samples 14-23 the result of this function is like erasing a section of recording tape. Use it to create sections of silence without changing the overall length of the sample. If you want to completely remove a segment and shorten the sample, you can do it with the...
Page 422
14-24 sampling and sample editing editing samples 6 reverse with this function you can reverse the order of the individual samples between the start and end positions you set. The xfade parameter lets you apply a crossfade to the start and end of the reversed segment. The curve parameter lets you se...
Page 423
Sampling and sample editing editing samples 14-25 8 insert zero this function will insert a period of silence of any length into the selected sample range. This function is equivalent to splicing a section of blank tape into an existing segment of recorded tape. It’s useful for creating a delay on t...
Page 424
14-26 sampling and sample editing editing samples mixing samples, step-by-step first, use the start parameter of sample 1 to set the point at which the mix will begin. Then press the samp2 soft button, and a page will appear enabling you to view and audition the list of ram samples. Select a sample ...
Page 425
Sampling and sample editing editing samples 14-27 11 volume ramp this function lets you apply a ramp to the volume of the selected sample range. The start level and end level parameters let you set the amount of cut (negative value) or boost (positive value) at the start and end points of the segmen...
Page 426
14-28 sampling and sample editing editing samples 13 resample use this function to change the sample rate of the samples in the selected segment. This is convenient for converting samples to new rates matching those of other samples to be mixed with or inserted into. It’s also useful for saving memo...
Page 427
Sampling and sample editing editing samples 14-29 function is in progress, the display will indicate the percentage of individual sample segments that have been processed. The quick parameter lets you select one of three warping routines. Use quick 0 to audition your new sample, then use quick 1 or ...
Page 428
14-30 sampling and sample editing editing samples interesting and unusual effects by mixing different types of samples, especially if you set the tempo parameter to a high value. The tempo parameter sets the interval between repetitions in beats per minute. The of parameter establishes the number of...
Page 429
Sampling and sample editing editing samples 14-31 parameter to 4, then sample 2 will play on the first, fifth, and ninth beat of your six-second sample 1 segment. The result will look something like the diagram below. If you change beat to 3, sample 2 will play on beats 3, 7, and 11. If you set beat...
Page 430
14-32 sampling and sample editing editing samples 18 mix echo this function operates much like mix beat, but instead of the beat and of parameters, you have start and # parameters. The start parameter sets the beat at which the selected sample 2 segment begins being mixed with the selected sample 1 ...
Page 431
Sampling and sample editing editing samples 14-33 20 crossfade loop (xfadeloop) the crossfade loop function lets you create smoother loops by crossfading the beginning segment of the loop with a segment of equal length at the end of the loop. These segments can be defined by the loop and end paramet...
Page 432: The Keymap Editor
14-34 sampling and sample editing the keymap editor here’s an example. Suppose you set thresh, comp, and time as shown in the preceding diagram. Beginning from the start point, when the signal first reaches the threshold, the dynamics function begins compressing the signal, attenuating every point a...
Page 433
Sampling and sample editing the keymap editor 14-35 when you trigger a note, the k2661 identifies the key range where the note on event occurred. It also checks the attack velocity value of the note. It then addresses its memory, and retrieves the sample root that’s assigned to that key range and at...
Page 434
...
Page 435
Sampling and sample editing the keymap editor 14-37 assign the assign soft button lets you select a sample, then specify the key range to which it’s assigned. This enables you to insert a new key range within the current keymap. When you press the assign soft button, a dialog appears that prompts yo...
Page 436
14-38 sampling and sample editing the keymap editor the setting for the low key cannot be higher than the setting for the high key. Similarly, the setting for the high key cannot be lower than the setting for the low key. Sample this is where you assign a sample root to the current key range. Depend...
Page 437: Building A Keymap
Sampling and sample editing building a keymap 14-39 the k2661 supports keymaps with up to eight velocity levels. You can’t add velocity levels to existing keymaps; if you want to create your own multi-velocity keymaps, select an existing multi-velocity keymap in the program editor before entering th...
Page 438
14-40 sampling and sample editing using the analog inputs to trigger samples parameter, scroll to the range you need, then highlight the coarse tune parameter. Adjust coarse tune to bring the sample to the proper pitch within that key range. Then scroll back up to the key range parameter, select the...
Page 439
Sampling and sample editing using the analog inputs to trigger samples 14-41 samples that are one key above the click key; the right channel will trigger samples that are two keys above the click key. One great use for the trigger inputs is to replace the kick and snare from a multi-track recording ...
Page 440: Live Mode
14-42 sampling and sample editing live mode live mode if you have the sampling option, you can use what we call live mode. In live mode, the k2661 takes any input signal and routes it through the vast dsp algorithms and kdfx. You can connect any audio source—synths, mics, cd players, anything—to any...
Page 441
Sampling and sample editing live mode 14-43 live mode programs live mode also includes two live mode keymaps at 197 and 198 (left and right respectively). Usage notes to use the programs, you must hold down a key (c 4, unless you’re going for a special effect) for the inputs to run through vast. An ...
Page 442
14-44 sampling and sample editing live mode the pitch, the playback lags behind, and when you return the pitch to normal, the playback snaps back to the present—which means some of your audio literally disappears into the ether. If you bend the pitch down and hold it there for a while, eventually th...
Page 443
Sampling and sample editing live mode 14-45 arpeggiator you can also do controlled pitch shifting on incoming audio using the arpeggiator. By constantly sending new note starts, it is possible to bend the pitch without losing the tempo of the incoming signal. It can work in both directions, although...
Page 444
14-46 sampling and sample editing live mode chord progressions record a few bars of block chords—all notes under c 4—into the sequencer, using a simple quarter-note or half-note pattern. What sound you use doesn’t matter. Now replace the program on the recorded track with the live mode default progr...
Page 445: Chapter 15
Advanced kdfx personalities 15-1 chapter 15 advanced kdfx this chapter describes the organization of kdfx in detail. Personalities kdfx can be said to have two distinct “personalities,” depending on the setting of the fx mode parameter on the effects-mode page. If fx mode is set to master, then all ...
Page 447
Advanced kdfx navigating kdfx 15-3 inside the studio editor, however, when you press the fxbus soft button from another page, it will take you to whichever fxbus page you were last looking at. The four fxbuses are the equivalent of four effects processors inserted into the effects loop of a mixing c...
Page 448
15-4 advanced kdfx navigating kdfx input from the fxbus page, or anywhere inside the studio editor, pressing the input soft button brings you to the input a page. The other input pages—b, c, and d—are selected by using the chan/bank up and down buttons. Depending on how the inputs are configured—ste...
Page 449
Advanced kdfx navigating kdfx 15-5 output in the studio editor, pressing the output soft button accesses the output page, where the kdfx’s “virtual” outputs are assigned to the k2661’s physical outputs. The output page can also be accessed from any of the fxbus pages by placing the cursor on the box...
Page 450
15-6 advanced kdfx exploring the studio parameters the effects/fx bypass button, when you are in the studio editor, bypasses all of the fx presets (all of the insert fx and the aux fx) in the current studio, so that you can hear the signals without processing. It does not, however, change the eqs, g...
Page 451
Advanced kdfx exploring the studio parameters 15-7 the arrow meter on an input page, whenever there is signal present on its bus, the arrow next to the letter of the bus flashes. This is a good way to check that you have set up your program output routings correctly. More on this later. Eq the input...
Page 452
15-8 advanced kdfx exploring the studio parameters stereo inputs with pan (sp) if the input is set to sp, then each fxbus send has a pan parameter and a width parameter. The width parameter determines how much separation there will be between the left and right input signals as they are sent to the ...
Page 453: Effects Buses
Advanced kdfx effects buses 15-9 effects buses the four insert effects buses (fxbuses) receive the signals from the input editor and process them. Press the fxbus soft button to go to one of the fxbus pages—the first time you do this after entering the studio editor, it will be the fxbus1 page.To go...
Page 454
15-10 advanced kdfx effects buses there is no external level control over the output of the fxbus itself—it just shows up, in pre- effect and post-effect versions, on the output page. Figure 15-4 fxbus signal routing the aux bus the auxiliary effects bus is accessed by pressing the auxfx soft button...
Page 455
Advanced kdfx effects buses 15-11 figure 15-5 aux bus outputs about fx presets fx presets are where the processing takes place in kdfx. Each of the insert fxbuses and the aux bus have their own fx preset, and they are all independent of each other. If you think of a studio as being the equivalent of...
Page 456
15-12 advanced kdfx effects buses for example, if you’ve combined several inputs into one fxbus and the signal is too hot for the fx preset, you can pad it down here. The trim is adjustable from off/-79.0 db to +24 db. Below the input gain is usually (but not always) an output gain, which sets the l...
Page 457
Advanced kdfx effects buses 15-13 pressing edit, and find those two parameters on the first parameter page (param1). You’ll see their values are the same as on the fxbus page. Figure 15-6 bus overrides in place, but not engaged press exit to go back to the fxbus page. To engage a bus override, you h...
Page 458
15-14 advanced kdfx effects buses figure 15-7 bus overrides engaged if you now change the parameter value from inside the fx preset, it breaks the bus override. By doing this, however, you have changed the fx preset, and when you leave the fx preset you will be asked if you wish to save it. If you t...
Page 459
Advanced kdfx effects buses 15-15 allocation understanding pau allocation and how it works is very important for using kdfx to its fullest potential. What’s a pau? The basic unit of signal processing in kdfx is the processing allocation unit, or pau. There are a total of 4 paus that can be split amo...
Page 460
15-16 advanced kdfx effects buses set take precedence over auto allocations. So for example, if you set the allocation of fxbus1 to 3, and set the allocation of fxbus2 to auto, the maximum number of paus available to fxbus 2 is still only 1, and if you try to load a size-2 fx preset into fxbus2, it ...
Page 461
Advanced kdfx effects buses 15-17 metering all input and fxbus pages have rudimentary signal meters (the arrows), as we’ve seen. On the input pages, the arrow next to the input letter flashes when there is signal present at the input. On the fxbus and auxfx pages, the arrow next to the fxbus number ...
Page 462: Output Section
15-18 advanced kdfx output section output section figure 15-8 fxbuses and physical outputs in the output section, the various signal paths are routed to the k2661’s physical outputs. Each of the four output pairs, a, b, c, and d, has a selector switch to determine which signal it will carry. All sig...
Page 463
Advanced kdfx output section 15-19 separate analog and digital outputs the k2661's separate analog outputs (two pairs: a and b) are wired in parallel and are "live" at all times. So are the eight digital outputs (four stereo pairs) available in adat format at the adat/aes optical jack. Also availabl...
Page 464: Real-Time Control of Kdfx
15-20 advanced kdfx saving studios and other objects saving studios and other objects saving saving a studio or an fx preset is handled the same as any other k2661 object—see saving and naming on page 5-3 if you need help with this. To save an object, from any of the editing pages within the object,...
Page 465
Advanced kdfx real-time control of kdfx 15-21 dynamically and smoothly, giving kdfx a high degree of flexibility in performance and automation. Kdfx parameters can be controlled from the following • the k2661’s sliders, wheels, ribbons, and pedals • external midi sources like another controller or a...
Page 466
15-22 advanced kdfx real-time control of kdfx the kdfx pages if you look inside any program, you will see several pages that handle the studio and kdfx control assignments. Open up a program with the edit button and press more> until you see this at the bottom of the display: a these are the fxmod s...
Page 467
Advanced kdfx real-time control of kdfx 15-23 five setups. This gives a grand total of 18 studio parameters that can be under real-time control. Don’t worry, you don’t have to use them all. Bus assignments the first column lets you choose which bus inside the studio you want this fxmod to control: i...
Page 468
15-24 advanced kdfx real-time control of kdfx value of the parameter when the studio is not under fxmod control, so don’t get confused. If you are in program mode, and this is the current program, the adjust value takes precedence over the studio’s fixed value, and it’s the adjust value that will be...
Page 469
Advanced kdfx real-time control of kdfx 15-25 tempo-based parameters there are several different ways kdfx can respond to tempo information, from the internal sequencer or an external one. These are discussed later in this chapter (see tempo-based control of kdfx on page 15-32). Depth the depth para...
Page 470
15-26 advanced kdfx real-time control of kdfx saving it, and go back to the fxmod pages of the program editor, the link automatically reestablishes itself. If you change the fx preset on an fxbus, the fxmod links to the preset on that bus may or may not break. If the preset you’re calling up uses th...
Page 471
Advanced kdfx real-time control of kdfx 15-27 importing studios from another program or setup if you have a killer studio with fxmods set up in one program (or setup) and you want to use the same studio and fxmods in a different program, you don’t have to rebuild the studio by hand: you can copy stu...
Page 472
15-28 advanced kdfx real-time control of kdfx when kdfx is under setup control, any fxmods in the programs within the setup are ignored. If you have a program that contains a studio and fxmods that you would like to use while playing a setup, import the kdfx from the program into the current setup. ...
Page 473
Advanced kdfx real-time control of kdfx 15-29 using kdfx with a sequencer if you use an external midi sequencer, you are probably thinking about how powerful it will be putting kdfx under sequencer control. Certainly being able to record, edit, and automate a studio’s parameters as part of a midi se...
Page 474
15-30 advanced kdfx real-time control of kdfx their kdfx pages. To switch from one to the other, send an appropriate program change command on channel 16 from your sequencer. Setting up static fxmods in different programs, all of which address the same studio, as we saw earlier, is a good way to mak...
Page 475
Advanced kdfx real-time control of kdfx 15-31 experimentation will help you determine how to achieve acceptable transitions between studios. Figure 15-10 effect of fx algorithm on transition between fx presets changing pau allocations there are other circumstances under which using the same algorith...
Page 476
15-32 advanced kdfx real-time control of kdfx fxbus1, even though the fx preset is only using one of the paus, then that second pau would not get reassigned to the reverb, and the reverb’s transition would be smooth. Figure 15-11 avoiding transition problems when paus get reallocated tempo-based con...
Page 477
Advanced kdfx real-time control of kdfx 15-33 expressed in beats (bts) and ranges from 1/24 (the actual time is 24 times faster than the tempo) to 32 (the time is 32 times slower than the tempo) in a sliding scale based on 24ths of a beat. So for example, if an lfo has a tempo setting of 120 bpm and...
Page 478
15-34 advanced kdfx real-time control of kdfx tap tempo a real-time tap on a footswitch or button can also be used to control the tempo of a parameter in kdfx. Like tempo, tap tempo is not kdfx-specific, but can be used throughout the k2661’s operating system, including the sequencer. Tap tempo is o...
Page 479: Using The Algorithms
Advanced kdfx using the algorithms 15-35 using the algorithms this section will discuss the processing algorithms found in kdfx: what their parameters mean, and how to use them. It is designed to be read through so that you can get a general understanding of the algorithms. You can find a more compl...
Page 480
15-36 advanced kdfx using the algorithms out gain sets the level of the signal after it passes through the fxpreset. From here the signal goes directly to the output page, if one of the outputs is set to fxbusn. The level can be further changed before it goes to the mix and/or aux buses. In/out enab...
Page 481
Advanced kdfx using the algorithms 15-37 settings the early reflections are seamless. It is adjustable from 0.00 to 2.00, with 1.00 being nominal for the given room type. Density controls how tightly the early reflections are packed in time. Low density settings group the early reflections close tog...
Page 482
15-38 advanced kdfx using the algorithms delayscale lets you change the lengths of all the taps together. Its range is 0 to 10x. Note that it is possible for kdfx to run out of delay memory with over-generous settings of delayscale or very slow tempos. If this happens, delay times will be automatica...
Page 483
Advanced kdfx using the algorithms 15-39 treb gain and bass gain control the amount of cut or boost above (treb) or below (bass) the center frequency. The range is -79 to +24 db. Midn gain sets the cut or boost for the parametric band n, with a range of -79 to +24 db. Midn freq sets the center frequ...
Page 484
15-40 advanced kdfx using the algorithms source. Feedback compression tends to be more subtle, but it does not allow instantaneous attack compression. Atk (attack) time for the compressor is adjustable from 0.0 to 228.0 ms. Rel (release) time for the compressor is adjustable from 0 to 3000 ms. Smoot...
Page 485
Advanced kdfx using the algorithms 15-41 gate time is the time that the gate will stay open when the sidechain signal reaches the threshold. Its range is 0 to 3000ms. Ducking reverses the action of the gate. Normally this if set to off, and the gate opens when the input signal rises above the thresh...
Page 486
15-42 advanced kdfx using the algorithms flanger flanging is the process of adding or subtracting a signal with a time-displaced replica of itself, which results in a series of notches in the frequency spectrum, generally referred to as a comb filter. In kdfx, the flanger is a multi-tap delay line, ...
Page 487
Advanced kdfx using the algorithms 15-43 sample. At low values, the buzz starts at high frequencies and drops slowly, while at high values the buzz starts at a lower pitch and drops rapidly. Range is 0.0 to 40.0 samples. Contour controls the overall shape of the reverb. When set to a high value, sou...
Page 488
15-44 advanced kdfx using the algorithms retrigger is the input-signal threshold at which the envelope detector resets, so that it can trigger again. This parameter is only useful when it is set below the value of trigger. Range is from -79 to 0 db. Env rate is the envelope detector decay rate. This...
Page 489
Advanced kdfx using the algorithms 15-45 cabinet hp and cabinet lp are highpass and lowpass filters to set the frequency response limits of the cabinets. Range of both filters is 16 to 25088 hz. Polydistort this is a more complex distortion algorithm that provides two, four, or six stages of distort...
Page 490
15-46 advanced kdfx using the algorithms vibrato/chorus the vibrato/chorus algorithm (and also the kb3 effects algorithm) simulates the vibrato and chorus effects on a hammond organ, and is used in conjunction with the rotary speaker. It has several unique parameters: vibchinout is an in/out switch ...
Page 491
Advanced kdfx using the algorithms 15-47 centratten (attenuation) (autopan) is the amount the signal level drops as it is panned through the center of the stereo image. For the smoothest tracking, a widely accepted subjective reference is -3db. Values above -3db will cause somewhat of a bump in leve...
Page 492
15-48 advanced kdfx using the algorithms the other four oscillators, sine2 through sine5, each have lvl and freq controls. Srs (sound retrieval system) srs, which is used under license from srs labs, inc., is a single-ended processing system that produces a fully immersive, three-dimensional sound i...
Page 493
Advanced kdfx using the algorithms 15-49 stereo analyze in this algorithm you can look at the two channels of a stereo signal, and also their inversions, sums, and differences. You can adjust their gains, and apply small delays to either or both channels. L invert and r invert invert the phase of th...
Page 494: Special Topics
15-50 advanced kdfx special topics special topics song mode we’ve referred to the special aspects of kdfx in song mode elsewhere in the manual. Here is a summary of what’s been said, along with some new information. Fx mode in song mode if fx mode on the effects-mode page is set to program, and you ...
Page 495
Advanced kdfx special topics 15-51 studios and songs in master mode when you are using kdfx in master mode, the studio does not get saved with the song, since it is not a dependent object of the song, or of anything in it. Therefore, if you want to recall a studio whenever you load in a particular s...
Page 496
15-52 advanced kdfx special topics.
Page 497: Chapter 16
Dsp functions introduction to algorithm programming 16-1 chapter 16 dsp functions this chapter explains the dsp functions that can be inserted into the algorithms in the program editor. As you configure each algorithm, the dsp functions you select determine the type of synthesis you apply to your so...
Page 498
16-2 dsp functions introduction to algorithm programming deciding which algorithm to use for a new sound is primarily a process of planning a layer’s signal path through the sound engine. The real sound manipulation is done by the dsp functions you insert into the algorithm. The algorithm simply lay...
Page 499
Dsp functions introduction to algorithm programming 16-3 has its own algorithm, as well as triple mode, which amalgamates the dsp capabilities of three layers). You can create completely new sounds just by tweaking the parameters on the control-input page for a single dsp function. When you begin ad...
Page 500
16-4 dsp functions introduction to algorithm programming key track start (kstart) this parameter appears on many control-input pages, and gives you added control over the effect of key tracking. For each note you play, it multiplies the value of the keytrk parameter by a number that varies with the ...
Page 501
Dsp functions introduction to algorithm programming 16-5 figure 16-2 unipolar keystart bipolar keystart for bipolar kstart values with positive key tracking values, the effect on key tracking depends on whether the kstart parameter is set above or below c 4. When it’s above, the effect on key tracki...
Page 502: The Dsp Functions
16-6 dsp functions the dsp functions use bipolar settings for kstart when you want to gradually increase or decrease the key tracking effect of the currently selected dsp function across the entire keyboard range. With kstart at c 4 bipolar, playing c 4 will apply the dsp function at the level you s...
Page 503
Dsp functions the dsp functions 16-7 the use of lowpass, highpass, notch, and bandpass filters is often referred to as subtractive synthesis, since the timbre of a sound is changed by removing certain partials. Allpass filters, instead of cutting or boosting the partials of a sound, change the phase...
Page 504
16-8 dsp functions the dsp functions one-pole lowpass filter (lopass) frequencies below the cutoff frequency are unaffected by this filter. At the cutoff frequency, the signal is attenuated 3 db. There’s a rolloff of 6 db per octave above the cutoff frequency—that is, the signal is attenuated 6 db w...
Page 505
Dsp functions the dsp functions 16-9 the coarse adjust parameter sets the cutoff frequency in terms of a key name. The remaining parameters (except pad) alter the cutoff frequency in increments of cents. You’ll notice that positive values for key tracking have an interesting effect on the function o...
Page 506
...
Page 507
Dsp functions the dsp functions 16-11 two-pole lowpass filter, +12 db resonance (lp2res) this is similar to lopas2; the only difference is that its resonance is fixed at +12 db. Four-pole lowpass filter with separation (4pole lopass w/ sep) -80 -70 -60 -50 -40 -30 -20 -10 0 10 20 10 100 1000 10000 1...
Page 508
16-12 dsp functions the dsp functions this combines 2pole lowpass and lopas2 in one three-stage function. The parameters on the f1 frq control-input page affect the cutoff frequencies of both filters. The parameters on the f2 res page affect the resonance of 2pole lowpass. The parameters on the f3 s...
Page 509
...
Page 510
16-14 dsp functions the dsp functions one-pole highpass filter (hipass) high-frequency partials pass through this filter unaffected. At the cutoff frequency, the signal is attenuated 3 db. There’s a roll-off of 6 db per octave below the cutoff frequency. The resonance is fixed at -3db. When the cuto...
Page 511
Dsp functions the dsp functions 16-15 two-pole highpass filter (hipas2) this is very similar to hipass. The primary difference is in the steepness of the rolloff at the cutoff frequency. Below the cutoff frequency, the rolloff is similar to that of hipass, except that there’s a one-octave shift—that...
Page 512
16-16 dsp functions the dsp functions this combines two of the 2pole hipass filters into one three-stage function. It has a rolloff of 6 db per octave below the cutoff frequency. The parameters on the f1 frq control-input page affect the cutoff frequencies of both filters. The parameters on the f2 r...
Page 513
Dsp functions the dsp functions 16-17 one-pole allpass filter (alpass) allpass filters do not affect a sound’s frequency response (the amplitude of partials at various frequencies), but change the phase of each partial depending on its proximity to the center frequency. The phase shift is -90 degree...
Page 514
16-18 dsp functions the dsp functions two-pole allpass filter (2pole allpass) using 2pole allpass is very similar to using alpass, with two differences. First, the phase shift is -180 degrees for partials at the center frequency, approaching 0 degrees for partials at low frequencies, and approaching...
Page 515
adjust:0....
Page 516
16-20 dsp functions the dsp functions the two-pole notch filter has two control-input pages, one for center frequency, one for width. Partials with frequencies above or below the notch will be unaffected. Within the notch, partials will be attenuated according to the width of the notch. The width is...
Page 517
Dsp functions the dsp functions 16-21 two-pole bandpass filter (bandpass filter) this is essentially the opposite of a notch filter; it passes all partials at the center frequency, and cut the levels of partials above or below the center frequency. The width is defined the same as for the double not...
Page 518
16-22 dsp functions the dsp functions two-pole bandpass filter, fixed width (band2) the only functional difference between band2 and bandpass filter is that the width of band2 is fixed at 2.2 octaves. This gives you a one-stage bandpass filter function. Double notch filter with separation (double no...
Page 519
Dsp functions the dsp functions 16-23 this is a three-stage function that puts two notches in the frequency response. As with notch filter and notch2, there are control-input pages for frequency and width. A third control-input page affects the separation of the notches. Setting the center frequency...
Page 520
16-24 dsp functions the dsp functions -70 -60 -50 -40 -30 -20 -10 0 10 100 1000 10000 100000 frequency in hertz amplitude in db center frequency = c 7; width = 2 octaves; separation at -2, 0, +2 octaves -2 0 +2 twin peaks separation bandpass filter: -70 -60 -50 -40 -30 -20 -10 0 10 100 1000 10000 10...
Page 521
Dsp functions the dsp functions 16-25 equalization (eq) equalization is a specialized filtering process that lets you boost or cut the amplitude of a specified range of frequencies. Parametric equalizer (parametric eq) this function has three interacting parameters, each with its own control-input p...
Page 522
16-26 dsp functions the dsp functions when you’re using the parametric eq, you might use the following sequence. Set the center frequency (press the f1 frq soft button to select its control-input page). The frequency is measured in terms of each note of the keyboard. The frequency in hertz of each n...
Page 523
k...
Page 524
keytrk:0.000...
Page 525
Dsp functions the dsp functions 16-29 0 5 10 15 10 100 1000 10000 100000 frequency in hertz amplitude in db gain = 12 db cutoff frequency from c 3 to c 9 c 3 c 9 -20 -10 0 10 20 10 100 1000 10000 100000 frequency in hertz amplitude in db cutoff frequency = c 6; gain from -18 to 18 db 18 6 -6 -18 par...
Page 526
16-30 dsp functions the dsp functions bass tone control (para bass) this is a two-stage function, with control-input pages for frequency and amplitude. These pages are the same as those for frequency and amplitude in para eq. On the frequency control-input page, you’ll set the cutoff frequency. For ...
Page 527
Dsp functions the dsp functions 16-31 treble tone control (para treble) para treble is very similar to para bass; the only difference is that the amplitude setting affects notes above the cutoff frequency. 0 2 4 6 8 10 12 14 16 10 100 1000 10000 100000 frequency in hertz amplitude in db gain = 12 db...
Page 528
16-32 dsp functions the dsp functions steep bass tone control (steep resonant bass) -4 -2 0 2 4 6 8 10 12 14 16 10 100 1000 10000 100000 frequency in hertz amplitude in db resonance = -3 db; gain = 12 db; cutoff frequency from c 2 to c 4 c 2 c 4 steep resonant bass: frequency -20 -15 -10 -5 0 5 10 1...
Page 529
Dsp functions the dsp functions 16-33 this function uses a two-pole lowpass filter to give you a sharper transition in bass response than para bass. Like para bass, there are control-input pages for cutoff frequency and amplitude, which are identical to those for para bass. There is also a control-i...
Page 530
16-34 dsp functions the dsp functions pitch / amplitude / panner pitch we used the pitch control-input page as an example to introduce the common dsp control parameters in chapter 6 (common dsp control parameters on page 6-14), so we won’t add much here. The pitch function modifies the pitch of the ...
Page 531
Dsp functions the dsp functions 16-35 panner this single-stage function converts a single wire at its input into a double wire at its output, splitting the signal between an “upper” and “lower” wire. This creates a double-output algorithm, as discussed on page 6-31. The parameters on the panner page...
Page 532
16-36 dsp functions the dsp functions upper and lower amp (amp u amp l) this two-stage function is similar to the amp function described above, but it appears in algorithms that have split the signal to two wires and has sent them through different dsp functions in the f2 and f3 blocks. This functio...
Page 534
16-38 dsp functions the dsp functions functions, they can be used to combine two-wire signals for the f4 amp block, or to enable you to apply another dsp function to the combined signals before the f4 amp block. There’s a pad parameter on the control-input pages for these functions, which attenuates...
Page 535
Dsp functions the dsp functions 16-39 since these waveform functions generate an output signal only, and don’t receive an input signal to pass along, the algorithms are arranged so you won’t inadvertently assign a series of waveforms that interfere with each other. You’ll usually find, for example, ...
Page 536
16-40 dsp functions the dsp functions sine, sawtooth (saw), square there’s only one parameter on this control-input page that may still be unfamiliar to you: fine hz. This is discussed on page 6-27. It can tune the pitch of the waveform in terms of its actual frequency in hertz, as opposed to the us...
Page 538
16-42 dsp functions the dsp functions there are three dsp functions that add waveforms to a layer’s existing sample: sine+, saw+, and noise+. The parameters on the control-input page for the sine+ function affect the pitch of the sine waveform without affecting the pitch of the existing sample. The ...
Page 539
Dsp functions the dsp functions 16-43 there’s more to the high frequency stimulator than meets the eye. It works like this: the signal is run through a high-pass filter, then through a distortion function, then through a second high- pass filter. Finally, it’s mixed with the original signal after pa...
Page 540
...
Page 541
Dsp functions the dsp functions 16-45 distortion (dist) using this function is much like overdriving an ordinary keyboard or guitar amplifier. The input signal is multiplied by the gain control (the combined values of the parameters on its control-input page labeled drv, for drive), then passes into...
Page 542
k...
Page 543
Dsp functions the dsp functions 16-47 waveforms cycling at frequencies of 2 hz. Of course, these are just a few of the countless modulations you can apply to different waveforms at different frequencies. -1 -0.8 -0.6 -0.4 -0.2 0 0.2 0.4 0.6 0.8 1 0 50 100 150 200 250 300 350 400 450 500 amount = .1 ...
Page 544
16-48 dsp functions the dsp functions as the shaper receives input signals, it evaluates the signal’s level according to its own internal scale. When the shaper’s adjust value is at .25, an input signal moving from negative full scale to positive full scale (a sawtooth) will map to an output curve w...
Page 545
Dsp functions the dsp functions 16-49 two-parameter shaper (2param shaper) this function is similar to the shapers described above, but it has two control-input pages instead of one. The f1 evn control parameters enable you to add distortion to sine wave partials that are even harmonics of the input...
Page 546
16-50 dsp functions the dsp functions the following three graphs show the effect of wrap on a sawtooth wave at the same frequency. With this function you can completely mutilate a sound, and with large amounts of wrap, turn anything into white noise. At the input of the wrap function, the signal is ...
Page 547
Dsp functions the dsp functions 16-51 pulse width modulation (pwm) pulse width modulation can produce some classic synth sounds, and can break new sonic ground as well. Its operation is very simple; it adds an oscillating dc offset to the input signal (shifts it toward positive or negative full scal...
Page 548
16-52 dsp functions the dsp functions the parameters on the pwm control-input page affect the dc offset of the signal, in terms of the percentage of shift from no offset to maximum offset. At a value of 0%, there is an offset positive full scale. At 100%, the offset is negative full scale, and at 50...
Page 549
Dsp functions the dsp functions 16-53 the parameters on the control-input page for sw+dst control the pitch of the sawtooth wave. Added sawtooth wave plus shaper (sw+shp) for this function, the sample input is combined with a sawtooth wave, then passed into the shaper function. The shaper has a cons...
Page 550
16-54 dsp functions the dsp functions parameters on the f2 pch control-input page affect the pitch of the sine wave, and consequently all subsequent results. Mixers with nonlinear inputs x amp this function can be used in the final algorithm block when it mixes two input wires into a single output. ...
Page 551
Dsp functions the dsp functions 16-55 amplitude modulation (amp mod) the amp mod function multiplies its two input signals, and the result is multiplied by a gain value that is determined by the parameters on the ampmod’s control-input page. This result determines the balance between the upper and l...
Page 552
16-56 dsp functions the dsp functions because the pitch of the slave waveform is forced to be nearly that of the master, you can adjust the key tracking of the slave to values less than 100 cents per key without affecting the pitch. This will help reduce some of the harshness at the high end of the ...
Page 553: Chapter 17
Funs the mechanics of control sources 17-1 chapter 17 funs the name “fun” is an abbreviation for “function.” funs are a series of equations that you can use to modulate control-source signals. We’ve discussed various control sources throughout this manual, from the physical controls like the mod whe...
Page 554: Programming The Funs
17-2 funs programming the funs between 0 and +1 as you push it up. When fully up, it sends a value that’s interpreted as +1. It can be used as a bipolar control source by assigning a value of bi-mwl to any control source parameter. The pitch wheel is normally bipolar; it sends a control signal value...
Page 555: The Fun Equations
Funs the fun equations 17-3 need to go to the layer page and set the pbmode parameter to a value of off to keep pitch wheel messages from interfering with the test model. Now select the function parameter, and scroll through the list of equations. Move your midi controller’s mod wheel and data slide...
Page 556
17-4 funs the fun equations value of +.5. An input value of -1 gives an output value of 0, as do input values of 0 and +1. An input value of +.5 gives an output value of -.5. Basic fun equations the first six equations are weighted sums and differences—that is, the signal values of inputs a and b ar...
Page 557
Funs the fun equations 17-5 -a * b the value of input a is multiplied by -1, then multiplied by the value of input b. This will reverse the normal effect of the control source assigned to input a. This equation also produces an effect like that of src2 and dptctl with the mindpt parameter set to 0. ...
Page 559
Funs the fun equations 17-7 as an example, consider the fun we set up at the beginning of the previous section: the mod wheel was assigned as input a, and the data slider as input b. The fun was assigned as src1 on the pitch page, and the depth of src1 was set to 1200 cents. If you push the mod whee...
Page 560
17-8 funs the fun equations successive graph represents the same change in the value of input b, at successively lower values for input a. This equation works as intended only when the value of input a is 0 or positive. Negative values for input a will result in a much less predictable response than...
Page 561
Funs the fun equations 17-9 figure 17-5 hipass (f = a, b) b / (1 - a) this is another weighted difference equation similar to the first six. The value of input a is subtracted from 1. The value of input b is then divided by the difference. You’ll get considerably different results for different inpu...
Page 562
17-10 funs the fun equations figure 17-6 (a + b)^2 sin (a + b), cos (a + b), tri (a + b) these equations are intended to be used with inputs that are sawtooth waves—for example, input a might be lfo1 with its shape set as a sawtooth. Each equation will map a sawtooth- shaped input into a sine-, cosi...
Page 563
Funs the fun equations 17-11 figure 17-8 sin (a + b) warp fun equations the next five equations all behave similarly, and are intended to be used as follows: the value of input a is the controlling value, and normally remains constant, although it doesn’t have to. The value of input b is expected to...
Page 564
17-12 funs the fun equations warp2(a, b) we call this equation slant-square.™ again, the value of input a controls the mapping of values for input b. If input b is a sawtooth wave, different values for input a will turn it into a number of variations on square waves. Figure 17-10 warp2(a, b) warp3(a...
Page 565
Funs the fun equations 17-13 figure 17-11 warp3(a, b) warp4(a, b) this equation, the period inverter,™ is based on repeated evaluations of the value of input b. The k2661 compares each new value of input b with the value from the previous evaluation. If the absolute value (always a positive number) ...
Page 566
17-14 funs the fun equations warp8(a, b) this relatively simple equation is a x b x 8. If the result is beyond the range of -1 to +1, it wraps around from +1 to -1 (or vice versa), until it’s within the allowable range. The table below shows some examples of how this works. Boolean fun equations a a...
Page 567
Funs the fun equations 17-15 ramp(f=a + b) the values of inputs a and b are added, then multiplied by 25. Ramp(f=a - b) the value of input b is subtracted from the value of input a, and the difference is multiplied by 25. Ramp(f=(a + b) / 4) the values of inputs a and b are added, and the sum is div...
Page 568
17-16 funs the fun equations sample b on a this is a sample and hold function. The values of inputs a and b are interpreted as logical quantities, as described for the equations a and b, a or b. When the value of input a changes from false to true (goes above +.5), the value of input b at that momen...
Page 569
Funs the fun equations 17-17 figure 17-13 diode equations diode (a - b) subtracts the value of input b from the value of input a. If the difference is less than 0, the output value is 0. Diode (a - b + .5) adds a constant of +.5 to the difference of (a - b), then maps all negative values to 0. The c...
Page 570
17-18 funs the order of evaluation for funs the order of evaluation for funs the k2661 is a computer, and processes information at very high speeds. Every 20 milliseconds, it checks the condition of every active parameter, evaluates any changes, and processes the new information. This is done accord...
Page 571: Chapter 18
Other editors the intonation table editor 18-1 chapter 18 other editors in addiion to the editors accessible from their respective modes, there are three editors that enable you to modify other performance parameters of the k2661. They are the intonation table editor, the velocity map editor, and th...
Page 572
18-2 other editors the intonation table editor enter the intonation table editor by pressing the edit button. The intonation table editor page displays a graphic representation of a c octave, with the low c always representing the tonic. The values for these parameters indicate the amount of detunin...
Page 573: The Velocity Map Editor
Other editors the velocity map editor 18-3 the velocity map editor every attack velocity value generated by your midi controller is mapped through the velocity map assigned on the midi-mode receive page before being passed to the sound engine. If you’re using the local keyboard channel feature, atta...
Page 574
18-4 other editors the velocity map editor the top line of the display gives you the usual reminder of your location. The bottom line labels the soft buttons, which execute the normal librarian functions of naming, saving, or deleting velocity maps, or dumping them via sysex. The values you see in t...
Page 575
Other editors the velocity map editor 18-5 when you select a parameter, the small crosshairs move to indicate the position on the curve of the dynamic level represented by that parameter. Each of the eight levels is marked on the curve by a small dot. The crosshairs jump to one of the dots when you ...
Page 576: The Pressure Map Editor
18-6 other editors the pressure map editor the pressure map editor pressure maps function in much the same way as velocity maps, but they affect the k2661’s response to mono pressure messages received from your midi controller. Like the velocity maps, pressure maps convert pressure values of 0–127 t...
Page 577: Chapter 19
Audio outputs audio configurations 19-1 chapter 19 audio outputs audio configurations there are several ways to get audio output from the k2661. The most common configuration is a pair of mono or stereo 1/4-inch cables connecting the mix outputs of the k2661 to inputs on a mixer or keyboard amp. The...
Page 578
19-2 audio outputs audio routing: programs to kdfx audio routing: programs to kdfx 1. In any mode (typically program mode), highlight a program name with the cursor, then press edit to enter the program editor. Note how many layers there are in the program. 2. Press one of the more soft buttons unti...
Page 579: Using The Digital Outputs
Audio outputs using the digital outputs 19-3 using the digital outputs digital audio output is available at the adat/aes out optical jack on the rear panel of the k2661. The format of the digital output stream can be chosen to match your other digital audio equipment. Formats supported by the k2661 ...
Page 580
19-4 audio outputs using the digital outputs.
Page 581: Chapter 20
Programming examples 20-1 chapter 20 programming examples the other chapters in this manual have described the k2661’s features in detail. This tutorial chapter will take you step-by step through several programming operations. Each of the following examples will begin from the same starting point: ...
Page 582
...
Page 583
Programming examples 20-3 to program a realistic delayed vibrato, you need to adjust the mode, delay, and attack parameters. Select the mode parameter and change its value to hold (use the alpha wheel or plus/minus buttons). This will prevent the vibrato from fading as it did. (this fading was cause...
Page 584: Example 2
20-4 programming examples first, select the trig parameter, and assign a value of vtrig1 (press 1, 0, 6, enter or hold enter and strike d # 5). Select the delay parameter and set its value to .34 seconds (3, 4, enter). Set the attack parameter to a value of .78 seconds. The asr page should now look ...
Page 585
Programming examples 20-5 press the more> soft button, and the three soft buttons that select the control-input pages for the lowpass filter will appear. Press the f1 frq soft button. The coarse adjust parameter will already be selected. Try a few different values for this parameter, to get a feel f...
Page 586: Example 3
20-6 programming examples the att1 time parameter will already be selected; set its value to 0.50 seconds. Press the right cursor button once to select the att2 time parameter and set its value to 1.06 seconds. Cursor down once to select the att2 level parameter and set its value to -1%. Cursor righ...
Page 587: Example 4
Programming examples 20-7 frequency of the parametric eq. There are lots of ways to set up sample and hold effects, but the fun is the basic element. In this case, every time the value of the fun’s input a (lfo1) becomes greater than +.5, the value of input b (randv1) is sampled. That value becomes ...
Page 588
20-8 programming examples the value for the keytrk parameter to -0.018x per key. Since we’re using a negative value, the amount of shaping will decrease with higher notes. Next we’ll program an envelope to change the shaper in real time. While still on the f1 amt page, select the src2 parameter, and...
Page 589: Example 5
Programming examples 20-9 the first step in our panner example, therefore, will be to select the output page. Select the pan parameter for the upper wire, and set it all the way to the right. Select the pan parameter for the lower wire and set it all the way to the left. Now you can select the f3 po...
Page 590
20-10 programming examples this is the basic process for creating any keymap and incorporating it into a program. In this case, we don’t want the layers to overlap, and we want each layer to use a distinct keymap with its own sample assignment. In other programs, you might want to create a keymap wi...
Page 591: Example 6
Programming examples 20-11 example 6 editing a setup for kb3 control 1. Go to setup mode, and select 97 controlsetup. 2. Press edit to enter the setup editor. 3. Press the more> soft button, then press the footsw soft button. 4. Use the cursor buttons to highlight taptempo (it’s the value of the des...
Page 592: Example 7
20-12 programming examples 20. Hold down g 6, then strike d 4 (or do the equivalent on your midi source). This enters a k as the first character in the name. 21. Hold down g 6 and strike b 2 to enter a b. 22. Release g 6, then press a # 2 to enter a 3. 23. Strike g # 6 three times to delete three ch...
Page 593: Appendix A
K2661 boot block starting the boot block a-1 appendix a k2661 boot block the boot block is a part of the k2661 software that lets you update the k2661 operating system and objects from either a scsi device or the smartmedia drive. The boot block also provides diagnostics options for service personne...
Page 594: Updating K2661 Software
A-2 k2661 boot block updating k2661 software updating k2661 software from time-to-time, kurzweil music systems may release updates to the k2661’s operating system, boot block, and/or objects. Generally, these will be posted at our web site: http://www.Kurzweilmusicsystems.Com/ use the boot block, as...
Page 595: Running Diagnostic Tests
K2661 boot block running diagnostic tests a-3 5. Highlight a filename, then press the select button. Press select a second time to deselect an item. You can select multiple files from the selection list. The status line at the top of the screen will show the current directory, how many files are in ...
Page 596
A-4 k2661 boot block resetting the k2661.
Page 597
I k2661 musician’s guide index index symbols ! Amp 16-54 + shape mod osc 16-53 numerics 2param shaper 16-49 2pole alpass 16-18 2pole lowpass 16-9 32 track sequencing 12-64 4pole hipass w/sep 16-15 4pole lopass w/sep 16-11 50% weight 15-47 a a/dry->b parameter 15-36 a->b cfg parameter 15-36 aborting ...
Page 598
Ii k2661 musician’s guide index b backing up files 13-84 backup 13-66 balance and amp (bal amp) 16-36 band2 16-22 bandpass filter 16-21 bandpass filters 16-21 bank select midi receive page 10-8 bank status indicator 13-19 basic editing 5-1 basic fun equations 17-4 basic midi channel 10-5 bass freq 1...
Page 599
Iii k2661 musician’s guide index crossfade and volume adjust curves 14-34 crossfade loop (xfadeloop) 14-33 crossfade parameter (output) 6-31 crossfade sense parameter (output) 6-31 crossover 15-45 crossover1 15-40, 15-48 crossover2 15-40 cursor buttons 3-3 curve n 15-45 d data entry 3-4 dc offset 15...
Page 600
Iv k2661 musician’s guide index edit song arrange page 12-64 common page 12-41 event page 12-45 step page 12-61 editfxpreset parameter pages 15-3 editing 5-1 editing conventions 5-1 editing kb3 programs 6-48 editing macros 13-53 editing samples 14-10 editing vast programs 6-11 editors, nested 4-3 ef...
Page 601
V k2661 musician’s guide index four-pole lowpass filter 16-11 free disk space 13-59 free utility 13-59, 13-63 freeze pedal parameter (layer) 6-22 freqscale 15-39 front panel navigation 3-2 fun diagram 17-3 fun equations 17-3 fun page (program editor) 6-43 function soft buttons 6-47 function soft but...
Page 602
Vi k2661 musician’s guide index insert fx bus 9-3 insert zero 14-25 intonation key 11-4 intonation table editor 18-1 intonation tables 11-2, 11-3 introduction to editing 5-1 intuitive data entry 3-6 invert 14-24 j joining samples 14-12 jump to page 5-8 k k1000 bank mode 7-9 k2000 bank mode 7-9 k2600...
Page 603
Vii k2661 musician’s guide index loading individual objects 13-14 loading midi files 12-23 loading older setup versions 7-2 loading selected entries from a macro file 13-52 local control 10-2 local keyboard channel with song mode 12-1 lock parameters 10-11 lomic a 15-46 lomic b 15-46 loop 14-17 loop...
Page 604
Viii k2661 musician’s guide index mode selection 4-1 modes 4-1 program 6-1 modes, using 4-3 modulator ring modulation 15-47 momentary switch type 7-30 mon 6-17 monitor (mon) 14-5 mono inputs 15-7 mono sound systems 2-2 monophonic parameter (common) 6-33 monophonic programs 6-33 monopole 15-49 morph ...
Page 605
Ix k2661 musician’s guide index drawbr 6-51 env2 and env3 (envelopes) 6-38 envctl (envelope control) 6-39 eq 6-59 f1–f3 6-27 f4 amp 6-28 fun (attack, sustain, release) 6-43 fxlfo 6-46 fxmod2–4 6-46 importkdfx 6-46 jumping to 5-8 kdfx 6-44 keyclk 6-54 keymap 6-23 layer 6-19 lfo 6-40 marking 5-8 maste...
Page 606
X k2661 musician’s guide index extended 10-12 kurzweil 10-12 midi 10-3, 10-13, 10-15 quick access banks 10-13, 10-15 quick access mode 8-1 program editor alg page 6-17 amp page (kb3) 6-56 ampenv page 6-35 asr page 6-42 common page 6-32 drawbr page 6-51 env2 and env3 pages 6-38 envctl page 6-39 eq pa...
Page 607
Xi k2661 musician’s guide index resonance 15-43 resonant filter 15-43 retrigger 15-41, 15-44 reverb types 15-36 reverse 14-24 reversing samples 6-26 ribbon configuration (ribcfg) page setup mode 7-42 ribbon page setup mode 7-42 ribbons center 7-43 large ribbon configuration 7-42 position mode (posmo...
Page 608
Xii k2661 musician’s guide index continuous control pedal (cpedal) page 7-27 continuous controller parameters 7-23 controllers 7-19 controlling kb3 features 20-11 curve (curv) 7-24 destination 7-9, 7-30 destination (dest) 7-24 editing hints and suggestions 7-45 entry (ent) and exit states 7-31 entry...
Page 609
Xiii k2661 musician’s guide index stealer soft button on utility page 11-12 steep bass tone control 16-32 step page song mode 12-61 stereo analyze 15-49 stereo inputs with pan 15-8 stereo keymaps 6-31 stereo parameter (keymap) 6-24 stereo simulation 15-48 storing objects in memory banks 13-34 studio...
Page 610
Xiv k2661 musician’s guide index velocity crossover 14-38 velocity map editor 18-3 velocity maps 10-3, 10-6 velocity sensitivity 11-2 velocity stabs 20-1 velocity tracking 6-16 velocity tracking parameter (envctl) 6-40 velocity tracking parameter (f4 amp) 6-29 velocity tracking parameter (keymap) 6-...


