- DL manuals
- Oce
- Printer
- CS620 Pro
- User Manual
Oce CS620 Pro User Manual
Summary of CS620 Pro
Page 1
Océ cs620 / user manual océ cs650 pro.
Page 2: Océ-Technologies B.V.
Copyright © 2006 océ-technologies b.V. Venlo, the netherlands all rights reserved. No part of this work may be reproduced, copied, adapted, or transmitted in any form or by any means without written permission from océ. Océ-technologies b.V. Makes no representation or warranties with respect to the ...
Page 3
Océ cs620/cs650 pro contents-1 contents 1 introduction/safety information 1.1 energy star® ..................................................................................... 1-5 1.2 license .............................................................................................. 1-6 1.3 avai...
Page 4
Contents-2 océ cs620/cs650 pro 4.4 exchanging toner recovery box ..................................................... 4-30 4.5 replenishing staples ....................................................................... 4-33 4.6 disposing punch waste....................................................
Page 5
Océ cs620/cs650 pro contents-3 6.5 simplex/duplex setting .................................................................. 6-33 6.5.1 making double-sided copies using adf ...................................... 6-33 6.5.2 making double-sided copies using original glass ........................ 6-37...
Page 6
Contents-4 océ cs620/cs650 pro 8.8 programming different settings for an output job: program job ... 8- 35 8.9 dividing an image for enlarged copy: multi-page enlargement . 8-39 8.10 erasing outside area of original: non-image area erase ............ 8-42 8.11 reversing color in image: neg./positive...
Page 7
Océ cs620/cs650 pro contents-5 9.4.2 folding copies.............................................................................. 9-22 9.4.3 attaching cover sheet (post inserter on fd-501) ......................... 9-24 9.5 output modes using saddle stitcher sd-501 ............................... 9-...
Page 8
Contents-6 océ cs620/cs650 pro 11.2.2 to display output history .............................................................. 11-7 11.2.3 to display send history ................................................................. 11-8 11.2.4 to check incomplete jobs......................................
Page 9
Océ cs620/cs650 pro contents-7 14.5.4 03 multi folder (fold) adj. \ 02 tri-fold-in pos. Adj................... 14-40 14.5.5 03 multi folder (fold) adj. \ 03 tri-fold-out pos. Adj. ............... 14-43 14.5.6 03 multi folder (fold) adj. \ 04 double parallel pos. Adj. .......... 14-46 14.5.7 03 multi...
Page 10
Contents-8 océ cs620/cs650 pro 15.3 function list of machine administrator setting........................... 15-21 16 user setting 16.1 user setting outlines ....................................................................... 16-3 16.2 01 system setting.............................................
Page 11
Océ cs620/cs650 pro contents-9 19.5 transmitting machine setting file................................................ 19-30 20 security functions 20.1 security modes ............................................................................... 20-4 21 security strengthen mode 21.1 description of s...
Page 12
Contents-10 océ cs620/cs650 pro 26.1 how to input characters ................................................................. 26-3 26.2 index ................................................................................................. 26-5.
Page 13
1 introduction/safety information.
Page 15
Introduction/safety information 1 océ cs620/cs650 pro 1-3 1 introduction/safety information thank you for choosing this machine. This manual contains details on the operation of the various functions of the machine, precautions on its use, and basic troubleshooting procedures. In order to ensure tha...
Page 16
1 introduction/safety information 1-4 océ cs620/cs650 pro exemption - no part of this manual may be used or duplicated without permission. - manufacturer and sales company will have no liability for any influences caused by using the printing system and this user manual. - the information written in...
Page 17
Introduction/safety information 1 océ cs620/cs650 pro 1-5 1.1 energy star® the energy star ® program has been established to encourage the widespread and voluntary use of energy efficient technologies that reduce energy consumption and prevent pollution. As an energy star partner, we have determined...
Page 18
1 introduction/safety information 1-6 océ cs620/cs650 pro 1.2 license for information on incorporated softwares the softwares installed in this product comprise various independent software modules and components. Each software module or component is copyrighted by the author, i.E. The one we wrote ...
Page 19
Introduction/safety information 1 océ cs620/cs650 pro 1-7 gnu general public license (version 2, june 1991) copyright (c) 1989, 1991 free software foundation, inc. 59 temple place, suite 330, boston, ma 02111-1307 usa everyone is permitted to copy and distribute verbatim copies of this license docum...
Page 20
1 introduction/safety information 1-8 océ cs620/cs650 pro the precise terms and conditions for copying, distribution and modification follow. Gnu general public license terms and conditions for copying, distribution and modification 0. This license applies to any program or other work which contains...
Page 21
Introduction/safety information 1 océ cs620/cs650 pro 1-9 the program under these conditions, and telling the user how to view a copy of this license. (exception: if the program itself is interactive but does not normally print such an announcement, your work based on the program is not required to ...
Page 22
1 introduction/safety information 1-10 océ cs620/cs650 pro compilation and installation of the executable. However, as a special exception, the source code distributed need not include anything that is normally distributed (in either source or binary form) with the major components (compiler, kernel...
Page 23
Introduction/safety information 1 océ cs620/cs650 pro 1-11 if any portion of this section is held invalid or unenforceable under any particular circumstance, the balance of the section is intended to apply and the section as a whole is intended to apply in other circumstances. It is not the purpose ...
Page 24
1 introduction/safety information 1-12 océ cs620/cs650 pro 11. Because the program is licensed free of charge, there is no warranty for the program, to the extent permitted by applicable law. Except when otherwise stated in writing the copyright holders and/or other parties provide the program "as i...
Page 25
Introduction/safety information 1 océ cs620/cs650 pro 1-13 gnu lesser general public license (version 2.1, february 1999) copyright (c) 1991, 1999 free software foundation, inc. 59 temple place, suite 330, boston, ma 02111-1307 usa everyone is permitted to copy and distribute verbatim copies of this...
Page 26
1 introduction/safety information 1-14 océ cs620/cs650 pro to protect each distributor, we want to make it very clear that there is no warranty for the free library. Also, if the library is modified by someone else and passed on, the recipients should know that what they have is not the original ver...
Page 27
Introduction/safety information 1 océ cs620/cs650 pro 1-15 the precise terms and conditions for copying, distribution and modification follow. Pay close attention to the difference between a "work based on the library" and a "work that uses the library". The former contains code derived from the lib...
Page 28
1 introduction/safety information 1-16 océ cs620/cs650 pro 2. You may modify your copy or copies of the library or any portion of it, thus forming a work based on the library, and copy and distribute such modifications or work under the terms of section 1 above, provided that you also meet all of th...
Page 29
Introduction/safety information 1 océ cs620/cs650 pro 1-17 3. You may opt to apply the terms of the ordinary gnu general public license instead of this license to a given copy of the library. To do this, you must alter all the notices that refer to this license, so that they refer to the ordinary gn...
Page 30
1 introduction/safety information 1-18 océ cs620/cs650 pro if such an object file uses only numerical parameters, data structure layouts and accessors, and small macros and small inline functions (ten lines or less in length), then the use of the object file is unrestricted, regardless of whether it...
Page 31
Introduction/safety information 1 océ cs620/cs650 pro 1-19 c) accompany the work with a written offer, valid for at least three years, to give the same user the materials specified in subsection 6a, above, for a charge no more than the cost of performing this distribution. D) if distribution of the ...
Page 32
1 introduction/safety information 1-20 océ cs620/cs650 pro 9. You are not required to accept this license, since you have not signed it. However, nothing else grants you permission to modify or distribute the library or its derivative works. These actions are prohibited by law if you do not accept t...
Page 33
Introduction/safety information 1 océ cs620/cs650 pro 1-21 12. If the distribution and/or use of the library is restricted in certain countries either by patents or by copyrighted interfaces, the original copyright holder who places the library under this license may add an explicit geographical dis...
Page 34
1 introduction/safety information 1-22 océ cs620/cs650 pro 16. In no event unless required by applicable law or agreed to in writing will any copyright holder, or any other party who may modify and/or redistribute the library as permitted above, be liable to you for damages, including any general, s...
Page 35
Introduction/safety information 1 océ cs620/cs650 pro 1-23 how to apply these terms to your new libraries if you develop a new library, and you want it to be of the greatest possible use to the public, we recommend making it free software that everyone can redistribute and change. You can do so by p...
Page 36
1 introduction/safety information 1-24 océ cs620/cs650 pro license issues the openssl toolkit stays under a dual license, i.E. Both the conditions of the openssl license and the original ssleay license apply to the toolkit. See below for the actual license texts. Actually both licenses are bsd-style...
Page 37
Introduction/safety information 1 océ cs620/cs650 pro 1-25 in any way out of the use of this software, even if advised of the possibility of such damage. This product includes cryptographic software written by eric young (eay@crypt-soft.Com). This product includes software written by tim hudson (tjh...
Page 38
1 introduction/safety information 1-26 océ cs620/cs650 pro this software is provided by eric young "as is" and any express or implied warranties, including, but not limited to, the implied warranties of merchantability and fitness for a particular purpose are disclaimed. In no event shall the author...
Page 39
Introduction/safety information 1 océ cs620/cs650 pro 1-27 1.3 available features auto low power automatically lowers the power after a specified period of copier inactivity auto paper select automatically selects copy paper size to match the original documents. Auto reset automatically resets to th...
Page 40
1 introduction/safety information 1-28 océ cs620/cs650 pro copy density manually selects up to 9 density levels. Custom size in original setting identifies the special original size which the machine cannot detect, in order to select the optimal paper size for copying or printing. Frame center erase...
Page 41
Introduction/safety information 1 océ cs620/cs650 pro 1-29 job list displays the job list screen to view the current machine status, changes the operation order of reserve jobs, deletes the unused reserve job, or displays the previous job list. Manual shut-off shuts off the machine’ power when press...
Page 42
1 introduction/safety information 1-30 océ cs620/cs650 pro output for machine with finisher fs-607 installed non-sort, collate, uncollate, and staple modes using the primary (main) tray collated and uncollate modes using the secondary (sub) tray selects an output tray and output mode on the output a...
Page 43
Introduction/safety information 1 océ cs620/cs650 pro 1-31 reserve scans in subsequent copy jobs while the machine is busy printing or copying. Rotation rotates the image before copying when the portrait/landscape orientation of the original is different from the orientation of the copy paper. Separ...
Page 44
1 introduction/safety information 1-32 océ cs620/cs650 pro zoom selects fixed ratios, four reduction, four enlargement, and three user-set ratios. Zoom ratios can be selected from 25% ~ 400% in 0.1% increments..
Page 45
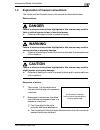
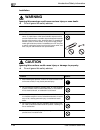
Introduction/safety information 1 océ cs620/cs650 pro 1-33 1.4 explanation of manual conventions the marks and text formats used in this manual are described below. Safety advices 6 danger failure to observe instructions highlighted in this manner may result in fatal or critical injuries in fact of ...
Page 46
1 introduction/safety information 1-34 océ cs620/cs650 pro tips 2 note text highlighted in this manner contains useful information and tips to ensure safe use of the machine. 2 reminder text highlighted in this manner contains information that should be reminded. ! Detail text highlighted in this ma...
Page 47
Introduction/safety information 1 océ cs620/cs650 pro 1-35 1.5 legal restrictions on copying certain types of original must never be copied with the purpose or intent to pass copies of such documents off as the originals. The following is not a complete list, but is meant to be used as a guide to re...
Page 48
1 introduction/safety information 1-36 océ cs620/cs650 pro 1.6 for eu member states only this symbol means: do not dispose of this product together with your household waste! Please refer to the information of your local community or contact our dealers regarding the proper handling of end-of- life ...
Page 49
Introduction/safety information 1 océ cs620/cs650 pro 1-37 1.7 safety information this section contains detailed instructions on the operation and maintenance of this machine. To achieve optimum utility of this device, all operators should carefully read and follow the instructions in this manual. P...
Page 50
1 introduction/safety information 1-38 océ cs620/cs650 pro meaning of symbols disassemble and modification 7 warning ignoring this warnings could cause serious injury or even death. % do not ignore this safety advices. Symbol meaning example meaning a triangle indicates a danger against which you sh...
Page 51
Introduction/safety information 1 océ cs620/cs650 pro 1-39 power cord 7 warning ignoring this warnings could cause serious injury or even death. % do not ignore this safety advices. Warning symbol • use only the power cord supplied in the package. If a power cord is not supplied, only use the power ...
Page 52
1 introduction/safety information 1-40 océ cs620/cs650 pro power source 7 warning ignoring this warnings could cause serious injury or even death. % do not ignore this safety advices. 7 caution ignoring this cautions could cause injury or damage to property. % do not ignore this safety advices. Warn...
Page 53
Introduction/safety information 1 océ cs620/cs650 pro 1-41 power plug 7 warning ignoring this warnings could cause serious injury or even death. % do not ignore this safety advices. 7 caution ignoring this cautions could cause injury or damage to property. % do not ignore this safety advices. Ground...
Page 54
1 introduction/safety information 1-42 océ cs620/cs650 pro installation 7 warning ignoring this warnings could cause serious injury or even death. % do not ignore this safety advices. 7 caution ignoring this cautions could cause injury or damage to property. % do not ignore this safety advices. Warn...
Page 55
Introduction/safety information 1 océ cs620/cs650 pro 1-43 ventilation 7 caution ignoring this cautions could cause injury or damage to property. % do not ignore this safety advices. Actions in response to troubles 7 warning ignoring this warnings could cause serious injury or even death. % do not i...
Page 56
1 introduction/safety information 1-44 océ cs620/cs650 pro 7 caution ignoring this cautions could cause injury or damage to property. % do not ignore this safety advices. Consumables 7 warning ignoring this warnings could cause serious injury or even death. % do not ignore this safety advices. 7 cau...
Page 57
Introduction/safety information 1 océ cs620/cs650 pro 1-45 when moving the machine 7 caution ignoring this cautions could cause injury or damage to property. % do not ignore this safety advices. Before successive holidays 7 caution ignoring this cautions could cause injury or damage to property. % d...
Page 58
1 introduction/safety information 1-46 océ cs620/cs650 pro 1.8 regulation notices ce marking (declaration of conformity) for users of the european union (eu) this product complies with the following eu directives: 89/336/eec, 73/23/eec and 93/68/eec directives. This declaration is valid for the area...
Page 59
Introduction/safety information 1 océ cs620/cs650 pro 1-47 interference-causing equipment standard (ices-003 issue 4) (for canada users) this class a digital apparatus complies with canadian ices-003. Cet appareil numérique de la classe a est conforme à la norme nmb-003 du canada. For users in count...
Page 60
1 introduction/safety information 1-48 océ cs620/cs650 pro 1.9 laser safety this product employs a class 3b laser diode having maximum power of 15 mw and wavelength of 775 - 800 nm. This product is certified as a class 1 laser product. Since the laser beam is concealed by protective housings, the pr...
Page 61
Introduction/safety information 1 océ cs620/cs650 pro 1-49 for finland, sweden users loukan 1 laserlaite klass 1 laser apparat 7 varoitus tämä on puolijohdelaser. % laitteen käyttäminen muulla kuin tässä käyttöohjeessa mainitulla tavalla saattaa altistaa käyttäjän turvallisuusluokan 1 ylittävälle nä...
Page 62
1 introduction/safety information 1-50 océ cs620/cs650 pro.
Page 63
Introduction/safety information 1 océ cs620/cs650 pro 1-51 1.10 ozone release 7 caution locate the machine in a well ventilated room % a negligible amount of ozone is generated during normal operation of this machine. An unpleasant odor may, however, be created in poorly ventilated rooms during exte...
Page 64: Caution
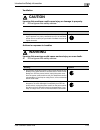
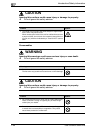
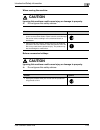
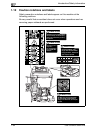
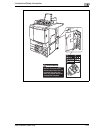
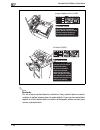
1 introduction/safety information 1-52 océ cs620/cs650 pro 1.12 caution notations and labels safety precaution notations and labels appear on this machine at the following positions. Be very careful that an accident does not occur when operations such as removing paper misfeeds are performed. The fi...
Page 65: Warning
Introduction/safety information 1 océ cs620/cs650 pro 1-53 do not throw the toner recovery box into a fire. If it is thrown into a fire, the toner may ignite and cause a dangerous situation. Warning.
Page 66: Caution
1 introduction/safety information 1-54 océ cs620/cs650 pro 2 reminder do not remove caution labels or notations. If any caution label or caution notation is soiled, please clean to make legible. If you cannot make them legible, or if the caution label or notation is damaged, please contact your serv...
Page 67
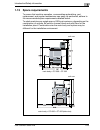
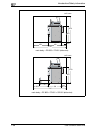
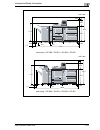
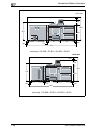
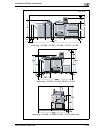
Introduction/safety information 1 océ cs620/cs650 pro 1-55 1.13 space requirements to ensure that machine operation, consumables replenishing, part replacement, and regular maintenance can easily be performed, adhere to the recommended space requirements detailed below. To whole machine may weigh ap...
Page 68
1 introduction/safety information 1-56 océ cs620/cs650 pro 1021 1619 899 950 293 1619 899 2142 1021 950 293 766 2142 unit: mm unit: mm main body + df-609 + pf-601 (side-view) main body + df-609 + pf-601 + sd-501 (side-view).
Page 69
Introduction/safety information 1 océ cs620/cs650 pro 1-57 175 760 544 254 947 2997 1179 100 117 100 1619 1021 393 205 175 760 400 947 2866 1231 100 100 1619 1021 393 205 267 117 unit: mm unit: mm main body + df-609 + pf-601 + ru-504 + fs-503 main body + df-609 + pf-601 + ru-503 + fd-501.
Page 70
1 introduction/safety information 1-58 océ cs620/cs650 pro 175 760 1170 947 3252 46.4 100 100 1619 1021 393 205 175 760 785 947 2867 1179 100 100 1619 1021 393 205 unit: mm unit: mm main body + df-609 + pf-601 + ru-503 + sd-501 main body + df-609 + pf-601 + ru-503 + ls-501.
Page 71
Introduction/safety information 1 océ cs620/cs650 pro 1-59 1619 175 760 400 544 947 3397 1021 393 1231 100 100 205 254 117 unit: mm main body + df-609 + pf-601 + ru-504 + fd-501 + fs-503 main body + df-609 + lu-202+ fs-607 + pi-502 main body + df-609 + lu-202+ fs-607 + pi-502 (side-view).
Page 72
1 introduction/safety information 1-60 océ cs620/cs650 pro 2 reminder be sure to allow a clearance of 200 mm or more at the back of this machine for the ventilation duct..
Page 73
Introduction/safety information 1 océ cs620/cs650 pro 1-61 1.14 operation precautions to ensure the optimum performance of this machine, observe the precautions described below. Power source the power source requirements are as follows. - voltage: 230 v ac - frequency: 50 hz – use a power source wit...
Page 74
1 introduction/safety information 1-62 océ cs620/cs650 pro.
Page 75
2 preparation for use.
Page 77
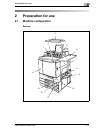
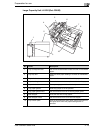
Preparation for use 2 océ cs620/cs650 pro 2-3 2 preparation for use 2.1 machine configuration external 1 2 3 4 5 6 7 8 9 10 11 12 13 14.
Page 78
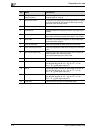
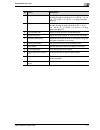
2 preparation for use 2-4 océ cs620/cs650 pro no. Name description 1 adf (automatic document feeder) (option) automatically feeds multiple originals one at a time to the original glass for copying. 2 sub power switch turns on/off the copying and scanning functions. Turning it off will terminate all ...
Page 79
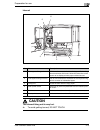
Preparation for use 2 océ cs620/cs650 pro 2-5 internal 7 caution the internal fixing unit is very hot. % to avoid getting burned, do not touch. 1 2 3 4 5 6 no. Name description 1 conveyance fixing unit withdrawn for removal of mishandled paper. For handling levers and knobs of this unit, follow the ...
Page 80
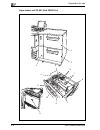
2 preparation for use 2-6 océ cs620/cs650 pro paper feeder unit pf-601 (océ cs650 pro) 1 2 3 4 5 6 7 8 7 9 10 6 11.
Page 81
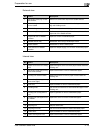
Preparation for use 2 océ cs620/cs650 pro 2-7 no. Name description 1 tray 4 hold 3,000 sheets of sra3 w, sra4 w/v, a3 w, b4 w, a4 w/v, b5 w/v, a5 w, b6 w, 13" e 19" w, 12" e 18" w, 11" e 17" w, 8.5" e 14" w, 8.5" e 11" w/v, plain paper (80 g/m 2 ) 2 tray 5 hold 3,000 sheets of sra3 w, sra4 w/v, a3 w...
Page 82
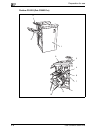
2 preparation for use 2-8 océ cs620/cs650 pro finisher fs-503 (océ cs650 pro) 1 2 3 6 5 4 8 7 9 10
Page 83
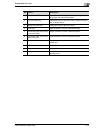
Preparation for use 2 océ cs620/cs650 pro 2-9 no. Name description 1 finisher door opens to the internal finisher to allow clearing mishan- dled paper and replenishing staples. 2 primary (main) tray holds sets output in non-sort mode, collate mode (off- set), or staple mode. 3 secondary (sub) tray h...
Page 84
2 preparation for use 2-10 océ cs620/cs650 pro large capacity stacker ls-501 (océ cs650 pro) 1 4 5 6 7 8 2 3 9 10 12 13 15 16 17 14 11.
Page 85
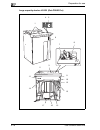
Preparation for use 2 océ cs620/cs650 pro 2-11 no. Name description 1 secondary (sub) tray holds sets output in non-sort mode. 2 top cover handle (left) opens to remove mishandled paper. 3 top cover handle (right) opens to remove mishandled paper. 4 paper removal indicator lights while the stacker g...
Page 86
2 preparation for use 2-12 océ cs620/cs650 pro folding unit fd-501 (océ cs650 pro) 1 2 3 4 5 6 7 8 12 1 2 3 4 5 6 7 9 10 8 9 11.
Page 87
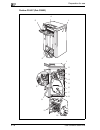
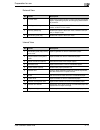
Preparation for use 2 océ cs620/cs650 pro 2-13 external view internal view no. Name description 1 primary (main) tray holds sets output in non-sort mode, punch mode, or staple mode. 2 secondary (sub) tray holds sets output in non-sort mode. 3 lower tray holds cover sheets. 4 lower tray guide plates ...
Page 88
2 preparation for use 2-14 océ cs620/cs650 pro saddle stitcher sd-501 (océ cs650 pro) 1 2 3 4 5 6 7 8 1 2 3 4 5 6 7 8 9 10 11 12 13.
Page 89
Preparation for use 2 océ cs620/cs650 pro 2-15 external view internal view no. Name description 1 secondary (sub) tray of sad- dle stitcher holds non-sorted sets output from saddle stitcher. 2 multi-folding mode outlet cover handle opens the cover to remove mishandled paper when us- ing multi-foldin...
Page 90
2 preparation for use 2-16 océ cs620/cs650 pro finisher fs-607 (océ cs620) 3 2 4 1 1 2 3 4 5 6 7 8 9 3 11 10
Page 91
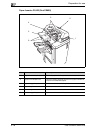
Preparation for use 2 océ cs620/cs650 pro 2-17 external view internal view no. Name description 1 finisher door opens to the internal finisher to allow clearing mishandled paper, replenishing staples, and emptying waste basket of punch kit. 2 folding mode tray holds sets output in multi half fold mo...
Page 92
2 preparation for use 2-18 océ cs620/cs650 pro paper inserter pi-502 (océ cs620) 3 2 1 4 5 6 no. Name description 1 paper inserter control panel controls paper inserter operations. 2 upper unit release lever can be moved to slide the upper unit of paper inserter for removal of mishandled paper. 3 up...
Page 93
Preparation for use 2 océ cs620/cs650 pro 2-19 large capacity unit lu-202 (océ cs620) 5 6 7 8 9 10 3 2 4 1 no. Name description 1 tray conveyance lever can be moved downward to ease removal of mishandled paper. 2 tray top door opens to allow paper loading or removal of mishandled paper. 3 tray left ...
Page 94
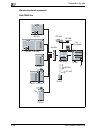
2 preparation for use 2-20 océ cs620/cs650 pro standard/optional equipment océ cs650 pro fd-501 + ls-501 ic-408 sd-501 ls-501 + sd-501 ls-501 ru-503 ic-303 hd-506 df-609 oc-506 pf-601 main body key counter fd-501.
Page 95
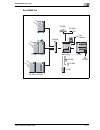
Preparation for use 2 océ cs620/cs650 pro 2-21 océ cs650 pro ls-501 + fd-503 ic-408 fs-503 fd-501 + fs-503 ru-504 ic-303 ht-504 df-609 oc-506 pf-601 main body key counter hd-506.
Page 96
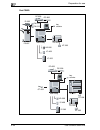
2 preparation for use 2-22 océ cs620/cs650 pro océ cs620 fs-607 hd-506 pk-512 pi-502 ht-503 df-609 oc-506 lu-202 key counter pk-513 main body ic-408 ic-303 hd-506 df-609 oc-506 key counter main body ic-408 ic-303 ht-504 pf-601 lu-202 ht-503 ot-502.
Page 97
Preparation for use 2 océ cs620/cs650 pro 2-23 2.2 turning on/off the power this machine has two power switches: the main power switch and the sub power switch. 2 reminder once the main power switch is turned on, be sure not to use it in usual operation. To turn on the power 1 turn on the main power...
Page 98
2 preparation for use 2-24 océ cs620/cs650 pro 4 the machine status screen with the job list will be displayed. ! Detail administrator may have changed the screen to be displayed after the machine power is on, so that a user should enter the user name and password to operate the machine. See page 2-...
Page 99
Preparation for use 2 océ cs620/cs650 pro 2-25 to turn off the power 0 be sure not to turn off the main power switch in usual operation. 0 when the machine is under control of the weekly timer function, do not turn off the sub power switch. Turning it off will deactivate the function. 1 turn off the...
Page 100
2 preparation for use 2-26 océ cs620/cs650 pro 2.3 automatically returning to the default settings: auto reset pressing [reset] on the control panel or a certain period of machine inactivity clears all the copy settings specified so far and restores the machine to the default settings. This function...
Page 101
Preparation for use 2 océ cs620/cs650 pro 2-27 2.4 to use machine when power save led lights if you find the power save led lit on the control panel, the machine cannot be operated due to the power save or weekly timer function. To activate the machine 1 press any key on the control panel. – if the ...
Page 102
2 preparation for use 2-28 océ cs620/cs650 pro automatically conserving energy (auto low power) this function conserves energy by lowering the power consumption to the following extent in standby mode. 170.4w auto low power activates automatically after a specified period (initially 15 minutes) of c...
Page 103
Preparation for use 2 océ cs620/cs650 pro 2-29 automatically conserving energy (auto shut-off) this function achieves further energy conservation by reducing power consumption to the following extent in standby mode. 7.4w auto shut-off follows auto low power after a specified period (initially 90 mi...
Page 104
2 preparation for use 2-30 océ cs620/cs650 pro manually conserving energy follow the procedure below to operate power save function (low power or shut-off) manually. 1 press [power save] for one second or longer, then release it. The following message will be displayed. Using auto shut-off: auto shu...
Page 105
Preparation for use 2 océ cs620/cs650 pro 2-31 limiting machine usage (weekly timer) the weekly timer function turns a copier on and off at the time specified by the administrator. When a machine is in off condition under control of weekly timer, the power save led is lit and machine operation is un...
Page 106
2 preparation for use 2-32 océ cs620/cs650 pro 3 set the hour for the interrupt use, then press [start]. – enter a 1-digit hour (ex. 3 for 3 hours) using the control panel keypad (0 ~ 9), then press [start]. Input desired copy time 3 hour(s) $# minute(s) 4 set the minute for the interrupt use, then ...
Page 107
Preparation for use 2 océ cs620/cs650 pro 2-33 2.5 making user authentication this machine can prohibit its operation until the user name, user password, section name, and/or section password specified by the administrator are verified. Copy quantity limit for each section can also be set. When the ...
Page 108
2 preparation for use 2-34 océ cs620/cs650 pro to enter user name and password 1 enter the user name, user password, section name, and/or section password, as required. – touch the desired item key to display the keypad screen. Enter your user name (max. 64 characters), user password (max. 64 charac...
Page 109
3 paper and original information.
Page 111
Paper and original information 3 océ cs620/cs650 pro 3-3 3 paper and original information 3.1 paper information this machine is equipped with the following trays for loading copy paper. - tray 1, 2 and 3 (main body trays) - bypass tray - tray 4 and 5 (paper feeder unit pf-601) - tray 4 (large capaci...
Page 112
3 paper and original information 3-4 océ cs620/cs650 pro paper weight paper trays paper weight tray 1, 2 and 3 (main body trays) a4, 8.5" e 11" or larger: 64 to 256 g/m 2 smaller than a4, 8.5" e 11": 64 to 209 g/m 2 bypass tray 64 to 300 g/m 2 tray 4 and 5 (paper feed unit pf-601) tray 4 (upper tray...
Page 113
Paper and original information 3 océ cs620/cs650 pro 3-5 2 reminder be sure to use paper only of the weight specified for the tray; otherwise copy quality may be deteriorated or machine trouble may occur. ! Detail the paper weight setting for trays 1 to 5 is described on page 13-10. The paper weight...
Page 114
3 paper and original information 3-6 océ cs620/cs650 pro paper tray/ exit tray capacity paper trays capacity tray 1, 2 and 3 (main body trays) 500 sheets (80 g/m 2 ) bypass tray 250 sheets (80 g/m 2 ) tray 4 and 5 (pf-601 trays) 3,000 sheets (80 g/m 2 ) tray 4 (large capacity unit lu-202) 3,000 shee...
Page 115
Paper and original information 3 océ cs620/cs650 pro 3-7 large capac- ity stacker ls-501 stacker max. 5,000 sheets (80 g/m 2 ) sra3 w, sra4 w/v, a3 w, b4 w, a4 w/v, f4 w, 8k w, 16k v, 13" e 19" w, 12" e 18" w, 11" e 17" w, 8.5" e 14" w, 8.5" e 11" w/v max. 3,000 sheets coated paper 380 mm or longer ...
Page 116
3 paper and original information 3-8 océ cs620/cs650 pro 2 note if the saddle stitcher tray is not fully withdrawn, the machine will detect that the tray is filled up, even with less number of finished sets than that specified in specifications. ! Detail height of the folded and stapled booklet the ...
Page 117
Paper and original information 3 océ cs620/cs650 pro 3-9 paper size paper trays available size tray 1 to 3 (main body trays) standard size: sra3 w, sra4 w/v, a3 w, b4 w, a4 w/v, b5 w/v, a5 w, 12" e 18" w, 11" e 17" w, 8.5" e 11" v available to detect 8.5" e 14" w, 8.5" e 11" v instead of sra4 w, a4 ...
Page 118
3 paper and original information 3-10 océ cs620/cs650 pro equipment available size automatic duplex unit max. 330 mm e 487 mm to min. 100 mm e 140 mm tab paper: unavailable finisher fs-503 secondary (sub) tray standard size: sra3 w, sra4 w/v, a3 w, b4 w, f4 w, a4 w/v, b5 w/v, a5 w/v, b6 w, a6 w, 8k ...
Page 119
Paper and original information 3 océ cs620/cs650 pro 3-11 folding unit fd-501 punch (4 holes) standard size: a3 w, b4 w, a4 v, b5 v, 8k w, 16k v, 12" e 18" w, 11" e 17" w, 8.5" e 14" w, 8.5" e 11" v tab paper: a4 v, 8.5" e 11" v fold standard size: sra4 w, a3 w, b4 w, a4 w, 8k w, 12" e 18" w, 11" e ...
Page 120
3 paper and original information 3-12 océ cs620/cs650 pro finisher fs-607 secondary (sub) tray standard size: sra3 w, sra4 w/v, a3 w, b4 w, f4 w, a4 w/v, b5 w/v, a5 w/v, b6 w, a6 w, 8k w, 16k w/v, 13" e 19" w, 12" e 18" w, 11" e 17" w, 8.5" e 14" w, 8.5" e 11" w/v, 5.5" e 8.5"w/v custom size: max. 3...
Page 121
Paper and original information 3 océ cs620/cs650 pro 3-13 auto tray switch function if the selected paper tray runs out of paper while a job is being printed and a different paper tray is loaded with paper meeting the following conditions, the other paper tray is automatically selected so printing c...
Page 122
3 paper and original information 3-14 océ cs620/cs650 pro 3.2 original information when making copies, position the original into the adf or on the original glass. To copy original that cannot be positioned into the adf, position them on the original glass. Using original glass use the original glas...
Page 123
Paper and original information 3 océ cs620/cs650 pro 3-15 ! Detail detectable paper size can be changed from ab series to inch series, only a series, or ab series and inch series mixed by the administrator. See page 17-73. 5.5" e 8.5" w, a5 w, and b6 w, one of which can be selected. See page 17-73. ...
Page 124
3 paper and original information 3-16 océ cs620/cs650 pro adf originals following four modes are provided when using the adf to scan originals. - normal mode - mixed mode - z-folded mode specifications for each mode are described as follows. ! Detail detectable original size can be changed from ab s...
Page 125
Paper and original information 3 océ cs620/cs650 pro 3-17 mixed mode: use mixed mode to copy mixed size originals. See page 6-11 for details. 2 note see below for the guide width of each combination. Item description detectable original size two types of size combination are determined by the adf gu...
Page 126
3 paper and original information 3-18 océ cs620/cs650 pro z-folded original mode: use z-folded original mode to scan folded originals without using the size detection sensor of the adf. See page 6-13 for details. Item description detectable original size a3 w, b4 w, a4 v, b5 w/v, 11" e 17" w, 8.5" e...
Page 127
4 supplies & handling.
Page 129
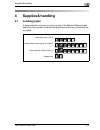
Supplies & handling 4 océ cs620/cs650 pro 4-3 4 supplies & handling 4.1 loading paper a paper indicator is shown on each tray key of the machine status screen and of the copy screen to indicate the paper level of the tray. (five levels are provided) main body (tray 1 to 3) paper feeder unit trays (t...
Page 130
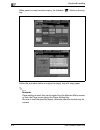
4 supplies & handling 4-4 océ cs620/cs650 pro when paper in a tray becomes empty, the indicator “ ” blinks on the tray key. Follow the procedure below to supply the empty tray with copy paper. 2 reminder paper setting for each tray can be made from the machine status screen or from the copy screen u...
Page 131
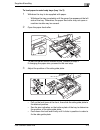
Supplies & handling 4 océ cs620/cs650 pro 4-5 to load paper in main body trays (tray 1 to 3) 1 withdraw the tray to be supplied with paper. – withdraw the tray completely until the green line appears at the left side of the tray. Otherwise, the paper feed roller may not open or machine trouble may b...
Page 132
4 supplies & handling 4-6 océ cs620/cs650 pro 4 adjust the position of the rear stopper. – to slide the rear stopper to the right, hold it at the upper part and slide it while pressing down slightly. On the other hand, hold the rear stopper at the lower part to slide it to the left. 5 place paper on...
Page 133
Supplies & handling 4 océ cs620/cs650 pro 4-7 2 reminder be sure to fix the side guide plate in position according to the size indication on the tray bottom plate so that the machine can detect the correct paper size. Be sure to press down the rear stopper when moving it to the right, and also be su...
Page 134
4 supplies & handling 4-8 océ cs620/cs650 pro to load paper in bypass tray 0 when using the bypass tray, specify the paper type to be loaded on the tray at the same time. See page 6-48 for details. 0 do not use paper with staples or paper that conducts electricity (silver, carbon, etc.), otherwise a...
Page 135
Supplies & handling 4 océ cs620/cs650 pro 4-9 to load paper in paper feeder unit trays (tray 4 and 5) 0 be sure that the machine is powered on before withdrawing the tray. 0 only one tray can be withdrawn at a time. 0 procedure to make fine adjustment of tray 5 paper guides is explained in another p...
Page 136
4 supplies & handling 4-10 océ cs620/cs650 pro 4 fix the paper guide knobs. – turn the paper guide knobs (two for each) clockwise to fix the guides. 5 load the paper into the tray. – load the paper so that the left side edge is aligned with the left side lining of the tray. – pushing the guide lock ...
Page 137
Supplies & handling 4 océ cs620/cs650 pro 4-11 to load a5/b6/a6 size paper in paper feeder unit 0 the lower tray (tray 5) can be load with a5 w/ b6 w/ a6 w size paper using the auxiliary paper guide. The upper tray (tray 4) can be loaded with a5 w/ b6 w size paper using the auxiliary paper guide. Do...
Page 138
4 supplies & handling 4-12 océ cs620/cs650 pro 4 adjust the position of the auxiliary paper guides. – pushing the paper guide lock release lever, move the auxiliary paper guides along the appropriate size guides for a5 w, b6 w or a6 w paper. Release the pressure applied to the paper guide lock relea...
Page 139
Supplies & handling 4 océ cs620/cs650 pro 4-13 2 reminder do not load above the limit level, and carefully load the paper to be seated under the paper holding lover at the air nozzle. Be sure that the side paper guides and front edge guide are securely aligned to the paper; otherwise the machine can...
Page 140
4 supplies & handling 4-14 océ cs620/cs650 pro to make fine adjustment of tray 5 paper guides printed image may be dislocated if the paper guides are not aligned closely to the paper loaded in the tray. Adjust the position of paper guides correctly according to the following procedure. 1 withdraw th...
Page 141
Supplies & handling 4 océ cs620/cs650 pro 4-15 4 align paper guides to the sheet. – turn the four paper guide knobs counterclockwise to loosen them. – pushing the paper guide lock release lever, move the lateral guides along the sheet. Do not press the guides to the sheet strongly; otherwise paper m...
Page 142
4 supplies & handling 4-16 océ cs620/cs650 pro 7 load the paper into the tray. – load the paper so that the left side edge is aligned with the left side lining of the tray. – pushing the guide lock release lever, move the front edge guide to the edge of the paper. 8 push in the tray until it locks i...
Page 143
Supplies & handling 4 océ cs620/cs650 pro 4-17 to load paper in large capacity tray (tray 4) 0 without the power turned on, the tray bottom plate will not function. Be sure to turn on the power switch before loading paper in the tray. 1 open the tray top door. – the tray bottom plate will go up. – t...
Page 144
4 supplies & handling 4-18 océ cs620/cs650 pro – turn the tray paper guide knobs (two for each) clockwise to fix the guides. – move the position of the rear stopper to the appropriate positions according to the size indication on the size indication on the bottom plate. – turn the two rear stopper k...
Page 145
Supplies & handling 4 océ cs620/cs650 pro 4-19 4 press the paper loading button. 5 repeat the steps 3 and 4 until the bottom plate will not go down any more. 6 close the tray top door. 2 reminder do not load above the limit indicated on the tray paper guides. Be sure that the rear stopper is correct...
Page 146
4 supplies & handling 4-20 océ cs620/cs650 pro 4.2 loading tabbed sheets tabbed sheets can be used if the tray paper type is specified as tabbed sheets in the paper setting. Follow the procedure below to supply the tray with tabbed sheets. To load tabbed sheets in main body trays (tray 1 to 3) 0 the...
Page 147
Supplies & handling 4 océ cs620/cs650 pro 4-21 4 move the side guide plates to the edge of the paper. – set paper aligning it to the paper feed roller side of the tray. – press the release lever of the front side guide plate to move the side guide plates, and also move the rear edge guide to the edg...
Page 148
4 supplies & handling 4-22 océ cs620/cs650 pro to load tabbed sheets in bypass tray example 1: 3 tabbed sheets loaded in position for one finished set. Example 2: 9 tabbed sheets loaded in position for 3 finished sets. 1 open the bypass tray located on the right side of the machine. 2 specify the pa...
Page 149
Supplies & handling 4 océ cs620/cs650 pro 4-23 to load tabbed sheets in paper feeder unit trays (tray 4 and 5) 0 the tray paper type should be specified as tabbed sheets. See page 6-48 for the details of paper setting. 0 example: 9 tabbed sheets loaded in position for 3 finished sets. 1 withdraw the...
Page 150
4 supplies & handling 4-24 océ cs620/cs650 pro to load tabbed sheets in large capacity tray (tray 4) 0 the tray paper type should be specified as tabbed sheets. See "using paper not specified to any tray: paper setting" on page 6-48 for the de- tails of paper setting. 1 specify the paper type of tra...
Page 151
Supplies & handling 4 océ cs620/cs650 pro 4-25 4.3 adding toner this machine is equipped with a toner storage to spare some toner so that the machine can keep printing for a while even if the toner in toner bottle is used up. When toner supply from the toner bottle becomes low, the message "ready to...
Page 152
4 supplies & handling 4-26 océ cs620/cs650 pro 7 warning precaution for the empty toner bottle if it is thrown into a fire, the toner may ignite and cause a dangerous situation. % do not throw toner or the empty toner bottle into a fire! 7 caution precaution for storing and handling the toner bottle...
Page 153
Supplies & handling 4 océ cs620/cs650 pro 4-27 to exchange the toner bottle 1 open the toner access door. 2 unlock and open the toner bottle cover of the empty toner bottle. 3 partially withdraw the toner bottle, then turn it to set the up-arrow mark (+) at the top..
Page 154
4 supplies & handling 4-28 océ cs620/cs650 pro 4 fully withdraw the toner bottle straightforward to remove the bottle. 5 loosen toner in the new toner bottle. – tap both top and bottom of the new toner bottle on a solid surface five times each, then shake the bottle at least five times. 6 remove the...
Page 155
Supplies & handling 4 océ cs620/cs650 pro 4-29 7 set the new toner bottle. – while positioning the up-arrow mark (+) at the top and aligning the two hollow parts of the toner bottle with the salients on the bottle entrance, fully insert the new toner bottle until it locks in place. 8 close and lock ...
Page 156
4 supplies & handling 4-30 océ cs620/cs650 pro 4.4 exchanging toner recovery box when the toner recovery box becomes full with the used toner, "please exchange toner recovery box" message will be displayed on the touch screen, and also the toner recovery box indicator on the machine status screen wi...
Page 157
Supplies & handling 4 océ cs620/cs650 pro 4-31 to exchange toner recovery box 1 open the toner recovery box door on the rear-right side of the machine. 2 withdraw the toner recovery box. 3 cover the used toner inlet of toner recovery box with a sticker. – remove the sticker from the toner recovery b...
Page 158
4 supplies & handling 4-32 océ cs620/cs650 pro 4 set the new toner recovery box, then close the toner recover box door. 2 reminder be sure to completely cover the used toner inlet with the sticker, otherwise the used toner may leak out to soil the machine..
Page 159
Supplies & handling 4 océ cs620/cs650 pro 4-33 4.5 replenishing staples inserting a new staple cartridge into finisher fs-503 (océ cs650 pro) when the staple cartridge of the finisher fs-503 becomes empty, the staple cartridge supply indicator lights in red in the option status area of the machine s...
Page 160
4 supplies & handling 4-34 océ cs620/cs650 pro 3 remove the staple cartridge. – pull down the handle of the staple cartridge to draw it downward. 4 set the staple roll into the staple cartridge. – open the staple cartridge cover, then set the staple roll into the cartridge. – close the cover, then r...
Page 161
Supplies & handling 4 océ cs620/cs650 pro 4-35 6 return the stapler unit to its original position. 7 close the finisher door. 2 reminder do not pull the lock tape upward, otherwise the tape may rip and remain inside the cartridge so that the staples cannot be used..
Page 162
4 supplies & handling 4-36 océ cs620/cs650 pro inserting a new staple cartridge into saddle stitcher sd-501 (océ cs650 pro) when the staple cartridge of the sd-501 saddle stitcher is empty, the staple cartridge supply indicator lights in red in the option status area of the machine status screen. If...
Page 163
Supplies & handling 4 océ cs620/cs650 pro 4-37 3 set the new cartridge. – check that the top side of the staple cartridge is up, otherwise it cannot be inserted. 4 close the left side door of the saddle stitcher..
Page 164
4 supplies & handling 4-38 océ cs620/cs650 pro inserting a new staple cartridge into finisher fs-607 (océ cs620) when the staple cartridge of the finisher fs-607 becomes empty, the staple cartridge supply indicator lights in red in the option status area of the machine status screen. Follow the proc...
Page 165
Supplies & handling 4 océ cs620/cs650 pro 4-39 3 remove the staple cartridge. – pull up and draw forward the sta- ple cartridge, then remove it while sliding it along the stapler rail. 4 remove the empty staple case from the staple cartridge. 5 insert the new staple case into the staple cartridge. –...
Page 166
4 supplies & handling 4-40 océ cs620/cs650 pro 6 set the staple cartridge. – insert the cartridge while sliding it along the stapler rail, then push down and in to secure it in place. 7 return the stacker unit to its original position. 8 close the finisher door. 1 2.
Page 167
Supplies & handling 4 océ cs620/cs650 pro 4-41 4.6 disposing punch waste emptying waste basket of finisher fs-607 (océ cs620) when the waste basket of punch kit pk-512 installed in finisher fs-607 be- comes full, the punch waste basket indicator lights in red in the option status area of the machine...
Page 168
4 supplies & handling 4-42 océ cs620/cs650 pro 3 empty the waste basket. 4 return the waste basket to its origi- nal position, then close the finisher door securely..
Page 169
Supplies & handling 4 océ cs620/cs650 pro 4-43 emptying waste basket of folding unit fd-501 (océ cs650 pro) when the waste basket of folding unit fd-501 becomes full, the punch waste basket indicator lights in red in the option status area of the machine status screen. Follow the procedure below to ...
Page 170
4 supplies & handling 4-44 océ cs620/cs650 pro 2 empty the waste basket. 3 return the waste basket to its original position, then close the folding unit door securely..
Page 171
Supplies & handling 4 océ cs620/cs650 pro 4-45 4.7 disposing trimmings when the waste basket of the saddle stitcher sd-501 becomes full, the trim waste indicator lights in red in the option status area of the machine status screen. If printing job is in progress, a message will be displayed on the c...
Page 172
4 supplies & handling 4-46 océ cs620/cs650 pro emptying waste basket of saddle stitcher sd-501 (océ cs650 pro) 1 withdraw the waste basket. – the waste basket cannot be withdrawn while machine operation is in progress. Be sure to confirm that the machine has stopped its operation before withdrawing ...
Page 173
Supplies & handling 4 océ cs620/cs650 pro 4-47 2 reminder be sure to return the waste basket to its original position, otherwise the trimming function cannot be performed..
Page 174
4 supplies & handling 4-48 océ cs620/cs650 pro 4.8 removing finished sets from large capacity stacker ls-501 (océ cs650 pro) the large capacity stacker ls-501 can hold 5,000 output sheets (2,000 sheets for b5 and a5) at maximum. Follow the procedure below to take out paper from the stacker. 2 note t...
Page 175
Supplies & handling 4 océ cs620/cs650 pro 4-49 3 withdraw the carriage by holding its handle. – be sure to withdraw the carriage straightforward, and do not change the direction forcibly while driving it. 4 remove the sheets from the carriage. The stacker unit can be removed from the carriage. 5 ret...
Page 176
4 supplies & handling 4-50 océ cs620/cs650 pro 2 reminder the carriage is for the exclusive use of carrying paper. Do not drive it in any other use. Never put yourself in the large capacity stacker. Once lowering the stacker unit for the purpose of removing mishandled paper or checking output sheets...
Page 177
Supplies & handling 4 océ cs620/cs650 pro 4-51 to secure paper on the carriage 1 remove the paper stopper form the carriage. 2 mount the paper stopper on the paper holder. – pull the tow projections of paper stopper to the holder, then raise the another side as illustrated. 3 hold the paper using th...
Page 178
4 supplies & handling 4-52 océ cs620/cs650 pro 5 remove the paper stopper from the paper holder. – pull up and turn the paper stopper as illustrated. – remove the stopper from the paper holder. 6 return the paper stopper to its original position. Return the paper stopper properly; otherwise the stac...
Page 179
5 before making copies.
Page 181
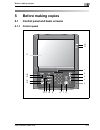
Before making copies 5 océ cs620/cs650 pro 5-3 5 before making copies 5.1 control panel and basic screens 5.1.1 control panel 1 2 3 4 5 6 7 8 9 10 11 12 13 14 15 16 17 18 19.
Page 182
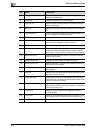
5 before making copies 5-4 océ cs620/cs650 pro no. Name description 1 keypad enters values for various settings, including the print quantity and password. 2 [reset] key restores machine to the initial settings. 3 [interrupt] key stops copying/printing/scanning in progress to allow a simple copying ...
Page 183
Before making copies 5 océ cs620/cs650 pro 5-5 7 caution the touch panel is covered with glass. % do not drop heavy objects on the glass, or put excess weight or pressure on it; otherwise the glass may break or scratched and you may be injured..
Page 184
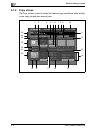
5 before making copies 5-6 océ cs620/cs650 pro 5.1.2 copy screen the copy screen is used to select the desired copy conditions when setting a new copy job and also reserve jobs. 1 2 3 4 5 6 7 8 9 10 11 12 13 14 15 16 17 18 19 20 21 22 23 24 25 26.
Page 185
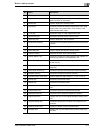
Before making copies 5 océ cs620/cs650 pro 5-7 no. Name description 1 [copy] tab touched to display the copy screen. 2 color mode area used to specify the desired color mode (single color, black, full color, or auto color). 3 [scan] tab used to display the scanner screen. 4 [zoom] key touched to sel...
Page 186
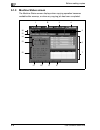
5 before making copies 5-8 océ cs620/cs650 pro 5.1.3 machine status screen the machine status screen displays when copying operation becomes available after warmup, or when any copying job has been completed. 1 2 3 4 2 5 6 7 8 9 10 11 12 13 14 15 16.
Page 187
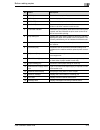
Before making copies 5 océ cs620/cs650 pro 5-9 no. Name description 1 [copy] tab touched to display the copy screen. 2 [scan] tab used to display the scanner screen. 3 [job list] tab touched to display the job list screen. 4 [machine] tab touched to display the machine status screen, and blinks in r...
Page 188
5 before making copies 5-10 océ cs620/cs650 pro 5.2 general copy operation follow the procedure below to make a basic copy. How to make a basic copy 0 the following procedure is basic and not always applicable to the operation of selected copy conditions. When using a specific function, be sure to f...
Page 189
Before making copies 5 océ cs620/cs650 pro 5-11 2 display copy screen. – touch [copy] tab on the machine status screen to display the copy screen. 3 set copy conditions as desired. – the following settings are available on the copy screen. [original setting]: see page 6-3. [separate scan]: see page ...
Page 190
5 before making copies 5-12 océ cs620/cs650 pro 4 enter the desired print quantity from the control panel keypad. – for details on entering print quantity, see page 5-20. Entered quantity will be displayed on the touch panel. 5 press [start] on the control panel. – when the machine starts scanning t...
Page 191
Before making copies 5 océ cs620/cs650 pro 5-13 the reserve job setting is available from this popup menu. Touch [yes] or [close] to return to the copy screen. See page 6-63 for details..
Page 192
5 before making copies 5-14 océ cs620/cs650 pro – if no is touched, the machine status screen will be restored. The current job will be displayed in the job list, with the count/set quantity indicated at the upper right corner of the screen. ! Detail the screen to be displayed after machine power is...
Page 193
Before making copies 5 océ cs620/cs650 pro 5-15 5.3 positioning the original use the adf or original glass to scan the original. 5.3.1 positioning originals into the adf the adf (automatic document feeder) automatically feeds up to 100 originals directly to the original glass area, starting with the...
Page 194
5 before making copies 5-16 océ cs620/cs650 pro 3 adjust paper guides. 2 reminder once closed, do not open the document feeder, otherwise the selected copy conditions may be altered automatically..
Page 195
Before making copies 5 océ cs620/cs650 pro 5-17 positioning the original in mixed mode mixed size originals can be copied together from the document feeder. For the sizes available in the mixed mode, see page 3-15. 1 arrange the original in order. – arrange the mixed sizes originals aligning them to...
Page 196
5 before making copies 5-18 océ cs620/cs650 pro positioning the original in z-folded mode z-folded mode detects the folded original size without using the size detection sensor of the adf. For the sizes available in the z-folded mode, see p. 3-16. 1 arrange the original in order. 2 position the orig...
Page 197
Before making copies 5 océ cs620/cs650 pro 5-19 5.3.2 positioning the original on original glass use the original glass when the original is not suitable for use with the adf, e.G., when size is incompatible, or when the original is folded, stapled, torn, or in generally poor condition. ! Detail for...
Page 198
5 before making copies 5-20 océ cs620/cs650 pro 5.4 setting print quantity this section describes how to set or change the print quantity. To set print quantity the machine is initially set to copy the original set in amounts determined by the print quantity setting, then output sorted sets. 0 print...
Page 199
Before making copies 5 océ cs620/cs650 pro 5-21 to change print quantity follow the procedure below to change the print quantity that has been already entered. 1 press [c] (clear quantity). The quantity displayed on the touch panel will return to 1. 2 enter the correct quantity from the control pane...
Page 200
5 before making copies 5-22 océ cs620/cs650 pro 5.5 setting job during warmup while the machine is warming up after power is turned on, you can select copy conditions and start scanning so that the machine may start printing immediately the machine engine is ready. Service can set the machine to dis...
Page 201
Before making copies 5 océ cs620/cs650 pro 5-23 to scan the original during warmup 1 turn on the main power switch and sub power switch of the machine. – for details on turning on the power, see page 2-23. 2 display the copy screen to check that the message "ready to set reserve job" is displayed in...
Page 202
5 before making copies 5-24 océ cs620/cs650 pro 3 set the desired copy conditions, and enter the print quantity. – for details on setting print quantity, see page 5-20. 4 position the original face up in the adf or face down on the original glass. – for details on positioning the original, see page ...
Page 203
Before making copies 5 océ cs620/cs650 pro 5-25 if [no] is touched, the machine status screen will be restored. The current job will be displayed in the job list, with the count/set quantity indicated at the upper right corner of the screen. ! Detail the screen to be displayed after machine power is...
Page 204
5 before making copies 5-26 océ cs620/cs650 pro 5.6 to stop scanning/printing this section describes how to stop the job currently in process (scanning, printing, or both of scanning and printing). To stop scanning/printing 0 this procedure is effective only for the job in progress. To stop reserved...
Page 205
Before making copies 5 océ cs620/cs650 pro 5-27 both scanning and printing are in progress % touch [stop job] to cancel the job, or touch [continue] to complete the job. 2 reminder touching [stop job] will delete all the scanned data..
Page 206
5 before making copies 5-28 océ cs620/cs650 pro scanning a job in separate scan mode % touch [stop job] to cancel the job, or touch [continue] to complete the job. 2 reminder touching [stop job] will delete all the scanned data..
Page 207
Before making copies 5 océ cs620/cs650 pro 5-29 batch printing is in progress % touch [stop job] to cancel the job, or touch [continue] to complete the job. 2 reminder touching [stop job] will delete all the scanned data..
Page 208
5 before making copies 5-30 océ cs620/cs650 pro scanning and printing the job using program job % touch [stop job] to cancel the job, or touch [continue] to complete the job. 2 reminder touching [stop job] will delete all the scanned data..
Page 209
Before making copies 5 océ cs620/cs650 pro 5-31 scanning reserve job while printing select to stop scanning, printing, or to stop both operation. 1 start scanning the reserve job while printing. The following popup menu will be displayed. 2 touch [no] to restore the machine status screen. – if machi...
Page 210
5 before making copies 5-32 océ cs620/cs650 pro 4 select the job to cancel. – touch [scan] to stop scanning the reserve job and continue printing. Touch [print] to stop printing and continue the scanning job. Touch [scan/print] to cancel both scanning and printing jobs. Touch [continue] to complete ...
Page 211
6 basic job settings.
Page 213
Basic job settings 6 océ cs620/cs650 pro 6-3 6 basic job settings 6.1 original setting this section describes how to specify the original types and direction. 6.1.1 selecting binding direction of the original: bind direction when copying double-sided originals in 2-1 or 2-2 mode, the copied sets wil...
Page 214
6 basic job settings 6-4 océ cs620/cs650 pro 0 top binding is available only in 2-1 or 2-2 copy mode. 0 if the machine restores the initial setting, this function will be reset to right & left binding. 0 the machine is set to match the binding direction of the original with the binding direction of ...
Page 215
Basic job settings 6 océ cs620/cs650 pro 6-5 6.1.2 specifying orientation of the original: direction specify the orientation of the original placed in the adf or on original glass. Without this setting, the copy results may not be obtained as expected, especially when making copies under following c...
Page 216
6 basic job settings 6-6 océ cs620/cs650 pro 1 position the original. 2 touch [original setting] on the copy screen. The original setting screen will be displayed. 3 touch the desired original direction key to highlight it. 4 touch [ok] to complete the setting and return to the copy screen. – touch ...
Page 217
Basic job settings 6 océ cs620/cs650 pro 6-7 6.1.3 specifying original type: image/type image select one of the following modes according to the original image type, so that the copy quality more closely matches to that of the original. This setting is effective when making copies in full color, sin...
Page 218
6 basic job settings 6-8 océ cs620/cs650 pro key description select for copying the original including both text and photo image. This mode is specified as factory default. Select to reproduce a half-tone photo image. The copy will closely rep- resent the half-tones of the original image. Select for...
Page 219
Basic job settings 6 océ cs620/cs650 pro 6-9 type use this function to improve the image quality by specifying the printed original type. Key description select for normal original. Select for photo-printed original. Select for copied original. Select for original printed using ink-jet printer..
Page 220
6 basic job settings 6-10 océ cs620/cs650 pro 1 position the original. 2 touch [original setting] on the copy screen. The original setting screen will be displayed. 3 touch the desired mode key to highlight it. – select the desired mode for each of image and type. 4 touch [ok] to complete the settin...
Page 221
Basic job settings 6 océ cs620/cs650 pro 6-11 6.1.4 copying mixed size originals: mixed use the mixed mode to copy the mixed size original set scanned from the adf with auto paper select or auto zoom activated. Function description auto paper select makes a copy of the same size as the original set....
Page 222
6 basic job settings 6-12 océ cs620/cs650 pro 0 load the original in the adf. 0 combination of the original sizes to be mixed depends on the widest original width (width of the adf original guides). See "positioning originals into the adf" on page 5-15 for details. 0 do not load more than 100 sheets...
Page 223
Basic job settings 6 océ cs620/cs650 pro 6-13 6.1.5 copying z-folded original: z-folded use the z-folded mode with the document feeder to copy z-folded originals. Otherwise, the size detection sensor of the adf may function incorrectly. 0 load the original in the adf. 0 this mode requires more scann...
Page 224
6 basic job settings 6-14 océ cs620/cs650 pro 6.1.6 specifying original thickness: thickness use this function with the adf to copy thin or thick originals. 0 load the original in the adf. 0 avoid using thin mode for double-sided originals, otherwise the originals may be damaged. 0 this function is ...
Page 225
Basic job settings 6 océ cs620/cs650 pro 6-15 6.1.7 copying non-standard size original: custom the machine usually detects the standard size of the original fed through adf or positioned on the original glass (standard mode). Use the custom mode to specify the desired standard size as scanning area ...
Page 226
6 basic job settings 6-16 océ cs620/cs650 pro 4 specify the desired scanning size. – selecting from standard size keys: touch the desired size key to highlight it. The machine scans the special size original as selected standard size. – selecting [full area]: select [full area] for small original th...
Page 227
Basic job settings 6 océ cs620/cs650 pro 6-17 – specifying a special size: (1) touch [size input] to display the size setting screen. (2) select the lengthwise/widthwise dimension key to highlight it, then use [+], [,] or touch screen keypad to enter the desired special size within the available ran...
Page 228
6 basic job settings 6-18 océ cs620/cs650 pro – registering a special size: (1) touch [size input] to display the size setting screen. (2) select the lengthwise/widthwise dimension key to highlight it, then use [+], [,], or touch screen keypad to enter the desired special size within the available r...
Page 229
Basic job settings 6 océ cs620/cs650 pro 6-19 (6) enter the desired name, then touch [ok] to return to the previous screen. (7) touch [close] to restore the size setting screen. (8) touch [ok] to return to the custom size screen with specified size displayed. – recalling a special size: (1) touch [s...
Page 230
6 basic job settings 6-20 océ cs620/cs650 pro 5 touch [ok]. The original setting screen will be restored. 6 touch [ok] to return to the copy screen. – touch [default set] to restore the initial setting, or touch [cancel] to resume the previous setting..
Page 231
Basic job settings 6 océ cs620/cs650 pro 6-21 6.1.8 copying tabbed originals: tab paper use tab paper mode to scan a4 v or 8.5" e 11" v tabbed original in order to print it including the tab part. ! Detail see page 4-20 for details on loading tabbed copy paper in a tray. 0 available tabbed copy pape...
Page 232
6 basic job settings 6-22 océ cs620/cs650 pro 4 touch the desired size key to highlight it, then touch [ok]. The original setting screen will be restored. 5 touch [ok] to return to the copy screen. – touch [default set] to restore the initial setting, or touch [cancel] to resume the previous setting...
Page 233
Basic job settings 6 océ cs620/cs650 pro 6-23 6.2 separate scan mode a large amount of the original can be divided and scanned into memory. The adf accepts only 100 sheets at a time, however, the separate scan mode allows you to handle the original that exceeds 100 sheets as a single job. The multip...
Page 234
6 basic job settings 6-24 océ cs620/cs650 pro 3 touch [separate scan] to highlight it. The separate scan mode will be activated. If this key is already highlighted, the separate scan mode has been activated automatically due to some copy selection. 4 press [start] on the control panel. The machine s...
Page 235
Basic job settings 6 océ cs620/cs650 pro 6-25 7 enter the desired print quantity, then press [start]. All the data in memory will be output. ! Detail to delete the scanned data without printing or to suspend the printing job, press [stop]. See "to stop scanning/printing" on page 5-26 for details..
Page 236
6 basic job settings 6-26 océ cs620/cs650 pro 6.3 selecting color mode the following four modes are available: - single color mode copies in one color selected from red, green, blue, magenta, cyan, and yellow. - black mode makes black-and-white copies whether the original image is colored or not. - ...
Page 237
Basic job settings 6 océ cs620/cs650 pro 6-27 – touching single color will display the single color screen. Select the desired color key, then touch [ok]. 3 select additional copy conditions, as desired. 4 enter the desired print quantity, then press [start] on the control panel..
Page 238
6 basic job settings 6-28 océ cs620/cs650 pro 6.4 zoom in the initial settings on the copy screen, the magnification is automatically set at 1.000 (full size). This section describes how to change the magnification ratio. 6.4.1 copying in 1.000 magnification mode follow this procedure to make a 100%...
Page 239
Basic job settings 6 océ cs620/cs650 pro 6-29 6.4.2 changing magnification ratio the following four modes are provided. - zoom (proportional): 0.250 to 4.000 in 0.001 (0.1%) increments - zoom (individual): vertical and horizontal zoom ratios can be specified individually within the range from 0.250 ...
Page 240
6 basic job settings 6-30 océ cs620/cs650 pro – zoom (individual): touch to highlight the vertical zoom key (the second one in the left side line) in the zoom area, then use the screen keypad to enter the desired lengthwise magnification ratio. Similarly, touch the horizontal zoom key (the third one...
Page 241
Basic job settings 6 océ cs620/cs650 pro 6-31 – preset zoom: touch the desired preset zoom key in the preset zoom area. 3 touch [ok] to return to the copy screen. – touch [cancel] to resume the previous setting..
Page 242
6 basic job settings 6-32 océ cs620/cs650 pro 6.4.3 setting magnification ratio automatically: auto zoom selecting a tray of the paper size specified as standard or tab paper in paper setting, the machine will select an appropriate magnification ratio automatically according to the scanned original ...
Page 243
Basic job settings 6 océ cs620/cs650 pro 6-33 6.5 simplex/duplex setting the machine is initially set to simplex (1->1) copy mode to make single-sided copies from single-sided originals. Follow the procedure below to make double-sided copies from the original scanned from the document feeder or from...
Page 244
6 basic job settings 6-34 océ cs620/cs650 pro 0 specify the original direction on the original setting screen according to that of the original loaded in the adf. 0 the double-sided copies can be arranged upside down on the back pages. 0 the normal double-sided copies (having the same edge as page t...
Page 245
Basic job settings 6 océ cs620/cs650 pro 6-35 3 specify other conditions for making double-sided copies. – selecting the original set direction and binding direction: (1) touch [original setting] on the copy screen to display the original setting screen. (2) touch to highlight the original direction...
Page 246
6 basic job settings 6-36 océ cs620/cs650 pro – selecting the binding direction of double-sided copies: (1) touch [output appli.] on the copy screen to display the output application screen. (2) touch the desired binding direction key to highlight it. To make double-sided copies arranged upside down...
Page 247
Basic job settings 6 océ cs620/cs650 pro 6-37 6.5.2 making double-sided copies using original glass use the original glass to scan originals unsuitable for the document feeder. 0 use the separate scan mode. 0 specify the original direction on the original setting screen according to that of the orig...
Page 248
6 basic job settings 6-38 océ cs620/cs650 pro 3 specify other conditions for making double-sided copies. – selecting the original set direction: (1) touch [original setting] on the copy screen to display the original setting screen. (2) touch to highlight the original direction key according to the ...
Page 249
Basic job settings 6 océ cs620/cs650 pro 6-39 – selecting the binding direction of double-sided copies: (1) touch [output appli.] on the copy screen to display the output application screen. (2) touch the desired binding direction key to highlight it. To make double-sided copies arranged upside down...
Page 250
6 basic job settings 6-40 océ cs620/cs650 pro 7 when all originals are scanned, touch [separate scan] to exit the separate scan mode. 8 press [start] to print. All the data in memory will be output. ! Detail to delete the scanned data without printing, or to suspend the printing job, press [stop]. F...
Page 251
Basic job settings 6 océ cs620/cs650 pro 6-41 6.5.3 making single-sided copies from double-sided originals use adf and select [2->1] mode to make single-sided copies from double- sided originals. 0 specify the original direction on the original setting screen according to that of the original loaded...
Page 252
6 basic job settings 6-42 océ cs620/cs650 pro 2 touch [2->1] on the copy screen to highlight it. 3 specify copy conditions for making copies from double-sided originals. – selecting the original set direction and binding direction: (1) touch [original setting] on the copy screen to display the origi...
Page 253
Basic job settings 6 océ cs620/cs650 pro 6-43 6.6 paper setting each paper tray has been preset with paper size and other specifications. The setting items are as follows: - paper type - name - weight - both sides adjustment - speed setting - hole-punch - colored paper - air assist (tray 4 and 5 of ...
Page 254
6 basic job settings 6-44 océ cs620/cs650 pro 6.6.1 selecting paper size automatically: auto paper select auto paper select detects the original size placed on the adf or original glass and automatically selects and feeds copy paper of the same size (e1.0 magnification mode), or selects an appropria...
Page 255
Basic job settings 6 océ cs620/cs650 pro 6-45 2 position the original. – the tray loaded with an appropriate paper size will be selected automatically. Or, a message will be prompt you that the appropriate size cannot be found in any tray. In this case, load the paper of the size referred in the mes...
Page 256
6 basic job settings 6-46 océ cs620/cs650 pro 6.6.2 turning on/off the rotation this function allows you to utilize auto paper select or auto zoom and copy the original documents onto size a4 or b5, irrespective of the copy paper feeding direction. ! Detail the machine can be set to change the timin...
Page 257
Basic job settings 6 océ cs620/cs650 pro 6-47 0 copy paper sizes: a4 v/w, b5 v/w 0 original sizes: a3 w, b4 w, a4 v/w, b5 v/w 1 touch [rotation off] on the copy screen to highlight it. When rotation is released, the rotation icon on the copy screen will disappear to indicate that this function is ca...
Page 258
6 basic job settings 6-48 océ cs620/cs650 pro 6.6.3 using paper not specified to any tray: paper setting each paper tray has been preset with paper size and other specifications. If you want to use another paper than any loaded in the trays, follow the procedure below to temporarily change the setti...
Page 259
Basic job settings 6 océ cs620/cs650 pro 6-49 4 select the tray to change the setting temporarily. – touch the desired tray key in the left side area of the screen. 5 change the setting of paper specifications. – change the paper specifications of the tray either by selecting the one previously regi...
Page 260
6 basic job settings 6-50 océ cs620/cs650 pro – to program a new setting: (1) touch [change]. In this case, the paper name cannot be changed. (2) touch [paper type], then select the desired paper type. Touch [ok] to complete the setting..
Page 261
Basic job settings 6 océ cs620/cs650 pro 6-51 the trays 4 and 5 exclusively allow the selection of four types of coated paper. (3) touch [weight]. Touch the desired paper weight key to highlight it. Use [unit change] to select the desired unit of the paper weight. Touch [ok] to complete the setting..
Page 262
6 basic job settings 6-52 océ cs620/cs650 pro the tray 5 and multi-sheet bypass tray exclusively allow the selection of 257 - 300 g/m 2 . (4) touch [both sides adj]. Touch [front] or [back] to select the printed side, select the adjustment item (vertical zoom, horizontal zoom, vertical shift, horizo...
Page 263
Basic job settings 6 océ cs620/cs650 pro 6-53 (5) touch [speed setting]. Select the desired speed key, then touch [ok]. This setting is unavailable if paper weight is specified as 106 - 135 g/m 2 . (6) make a selection for hole-punch. Touch [punched] if the paper has punch holes, or touch [no punche...
Page 264
6 basic job settings 6-54 océ cs620/cs650 pro (7) make a selection for colored paper. Touch [non white] when using colored paper, or touch [white] for white paper. (8) touch [ok] to return to the paper setting screen with the new specifications displayed. The paper specifications made in this step c...
Page 265
Basic job settings 6 océ cs620/cs650 pro 6-55 6 change the paper size temporarily. – select one of the following three options: standard, custom, tab paper – to set the desired standard size: (1) touch [size setting], then touch [standard] to highlight it. The tray can be set to detect some specific...
Page 266
6 basic job settings 6-56 océ cs620/cs650 pro – to set the desired custom size: (1) touch [size setting], then touch [custom]. (2) select the lengthwise/widthwise dimension key to highlight it, then use [+], [,], or touch screen keypad to enter the desired special size. Entered size should fall with...
Page 267
Basic job settings 6 océ cs620/cs650 pro 6-57 – to register the desired custom size: (1) touch [size setting], then touch [custom]. (2) select the lengthwise/widthwise dimension key to highlight it, then use [+], [,], or touch screen keypad to enter the desired special size. Entered size should fall...
Page 268
6 basic job settings 6-58 océ cs620/cs650 pro – to recall a registered custom size: (1) touch [size setting], then touch [custom]. (2) touch [size recall] to display the size recall screen. (3) touch the desired number key to highlight it, using [next] and [previous] as needed. (4) touch [ok] to res...
Page 269
Basic job settings 6 océ cs620/cs650 pro 6-59 – to set a tabbed paper size: (1) touch [size setting], then touch [tab paper]. (2) touch the desired tabbed paper size key to highlight it. (3) touch [ok] to complete the setting. 7 touch [close] on the paper setting screen. The copy screen will be rest...
Page 270
6 basic job settings 6-60 océ cs620/cs650 pro 2 note to output a chart for the both sides adjustment, follow the procedure below to set the adjustment value. (1) touch [front] on the both sides adjustment screen to select the printed side, then touch [chart adjustment]. (2) touch [copy] tab to displ...
Page 271
Basic job settings 6 océ cs620/cs650 pro 6-61 6.6.4 adjusting fixing pressure of fixing unit if printed image on large-sized paper becomes rugged, lowering the fixing pressure of the fixing unit may normalize the image. Reversely, if the image duplex-printed on small-sized thick paper shows unevenne...
Page 272
6 basic job settings 6-62 océ cs620/cs650 pro – slide the knob leftward to align the arrow mark on the lever with the one on the left side, if the image duplex-printed on small- sized thick paper shows unevenness. 5 close the left side cover of the fixing unit, return the fixing conveyance unit to i...
Page 273
Basic job settings 6 océ cs620/cs650 pro 6-63 6.7 setting reserve job the reserve function allows you to set up a new job while a current job is in process. When the current job is finished, the reserve job starts printing immediately. Service can set the machine to disable this function. Contact yo...
Page 274
6 basic job settings 6-64 océ cs620/cs650 pro – while printing job is in progress: the message “printing in progress” is displayed in the message area of the machine status screen. Touch [copy] tab to display the copy screen with the message “ready to set reserve job”. 2 select copy conditions for t...
Page 275
Basic job settings 6 océ cs620/cs650 pro 6-65 6.8 copy conditions incompatible with basic job settings.
Page 276
6 basic job settings 6-66 océ cs620/cs650 pro.
Page 277
Basic job settings 6 océ cs620/cs650 pro 6-67.
Page 278
6 basic job settings 6-68 océ cs620/cs650 pro.
Page 279
Basic job settings 6 océ cs620/cs650 pro 6-69 none: compatible o: grayed out 1: condition last selected has priority. (condition in the far left column will be released.) a: condition in the top row is selected automatically. Unreleasable. B: condition in the top row is selected automatically. Relea...
Page 280
6 basic job settings 6-70 océ cs620/cs650 pro.
Page 281
7 color adjustment.
Page 283
Color adjustment 7 océ cs620/cs650 pro 7-3 7 color adjustment 7.1 about colors rgb and cmyk models have you ever wondered why the world surrounding us appears colored to our eyes? Light is electromagnetic waves with wavelengths between about 380 - 780 nm, also called visible rays. The wavelengths of...
Page 284
7 color adjustment 7-4 océ cs620/cs650 pro the colors separated from visible light are called primary colors. Primary colors cannot be produced from other colors. These colors, however, can be combined to make up any other color (color mixture). The color mixture provides two different types, three ...
Page 285
Color adjustment 7 océ cs620/cs650 pro 7-5 hsb model this model is based on the human perception of color. When our eyes perceive colors in objects, we receive the information not only on the color itself (reddish, bluish, etc.) but the brightness (rather bright, dark, etc.) and the purity (vivid, d...
Page 286
7 color adjustment 7-6 océ cs620/cs650 pro 7.2 color copy quality modifying colors as mentioned above, colors can be reproduced by mixing four pigments, the three primary colors cyan (c), magenta (m), yellow (y), and black (k). To enhance the copy quality, this machine allows you to modify colors by...
Page 287
Color adjustment 7 océ cs620/cs650 pro 7-7 adjust the hue, saturation, and brightness. The hue adjustment leads the color of the image to another color adjacent in the color circle of red (r), yellow (y), green (g), cyan (c), blue (b), and magenta (m). Original hue saturation brightness.
Page 288
7 color adjustment 7-8 océ cs620/cs650 pro change the hue by varying the image’s red (r), green (g), and blue (b) individually or mutually. Original red green blue.
Page 289
Color adjustment 7 océ cs620/cs650 pro 7-9 change the hue by varying the image’s cyan (c), magenta (m), yellow (y), and black (k) individually or mutually. Original cyan magenta yellow black.
Page 290
7 color adjustment 7-10 océ cs620/cs650 pro reproducing images this machine provides two methods for reproducing images. The dither (error diffusion) method uses small dots (600 dots per inch) to reproduce the image. This method is appropriate for text originals. The screen method also provides two ...
Page 291
Color adjustment 7 océ cs620/cs650 pro 7-11 what is image distinction level? In many cases, originals include both photo and text. Although the text is normally printed in black, a color printer inevitably uses not only the black toner but cyan, magenta, and yellow in layers to reproduce the black t...
Page 292
7 color adjustment 7-12 océ cs620/cs650 pro applying filters in addition to the color adjustment and image reproduction methods, this machine allows you to apply the following filters to improve the copy image quality. Sharpen the outline of the image. (sharpness) increase the contrast of the image....
Page 293
Color adjustment 7 océ cs620/cs650 pro 7-13 increase shine on the image. (glossy) improving color copy quality to improve the color copy quality, this machine provides the three types of adjustment methods: color adjustment, selecting the image reproduction method and its adjustment, and other adjus...
Page 294
7 color adjustment 7-14 océ cs620/cs650 pro to use keys under [quality adjust.] on the copy screen when any setting is made on the quality adjustment screen, the selection will be listed as one of three keys in the area under the [quality adjust.] key on the copy screen. If four or more selections h...
Page 295
Color adjustment 7 océ cs620/cs650 pro 7-15 7.3 adjusting density level automatic exposure operates to detect the density level of the original image while scanning, and automatically selects the appropriate density for the copy. ! Detail the density to be selected automatically using automatic expo...
Page 296
7 color adjustment 7-16 océ cs620/cs650 pro 1 position the original. 2 touch [quality adjust.] on the copy screen. The quality adjustment screen will be displayed. 3 touch [copy density] to display the copy density screen..
Page 297
Color adjustment 7 océ cs620/cs650 pro 7-17 4 select the desired density level. – touch the desired density level key from [–1] to [–4] to make the copy image lighter, or from [+1] to [+4] to make it darker. – touch [standard] to select the middle density level. – to resume the automatic exposure, t...
Page 298
7 color adjustment 7-18 océ cs620/cs650 pro to adjust background adjust the background whiteness when copying newspaper or recycled paper original. 1 position the original. 2 touch [quality adjust.] on the copy screen. The quality adjustment screen will be displayed. Original background.
Page 299
Color adjustment 7 océ cs620/cs650 pro 7-19 3 touch [adj. Back.] to display the adjust background screen. 4 adjust the density level of the background. – touch the desired level key from [–1] to [–4] to make the background lighter, or from [+1] to [+4] to make it darker. – touch [standard] to select...
Page 300
7 color adjustment 7-20 océ cs620/cs650 pro 6 touch [close] on the quality adjustment screen. The copy screen will be restored with the [adj. Back.] key displayed and highlighted under the [quality adjust.] key. Use this key to directly jump to the adjust background screen, if any setting change is ...
Page 301
Color adjustment 7 océ cs620/cs650 pro 7-21 to adjust b-side prevent adjust the density level of the back side lighter when copying dark originals. 1 position the original. 2 touch [quality adjust.] on the copy screen. The quality adjustment screen will be displayed. 3 touch [b-side prevent] to disp...
Page 302
7 color adjustment 7-22 océ cs620/cs650 pro 4 adjust the density level of the back side. – touch the desired level key from [–1] to [–4] to make the back side lighter. – touch [standard] if adjustment is not needed. 5 touch [ok]. The quality adjustment screen will be restored. ? Do you want to resum...
Page 303
Color adjustment 7 océ cs620/cs650 pro 7-23 7.4 changing colors using rgb values change the color by modifying each value of red (r), green (g), and blue (b). 2 note in full color mode, this adjustment properly reflects on the strength of each color (red, green, and blue) reproduced on a printed ima...
Page 304
7 color adjustment 7-24 océ cs620/cs650 pro 3 touch the desired color key. The red, green, or blue adjustment screen will be displayed. 4 adjust the color value. – touch the desired level key from [–1] to [–4] to make the color weaker, or from [+1] to [+4] to make it stronger. – touch [standard] to ...
Page 305
Color adjustment 7 océ cs620/cs650 pro 7-25 5 touch [ok]. The quality adjustment screen will be restored. ? Do you want to resume the previous setting? % touch [cancel]. ? Do you want to restore the initial setting? % touch [default set]. ? Do you want to check the adjustment result? % touch [adj. P...
Page 306
7 color adjustment 7-26 océ cs620/cs650 pro 7.5 changing colors using hsb values change the color of the copy image by making adjustments to hue, saturation, and brightness. To adjust hue 1 position the original. 2 touch [quality adjust.] on the copy screen. The quality adjustment screen will be dis...
Page 307
Color adjustment 7 océ cs620/cs650 pro 7-27 4 make the desired adjustment. – touch the desired level key from [–1] to [–4] to make yellow closer to red, and red closer to magenta. (adjustment goes anticlockwise in the color circle.) or, touch a key from [+1] to [+4] to make yellow closer to green, a...
Page 308
7 color adjustment 7-28 océ cs620/cs650 pro 6 touch [ok]. The quality adjustment screen will be restored. ? Do you want to resume the previous setting? % touch [cancel]. ? Do you want to restore the initial setting? % touch [default set]. ? Do you want to check the adjustment result? % touch [adj. P...
Page 309
Color adjustment 7 océ cs620/cs650 pro 7-29 to adjust saturation 1 position the original. 2 touch [quality adjust.] on the copy screen. The quality adjustment screen will be displayed. 3 touch [saturation] to display the saturation screen..
Page 310
7 color adjustment 7-30 océ cs620/cs650 pro 4 make the desired adjustment. – touch the desired level key from [–1] to [–4] to make the colors calm, or from [+1] to [+4] to make them vivid. – touch [standard] to select the middle level. 5 to adjust the saturation by setting fine adjustment in each co...
Page 311
Color adjustment 7 océ cs620/cs650 pro 7-31 6 touch [ok]. The quality adjustment screen will be restored. ? Do you want to resume the previous setting? % touch [cancel]. ? Do you want to restore the initial setting? % touch [default set]. ? Do you want to check the adjustment result? % touch [adj. P...
Page 312
7 color adjustment 7-32 océ cs620/cs650 pro to adjust brightness 1 position the original. 2 touch [quality adjust.] on the copy screen. The quality adjustment screen will be displayed. 3 touch [brightness] to display the brightness screen..
Page 313
Color adjustment 7 océ cs620/cs650 pro 7-33 4 select the desired brightness level. – touch the desired level key from [–1] to [–4] to make the image darker, or from [+1] to [+4] to make it brighter. – touch [standard] to select the middle level. 5 touch [ok]. The quality adjustment screen will be re...
Page 314
7 color adjustment 7-34 océ cs620/cs650 pro 7.6 adjusting sharpness use this function to sharpen the outline of copy image. To adjust sharpness 1 position the original. 2 touch [quality adjust.] on the copy screen. The quality adjustment screen will be displayed. 3 touch [sharpness] to display the s...
Page 315
Color adjustment 7 océ cs620/cs650 pro 7-35 4 select the desired sharpness level. – touch the desired level key from [–1] to [–4] to make the outline smoother, or from [+1] to [+4] to make it sharper. – touch [standard] to select the middle level. 5 touch [ok]. The quality adjustment screen will be ...
Page 316
7 color adjustment 7-36 océ cs620/cs650 pro 7.7 adjusting contrast use this function to increase the contrast of copy image. To adjust contrast 1 position the original. 2 touch [quality adjust.] on the copy screen. The quality adjustment screen will be displayed. 3 touch [contrast] to display the co...
Page 317
Color adjustment 7 océ cs620/cs650 pro 7-37 4 select the desired contrast level. – touch the desired level key from [–1] to [–4] to decrease the contrast, or from [+1] to [+4] to increase the contrast. – touch [standard] to select the middle level. 5 touch [ok]. The quality adjustment screen will be...
Page 318
7 color adjustment 7-38 océ cs620/cs650 pro 7.8 setting image distinction level image distinction level detects and determines the photo portion and text area of the original when scanned, allowing you to obtain the optimum print result by modifying the standard for detection according to the charac...
Page 319
Color adjustment 7 océ cs620/cs650 pro 7-39 3 touch [distinction] to display the image distinction level screen. 4 make an adjustment to text/photo. – touch the desired level key from [–1] to [–4] to increase the proportion of photo, or from [+1] to [+4] to increase the proportion of text. – touch [...
Page 320
7 color adjustment 7-40 océ cs620/cs650 pro 6 touch [ok]. The quality adjustment screen will be restored. ? Do you want to resume the previous setting? % touch [cancel]. ? Do you want to restore the initial setting? % touch [default set]. ? Do you want to check the adjustment result? % touch [adj. P...
Page 321
Color adjustment 7 océ cs620/cs650 pro 7-41 7.9 selecting screen type or compression this machine provides two methods to reproduce the print image; line screen and dot screen. The machine selects an appropriate method automatically according to the other copy conditions selected for the job. ! Deta...
Page 322
7 color adjustment 7-42 océ cs620/cs650 pro to select reproducing method 1 position the original. 2 touch [quality adjust.] on the copy screen. The quality adjustment screen will be displayed. 3 touch [screen] to display the screen setting screen..
Page 323
Color adjustment 7 océ cs620/cs650 pro 7-43 4 select the desired reproducing method. – to select the line screen, touch [line 1] or [line 2/type 1] to highlight it. – to select the dot screen, touch [dot 1] or [dot 2/type 1] to highlight it. – to compress the scanned data, touch [compression] to hig...
Page 324
7 color adjustment 7-44 océ cs620/cs650 pro 7.10 changing colors using cmyk value change the hue by varying the image’s cyan (c), magenta (m), yellow (y), and black (k) individually or mutually. This adjustment can be made in each density area (shadow, mid tone, or highlight) of the individual color...
Page 325
Color adjustment 7 océ cs620/cs650 pro 7-45 4 select the desired density area. – check the shadow, mid tone, and highlight areas of the original, then select the desired density area to adjust the color balance. – if the adjustment is necessary for the whole density area, touch [all] to highlight it...
Page 326
7 color adjustment 7-46 océ cs620/cs650 pro 7.11 selecting glossy use this function to increase shine on the copy image. To specify glossy 1 position the original. 2 touch [quality adjust.] on the copy screen. The quality adjustment screen will be displayed. 3 touch [glossy] to highlight it..
Page 327
Color adjustment 7 océ cs620/cs650 pro 7-47 4 touch [close] on the quality adjustment screen. The copy screen will be restored with the [glossy] key displayed and highlighted under the [quality adjust.] key. ? Do you want to restore the initial setting? % touch [default set]. ! Detail setting "gloss...
Page 328
7 color adjustment 7-48 océ cs620/cs650 pro 7.12 copy conditions incompatible with color adjustment.
Page 329
Color adjustment 7 océ cs620/cs650 pro 7-49.
Page 330
7 color adjustment 7-50 océ cs620/cs650 pro none: compatible o: grayed out 1: condition last selected has priority. (condition in the far left column will be released.) a: condition in the top row is selected automatically. Unreleasable. B: condition in the top row is selected automatically. Releasa...
Page 331
8 application functions.
Page 333
Application functions 8 océ cs620/cs650 pro 8-3 8 application functions 8.1 to use application function follow the procedure below to display the application screen and select the desired copying features. To display application screen 1 touch [copy] tab on the machine status screen to display the c...
Page 334
8 application functions 8-4 océ cs620/cs650 pro – the application screen will be displayed on the touch panel. – if you touch a function key, another screen or two will display to enable you to enter the appropriate settings (except for program job, non-image area erase, neg./positive reverse, and i...
Page 335
Application functions 8 océ cs620/cs650 pro 8-5 to use keys under [application] on the copy screen when any setting is made on the application screen, the selection will be listed as one of three keys in the area under the [application] key on the copy screen. If four or more selections have been ma...
Page 336
8 application functions 8-6 océ cs620/cs650 pro 8.2 inserting sheets and covers: insert sheet use insert sheet in print mode or blank mode to insert chapter sheets or separator sheets into the finished set, as well as front and back covers. The covers and insertions can be fed from different tray so...
Page 337
Application functions 8 océ cs620/cs650 pro 8-7 e.G. Selecting [print] with page 5 specified as insertion location: simplex/duplex description 1%1 the 5th page of single-sided original is copied onto the insertion, which will be the 5th sheet of copied set. 1%2 the 5th and 6th pages of single-sided ...
Page 338
8 application functions 8-8 océ cs620/cs650 pro e.G. Selecting [blank] with page 5 specified as insertion location: simplex/duplex description 1%1 a blank insertion will be added as the 6th sheet of copied set, after the 5th page of single-sided original is simplex-copied. 1%2 a blank insertion will...
Page 339
Application functions 8 océ cs620/cs650 pro 8-9 0 use adf. Use separate scan mode if original count exceeds 100 or if original glass is desired for scanning the original. See page 6-23 for details. 0 trays for copy paper, front/back covers, and insertions should have the same paper size loaded. Auto...
Page 340
8 application functions 8-10 océ cs620/cs650 pro 5 select the desired cover mode. – touch [front/back cover] on the insert sheet screen. – touch the desired tray key to select the cover sheet tray source. – select the desired front/back cover mode. Touch [none] if no cover is desired, [print] to ins...
Page 341
Application functions 8 océ cs620/cs650 pro 8-11 6 select the desired insertion mode. – touch [insert paper] on the insert sheet screen. – touch the desired tray key to select the insertion tray source. – select the desired insertion mode. Touch [print] to insert a copied insertion, or touch [blank]...
Page 342
8 application functions 8-12 océ cs620/cs650 pro – touch [ok] to complete the setting and return to the insert sheet screen, or touch [cancel] to restore the previous setting. ? What if an entered page number is larger than the total original page count? % the entered page number will be ignored. ? ...
Page 343
Application functions 8 océ cs620/cs650 pro 8-13 9 confirm the setting information on the screen. – the insert sheet screen provides the information of the setting made on each subsequent screen. If no setting change is desired, touch [close] to return to the application screen. – to release the ins...
Page 344
8 application functions 8-14 océ cs620/cs650 pro 8.3 locating title pages on the right side: chapters chapter is used with adf in 1-2 mode for the purpose of locating title pages on the right side, rather than reverse side, of a duplex copy to improve the presentation of double-sided copies. To effe...
Page 345
Application functions 8 océ cs620/cs650 pro 8-15 0 use adf. Use separate scan mode if original count exceeds 100 or if original glass is desired for scanning the original. See page 6-23 for details. 0 max. Title pages: 30 sheets, from 1 ~ 999 0 the chapter page can be copied on the sheet from anothe...
Page 346
8 application functions 8-16 océ cs620/cs650 pro 4 enter the page number of each title page. – use the control panel keypad to enter the page number of each title page. Touch [set] after each entry to move to the next key. To clear an incorrect entry, touch [delete]. Repeat this procedure to make al...
Page 347
Application functions 8 océ cs620/cs650 pro 8-17 6 touch [ok] on the application screen. The copy screen will be restored, with highlighted [chapters] key displayed under the [application] key. Use this key to jump to the subsequent screen to make any setting change. 7 enter the desired print quanti...
Page 348
8 application functions 8-18 océ cs620/cs650 pro 8.4 lay out several pages onto one sheet: combine originals use this function to lay out and copy a fixed number (2, 4, or 8) of pages onto one sheet of copy paper, so that the paper use can be saved. The following functions are provided to combine or...
Page 349
Application functions 8 océ cs620/cs650 pro 8-19 8 in 1 select this setting to print eight original images onto one page. The page arrangement (numbering direction) can be specified. Horizontal order, left binding horizontal order, right binding vertical order, left binding vertical order, right bin...
Page 350
8 application functions 8-20 océ cs620/cs650 pro 0 use adf. 0 if the original is placed on the original glass, separate scan mode will function automatically. 0 auto zoom is automatically selected. Normally the fixed size of tray 1 will be selected. (available to be changed manually.) 1 position the...
Page 351
Application functions 8 océ cs620/cs650 pro 8-21 5 touch [ok] to complete the setting. – to restore the previous setting, touch [cancel]. – to release the combine originals function with the current setting remained, touch [function off]. 6 touch [ok] on the application screen. The copy screen will ...
Page 352
8 application functions 8-22 océ cs620/cs650 pro 8.5 making a multiple page signature booklet: booklet pagination use this function to make a multiple page signature booklet on both sides of paper. Original images are scanned into memory and automatically arranged in booklet format in correct order....
Page 353
Application functions 8 océ cs620/cs650 pro 8-23 0 use adf. Use separate scan mode if original count exceeds 100 or if original glass is desired for scanning the original. See page 6-23 for details. 0 available original sizes are a3 w, b4 w, a4 w/v, and b5 w/v. 0 original pages should be a multiple ...
Page 354
8 application functions 8-24 océ cs620/cs650 pro 5 touch to highlight the desired mode key. – when a cover sheet is required, touch [cover tray select] to select the cover sheet tray source. – touch [left bind] or [right bind] if you want to change the output order. 6 touch [ok] to complete the sett...
Page 355
Application functions 8 océ cs620/cs650 pro 8-25 8.6 inserting different original images into printed sets: insert image use this function to insert images scanned from the original glass into a set of original document scanned from the adf at specified locations, then output the combined images as ...
Page 356
8 application functions 8-26 océ cs620/cs650 pro 0 up to 30 locations can be specified for the original from 1 to 999 pages. 0 separate scan mode is automatically selected. 1 load the original in the adf. – be sure to arrange the original in page order, and then place it with the first page faceup. ...
Page 357
Application functions 8 océ cs620/cs650 pro 8-27 – up to 30 image insertion locations can be specified. To enter the 16th to 30th locations, touch [,] to scroll to the next page. ? What if an entered page number is larger than the total original page count? % the insertion images will be added at th...
Page 358
8 application functions 8-28 océ cs620/cs650 pro 7 touch [ok] on the application screen. The copy screen will be restored, with highlighted [insert image] key displayed under the [application] key. Use this key to jump to the subsequent screen to make any setting change. The [separate scan] key on t...
Page 359
Application functions 8 océ cs620/cs650 pro 8-29 8.7 dividing spread image into right and left pages: book copy use this function to divide a page spread image, such as an open book or catalog, into two separate images of right and left pages. If front and back covers are desired, scan the cover pag...
Page 360
8 application functions 8-30 océ cs620/cs650 pro e.G. Using booklet pagination in combination to make a booklet: front/back cover + spread printed sets will be output from the front cover page, divided document pages according to pagination, then the back cover page. The original should be scanned f...
Page 361
Application functions 8 océ cs620/cs650 pro 8-31 e.G. Using adf to scan page spread originals to copy right and left pages separately: mode key description left bind page spread originals will be scanned from the left page to the right page, and will be output in page order. Right bind page spread o...
Page 362
8 application functions 8-32 océ cs620/cs650 pro 0 available paper sizes: a4, b5, 8.5" e 11" 0 separate scan mode is automatically selected. 0 non-image area erase and image centering are automatically selected for scanning the original from original glass. Do not close the adf throughout the scanni...
Page 363
Application functions 8 océ cs620/cs650 pro 8-33 4 select the desired book copy mode. – touch either [spread], [front cover + spread], or [front/back cover + spread] to highlight it. – select the binding position of the original by touching [left bind] or [right bind]. 5 to make a multiple page sign...
Page 364
8 application functions 8-34 océ cs620/cs650 pro 8 select additional copy conditions, as desired. – available paper sizes are a4 v, b5 v, and 8.5" e 11" v. – auto zoom and auto paper select are released and e1.0 magnification is selected automatically. – be sure not to select [top] as binding direct...
Page 365
Application functions 8 océ cs620/cs650 pro 8-35 8.8 programming different settings for an output job: program job in the ordinary separate scan mode, the combined features selected for the job are applied to all originals to be scanned. Using program job, you may scan multiple sets of originals and...
Page 366
8 application functions 8-36 océ cs620/cs650 pro 0 separate scan mode is automatically selected. 0 output mode and print quantity setting cannot be specified for each job. The last setting made will be applied to all jobs. 0 the paper size specified for the first job will be applied to all subsequen...
Page 367
Application functions 8 océ cs620/cs650 pro 8-37 6 press [start] to start scanning. When scanning for the current job is completed, the popup menu will be displayed to ask you whether or not to store the scanned image data as a job for printing in specified copy conditions. 7 touch [decision] to sto...
Page 368
8 application functions 8-38 océ cs620/cs650 pro 10 touch [output appli.] to display the output application screen, then select the desired output mode. – the setting made at this time will be applied to all subsequent jobs. 11 enter the desired print quantity from the control panel keypad. – entere...
Page 369
Application functions 8 océ cs620/cs650 pro 8-39 8.9 dividing an image for enlarged copy: multi-page enlargement use this function to make an enlarged copy, made up of several copied pages divided and enlarged from an original image. 0 use the original glass to scan. 0 use auto paper select, or sele...
Page 370
8 application functions 8-40 océ cs620/cs650 pro – touch the desired tray key to highlight it. If auto paper select is selected (initial setting), the largest paper size loaded in a tray will be selected automatically. 3 touch [application] on the copy screen. 4 touch [multi-page enlargement] on the...
Page 371
Application functions 8 océ cs620/cs650 pro 8-41 5 select an output paper size or magnification, as desired. – to select an output paper size: touch the desired size key to highlight it. – to select a magnification ratio: use the touch panel keypad or [+]/[,] to specify the desired magnification rat...
Page 372
8 application functions 8-42 océ cs620/cs650 pro 8.10 erasing outside area of original: non-image area erase using this function, the machine will automatically detect the original size placed on the original glass, then make a copy eliminating the exposed glass area outside the borders of the origi...
Page 373
Application functions 8 océ cs620/cs650 pro 8-43 3 touch [non-image area erase] on the application screen. The incompatible function keys will be dimmed to show inactivity. 4 touch [ok] on the application screen. The copy screen will be restored, with highlighted [non-image area] key displayed under...
Page 374
8 application functions 8-44 océ cs620/cs650 pro 8.11 reversing color in image: neg./positive reverse use this function to reverse the positive image to the negative image and vice versa in the selected color mode. - single color: makes a reversed image in the selected single color. - black: reverse...
Page 375
Application functions 8 océ cs620/cs650 pro 8-45 1 position the original. 2 touch [application] on the copy screen. 3 touch [neg./positive reverse] on the application screen. The incompatible function keys will be dimmed to show inactivity. 4 touch [ok] on the application screen. The copy screen wil...
Page 376
8 application functions 8-46 océ cs620/cs650 pro 8.12 repeating original image on one sheet: image repeat 8.12.1 setting repeat times automatically use the size manual input mode to manually specify the scanning area of the original glass, then let the machine to print the scanned image repeatedly o...
Page 377
Application functions 8 océ cs620/cs650 pro 8-47 0 scan the original from original glass. The adf cannot be used to scan the original. 0 use the size manual input mode to repeat a part of the original, not the entire image, by specifying the scanning area. 0 size auto detect mode uses non-image area...
Page 378
8 application functions 8-48 océ cs620/cs650 pro 4 make setting for size manual input or size auto detect, as desired. – to select size manual input: touch [manual] to highlight it, then use [+]/[,] to specify the desired horizontal/vertical width. – if the touch panel keypad is desired, touch [inpu...
Page 379
Application functions 8 océ cs620/cs650 pro 8-49 – to select size auto detect: touch [auto] to highlight it. 5 touch [ok] to complete the setting. – to restore the previous setting, touch [cancel]. – to release the image repeat function with the current setting remained, touch [function off]. 6 touc...
Page 380
8 application functions 8-50 océ cs620/cs650 pro ! Detail using size auto detect mode, image repeat may perform incorrectly if the lighting in the work place is directly over the original glass. In this case, consult your service representative about an appropriate place for installation. You may fi...
Page 381
Application functions 8 océ cs620/cs650 pro 8-51 8.12.2 specifying repeat times: repeat repeat mode will scan the image area specified by the selected paper size and mode (2 repeat, 4 repeat, or 8 repeat), then arrange the image by specified times in one copy sheet. 2 repeat 4 repeat 8 repeat.
Page 382
8 application functions 8-52 océ cs620/cs650 pro 0 magnification ratio is fixed to e1.0 (100%). Rotation becomes unavailable, if this magnification ratio is changed manually. 0 the scanning area will be a portion of the selected paper size equally divided according to the selected mode. 1 position t...
Page 383
Application functions 8 océ cs620/cs650 pro 8-53 5 touch [ok] to complete the setting. – to restore the previous setting, touch [cancel]. – to release the image repeat function with the current setting remained, touch [function off]. 6 touch [ok] on the application screen. The copy screen will be re...
Page 384
8 application functions 8-54 océ cs620/cs650 pro 8.13 eliminating copy marks along borders: frame center erase when the original is scanned from the original glass, black copy marks may be produced along borders and center line, and also around punch holes. Use this function to eliminate them from t...
Page 385
Application functions 8 océ cs620/cs650 pro 8-55 0 available range for the frame erase amount is 1 to 300 mm, for the center erase amount is 1 to 99 mm, in 1 mm increments. 0 frame erase and center erase can be used in combination. 0 the frame erase amount can be specified both collectively for all ...
Page 386
8 application functions 8-56 océ cs620/cs650 pro 4 touch [erase/all sides], [erase/each side], or [center erase] to highlight it. – use frame erase and center erase in combination, if desired. 5 specify the erasure amount for the selected mode. – to specify the erase amount for erase/all sides: conf...
Page 387
Application functions 8 océ cs620/cs650 pro 8-57 – to specify the erase amount for erase/each side: touch the desired side key on the right side of the screen to highlight the erase amount in the illustration, then use [,] and [+], or touch panel keypad to enter the desired erase amount. – to specif...
Page 388
8 application functions 8-58 océ cs620/cs650 pro 7 touch [ok] on the application screen. The copy screen will be restored, with highlighted [frame/fold] key displayed under the [application] key. Use this key to jump to the subsequent screen to make any setting change. 8 enter the desired print quan...
Page 389
Application functions 8 océ cs620/cs650 pro 8-59 8.14 copying image in the center of copy paper: image centering use this function to detect the image area of the original and center the whole image on copy paper. 1 position the original. – both adf and original glass are available. 2 touch [applica...
Page 390
8 application functions 8-60 océ cs620/cs650 pro 4 touch [ok] on the application screen. The copy screen will be restored, with highlighted [non-image area] and [image centering] keys displayed under the [application] key. These keys can also be used to display the application screen for making sett...
Page 391
Application functions 8 océ cs620/cs650 pro 8-61 8.15 adjusting position of copy image: page margin - shift use this function to create a binding margin on copies in order to make it easier for filing purposes, and also to adjust the position of copy image on both front and back sides when making do...
Page 392
8 application functions 8-62 océ cs620/cs650 pro 0 available shift direction: top, bottom, right, left 0 shift amount: 0 to 250 mm in 1 mm increments 1 position the original. 2 touch [application] on the copy screen. 3 touch [page margin] on the application screen. 4 touch [shift]..
Page 393
Application functions 8 océ cs620/cs650 pro 8-63 5 select the side of copy paper to be adjusted with image position. – touch [front], [back], or [double sided] to highlight it. – making single-sided copies, only the front side setting will be effective. – to have the same shift amount on both sides ...
Page 394
8 application functions 8-64 océ cs620/cs650 pro 6 specify the shift direction and amount. – use [top] or [bottom] to shift the image in lengthwise direction, and [right] or [left] in widthwise direction. Touch the desired shift direction key to highlight it, then use [,] and [+], or touch panel key...
Page 395
Application functions 8 océ cs620/cs650 pro 8-65 2 note page space function is available only when booklet pagination or 2 repeat mode of image repeat has been already selected. Use this function to make the desired amount of blank space between the two images on a page. Booklet page space original ...
Page 396
8 application functions 8-66 océ cs620/cs650 pro 8.16 reducing images to create binding margin: page margin - reduce & shift use this function instead of shift to prevent image loss when creating a binding margin. To create a binding margin without reducing the original image, see "adjusting positio...
Page 397
Application functions 8 océ cs620/cs650 pro 8-67 0 auto zoom is automatically selected and cannot released. Reduction ratio will depend on the specified shift amount. 0 shift amount: 0 to 250 mm in 1 mm increments 1 position the original. 2 touch [application] on the copy screen. 3 touch [page margi...
Page 398
8 application functions 8-68 océ cs620/cs650 pro 5 select the side of copy paper to be adjusted with image position. – touch [front] or [back] to highlight it. – auto zoom will automatically determine the reduction ratio according to the shift amount specified for the front page. Setting for the bac...
Page 399
Application functions 8 océ cs620/cs650 pro 8-69 8.17 printing additional information: stamp/image overlay this function allows you to print onto output copies the desired type of built- in stamp, numbering for multiple sets, page number for multiple pages, date/time, watermark, and watermark number...
Page 400
8 application functions 8-70 océ cs620/cs650 pro the above six modes are provided with following detailed settings. For details, see page 8-83. - fine adjustment for printed position - start number setting for set numbering mode - start number setting for page no. Mode - character size/type setting ...
Page 401
Application functions 8 océ cs620/cs650 pro 8-71 8.17.1 printing stamp onto copies: built-in stamp print the desired letter type selected from preset stamps onto the specified position of copies. 0 to use this function, the optional hdd (hd-506) is required to be installed in the machine. 1 position...
Page 402
8 application functions 8-72 océ cs620/cs650 pro 5 select the desired stamp type, printing position, character size, print page and color. – touch one of the twelve stamp type keys to highlight it. – touch one of the nine printing position keys to highlight it. If fine adjustment is desired, touch [...
Page 403
Application functions 8 océ cs620/cs650 pro 8-73 8.17.2 printing distribution number: set numbering print a distribution number onto the specified position of copies. 1 position the original. 2 touch [application] on the copy screen. 3 touch [stamp/image overlay] on the application screen. 4 touch [...
Page 404
8 application functions 8-74 océ cs620/cs650 pro 5 select the desired numbering type, printing position, character size, print page, start number, and color. – touch one of the four numbering type keys to highlight it. – touch one of the nine printing position keys to highlight it. If fine adjustmen...
Page 405
Application functions 8 océ cs620/cs650 pro 8-75 8.17.3 printing page number: page no. Print a page number onto the specified position of copies. 1 position the original. 2 touch [application] on the copy screen. 3 touch [stamp/image overlay] on the application screen. 4 touch [page no.]..
Page 406
8 application functions 8-76 océ cs620/cs650 pro 5 select the desired page numbering type, printing position, print page, color, character size/type, and start number. – touch one of the five page numbering type keys to highlight it. – touch one of the nine printing position keys to highlight it. If...
Page 407
Application functions 8 océ cs620/cs650 pro 8-77 8.17.4 printing date/time: date/time print date and time onto the specified position of copies. 1 position the original. 2 touch [application] on the copy screen. 3 touch [stamp/image overlay] on the application screen. 4 touch [date/time]..
Page 408
8 application functions 8-78 océ cs620/cs650 pro 5 select the desired date/time type, printing position, character size/type, print page, and color. – touch one of the five date type keys and one of the three time type keys to highlight it. – touch one of the nine printing position keys to highlight...
Page 409
Application functions 8 océ cs620/cs650 pro 8-79 8.17.5 printing watermark onto copies: watermark print the desired letter type selected from preset watermarks in the center of printed page background. 0 to use this function, the optional hdd (hd-506) is required to be installed in the machine. 1 po...
Page 410
8 application functions 8-80 océ cs620/cs650 pro 5 select the desired watermark type, color, and text density. – touch one of the twelve watermark type keys to highlight it. – touch one of the seven color keys to highlight it. – touch one of the four text density keys to highlight it. – if fine adju...
Page 411
Application functions 8 océ cs620/cs650 pro 8-81 8.17.6 printing distribution number as watermark: set numbering print a distribution number in the specified form repeatedly over the scanned image. 1 position the original. 2 touch [application] on the copy screen. 3 touch [stamp/image overlay] on th...
Page 412
8 application functions 8-82 océ cs620/cs650 pro 5 select the desired watermark numbering type, character size, start number, color, and text density. – touch one of the four numbering type keys to highlight it. – touch [character size] to select 20 point or 36 point. – to specify the start number, ...
Page 413
Application functions 8 océ cs620/cs650 pro 8-83 8.17.7 detailed setting in "stamp/watermark" making fine adjustment on printing position use this function to make fine adjustment on printing position of built-in stamp, set numbering, page no., and date/time. The adjustment range is 0 to 50 mm, in l...
Page 414
8 application functions 8-84 océ cs620/cs650 pro setting start number in "set numbering" touching [start number] on the set numbering screen will display the following screen to allow you to specify the start number. 1 use [,] and [+], or touch panel keypad to enter the desired start number. Up to f...
Page 415
Application functions 8 océ cs620/cs650 pro 8-85 setting start number in "page no." touching [start number] on the page no. Screen will display the following screen to allow you to specify the start number and page to be started with page numbering. If chapters is already selected, chapter start num...
Page 416
8 application functions 8-86 océ cs620/cs650 pro selecting character size/type use this function to specify the character size and type for page no., and date/time. 1 touch one of the four keys under character size to highlight it. 2 touch either [gothic] or [ming] under font to highlight it. 3 touc...
Page 417
Application functions 8 océ cs620/cs650 pro 8-87 setting print page in "page no." this function allows you to print the page number on the front cover and insertions, if print/blank insert paper mode of insert sheet has already been selected. 1 touch one of the three keys under "cover" to highlight ...
Page 418
8 application functions 8-88 océ cs620/cs650 pro selecting color use this function to select the desired color in built-in stamp, set numbering, page no., and date/time. 1 touch one of the seven color keys to highlight it. 2 touch [ok] to complete the setting and return to the previous screen..
Page 419
Application functions 8 océ cs620/cs650 pro 8-89 8.18 overlaying image onto printed pages: image overlay use this function to scan an image, then overlay the image onto each page copied in the job. 1 position the overlaying original. – position a sheet of original faceup in the adf or facedown on th...
Page 420
8 application functions 8-90 océ cs620/cs650 pro 5 touch [ok] to complete the setting. – to restore the previous setting, touch [cancel]. – to release the stamp/image overlay function with the current setting remained, touch [function off]. 6 touch [ok] on the application screen. The copy screen wil...
Page 421
Application functions 8 océ cs620/cs650 pro 8-91 8.19 storing overlay image in hdd/ overlaying image stored in hdd: program overlay use program overlay to scan and store several images in hdd, then recall the desired image from the hdd to overlay onto each page copied in the job. To use this functio...
Page 422
8 application functions 8-92 océ cs620/cs650 pro 1 position the overlaying original facedown on the original glass. 2 touch [application] on the copy screen. 3 touch [stamp/image overlay] on the application screen. 4 touch [program overlay]. The image store/recall screen will be displayed. Proceed t...
Page 423
Application functions 8 océ cs620/cs650 pro 8-93 5 touch [store]. 6 enter the desired image name to be stored. – use the touch screen keypad to enter the desired name up to 8 characters. The date when making this entry will be stored automatically. 7 touch [ok]. The copy screen to store the overlayi...
Page 424
8 application functions 8-94 océ cs620/cs650 pro 8 press [start] on the control panel. The following screen will be displayed to indicate that the machine is now storing the image data in hdd. When completed, the image store/recall screen will be restored. 9 select the desired overlaying image data....
Page 425
Application functions 8 océ cs620/cs650 pro 8-95 14 touch [separate scan] to exit the separate scan mode. 15 enter the desired print quantity from the control panel keypad, then press [start]. The machine will start printing when ready for output..
Page 426
8 application functions 8-96 océ cs620/cs650 pro popup menu for name duplication if the entered name is duplicated, the popup menu will be displayed instead of the copy screen. If both [ok] and [cancel] keys are displayed, the image with the entered name applied can be overwritten. Touch [cancel] to...
Page 427
Application functions 8 océ cs620/cs650 pro 8-97 8.20 copy conditions incompatible with application functions.
Page 428
8 application functions 8-98 océ cs620/cs650 pro.
Page 429
Application functions 8 océ cs620/cs650 pro 8-99.
Page 430
8 application functions 8-100 océ cs620/cs650 pro.
Page 431
Application functions 8 océ cs620/cs650 pro 8-101 none: compatible o: grayed out 1: condition last selected has priority. (condition in the far left column will be released.) a: condition in the top row is selected automatically. Unreleasable. B: condition in the top row is selected automatically. R...
Page 432
8 application functions 8-102 océ cs620/cs650 pro *7 only 2 in 1 and 2 repeat modes are available. 4 in 1 mode is compatible only with page numbering in stamp. *10 available combinations of stamp/watermark/image overlay/program overlay are as shown below. *15 compatible if booklet pagination is sele...
Page 433
9 output applications.
Page 435
Output applications 9 océ cs620/cs650 pro 9-3 9 output applications 9.1 selecting an output tray this section describes how to select an output tray. 1 position the original. 2 touch [output appli.] on the copy screen. The output application screen will be displayed. Output tray positions are indica...
Page 436
9 output applications 9-4 océ cs620/cs650 pro 3 touch [output tray]. The output tray selection screen reflecting the combination of optional devices will be displayed. 4 select the desired output tray. – touch the desired tray position key to highlight it. Machine with large capacity stacker ls-501 ...
Page 437
Output applications 9 océ cs620/cs650 pro 9-5 this setting is initially specified as prohibit. 5 touch [ok] on the output tray selection screen. The output application screen will be restored, with the selected tray mark highlighted. 6 touch [ok] on the output application screen. The copy screen wil...
Page 438
9 output applications 9-6 océ cs620/cs650 pro 7 withdraw the saddle stitcher tray, if selected as an output tray. – open the tray stand when fully withdrawn. 2 reminder never return the saddle stitcher tray to its original position with the tray stand opened. Be careful not to exceed the finisher tr...
Page 439
Output applications 9 océ cs620/cs650 pro 9-7 9.2 setting binding direction for duplex copies use this function to specify the binding direction of output copies when setting duplex mode (1->2/ 2->2). Select [top] when making top-bound duplex copies (printed upside down on back pages) from side-boun...
Page 440
9 output applications 9-8 océ cs620/cs650 pro 0 the top binding mode is effective only when duplex mode is selected. 0 resetting the machine will restore the right & left binding mode. 1 position the original. 2 touch [output appli.] on the copy screen. The output application screen will be displaye...
Page 441
Output applications 9 océ cs620/cs650 pro 9-9 9.3 sorting/stapling copies (finisher fs-503, océ cs650 pro) the finisher fs-503 has a primary (main) tray and a secondary (sub) tray, each of which has the following output modes. Output to the primary (main) tray - non-sort non-sort mode simply means t...
Page 442
9 output applications 9-10 océ cs620/cs650 pro output to the secondary (sub) tray - collate collate mode outputs multiple copies of the original set. No offset output is available. - uncollate uncollate mode groups together multiple copies of each original. No offset output is available. Combined wi...
Page 443
Output applications 9 océ cs620/cs650 pro 9-11 9.3.1 non-sort/collate/uncollate output to the primary (main) tray a machine with finisher fs-503 installed is set to collate output to the primary (main) tray by default, regardless of whether or not to be equipped with other optional devices. Please s...
Page 444
9 output applications 9-12 océ cs620/cs650 pro 3 select the desired output mode. – for non-sort output, cancel both [collate] and [uncollate]. – for collate output, touch [collate] to highlight it. – for uncollate output, touch [uncollate] to highlight it. – select output face (face down / face up),...
Page 445
Output applications 9 océ cs620/cs650 pro 9-13 9.3.2 stapling output to the primary (main) tray copies will be stapled in this mode. Follow the procedure below to select the stapling position and number of staples: top left/ top right (corner staple), left/top/right (2 position staple). ! Detail for...
Page 446
9 output applications 9-14 océ cs620/cs650 pro 4 touch [staple] to select the stapling position. The staple setting screen will be displayed. 5 touch the desired stapling position key to select it. 6 touch [ok]. – to restore the previous setting, touch [cancel]. – to release the staple function with...
Page 447
Output applications 9 océ cs620/cs650 pro 9-15 2 reminder the primary (main) tray gradually goes down while printed materials are output. Do not allow any object to interfere with the operation of the tray on the left side of the finisher, as any interference may cause damage to the finisher. Be car...
Page 448
9 output applications 9-16 océ cs620/cs650 pro 9.3.3 collate/uncollate output to the secondary (sub) tray a machine with finisher fs-503 installed is set to collate output to the primary (main) tray by default, regardless of whether or not to be equipped with other optional devices. Change the outpu...
Page 449
Output applications 9 océ cs620/cs650 pro 9-17 4 select the desired output mode. – for collate output, touch [collate] to highlight it. – for uncollate output, touch [uncollate] to highlight it. – select output face (face down / face up), and output order (1 to n / n to 1) as needed. 5 touch [ok] on...
Page 450
9 output applications 9-18 océ cs620/cs650 pro 9.4 output modes using folding unit fd-501 (océ cs650 pro) using folding unit fd-501, the following punch/folding patterns are available: - punch: punches 2 or 4 holes in printed sheets for filing purposes. Specify the desired punch position (left/right...
Page 451
Output applications 9 océ cs620/cs650 pro 9-19 9.4.1 punching file holes in copies copies will be punched in this mode. Follow the procedure below to select 2- or 4-hole punch and punch position. ! Detail for detailed specifications, see "paper tray/ exit tray capacity" on page 3-6 and "folding unit...
Page 452
9 output applications 9-20 océ cs620/cs650 pro 4 touch [hole-punch]. The hole-punch screen will be displayed. 5 touch the desired punch key to select it. 6 touch [ok]. – to restore the previous setting, touch [cancel]. – to release the punch function with the current number of punch holes and punch ...
Page 453
Output applications 9 océ cs620/cs650 pro 9-21 2 reminder be careful not to exceed the finisher tray capacity when selecting the print quantity, otherwise unexpected trouble may be caused..
Page 454
9 output applications 9-22 océ cs620/cs650 pro 9.4.2 folding copies copies will be folded in this mode. Follow the procedure below to select the desired one from six folding types. ! Detail for detailed specifications, see "paper tray/ exit tray capacity" on page 3-6 and "folding unit fd-501" on pag...
Page 455
Output applications 9 océ cs620/cs650 pro 9-23 4 touch the desired folding type key, and either [outside print] or [inside print] to select the printed side. – the printed side cannot be selected when z-fold is selected. 5 touch [ok]. – to restore the previous setting, touch [cancel]. – to release t...
Page 456
9 output applications 9-24 océ cs620/cs650 pro 9.4.3 attaching cover sheet (post inserter on fd-501 océ cs650 pro) this function is provided by folding unit fd-501 mounted with post inserter. Cover sheets loaded in the upper/lower tray of the post inserter will be attached to the output copies as a ...
Page 457
Output applications 9 océ cs620/cs650 pro 9-25 1 load paper in the upper/lower tray of the post inserter. 2 use insert sheet and booklet pagination to attach a cover sheet. 2 reminder do not load more than 500 sheets (80 g/m 2 ) for each of the upper and lower trays. Do not load above the limit line...
Page 458
9 output applications 9-26 océ cs620/cs650 pro to prevent small cover sheet from skewing the small cover sheet may be skew, when loading it in the upper/lower tray of the post inserter. Three paper rollers are attached to the upper/lower tray respectively. To lock the roller both sides, prevent pape...
Page 459
Output applications 9 océ cs620/cs650 pro 9-27 9.5 output modes using saddle stitcher sd-501 (océ cs650 pro) 9.5.1 making folded booklet using booklet pagination in combination, the machine installed with saddle stitcher sd-501 can create a multiple page signature booklet, folded and stapled at two ...
Page 460
9 output applications 9-28 océ cs620/cs650 pro 1 position the original. 2 touch [output appli.] on the copy screen. The output application screen will be displayed. 3 touch [fold & staple]. The screen to specify the trimming mode will be displayed. 4 touch [trimming] or [non trimming] to select whet...
Page 461
Output applications 9 océ cs620/cs650 pro 9-29 5 touch [ok]. – to restore the previous setting, touch [cancel]. – to release the fold & staple function with the current trimming setting remained, touch [function off]. The output application screen will be restored. 6 touch [ok] on the output applica...
Page 462
9 output applications 9-30 océ cs620/cs650 pro 9.5.2 folding copies the machine installed with saddle stitcher sd-501 provides multi half fold mode to double-fold up to 5 sheets of copied set, or multi tri-fold mode to fold it inside in three. Using multi tri-fold, the print side can be specified on...
Page 463
Output applications 9 océ cs620/cs650 pro 9-31 – if [multi half fold] is selected, the multi half fold screen will be displayed to specify whether or not to trim the edge of the folded sheets. Touch [trimming] or [non trimming] to select it. – if [multi tri-fold] is selected, the multi tri-fold scre...
Page 464
9 output applications 9-32 océ cs620/cs650 pro 5 touch [ok] on the output application screen. The specified output mode icon will be displayed on the copy screen. With multi half fold selected, booklet pagination in application is also selected automatically. 6 when using multi half fold, withdraw t...
Page 465
Output applications 9 océ cs620/cs650 pro 9-33 9.6 using folder/finisher functions manually if the optional folding unit fd-501, and finisher fs-503 are installed, you can load a set of paper in the lower tray of the post inserter and punch, fold, and/or staple it manually. ! Detail for detailed spe...
Page 466
9 output applications 9-34 océ cs620/cs650 pro 0 when using folder/finisher functions manually, paper should be placed only in the upper tray of the post inserter. 0 multi-feed detection is a feature that automatically stops the machine if more than one sheet is fed at a time. The post inserter is d...
Page 467
Output applications 9 océ cs620/cs650 pro 9-35 punching and stapling can be combined. When combining them, turn on the lamps for both functions. 3 press the start/stop button. – to interrupt the operation, press the start/stop button again. – if multi-feeding is detected and the machine stops even i...
Page 468
9 output applications 9-36 océ cs620/cs650 pro 9.7 using finisher fs-607 (océ cs620) the finisher fs-607 has a primary (main) tray and a secondary (sub) tray, each of which has the following output modes. Output to the primary (main) tray combined with the output modes above except staple mode, you ...
Page 469
Output applications 9 océ cs620/cs650 pro 9-37 output to the secondary (sub) tray combined with the output modes above, you can also choose to output face up or face down, and output front to back or back to front. Example: make 3 copied sets mode description collate collate mode outputs multiple co...
Page 470
9 output applications 9-38 océ cs620/cs650 pro 9.7.1 non-sort/ collate/ uncollate output to the primary (main) tray a machine with finisher fs-607 installed is set to collate output to the primary (main) tray by default, regardless of whether or not to be equipped with other optional devices. Please...
Page 471
Output applications 9 océ cs620/cs650 pro 9-39 3 select the desired output mode. – for non-sort output, cancel both [collate] and [uncollate]. – for collate output, touch [collate] to highlight it. – for uncollate output, touch [uncollate] to highlight it. – select output face (face down / face up),...
Page 472
9 output applications 9-40 océ cs620/cs650 pro 9.7.2 stapling output to the primary (main) tray copies will be stapled in this mode. Follow the procedure below to select the stapling position and number of staples: top left/ top right (corner staple), left/top/right (2 position staple). ! Detail for...
Page 473
Output applications 9 océ cs620/cs650 pro 9-41 4 touch [staple] to select the stapling position. The staple setting screen will be displayed. 5 touch the desired stapling position key to select it. 6 touch [ok]. – to restore the previous setting, touch [cancel]. – to release the staple function with...
Page 474
9 output applications 9-42 océ cs620/cs650 pro 2 reminder the primary (main) tray gradually goes down while printed materials are output. Do not allow any object to interfere with the operation of the tray on the left side of the finisher, as any interference may cause damage to the finisher. Be car...
Page 475
Output applications 9 océ cs620/cs650 pro 9-43 9.7.3 collate/ uncollate output to the secondary (sub) tray a machine with finisher fs-607 installed is set to collate output to the primary (main) tray by default, regardless of whether or not to be equipped with other optional devices. Change the outp...
Page 476
9 output applications 9-44 océ cs620/cs650 pro 4 select the desired output mode. – for collate output, touch [collate] to highlight it. – for uncollate output, touch [uncollate] to highlight it. – select output face (face down / face up), and output order (1 to n / n to 1) as needed. 5 touch [ok] on...
Page 477
Output applications 9 océ cs620/cs650 pro 9-45 9.7.4 making folded booklet (multi half fold / fold&staple) the machine with finisher fs-607 installed can use half fold or fold&staple mode to make a folded or folded & stapled booklet in combination with booklet pagination feature in application setti...
Page 478
9 output applications 9-46 océ cs620/cs650 pro 1 position the original. 2 touch [output appli.] on the copy screen. The output application screen will be displayed. 3 touch [fold & staple] or [multi half fold] to highlight it. 4 touch [ok] on the output application screen. The specified output mode ...
Page 479
Output applications 9 océ cs620/cs650 pro 9-47 9.7.5 folding copies in three (multi tri-fold) the finisher fs-607 can fold a4 w or 8.5”e11” w copies in three upon exit. Choose to print outside the fold (outside print) or inside (inside print). To fold copies in three 0 number of folded sheet: max. 3...
Page 480
9 output applications 9-48 océ cs620/cs650 pro 3 touch [multi tri-fold]. The multi tri-fold screen will be displayed. 4 touch [outside print] or [inside print], as desired. 5 touch [ok]. – to restore the previous setting, touch [cancel]. – to release the function with current setting remained, touch...
Page 481
Output applications 9 océ cs620/cs650 pro 9-49 9.7.6 punching file holes in copies (punch) the finisher fs-607 with punch kit pk-512/513 installed can punch file holes in output copies. 2 reminder do not punch special paper type such as labels, tracing paper, etc. Otherwise, machine trouble may occu...
Page 482
9 output applications 9-50 océ cs620/cs650 pro 1 position the original. 2 touch [punch] on the copy screen. – punched sheets will be delivered to the primary (main) tray. The output application icon shows the number of punch holes and punch position currently selected. If you want to change the numb...
Page 483
Output applications 9 océ cs620/cs650 pro 9-51 5 touch the desired punch key to select it. 6 touch [ok]. – to restore the previous setting, touch [cancel]. – to release the punch function with the current number of punch holes and punch position setting remained, touch [function off]. The output app...
Page 484
9 output applications 9-52 océ cs620/cs650 pro 9.8 cover sheet feeding (paper inserter) the finisher fs-607 with paper inserter pi-502 installed can attach cover sheets to output copies. Using insert sheet function, cover sheets loaded in the upper and lower trays of the paper inserter will be attac...
Page 485
Output applications 9 océ cs620/cs650 pro 9-53 0 upper/lower tray capacity: 200 sheets (200 g/m 2 paper) or within 30 mm thick each 0 use adf. 0 the cover paper size should be the same as copy paper size. 0 cover paper loaded in the paper inserter cannot be copied. 1 load cover paper into the upper ...
Page 486
9 output applications 9-54 océ cs620/cs650 pro 9.9 using finisher fs-607 manually (océ cs620) the finisher fs-607 with paper inserter pi-502 installed can be operated manually, using the operation panel provided on the paper inserter. Place a set of paper into the lower tray. Upper tray cannot be us...
Page 487
Output applications 9 océ cs620/cs650 pro 9-55 0 paper should be placed only in the lower tray of the paper inserter. Upper tray cannot be used. 0 staple (1 staple / 2 staples) and punch can be used in combination. 1 place a set of paper in the lower tray of the paper inserter. – staple (1 staple / ...
Page 488
9 output applications 9-56 océ cs620/cs650 pro 9.10 loading/sorting a volume of copies (large capacity stacker ls-501, océ cs650 pro) the large capacity stacker ls-501 has a stacker (on the carriage) and a secondary (sub) tray, each of which provides the following output modes. Output to the stacker...
Page 489
Output applications 9 océ cs620/cs650 pro 9-57 1 position the original. 2 touch [output appli.] on the copy screen. The output application screen will be displayed. Output tray positions are indicated as square marks on the front image of the machine, and the tray mark currently selected appears hig...
Page 490
9 output applications 9-58 océ cs620/cs650 pro 9.11 copy conditions incompatible with output applications.
Page 491
Output applications 9 océ cs620/cs650 pro 9-59.
Page 492
9 output applications 9-60 océ cs620/cs650 pro.
Page 493
Output applications 9 océ cs620/cs650 pro 9-61.
Page 494
9 output applications 9-62 océ cs620/cs650 pro none: compatible o: grayed out 1: condition last selected has priority. (condition in the far left column will be released.) a: condition in the top row is selected automaticaly. Unreleasable. B: condition in the top row is selected automaticaly. Releas...
Page 495
10 advanced information.
Page 497
Advanced information 10 océ cs620/cs650 pro 10-3 10 advanced information 10.1 checking feature selections before copying: mode check display the check screen to check the feature selections you made, and use proof copy to make a sample copy if needed, before making multiple copies. This is a conveni...
Page 498
10 advanced information 10-4 océ cs620/cs650 pro 3 check the job settings on the screen, using [next] and [previous] as required. – to make any setting change from the check screen, proceed to the next step. – to release any application function from the check screen, proceed to step 5. – if a sampl...
Page 499
Advanced information 10 océ cs620/cs650 pro 10-5 – the lcd will display an appropriate screen to change the copying condition selected. Change the setting as desired, then touch [ok] to restore the check screen to return to the checking steps. – when [bookmark] has been checked on some subsequent sc...
Page 500
10 advanced information 10-6 océ cs620/cs650 pro – touch [yes] to cancel the function, or [no] to restore. – if making a sample copy, proceed to the next step. – to start printing, proceed to step 7. 6 make a sample copy. – press [proof copy] on the control panel or touch [proof copy] on the check s...
Page 501
Advanced information 10 océ cs620/cs650 pro 10-7 10.2 making sample set for checking results: proof copy use proof copy to produce a sample of the copied set before making multiple copies. This is a convenient and cost effective way of viewing results of the copying selections. 0 proof copy is avail...
Page 502
10 advanced information 10-8 océ cs620/cs650 pro 4 change the settings or print quantity, as required, then press [start]. – if the desired selection cannot be changed, press [reset]] to delete all the data in memory and restart the job setting..
Page 503
Advanced information 10 océ cs620/cs650 pro 10-9 10.3 interrupting job in progress: interrupt mode use the interrupt mode to interrupt copying in progress to perform a simple job. Pressing [interrupt] on the control panel stops the machine operation temporarily at the timing available for interrupt ...
Page 504
10 advanced information 10-10 océ cs620/cs650 pro 3 position the original, then press [start] to start the interrupt copying. 4 when interrupt copying is completed, press [interrupt] again. The [interrupt] led turns out and the settings of the previous job will be restored. 5 press [start] to resume...
Page 505
Advanced information 10 océ cs620/cs650 pro 10-11 10.4 storing and recalling job conditions: mode memory use mode memory to store frequently used copy job settings, which can be recalled at any time. 10.4.1 storing job conditions follow the procedure below to store the copy job setting. 0 available ...
Page 506
10 advanced information 10-12 océ cs620/cs650 pro 4 review the settings, then touch [ok]. The mode memory screen will be restored. ? What if any correction is required? % touch [cancel] to return to the copy screen. Make new selections, then restart the operation from step 2. 5 touch the desired job...
Page 507
Advanced information 10 océ cs620/cs650 pro 10-13 6 enter the desired job name, then touch [ok]. – enter a job name in up to 16 characters, using the touch panel alphabet keypad. – use arrow keys [*] and [)] to move the cursor, and use [shift] to enter upper case letters or symbols. – touch [ok] to ...
Page 508
10 advanced information 10-14 océ cs620/cs650 pro 10.4.2 recalling stored job settings follow the procedure below to recall jobs that are already stored. 0 the mode memory screen can be displayed only from the copy screen. If any other screen such as machine status screen is displayed, pressing [mod...
Page 509
Advanced information 10 océ cs620/cs650 pro 10-15 4 touch [job check]. The job recall check screen displays to enable you to review the settings. 5 review the settings, then touch [ok]. The settings of the selected job will be recalled on the restored copy screen. 6 press [start] to print..
Page 510
10 advanced information 10-16 océ cs620/cs650 pro 10.5 recalling previous job settings follow the procedure below to copy with a previous job settings. 0 only the last-completed output job settings can be recalled as the previous job settings. Non-completed job or reserve job settings cannot be reca...
Page 511
Advanced information 10 océ cs620/cs650 pro 10-17 4 touch [job check] to review the settings. – the mode check screen will be displayed. Check the settings of the previous job on the screen. – recalled settings can be altered from this screen. See page 10-3 for details. 5 touch [ok]. The settings of...
Page 512
10 advanced information 10-18 océ cs620/cs650 pro 10.6 displaying screen for operation guide: help mode the help screen provides you with the information about copy job setting procedure, toner and paper supply, and control panel and touch panel key operation. Help screen comprises the following men...
Page 513
Advanced information 10 océ cs620/cs650 pro 10-19 to display help screen % press [help] on the control panel..
Page 514
10 advanced information 10-20 océ cs620/cs650 pro 10.7 adjusting response time of touch keys: accessibility this machine can sets the desired interval between touching the screen key and machine response in advance. Pressing the accessibility key on the control panel will select this interval, so th...
Page 515
Advanced information 10 océ cs620/cs650 pro 10-21 10.8 controlling copier from browser: remote panel when the machine is connected with a pc over a network, the web browser activated on the pc enables you to operate the machine. Also, machine operation can be made using the mouse/keyboard without us...
Page 516
10 advanced information 10-22 océ cs620/cs650 pro to control copier from browser 0 set the enhance security mode off on the machine. 0 the machine should be connected with a pc over a network with tcp/ip enabled. 0 specify the ip address of the machine. 0 specify the ip address of the pc to be used ...
Page 517
Advanced information 10 océ cs620/cs650 pro 10-23 3 using a mouse and keyboard, perform job operation..
Page 518
10 advanced information 10-24 océ cs620/cs650 pro.
Page 519
11 job management.
Page 521
Job management 11 océ cs620/cs650 pro 11-3 11 job management 11.1 overview of job list screen the job list screen allows you to check/operate the following items. - reserved job - output history - send history - incomplete - suspended (the letters on the key turn red if any suspended job remains.) t...
Page 522
11 job management 11-4 océ cs620/cs650 pro 11.2 job operation on job list screen this section describes how to check and operate the jobs on the job list screen. 11.2.1 to check/control reserved jobs use this function to display all the reserve jobs as a list. The list includes following information...
Page 523
Job management 11 océ cs620/cs650 pro 11-5 2 reminder this will not function if printing operation has already been started for the selected job..
Page 524
11 job management 11-6 océ cs620/cs650 pro to specify the next job to be printed % touch to highlight the desired reserve job key, then touch [print next]. The highlighted reserve job will be moved just under the current print job. To change the order of jobs % touch to highlight the desired reserve...
Page 525
Job management 11 océ cs620/cs650 pro 11-7 11.2.2 to display output history use this function to display output history as a list. The list includes following information. - job no.: consecutive numbers of both copy and print jobs - user name: user who transmitted the job - mode: copy or printer - s...
Page 526
11 job management 11-8 océ cs620/cs650 pro 11.2.3 to display send history use this function to display send history as a list. The list includes following information. - job no.: consecutive numbers of both copy and print jobs - user name: user who transmitted the job - mode: e-mail / ftp / smb / hd...
Page 527
Job management 11 océ cs620/cs650 pro 11-9 11.2.4 to check incomplete jobs use this function to display incomplete jobs as a list. The list includes following information. - job no.: consecutive numbers of both copy and print jobs - user name: user who transmitted the job - cause: memory full, cance...
Page 528
11 job management 11-10 océ cs620/cs650 pro 11.2.5 to check/operate suspended jobs use this function to display all suspended jobs as a list. The list includes following information. - job no.: consecutive numbers of both copy and print jobs - user name: user who transmitted the job - mode: copy or ...
Page 529
Job management 11 océ cs620/cs650 pro 11-11 to output suspended job 1 touch to highlight the desired job key, then touch [release]. The selected job will be output according to the current printing order. 2 to check the printing order, touch [reserved job] to display the reserved job list. To releas...
Page 530
11 job management 11-12 océ cs620/cs650 pro.
Page 531
12 screen setting outlines.
Page 533
Screen setting outlines 12 océ cs620/cs650 pro 12-3 12 screen setting outlines 12.1 machine status screen setting outlines the [paper setting], [both sides adj.], [adjustment], and [controller] keys are located at the bottom of the machine status screen, to display each setting screen..
Page 534
12 screen setting outlines 12-4 océ cs620/cs650 pro [paper setting] key: the paper set popup screen is displayed. 1 specify paper settings for each tray by registering paper settings or using predefined settings. This operation is equivalent to touching paper setting on the copy screen. Please refer...
Page 535
Screen setting outlines 12 océ cs620/cs650 pro 12-5 [both sides adj.] key: the both sides adjustment popup screen is displayed. 1 specify the vertical zoom, horizontal zoom, up/down shift amount, and right/left shift amount for both front and back pages. For the details, see page 6-48. 2 after compl...
Page 536
12 screen setting outlines 12-6 océ cs620/cs650 pro [adjustment] key: the adjustment mode menu screen is displayed. 1 adjust the settings of image control and output options. For the details, see page 14-3. 2 after completing the adjustment mode settings, touch [exit] to exit the adjustment mode..
Page 537
Screen setting outlines 12 océ cs620/cs650 pro 12-7 [controller] key: the controller setting menu screen is displayed. 1 specify the settings concerning the optional print controller. For the details, please see the contents of the user manuals for the optional controllers. 2 touch the [machine] tab...
Page 538
12 screen setting outlines 12-8 océ cs620/cs650 pro 12.2 utility screen setting outlines % press [utility/counter] on the control panel to display the utility menu screen. The utility screen includes two types of setting items: one in which a user can set and the other in which a machine administrat...
Page 539
Screen setting outlines 12 océ cs620/cs650 pro 12-9 [close] and [exit] on the utility screen touch [close] to return to the previous screen. Touch [exit] to return to the screen displayed before pressing [utility/counter] on the control panel..
Page 540
12 screen setting outlines 12-10 océ cs620/cs650 pro.
Page 541
13 paper setting.
Page 543
Paper setting 13 océ cs620/cs650 pro 13-3 13 paper setting 13.1 paper setting outlines this section provides information on, and instructions for, settings the items in the user setting. This machine provides paper setting mode in order to perform printing job according to the characteristics of pap...
Page 544
13 paper setting 13-4 océ cs620/cs650 pro 13.1.1 setting items in paper setting paper type select one of the following seven types. High quality, plain, color specific, coated-gl, coated-ml, coated-go, coated-mo see page 13-6 for details of paper type specifications. Paper name you can use maximum 2...
Page 545
Paper setting 13 océ cs620/cs650 pro 13-5 process adj. Usually, this adjustment is not available. Contact your service representative for detail. Collective adjustment of the process adjustment for all tray is specified with the machine admin. Setting. Size select [standard] or [custom]. - the custo...
Page 546
13 paper setting 13-6 océ cs620/cs650 pro 13.1.2 paper type specifications the following seven paper types are provided according to the plainness of paper. - coated-gl (gloss laser) glossy paper for laser printing. - coated-ml (mat laser) matte paper for laser printing. - coated-go (gloss offset) g...
Page 547
Paper setting 13 océ cs620/cs650 pro 13-7 weight is classified into eight types as shown in the following table. Plain/color specific/ high quality coated-gl coated-ml coated-go coated-mo plain gloss plain gloss plain plain gloss plain (disable) (disable) (disable) (disable) (disable) (disable) (dis...
Page 548
13 paper setting 13-8 océ cs620/cs650 pro * the coated paper of certain brand can not be used with installation environment. Contact your service representative. Item description air assist will be activated automatically when auto is selected. Copy speed becomes slower due to the setting for slowin...
Page 549
Paper setting 13 océ cs620/cs650 pro 13-9 paper weight conversion chart paper type basic size (inch) bond 17x22 432x559 cover 20x26 508x660 index 25.5x30.5 648x775 bristol 22.5x28.5 572x724 tag 24x36 610x914 book 25x38 635x965 g/m 2 lb lb lb lb lb lb 50.0 13.3 18.5 27.7 22.8 30.8 33.8 52.3 13.9 19.4...
Page 550
13 paper setting 13-10 océ cs620/cs650 pro 13.2 register paper type/weight follow the procedure below to register paper type/weight in the user setting. 1 press [utility/counter] on the control panel. The utility menu screen will be displayed. 2 touch [02 user setting], [01 system setting], and then...
Page 551
Paper setting 13 océ cs620/cs650 pro 13-11 3 touch [01 paper setting]. The paper setting menu screen will be displayed. 4 touch the key to be registered. – to modify the a paper setting which is already registered, touch to select the corresponding name for the setting. To register a new setting, to...
Page 552
13 paper setting 13-12 océ cs620/cs650 pro 5 touch add/edit. The input condition screen will be displayed. 6 select the paper type. – touch [paper type] to display the paper type screen. – select the desired paper type, and the touch [ok] to complete the setting. See page 13-6 for details of the pap...
Page 553
Paper setting 13 océ cs620/cs650 pro 13-13 7 enter the paper name. – touch [name] to display the input name screen. – enter the name of the paper to be used, and then touch [ok]. You can use maximum 22 characters. – the same name as the paper type specified is displayed on the screen. To alter it, e...
Page 554
13 paper setting 13-14 océ cs620/cs650 pro 9 adjust the printed position of the front and back. – touch [both sides adj.] to display the front and back page adjustment screen. – enter the adjustment value as follows. Touch [front] or [back] on the front and back page adjustment screen to select the ...
Page 555
Paper setting 13 océ cs620/cs650 pro 13-15 – enter the adjustment value as follows. Display the required item touching [next] and [previous], and touch it. Touch [+ -] to specify the value to be positive or negative.Use the touch panel keypad or arrow keys [+] and [,] to enter the desired adjustment...
Page 556
13 paper setting 13-16 océ cs620/cs650 pro 15 select the paper size. – to specify the standard size, touch [standard] on the link size information to display the standard size setting screen. Select the desired size key, then touch [ok] to complete the setting. – to specify the custom size, recall t...
Page 557
Paper setting 13 océ cs620/cs650 pro 13-17 16 touch [ok] on the input condition screen. – the paper setting screen will be restored. Touch [reset] to reset to the initial setting. 17 touch [close] on the paper setting screen. – touch [exit] to return to the copy screen. ! Detail chart adjustment is ...
Page 558
13 paper setting 13-18 océ cs620/cs650 pro 13.3 delete paper setting follow the procedure below to delete the paper setting previously registered. 1 press [utility/counter] on the control panel. The utility menu screen will be displayed. 2 touch [02 user setting], [01 system setting], and then [03 f...
Page 559
Paper setting 13 océ cs620/cs650 pro 13-19 3 touch [01 paper setting]. The paper setting screen will be displayed. 4 touch the key to be deleted..
Page 560
13 paper setting 13-20 océ cs620/cs650 pro 5 touch [delete]. A popup menu will be displayed to confirm that the selected register will be deleted. 6 touch [yes] to delete, or [no]. – return to the input condition screen. To delete multiple paper types, repeat steps 4 and 6. 7 touch [close] on the pa...
Page 561
14 machine adjustment.
Page 563
Machine adjustment 14 océ cs620/cs650 pro 14-3 14 machine adjustment this section describes information on adjusting the settings in the image control and output options. 14.1 01 machine adjustment 14.1.1 01 printer adjustment \ 01 restart timing adjustment perform this adjustment to control the res...
Page 564
14 machine adjustment 14-4 océ cs620/cs650 pro 3 touch [copy] tab. The copy screen will be displayed. 4 select a3 w/11" e 17" w paper, then press [start]. The sample pattern (no. 16) will be output. 5 measure the resultant restart timing. 6 if the desired result cannot be obtained, touch the [adjust...
Page 565
Machine adjustment 14 océ cs620/cs650 pro 14-5 7 display the required item using up/down arrow keys, and touch it. 8 use the touch panel keypad to enter the desired adjustment value, then touch [ available range: -60 to +60, 1 step = 0.1 mm 9 repeat the adjustment steps from 3 to 8 until the desired...
Page 566
14 machine adjustment 14-6 océ cs620/cs650 pro 14.1.2 01 printer adjustment \ 02 centering adjustment perform this adjustment to control image centering to the direction of paper feed. To specify centering adjustment 1 touch [adjustment] on the machine status screen. The adjustment menu screen will ...
Page 567
Machine adjustment 14 océ cs620/cs650 pro 14-7 4 select a3 w/11" e 17" w paper, then press [start]. The sample pattern (no. 16) will be output. 5 fold the output sheet at the center to the direction of paper feed and measure the distance between the lines on both sides. 6 if the desired result canno...
Page 568
14 machine adjustment 14-8 océ cs620/cs650 pro 14.1.3 01 printer adjustment \ 03 fd-mag. Adjustment perform this adjustment to control the magnification to the direction of paper feed. 2 note this value is used as the baseline for the both sides adjustment function in the paper setting. Specified va...
Page 569
Machine adjustment 14 océ cs620/cs650 pro 14-9 3 touch the required item key. 4 touch [copy] tab. The copy screen will be displayed. 5 select a3 w/11" e 17" w paper, then press [start]. The sample pattern (no. 16) will be output. 6 measure the resultant magnification to the direction of paper feed. ...
Page 570
14 machine adjustment 14-10 océ cs620/cs650 pro 8 touch the required item key. 9 use the touch panel keypad to enter the desired adjustment value, then touch [ available range: -100 to +100, 1 step = 0.01% 10 repeat the adjustment steps from 3 to 9 until the desired result is obtained. 11 touch [ret...
Page 571
Machine adjustment 14 océ cs620/cs650 pro 14-11 14.1.4 01 printer adjustment \ 04 cd-mag. Adjustment perform this adjustment to control the magnification perpendicular to the direction of paper feed. To specify cd-mag. Adjustment 1 touch [adjustment] on the machine status screen. The adjustment menu...
Page 572
14 machine adjustment 14-12 océ cs620/cs650 pro 4 touch [copy] tab. The copy screen will be displayed. 5 select a3 w/11" e 17" w paper, then press [start]. The sample pattern (no. 16) will be output. 6 measure the resultant magnification perpendicular to the direction of paper feed. 7 if the desired...
Page 573
Machine adjustment 14 océ cs620/cs650 pro 14-13 10 repeat the adjustment steps from 3 to 9 until the desired result is obtained. 11 touch [return] to restore the adjustment menu screen..
Page 574
14 machine adjustment 14-14 océ cs620/cs650 pro 14.1.5 02 scanner adjustment \ 01 restart timing adjustment perform this adjustment to control the restart timing in scanning the original with the original glass. To specify restart timing adjustment 1 touch [adjustment] on the machine status screen. ...
Page 575
Machine adjustment 14 océ cs620/cs650 pro 14-15 4 select a3 w/11" e 17" w paper, place the original of which a misalignment can be easily monitored on the original glass, then press [start]. 5 check the misalignment by comparing the original and the output. 6 if the desired result cannot be obtained...
Page 576
14 machine adjustment 14-16 océ cs620/cs650 pro 14.1.6 02 scanner adjustment \ 02 centering adjustment perform this adjustment to control image centering to the direction of paper feed in scanning the original with original glass. To specify centering adjustment 1 touch [adjustment] on the machine s...
Page 577
Machine adjustment 14 océ cs620/cs650 pro 14-17 4 select a3 w/11" e 17" w paper, place the original of which a misalignment can be easily monitored on the original glass, then press [start]. The sample pattern (no. 16) will be output. 5 check the misalignment by comparing the original and the output...
Page 578
14 machine adjustment 14-18 océ cs620/cs650 pro 14.1.7 02 scanner adjustment \ 03 fd-mag. Adjustment perform this adjustment to control the magnification to the direction of paper feed in scanning the original with original glass. To specify fd-mag. Adjustment 1 touch [adjustment] on the machine sta...
Page 579
Machine adjustment 14 océ cs620/cs650 pro 14-19 3 touch [copy] tab. The copy screen will be displayed. 4 select a3 w/11" e 17" w paper, then press [start]. The sample pattern (no. 16) will be output. 5 check the magnification in the direction of paper feed by comparing the output and the original. 6...
Page 580
14 machine adjustment 14-20 océ cs620/cs650 pro 8 repeat the adjustment steps from 3 to 9 until the desired result is obtained. 9 touch [return] to restore the adjustment menu screen..
Page 581
Machine adjustment 14 océ cs620/cs650 pro 14-21 14.2 02 image quality stability set priority to either the output speed or the image quality stability in a copying or printing job. To specify image quality stability 1 touch [adjustment] on the machine status screen. The adjustment menu screen will b...
Page 582
14 machine adjustment 14-22 océ cs620/cs650 pro 14.3 03 execute adjust operation execute adjustment operations for the automatic gamma adj., the color registration adj., the toner refresh mode, and the belt refresh mode. To specify execute adjust operation 1 touch [adjustment] on the machine status ...
Page 583
Machine adjustment 14 océ cs620/cs650 pro 14-23 14.4 04 finisher adjustment (fs-503, océ cs650 pro) 14.4.1 01 stapler position adj. \ 01 staple center position perform this adjustment for the center position of copied/printed sheets and of staples processed by the staple finisher fs-503. The paper w...
Page 584
14 machine adjustment 14-24 océ cs620/cs650 pro 3 touch [copy] tab. 4 press [start] on the control panel. A sample copy will be output. 5 if the desired result cannot be obtained, touch [adjustment] tab. The staple center position screen will be restored. 6 use the touch panel keypad to enter the de...
Page 585
Machine adjustment 14 océ cs620/cs650 pro 14-25 7 fold the output sheet in two on the center to the direction of paper feed and check misalignment (a) of the stapling center position. 8 if the test desired result cannot be obtained, touch [adjustment] tab. Repeat the adjustment steps from 3 to 7 unt...
Page 586
14 machine adjustment 14-26 océ cs620/cs650 pro 14.4.2 01 stapler position adj. \ 02 paper width (staple) perform this adjustment if stapled sheets are not aligned neatly processed by the staple finisher fs-503. To specify paper width (staple) 1 touch [adjustment] on the machine status screen. The a...
Page 587
Machine adjustment 14 océ cs620/cs650 pro 14-27 4 load the desired size of paper to be adjusted on a tray, touch staple and then press [start]. A sample pattern (no. 16) will be output. 5 open the finisher door, and withdraw the staple unit. – confirm the distance between the fixed plates and output...
Page 588
14 machine adjustment 14-28 océ cs620/cs650 pro 8 display the required size key using up/down arrow keys, and touch it. 9 use the touch panel keypad to enter the desired adjustment value, then touch [ available range: -20 (wide) to +20 (narrow), 1 step = 0.1 mm 10 remove the output paper, and close ...
Page 589
Machine adjustment 14 océ cs620/cs650 pro 14-29 14.4.3 01 stapler position adj. \ 03 paper width (straight) perform this adjustment if the paper for straight feed is misaligned in the staple finisher fs-503. To specify paper width (straight) 1 touch [adjustment] on the machine status screen. The adj...
Page 590
14 machine adjustment 14-30 océ cs620/cs650 pro 4 load the desired size of paper to be adjusted on a tray, touch staple and then press [start]. A sample pattern (no. 16) will be output. 5 open the finisher door, and withdraw the staple unit. – confirm the distance between the fixed plates and output...
Page 591
Machine adjustment 14 océ cs620/cs650 pro 14-31 8 display the required size key using up/down arrow keys, and touch it. 9 use the touch panel keypad to enter the desired adjustment value, then touch [ available range: -20 (wide) to +20 (narrow), 1 step = 0.1 mm 10 remove the output paper, and close ...
Page 592
14 machine adjustment 14-32 océ cs620/cs650 pro 14.5 04 finisher adjustment (fd-501, océ cs650 pro) 14.5.1 02 multi folder (punch) adj. \ 01 paper width adjustment perform this adjustment for the specific paper size if punch holes processed by the folding unit fd-501 dislocate largely. To specify pa...
Page 593
Machine adjustment 14 océ cs620/cs650 pro 14-33 3 touch [copy] tab. The copy screen will be displayed. 4 load the desired size of paper to be adjusted on a tray, specify the set number to 10, then press [start] on the control panel. A sample pattern will be output. 5 check the diameter of penetrated...
Page 594
14 machine adjustment 14-34 océ cs620/cs650 pro 8 use the touch panel keypad to enter the desired adjustment value, then touch [ available range: -20 (wide) to +20 (narrow), 1 step = 0.1 mm 9 repeat the adjustment steps from 3 to 8 until the desired result is obtained. 10 touch [return] to restore t...
Page 595
Machine adjustment 14 océ cs620/cs650 pro 14-35 14.5.2 02 multi folder (punch) adj. \ 02 hole-punch vertical pos. Perform this adjustment for the position of punch holes to the direction of paper feed. Punch holes can be adjusted separately for 2-hole punch and 4-hole punch. To specify hole-punch ve...
Page 596
14 machine adjustment 14-36 océ cs620/cs650 pro 4 touch [copy] tab. The copy screen will be displayed. 5 load the desired size of paper to be adjusted on a tray, specify punch, then press [start] on the control panel. A sample pattern (no. 16) will be output. 6 check the distance (a) from the edge o...
Page 597
Machine adjustment 14 océ cs620/cs650 pro 14-37 8 display the required size key using up/down arrow keys, and touch it. 9 use the touch panel keypad to enter the desired adjustment value, then touch [ available range: -40 (wide) to +40 (narrow), 1 step = 0.1 mm 10 repeat the adjustment steps from 4 ...
Page 598
14 machine adjustment 14-38 océ cs620/cs650 pro 14.5.3 03 multi folder (fold) adj. \ 01 half fold position adj. Perform this adjustment for the half fold position processed by the folding unit fd-501. To specify half fold position adj. 1 touch [adjustment] on the machine status screen. The adjustmen...
Page 599
Machine adjustment 14 océ cs620/cs650 pro 14-39 4 load the desired size of paper to be adjusted on a tray, specify folding, then press [start] on the control panel. A sample pattern (no. 16) will be output. 5 check the misalignment (a) of the edge of the feeding sheets. 6 if the desired result canno...
Page 600
14 machine adjustment 14-40 océ cs620/cs650 pro 14.5.4 03 multi folder (fold) adj. \ 02 tri-fold-in pos. Adj. Perform this adjustment for the folding positions in tri-fold-in mode processed by the folding unit fd-501. 2 reminder when adjusting both single fold and double fold, be sure to start with ...
Page 601
Machine adjustment 14 océ cs620/cs650 pro 14-41 3 touch [copy] tab. The copy screen will be displayed. 4 load the desired size of paper to be adjusted on a tray, specify letter fold-in, then press [start] on the control panel. A sample pattern (no. 16) will be output. 5 check a distance (a) and dist...
Page 602
14 machine adjustment 14-42 océ cs620/cs650 pro 7 display the required size key using up/down arrow keys, and touch it. 8 touch [double fold]. 9 use the touch panel keypad to enter the desired adjustment value, then touch [ available range: -50 to +50, 1 step = 0.1 mm – the distance (a) in step 5 wi...
Page 603
Machine adjustment 14 océ cs620/cs650 pro 14-43 14.5.5 03 multi folder (fold) adj. \ 03 tri-fold-out pos. Adj. Perform this adjustment for the folding positions in tri-fold-out mode processed by the folding unit fd-501. 2 note the baseline of single fold is calculated from the edge of the sheet, whi...
Page 604
14 machine adjustment 14-44 océ cs620/cs650 pro 3 touch [copy] tab. The copy screen will be displayed. 4 load the desired size of paper to be adjusted on a tray, specify tri- fold-out, then press [start] on the control panel. A sample pattern (no. 16) will be output. 5 check a distance (a) and dista...
Page 605
Machine adjustment 14 océ cs620/cs650 pro 14-45 7 display the required size key using up/down arrow keys, and touch it. 8 touch [single fold]. 9 use the touch panel keypad to enter the desired adjustment value, then touch [ available range: -50 to +50, 1 step = 0.1 mm – the distance (a) in step 5 wi...
Page 606
14 machine adjustment 14-46 océ cs620/cs650 pro 14.5.6 03 multi folder (fold) adj. \ 04 double parallel pos. Adj. Perform this adjustment for the folding positions in tri-fold-in mode processed by the folding unit fd-501. 2 reminder when adjusting both single fold and double fold, be sure to start w...
Page 607
Machine adjustment 14 océ cs620/cs650 pro 14-47 3 touch [copy] tab. The copy screen will be displayed. 4 load the desired size of paper to be adjusted on a tray, specify double parallel, then press start on the control panel. A sample pattern (no. 16) will be output. 5 check a distance (a) and dista...
Page 608
14 machine adjustment 14-48 océ cs620/cs650 pro 7 display the required size key using up/down arrow keys, and touch it. 8 touch [single fold]. 9 use the touch panel keypad to enter the desired adjustment value, then touch [ available range: -50 to +50, 1 step = 0.1 mm – the distance (a) in step 5 wi...
Page 609
Machine adjustment 14 océ cs620/cs650 pro 14-49 14.5.7 03 multi folder (fold) adj. \ 05 z-fold position adj. Perform this adjustment for the folding positions in z-fold mode processed by the folding unit fd-501. 2 reminder when adjusting both single fold and double fold, be sure to start with the si...
Page 610
14 machine adjustment 14-50 océ cs620/cs650 pro 3 touch [copy] tab. The copy screen will be displayed. 4 load the desired size of paper to be adjusted on a tray, specify z-fold, then press [start] on the control panel. A sample pattern (no. 16) will be output. 5 check a distance (a) and distance (b)...
Page 611
Machine adjustment 14 océ cs620/cs650 pro 14-51 7 display the required size key using up/down arrow keys, and touch it. 8 touch single fold. 9 use the touch panel keypad to enter the desired adjustment value, then touch [ available range: -50 to +50, 1 step = 0.1 mm – the distance (a) in step 5 will...
Page 612
14 machine adjustment 14-52 océ cs620/cs650 pro 14.5.8 03 multi folder (fold) adj. \ 06 gate fold position adj. Perform this adjustment for the folding positions in gate folding mode processed by the folding unit fd-501. 2 reminder when adjusting single fold, double fold and triple fold at a time, b...
Page 613
Machine adjustment 14 océ cs620/cs650 pro 14-53 3 touch [copy] tab. The copy screen will be displayed. 4 load the desired size of paper to be adjusted on a tray, specify gate, then press [start] on the control panel. A sample pattern (no. 16) will be output. 5 check a distance (a), distance (b) and ...
Page 614
14 machine adjustment 14-54 océ cs620/cs650 pro 7 display the required size key using up/down arrow keys, and touch it. 8 touch [single fold]. 9 use the touch panel keypad to enter the desired adjustment value, then touch [ available range: -50 to +50, 1 step = 0.1 mm – the distance (a) in step 5 wi...
Page 615
Machine adjustment 14 océ cs620/cs650 pro 14-55 14.6 04 finisher adjustment (ls-501, océ cs650 pro) 14.6.1 05 stacker adjustment \ 01 paper width adjustment perform this adjustment when output sheets are not aligned in a perpendicular position to the direction of paper feed processed by the large ca...
Page 616
14 machine adjustment 14-56 océ cs620/cs650 pro 3 touch [copy] tab. The copy screen will be displayed. 4 specify a3 then press [start] on the control panel. A sample pattern (no. 16) will be output. 5 if output sheets are misaligned, touch [adjustment] tab. The paper width adjustment screen will be ...
Page 617
Machine adjustment 14 océ cs620/cs650 pro 14-57 14.6.2 05 stacker adjustment \ 02 paper length adjustment perform this adjustment when output sheets are not aligned to the direction of paper feed processed by the large capacity stacker ls-501. To specify length adjustment 1 touch [adjustment] on the...
Page 618
14 machine adjustment 14-58 océ cs620/cs650 pro 4 specify a3 then press [start] on the control panel. A sample pattern (no. 16) will be output. 5 if output sheets are misaligned, touch [adjustment] tab. The paper length adjustment screen will be restored. 6 use the touch panel keypad to enter the de...
Page 619
Machine adjustment 14 océ cs620/cs650 pro 14-59 14.7 04 finisher adjustment (sd-501, océ cs650 pro) 14.7.1 06 saddle stitcher adj. \ 01 staple center adj. Perform this adjustment for the center (folding) position of copied/printed sheets and of staples processed by the saddle stitcher sd-501. The [0...
Page 620
14 machine adjustment 14-60 océ cs620/cs650 pro 3 touch [copy] tab. The copy screen will be displayed. 4 select the fold&staple mode, then press [start] on the control panel. A sample copy will be output. 5 check misalignment (a) of the folded line and stapling position. 6 if the test desired result...
Page 621
Machine adjustment 14 océ cs620/cs650 pro 14-61 7 use the touch panel keypad to enter the desired adjustment value, then touch [ available range: -50 (forward) to +50 (backward), 1 step = 0.1 mm 8 repeat the adjustment steps from 3 to 7 until the desired result is obtained. 9 touch [return] to resto...
Page 622
14 machine adjustment 14-62 océ cs620/cs650 pro 14.7.2 06 saddle stitcher adj. \ 02 staple paper width adj. Perform this adjustment if stapled sheets are not aligned neatly processed by the saddle stitcher sd-501. To specify staple paper width adj. 1 touch [adjustment] on the machine status screen. ...
Page 623
Machine adjustment 14 océ cs620/cs650 pro 14-63 4 load the desired size of paper to be adjusted on a tray, select fold&staple and then press [start] on the control panel. A sample pattern (no. 16) will be output. 5 check misalignment (a), in which misalignment occurs if the paper width setting is la...
Page 624
14 machine adjustment 14-64 océ cs620/cs650 pro 10 if adjustment in any other paper size is required, repeat steps from 3 to 9. 11 touch [return] to restore the adjustment menu screen. 2 note the following limitation is put on the paper width setting according to the actual paper width. * using pape...
Page 625
Machine adjustment 14 océ cs620/cs650 pro 14-65 14.7.3 06 saddle stitcher adj. \ 03 staple pitch adjustment perform this adjustment for the staple pitch processed by the saddle stitcher sd-501. To specify staple pitch adjustment 1 touch [adjustment] on the machine status screen. The adjustment menu ...
Page 626
14 machine adjustment 14-66 océ cs620/cs650 pro 4 load the desired size of paper to be adjusted on a tray, specify fold&staple, then press [start] on the control panel. A sample pattern (no. 16) will be output. 5 check the staple pitch (a) of the sample sheet. 6 if the desired result cannot be obtai...
Page 627
Machine adjustment 14 océ cs620/cs650 pro 14-67 10 if adjustment in any other paper size is required, repeat steps from 3 to 9. 11 touch [return] to restore the adjustment menu screen..
Page 628
14 machine adjustment 14-68 océ cs620/cs650 pro 14.7.4 06 saddle stitcher adj. \ 04 half fold position adj. Perform this adjustment for the double-folding position processed by the saddle stitcher sd-501. To specify half fold position adj. 1 touch [adjustment] on the machine status screen. The adjus...
Page 629
Machine adjustment 14 océ cs620/cs650 pro 14-69 4 load the desired size of paper to be adjusted on a tray, specify multi half fold, then press [start] on the control panel. A sample pattern (no. 16) will be output. 5 check the misalignment (a) of the edge of the feeding sheets. 6 if the desired resu...
Page 630
14 machine adjustment 14-70 océ cs620/cs650 pro 14.7.5 06 saddle stitcher adj. \ 05 tri-fold position adj. Perform this adjustment for the three-folding positions processed by the saddle stitcher sd-501. 2 note when adjusting both single fold and double fold, be sure to start with the double fold ad...
Page 631
Machine adjustment 14 océ cs620/cs650 pro 14-71 3 touch [copy] tab. The copy screen will be displayed. 4 load the desired size of paper to be adjusted on a tray, specify tri-fold, then press [start] on the control panel. A sample pattern (no. 16) will be output. 5 check a distance (a) and distance (...
Page 632
14 machine adjustment 14-72 océ cs620/cs650 pro 7 touch the required size key. 8 touch [double fold]. 9 use the touch panel keypad to enter the desired adjustment value, then touch [ available range: -50 to +50, 1 step = 0.1 mm – the distance (a) in step 5 will increase when the "+" value is entered...
Page 633
Machine adjustment 14 océ cs620/cs650 pro 14-73 14.7.6 06 saddle stitcher adj. \ 06 fold paper width adj. Adjust misalignment of the fold & staple, multi fold, and multi tri-fold paper processed by the saddle stitcher sd-501. To specify fold paper width adj. 1 touch [adjustment] on the machine statu...
Page 634
14 machine adjustment 14-74 océ cs620/cs650 pro 4 load the desired size of paper to be adjusted on a tray, specify the number of sheets to 5, then press [start] on the control panel. A sample pattern will be output. 5 check that any dislocation is found in the output set. 6 if the desired result can...
Page 635
Machine adjustment 14 océ cs620/cs650 pro 14-75 14.7.7 06 saddle stitcher adj. \ 07 trimming adjustment perform this adjustment for the trimmed width. To specify trimming adjustment 1 touch [adjustment] on the machine status screen. The adjustment menu screen will be displayed. 2 touch [04 finisher ...
Page 636
14 machine adjustment 14-76 océ cs620/cs650 pro 4 load the desired size of paper to be adjusted on a tray, specify fold&staple, then press [start] on the control panel. A sample pattern (no. 16) will be output. 5 check the trimmed width (a) from the edge of the feeding sheet. 6 if the desired result...
Page 637
Machine adjustment 14 océ cs620/cs650 pro 14-77 14.7.8 06 saddle stitcher adj. \ 08 trimming receiver adj. Frequent trimming may cause damage to the receiver, resulting in trimming failures. Select the interval in which the receiver should be moved after specified trimming operations (trimmer count)...
Page 638
14 machine adjustment 14-78 océ cs620/cs650 pro 3 select the trimmer count. Touch to choose between [700 times], [500 times], and [300 times]. 4 select the move pitch. Touch to choose between [1.0 mm], [1.5 mm], and [2.0 mm]. 5 touch [execute compulsive movement] to force the receiver to be moved. T...
Page 639
Machine adjustment 14 océ cs620/cs650 pro 14-79 14.8 04 finisher adjustment (ru-503/ru-504, océ cs650 pro) 14.8.1 07 ru adjustment \ 01 curl reform direction when paper jam occurs in options, it can be prevented by selecting the curl reform direction for the paper fed into the relay unit. To specify...
Page 640
14 machine adjustment 14-80 océ cs620/cs650 pro 3 touch to select [upper] or [lower]. Touch [off] if you do not use the function. 4 touch [return] to restore the adjustment menu screen..
Page 641
Machine adjustment 14 océ cs620/cs650 pro 14-81 14.9 finisher adjustment (fs-607, océ cs620) 14.9.1 01 saddle stitcher stopper adj. Adjust the dislocation of staple positions in widthwise direction of paper using fold & staple mode operated by the finisher fs-607. 1 touch [adjustment] on the machine...
Page 642
14 machine adjustment 14-82 océ cs620/cs650 pro 4 load the desired size of paper to be adjusted on a tray, select fold&staple and then press [start] on the control panel. A sample pattern (no. 16) will be output. 5 check the misalignment center fold and position of staples on output sheets. 6 if the...
Page 643
Machine adjustment 14 océ cs620/cs650 pro 14-83 10 if adjustment in any other paper size is required, repeat steps from 3 to 9. 11 touch [return] to restore the adjustment menu screen..
Page 644
14 machine adjustment 14-84 océ cs620/cs650 pro 14.9.2 02 half fold stopper adjustment perform this adjustment for the double-folding position processed by the finishher fs-607. 1 touch [adjustment] on the machine status screen. The adjustment menu screen will be displayed. 2 touch [04 finisher adju...
Page 645
Machine adjustment 14 océ cs620/cs650 pro 14-85 4 load the desired size of paper to be adjusted on a tray, specify multi center, then press [start] on the control panel. A sample pattern (no. 16) will be output. 5 check the misalignment (a) of the edge of the feeding sheets. 6 if the desired result ...
Page 646
14 machine adjustment 14-86 océ cs620/cs650 pro 14.9.3 03 punch adjustment \ 01 vertical position adj. Perform this adjustment for the center position of punch holes operated by the punch kit pk-512/513. 1 touch [adjustment] on the machine status screen. The adjustment menu screen will be displayed....
Page 647
Machine adjustment 14 océ cs620/cs650 pro 14-87 4 load the desired size of paper to be adjusted on a tray, specify punch, then press [start] on the control panel. A sample pattern (no. 16) will be output. 5 check the value of misalignment (a) between the center-fold line and punch position. 6 if the...
Page 648
14 machine adjustment 14-88 océ cs620/cs650 pro 14.9.4 03 punch adjustment \ 02 horizontcal position adj. Perform this adjustment for the position of punch holes in the feeding direction operated by the punch kit pk-512/513. 1 touch [adjustment] on the machine status screen. The adjustment menu scre...
Page 649
Machine adjustment 14 océ cs620/cs650 pro 14-89 5 load the paper on the desired tray (main body tray or paper inserter tray) to be adjusted, specify punch, then press [start] on the control panel. A sample pattern (no. 16) will be output. 6 check the distance (a) from the edge of the output sheet to...
Page 650
14 machine adjustment 14-90 océ cs620/cs650 pro 10 if adjustment in any other tray is required, repeat steps from 3 to 9. 11 touch [return] to restore the adjustment menu screen..
Page 651
Machine adjustment 14 océ cs620/cs650 pro 14-91 14.9.5 03 punch adjustment \ 03 registration adjustment perform this adjustment for the skew of the punch position made by the punch kit pk-512/513 in duplex copying or cover sheet feeding using the paper inserter. 1 touch [adjustment] on the machine s...
Page 652
14 machine adjustment 14-92 océ cs620/cs650 pro 4 touch [copy] tab. The copy screen will be displayed. 5 load the desired size of paper on the tray to be adjusted, specify punch, then press [start] on the control panel. A sample pattern (no. 16) will be output. 6 check whether or not the punch posit...
Page 653
Machine adjustment 14 océ cs620/cs650 pro 14-93 10 if adjustment in any other size is required, repeat steps from 3 to 9. 11 touch [return] to restore the adjustment menu screen..
Page 654
14 machine adjustment 14-94 océ cs620/cs650 pro 14.9.6 03 punch adjustment \ 04 paper edge detect sensor adj. Perform this adjustment to detect the paper edge to be used as reference point of punching operation. 1 touch [adjustment] on the machine status screen. The adjustment menu screen will be di...
Page 655
Machine adjustment 14 océ cs620/cs650 pro 14-95 14.9.7 04 tri-fold adjustment perform this adjustment for the three-folding positions processed by the finisher fs-607. 1 touch [adjustment] on the machine status screen. The adjustment menu screen will be displayed. 2 touch [04 finisher adjustment], a...
Page 656
14 machine adjustment 14-96 océ cs620/cs650 pro 4 load the desired size of paper to be adjusted on a tray, specify tri- fold, then press [start] on the control panel. A sample pattern (no. 16) will be output. 5 check the folding positions on the output sheet. 6 if the desired result cannot be obtain...
Page 657
Machine adjustment 14 océ cs620/cs650 pro 14-97 10 if adjustment in any other size is required, repeat steps 3 to 9. 11 touch [return] to restore the adjustment menu screen..
Page 658
14 machine adjustment 14-98 océ cs620/cs650 pro 14.9.8 05 2 position staple pitch adjustment perform this adjustment for the staple pitch in staple and fold & staple modes. 1 touch [adjustment] on the machine status screen. The adjustment menu screen will be displayed. 2 touch [04 finisher adjustmen...
Page 659
Machine adjustment 14 océ cs620/cs650 pro 14-99 5 select the folding method to be adjusted, then press [start] on the control panel. A sample pattern (no. 16) will be output. 6 check the amount of staple pitch. 7 if the desired result cannot be obtained, touch [adjustment] tab. The 2 position staple...
Page 660
14 machine adjustment 14-100 océ cs620/cs650 pro 14.9.9 06 paper inserter tray size adj. Perform the size adjustment for the upper tray and lower tray of the pape inserter pi-502. 1 touch [adjustment] on the machine status screen. The adjustment menu screen will be displayed. 2 touch [04 finisher ad...
Page 661
Machine adjustment 14 océ cs620/cs650 pro 14-101 5 load the a4 w or 8.5" e 11" w on the lower tray of the paper inserter, and then touch [start]. 6 touch [return] to restore the adjustment menu screen..
Page 662
14 machine adjustment 14-102 océ cs620/cs650 pro 14.9.1007 output quantity limit specify the quantity limit of the staple, fold & staple, half fold, or tri-fold. 1 touch [adjustment] on the machine status screen. The adjustment menu screen will be displayed. 2 touch [04 finisher adjustment], and the...
Page 663
15 utility screen outlines.
Page 665
Utility screen outlines 15 océ cs620/cs650 pro 15-3 15 utility screen outlines 15.1 chart of setting items on utility screen this section uses a systematic chart to describe the setting items provided on layered utility screens. Utility menu [01] scan send ad- dress * 1 [01] address edit e-mail hdd ...
Page 666
15 utility screen outlines 15-4 océ cs620/cs650 pro [02] user set- ting [01] system setting [07] power save setting * 3 [08] time and date setting * 4 [09] buzzer setting [01] buzzer volume reg- ulation [2] buzzer for job stop set [10] key re- sponse time [11] short cut key setting [01] applica- tio...
Page 667
Utility screen outlines 15 océ cs620/cs650 pro 15-5 [02] user set- ting [01] system setting [07] image quality setting [01] screen [02] screen initial setting [03] original density shift [04] acs ad- justment [08] change password [03] machine admin. Set- ting [01] system setting [01] power save sett...
Page 668
15 utility screen outlines 15-6 océ cs620/cs650 pro [03] machine admin. Set- ting [01] system setting [05] expert adjustment [01] aes lev- el adjuste- ment [02] erase adjustment [01] non-im- age area erase [02] erase operation setting [03] adf frame erase [03] printer adjustement * 8 [01] restart ti...
Page 669
Utility screen outlines 15 océ cs620/cs650 pro 15-7 [03] machine admin. Set- ting [01] system setting [05] expert adjustment [04] finisher adjustement (fd-501) * 9 [02] multi folder (punch) adj. [01] paper width adjust- ment [02] hole- punch verti- cal pos. [03] multi folder (fold) adj. [01] half fo...
Page 670
15 utility screen outlines 15-8 océ cs620/cs650 pro [03] machine admin. Set- ting [01] system setting [05] expert adjustment [04] finisher adjustment (sd-501) * 9 [06] saddle stitcher adj. [01] staple center adj. [02] staple paper width adj. [03] staple pitch adjust- ment [04] half fold position adj...
Page 671
Utility screen outlines 15 océ cs620/cs650 pro 15-9 [03] machine admin. Set- ting [01] system setting [05] expert adjustment [04] finisher adjustment (fs-607) [01] saddle stitcher stopper adj. [02] half fold stopper adj. [03] punch adjustment [01] vertical position adj. [02] horizon- tal position ad...
Page 672
15 utility screen outlines 15-10 océ cs620/cs650 pro [03] machine admin. Set- ting [01] system setting [05] expert adjustment [07] quality adjustment [01] printer gamma off- set adj. [02] printer gamma off- set auto adj. [03] printer gamma sen- sor adj. [04] image quality sta- bility [05] custom scr...
Page 673
Utility screen outlines 15 océ cs620/cs650 pro 15-11 [03] machine admin. Set- ting [03] scanner send ad- dress * 1 [01] address edit e-mail hdd ftp smb group [02] e-mail ti- tle setting [03] e-mail text setting [04] user auth./ac- count track [01] authenti- cation method [02] user au- thentication s...
Page 674
15 utility screen outlines 15-12 océ cs620/cs650 pro - 1* [01 scan send address] and [03 machine admin. Setting] > [03 scanner send address] are provided for the same setting, however, use the machine administrator setting for usual operation. - * 2 while general paper settings can be registered or ...
Page 675
Utility screen outlines 15 océ cs620/cs650 pro 15-13 the setting items of finisher adjustment vary depending on the optional equipment installed in the machine. - * 10 the adjustment operation by selecting [03 machine admin. Setting] > [01 system setting] > [05 expert adjustment] > [05 scanner adjus...
Page 676
15 utility screen outlines 15-14 océ cs620/cs650 pro 15.2 function list of user setting setting item/description default 01 system setting 01 language setting select the language used in the lcd. English / german / french /italian/ spanish english 02 unit setting select the unit of measurement for t...
Page 677
Utility screen outlines 15 océ cs620/cs650 pro 15-15 04 reset setting 01 auto reset setting set the reset interval starting from the completion of a copying job until the machine returns to the initial con- dition, without selecting any key on the touch panel or the control panel. Off/ 60 seconds/ 1...
Page 678
15 utility screen outlines 15-16 océ cs620/cs650 pro 09 buzzer setting 01 buzzer volume regulation set the buzzer sound (the touch key sound) as touch- ing the screen. On/ off, big/ small on 02 buzzer for job stop set select the duration of the buzzer sound when the ma- chine stops due to no paper a...
Page 679
Utility screen outlines 15 océ cs620/cs650 pro 15-17 02 initial setting 01 copy initial setting specify the initial values for the copy functions when the machine is reset to the initial setting, such as by pressing [reset] on the control panel. Copy initial setting (original setting/ color/ zoom/ a...
Page 680
15 utility screen outlines 15-18 océ cs620/cs650 pro 04 copy setting fold & staple auto select set the machine to automatically select the booklet mode when stapling & folding mode is selected. Yes/ no yes fine adjust margin select on/off to enter a decimal point for image shift. Yes/ no no orig. Gl...
Page 681
Utility screen outlines 15 océ cs620/cs650 pro 15-19 printer prohibit timer select the interval time that printing via pc is prohibited af- ter touching the touch keys. Off/ 15 seconds/ 30 seconds/ 60 seconds/ 90 seconds off bookmark function specify whether to delete the set bookmark or not, or sel...
Page 682
15 utility screen outlines 15-20 océ cs620/cs650 pro 06 printer setting 01 gray text outline enhance select to enable gray text outline enhancement for printing. Strong+/ normal/weak+ normal 02thin line enhancement specify the level of thin line enhancement for printing. Strong+/ strong/ normal/ wea...
Page 683
Utility screen outlines 15 océ cs620/cs650 pro 15-21 15.3 function list of machine administrator setting setting item/description default 01 system setting 01 power save setting set the interval time of auto low power and auto shut off modes. Auto low power: 5 min./ 10 min./ 15 min./ 30 min./ 60 min...
Page 684
15 utility screen outlines 15-22 océ cs620/cs650 pro 03 scanner prohibit setting specify whether to permit or prohibit the selection of [e-mail], [hdd], [ftp], [smb], [queue], or [manual in- put] for scanning functions. • e-mail: permission/ prohibition • ftp: permeation/ prohibition • hdd: permeati...
Page 685
Utility screen outlines 15 océ cs620/cs650 pro 15-23 02 multi folder (punch) adj. Adjust the settings related to the punch function of the folding unit fd-501. • paper width adjustment: -20 to +20 (1 step = 0.1mm) • hole-punch vertical pos.: 2-hole punch -40 to +40 (1 step = 0.1mm) 4-hole punch -40 ...
Page 686
15 utility screen outlines 15-24 océ cs620/cs650 pro 04 finisher adjustment adjust the settings related to the finisher (fs-607). 01 saddle stitcher stopper adj. Adjust the staple positions in widthwise direction of paper using fold & staple mode. -128 to +127 (1 step = 0.1mm) 02 half fold stopper a...
Page 687
Utility screen outlines 15 océ cs620/cs650 pro 15-25 06 process adjustment adjust the settings related to the process. • front & back density • toner density sensor • toner quantity/exposure 07 quality adjustment adjust the image quality. • printer gamma offset adj. • printer gamma offset auto adj. ...
Page 688
15 utility screen outlines 15-26 océ cs620/cs650 pro 06 pi size priority specify the standard size which cannot be detectable on the upper/lower tray of the post inserter of the fold- ing unit fd-501. Fd-501: a5 v / 5.5 e 8.5 v sra4 w / a4 w / 8.5 e 11 w, 8.5 e 14 w / 8 e 13 w / 8.12 e 13.2 w / 8.25...
Page 689
Utility screen outlines 15 océ cs620/cs650 pro 15-27 02 user authentication set 01 management setting specify whether to display the user list when setting the user authentication, and as select the functions available to authenticated users as well as the maxi- mum number of users displayed in the ...
Page 690
15 utility screen outlines 15-28 océ cs620/cs650 pro continuation print set the machine to output multiple reserve jobs in succes- sion. Copy on/ copy off/ printer on/ printer off copy off/ printer on stop key function specify whether to pause or abort a job when [stop] is pressed. Job temp. Stop/ j...
Page 691
Utility screen outlines 15 océ cs620/cs650 pro 15-29 non-image area erase of orig. Specify the conditions to be applied to [non-image area erase of orig]. Yes/ aps/ams/ except orig. Glass (1:1) yes adf frame erase set to erase the frame when copying in adf mode. None/ 1mm/ 2mm/ 3mm/ 4mm/ 5mm 3mm rot...
Page 692
15 utility screen outlines 15-30 océ cs620/cs650 pro default address select the default destination to be displayed when select- ing the scanner screen. E-mail/ hdd/ ftp/ smb/ queue e-mail compress method color/gray select the default destination to be displayed when select- ing the scanner screen. ...
Page 693
16 user setting.
Page 695
User setting 16 océ cs620/cs650 pro 16-3 16 user setting this section describes the items which the users can set on the utility screen. 16.1 user setting outlines the top menu, referred to as utility/counter screen, appears right after [utility/counter] is pressed. The user setting menu screen is t...
Page 696
16 user setting 16-4 océ cs620/cs650 pro how to display user setting menu screen 1 press the [utility/counter] on the control panel. The utility menu screen will be displayed. 2 touch [user setting]. The user setting menu screen will be displayed..
Page 697
User setting 16 océ cs620/cs650 pro 16-5 how to use [close], layer keys, and [exit] touch [close] to return to the previous screen. Touch the desired layer key on the left side area of the screen to jump to that screen. Touch [exit] to restore the copy screen..
Page 698
16 user setting 16-6 océ cs620/cs650 pro 16.2 01 system setting 01 language setting select the language used in the touch panel. The initial setting is english. 1 follow the procedure on page 16-3 to display the user setting menu screen. 2 touch [01 system setting], and then [01 language setting]. 3...
Page 699
User setting 16 océ cs620/cs650 pro 16-7 4 touch [ok] to complete the setting. – to cancel the change, touch [cancel]. In either case, the system setting menu screen will be restored. 5 if further changes are required, touch the desired key..
Page 700
16 user setting 16-8 océ cs620/cs650 pro 02 unit setting select the unit of measurement for the value to be entered by user and to be displayed on the touch panel. 1 follow the procedure on page 16-3 to display the user setting menu screen. 2 touch [01 system setting], [02 unit setting] in sequence....
Page 701
User setting 16 océ cs620/cs650 pro 16-9 03 feed tray setting \ 01 paper setting please refer to "13 paper setting" for the overview of, and instruction on, setting paper. 03 feed tray setting \ 02 paper feed auto selection when the selected paper tray becomes empty while copying is in progress, aut...
Page 702
16 user setting 16-10 océ cs620/cs650 pro 3 touch to highlight the desired tray key under ats/aps switch. The selected tray is automatically detected when ats functions. The trays not selected will not be detected even when ats functions. 4 the selected tray will be displayed under tray priority as ...
Page 703
User setting 16 océ cs620/cs650 pro 16-11 03 feed tray setting \ 03 ats permit setting set ats on or off. 1 follow the procedure on page 16-3 to display the user setting menu screen. 2 touch [01 system setting], [03 feed tray setting], and then [03 ats permit setting]. 3 touch [on] when ats is used,...
Page 704
16 user setting 16-12 océ cs620/cs650 pro 03 feed tray setting \ 04 auto paper type select the paper type setting of the tray which is automatically selected when ats functions. When the paper type that is not specified with this function is designated to the tray that is automatically selected by a...
Page 705
User setting 16 océ cs620/cs650 pro 16-13 – touch to highlight the desired type of keys under "paper type", "weight", "hole-punch", "tab paper", and "color paper". You may choose more than one key for each item. Switch the displayed unit for weight by touching [unit change]. 4 touch [ok] to complete...
Page 706
16 user setting 16-14 océ cs620/cs650 pro 03 feed tray setting \ 05 dehumidification fan if the dehumidification fan heater ht-504 is attached to the paper feeder unit pf-601, specify the on/off setting for dryness preparation and the fun heater function for each tray. 1 follow the procedure on page...
Page 707
User setting 16 océ cs620/cs650 pro 16-15 4 touch [ok] to complete the setting. – to cancel the change, touch [cancel]. In either case, the feed tray setting menu screen will be restored. 5 if further changes are required, touch the desired key..
Page 708
16 user setting 16-16 océ cs620/cs650 pro 04 reset setting \ 01 auto reset setting set the reset interval starting from the completion of a copying job until the machine returns to the initial screen, without selecting any key on the touch panel or the control panel. Use this setting mode to specify...
Page 709
User setting 16 océ cs620/cs650 pro 16-17 4 touch [ok] to complete the setting. – to cancel the change, touch [cancel]. In either case, the reset setting menu screen will be restored. 5 if further changes are required, touch the desired key..
Page 710
16 user setting 16-18 océ cs620/cs650 pro 04 reset setting \ 02 mode reset setting the following features can be provided by switching the setting. - change user select whether or not to initialize the settings currently specified when the machine takes it that the user has changed. This machine con...
Page 711
User setting 16 océ cs620/cs650 pro 16-19 1 follow the procedure on page 16-3 to display the user setting menu screen. 2 touch [01 system setting], [04 reset setting], and then [02 mode reset setting]. 3 touch the desired key to each item on the left side of the screen. – there are two setting scree...
Page 712
16 user setting 16-20 océ cs620/cs650 pro 05 default screen setting select the initial screen to be displayed when the power switch is turned on. [machine]: the machine status screen will be displayed. [job list]: the job list screen will be displayed. [copy]: copy screen will be displayed. 1 follow...
Page 713
User setting 16 océ cs620/cs650 pro 16-21 4 touch [ok] to complete the setting. – to cancel the change, touch [cancel]. In either case, the system setting menu screen will be restored. 5 if further changes are required, touch the desired key..
Page 714
16 user setting 16-22 océ cs620/cs650 pro 06 preset zoom setting the initial setting for preset zoom1 is 4.000, preset zoom2 is 2.000, and preset zoom3 is 0.500. 1 follow the procedure on page 16-3 to display the user setting menu screen. 2 touch [01 system setting], and then [06 preset zoom setting...
Page 715
User setting 16 océ cs620/cs650 pro 16-23 4 touch [ok] to complete the setting. – to cancel the change, touch [cancel]. In either case, the system setting menu screen will be restored. 5 if further changes are required, touch the desired key..
Page 716
16 user setting 16-24 océ cs620/cs650 pro 07 power save setting specify auto low power or auto shut off when setting the power save mode manually, and select the interval of time that must elapse before auto low power and auto shut off. Auto low power: 5 min. / 10 min. / 15 min. / 30 min. / 60 min. ...
Page 717
User setting 16 océ cs620/cs650 pro 16-25 3 specify the power save mode to be set manually by pressing [power save] on the control panel, by selecting [auto low power] or [auto shut off]. 4 select the interval of time that must elapse before turning to auto low power automatically. The initial setti...
Page 718
16 user setting 16-26 océ cs620/cs650 pro 2 note the period of time selected for auto low power cannot exceed the auto shut off setting. If the same period of time as auto shut off is selected for auto low power, auto shut off will function instead of auto low power. 2 note if the period of time sel...
Page 719
User setting 16 océ cs620/cs650 pro 16-27 08 time and date setting set the current date and time, the summer time, and also the time difference. The default setting for the summer time is off. 1 follow the procedure on page 16-3 to display the user setting menu screen. 2 touch [01 system setting], a...
Page 720
16 user setting 16-28 océ cs620/cs650 pro 4 set the summer time. – the summer time is initially deactivated. To activate the summer time (daylight savings time) function, touch [summer time] to highlight it. The present time will gain one hour. 5 the difference in time setting is provided in order t...
Page 721
User setting 16 océ cs620/cs650 pro 16-29 09 buzzer setting specify the following 2 settings. - 01 buzzer volume regulation set the buzzer sound (the touch key sound) as touching the screen, and also select the buzzer volume. - 02 buzzer for job stop set select the duration of the buzzer sound when ...
Page 722
16 user setting 16-30 océ cs620/cs650 pro 3 touch [on] to highlight it. Adjust the buzzer volume, as desired. Touch [small] or [big] to regulate the buzzer volume of the touch keys. – touch [off] to highlight it. The buzzer will go off. 4 touch [ok] to complete the setting. – to cancel the change, t...
Page 723
User setting 16 océ cs620/cs650 pro 16-31 6 select the desired time to highlight it. 7 touch [ok] to complete the setting. – to cancel the change, touch [cancel]. In either case, the buzzer setting menu screen will be restored. 8 if further changes are required, touch the desired key..
Page 724
16 user setting 16-32 océ cs620/cs650 pro 10 key response time select the response time between touching the key and the machine responses to it. 1 follow the procedure on page 16-3 to display the user setting menu screen. 2 touch [01 system setting], and then [10 key response time]. 3 select the de...
Page 725
User setting 16 océ cs620/cs650 pro 16-33 11 short cut key setting select up to 3 short cut keys to be displayed under [application] and [quality adjust.] on the copy screen, and under [quality adjust] on the scan settings screen of the scanner screen, for easy access to the desired setting screens....
Page 726
16 user setting 16-34 océ cs620/cs650 pro 3 to display the short cut keys under [application] on the copy screen, touch [01 application] to display the short cut key setting screen (application). – touch appropriate keys to select up to 3 short cuts for [application]. 4 touch [ok] to complete the se...
Page 727
User setting 16 océ cs620/cs650 pro 16-35 6 touch [ok] to complete the setting. The short cut key setting menu screen will be restored. 7 to set short cut keys to be displayed under [quality adjust.] on the scan settings screen of the scanner screen, touch [03 quality adjust. (scanner)] to display t...
Page 728
16 user setting 16-36 océ cs620/cs650 pro 9 to change the short cut keys displayed under [quality adjust.] on the copy screen to [density setting display], touch [04 quality adjust. Area set] to display the short cut key setting screen (quality) – select either [short cut display] or [density settin...
Page 729
User setting 16 océ cs620/cs650 pro 16-37 12 service port device specify whether to use the service port device or not, and select the keyboard type if the service port device is used. 1 follow the procedure on page 16-3 to display the user setting menu screen. 2 touch [01 system setting], and then ...
Page 730
16 user setting 16-38 océ cs620/cs650 pro 4 touch [ok] to complete the setting. – to cancel the change, touch [cancel]. In either case, the system setting menu screen will be restored. 5 if further changes are required, touch the desired key. 2 note when using the service port device, contact your s...
Page 731
User setting 16 océ cs620/cs650 pro 16-39 16.3 02 initial setting 01 copy initial setting besides the factory default setting (full auto), you may set the copying condition as the initial setting as desired. To specify the copy conditions set here to be used as the initial setting when the reset fun...
Page 732
16 user setting 16-40 océ cs620/cs650 pro 3 set the following setting items in initial conditions: original setting, color, zoom, application, image quality, output appli., simplex/duplex, paper setting, and rotation on/off. – follow the same procedure as setting it on the copy screen. Touch [adf] t...
Page 733
User setting 16 océ cs620/cs650 pro 16-41 02 scan initial setting besides the factory default setting (full auto), you may set the scanning condition as the initial setting as desired. To specify the scanning conditions set here to be used as the initial setting when the reset function is used, sele...
Page 734
16 user setting 16-42 océ cs620/cs650 pro 3 set the following setting items in initial conditions: original setting, color, zoom, color space, image adjust., scan size, resolution, and default server. – follow the same procedure as setting it on the copy screen. Touch [adf] to select the adf mode as...
Page 735
User setting 16 océ cs620/cs650 pro 16-43 16.4 03 common setting the following features can be provided by switching the setting. Feature description available options 1shot indication time select the shot indication time to be dis- played in the message area of the touch panel, such as "original si...
Page 736
16 user setting 16-44 océ cs620/cs650 pro 1 follow the procedure on page 16-3 to display the user setting menu screen. 2 touch [03 common setting]. 3 touch the desired key to each item on the left side of the screen. – there are two setting screens. Touch [next] and [previous] to switch between the ...
Page 737
User setting 16 océ cs620/cs650 pro 16-45 16.5 04 copy setting the following features can be provided by switching the setting. Feature description available options fold & staple auto select set the machine to automatically select the booklet mode when stapling & folding mode is selected. Yes/no fi...
Page 738
16 user setting 16-46 océ cs620/cs650 pro orig./out bind direction set set the machine to conform the binding di- rection of the originals and printed sets each other. On/off choose default tray when aps off select the tray to be automatically selected when aps is released. Aps tray/tray1/tray2/tray...
Page 739
User setting 16 océ cs620/cs650 pro 16-47 1 follow the procedure on page 16-3 to display the user setting menu screen. 2 touch [04 copy setting]. 3 touch the desired key to each item on the left side of the screen. – there are five setting screens. Touch [next] and [previous] to switch between the s...
Page 740
16 user setting 16-48 océ cs620/cs650 pro 16.6 05 scan setting the following features can be provided by switching the setting. Feature description available options file form default e-mail select the default file form when transmit- ting in e-mail. Packaged tiff/divid- ed tiff/packaged pdf/jpeg fi...
Page 741
User setting 16 océ cs620/cs650 pro 16-49 1 follow the procedure on page 16-3 to display the user setting menu screen. 2 touch [05 scan setting]. 3 touch the desired key to each item on the left side of the screen. – there are three setting screens. Touch [next] and [previous] to switch between the ...
Page 742
16 user setting 16-50 océ cs620/cs650 pro 16.7 06 printer setting specify the following 4 settings. Setting items to be specified varies depending on the printer controller installed in the machine. 1 follow the procedure on page 16-3 to display the user setting menu screen. 2 touch [06 printer sett...
Page 743
User setting 16 océ cs620/cs650 pro 16-51 3 select the desired key to highlight it. 4 touch [ok] to complete the setting. – to cancel the change, touch [cancel]. In either case, the printer setting menu screen will be restored. 5 touch [06 printer setting], and then [02 thin line enhancement]..
Page 744
16 user setting 16-52 océ cs620/cs650 pro 6 select the desired key to highlight it. 7 touch [ok] to complete the setting. – to cancel the change, touch [cancel]. In either case, the printer setting menu screen will be restored. 8 touch [06 printer setting], and then [03 reserved text enhancement]..
Page 745
User setting 16 océ cs620/cs650 pro 16-53 9 select the desired key to highlight it. 10 touch [ok] to complete the setting. – to cancel the change, touch [cancel]. In either case, the printer setting menu screen will be restored. 11 touch [06 printer setting], and then [04 blur prevention]..
Page 746
16 user setting 16-54 océ cs620/cs650 pro 12 select the desired key to highlight it. 13 touch [ok] to complete the setting. – to cancel the change, touch [cancel]. In either case, the printer setting menu screen will be restored. 14 if further changes are required, touch the desired key..
Page 747
User setting 16 océ cs620/cs650 pro 16-55 16.8 07 image quality setting 01 screen enable the selections of settings other than [line 1] when selecting [text & photo] or [photo] for image quality. Line 2: permission/prohibition dot 1: permission/prohibition dot 2: permission/prohibition 1 follow the ...
Page 748
16 user setting 16-56 océ cs620/cs650 pro 4 touch [ok] to complete the setting. – to cancel the change, touch [cancel]. In either case, the image quality setting menu screen will be restored. 5 if further changes are required, touch the desired key..
Page 749
User setting 16 océ cs620/cs650 pro 16-57 02 screen initial setting select then screen to be displayed when selecting [text & photo] or [photo] for image quality. Full color-text/photo: line 1/line 2/dot 1/dot 2/compression full color-photo: line 1/line 2/dot 1/dot 2/compression black-text/photo: li...
Page 750
16 user setting 16-58 océ cs620/cs650 pro 3 select the desired key to highlight it. – there are six setting screens. Touch [next] and [previous] to switch between the screens. 4 touch [ok] to complete the setting. – to cancel the change, touch [cancel]. In either case, the image quality setting menu...
Page 751
User setting 16 océ cs620/cs650 pro 16-59 03 original density shift specify the default density setting for each image quality mode. 0 - 6 (text & photo:3, map:3, photo:3, text:3) 1 follow the procedure on page 16-3 to display the user setting menu screen. 2 touch [07 image quality setting], and the...
Page 752
16 user setting 16-60 océ cs620/cs650 pro 5 touch [ok] to complete the setting. – to cancel the change, touch [cancel]. In either case, the image quality setting menu screen will be restored. 6 if further changes are required, touch the desired key..
Page 753
User setting 16 océ cs620/cs650 pro 16-61 04 acs adjustment adjust the automatic color detection function if a colored original is identified as monochrome or a monochrome original is identified as colored with this function. 1 follow the procedure on page 16-3 to display the user setting menu scree...
Page 754
16 user setting 16-62 océ cs620/cs650 pro 4 if the colored original is read as monochrome, use the keypad to enter a higher value, and then touch [ read as colored, use the keypad to enter a lower value, and then touch [ available range: -5 to +5 5 repeat the adjustment steps from 3 to 4 until the d...
Page 755
User setting 16 océ cs620/cs650 pro 16-63 16.9 08 change password change a user password which the user has registered for user authentication. The changed password is reflected to the user authentication setting description. 1 follow the procedure on page 16-3 to display the user setting menu scree...
Page 756
16 user setting 16-64 océ cs620/cs650 pro 4 touch [new password], then enter a new user password. – reenter the new user password in [check input]. 5 touch [ok] to complete the setting. – to cancel the change, touch [cancel]. In either case, the user setting menu screen will be restored. 6 if furthe...
Page 757
17 machine administrator setting.
Page 759
Machine administrator setting 17 océ cs620/cs650 pro 17-3 17 machine administrator setting this section provides information on, and instruction for, setting the items which the machine administrator can specify in the machine administrator menu screen. It also provides information on how to adjust ...
Page 760
17 machine administrator setting 17-4 océ cs620/cs650 pro how to access the machine administrator setting screen 1 press the [utility/counter] on the control panel. The utility menu screen will be displayed. 2 touch [03 machine admin. Setting]..
Page 761
Machine administrator setting 17 océ cs620/cs650 pro 17-5 – if the password input screen is displayed, enter the eight-digit machine administrator password, then touch [ok]. The machine administrator setting menu screen will be displayed..
Page 762
17 machine administrator setting 17-6 océ cs620/cs650 pro how to use [close], layer keys, and [exit] touch [close] to return to the previous screen. Touch the desired layer key on the left side area of the screen to jump to that screen. Touch [exit] to restore the copy screen..
Page 763
Machine administrator setting 17 océ cs620/cs650 pro 17-7 17.2 01 system setting 01 power save setting specify auto low power or auto shut off when setting the power save mode manually, and select the interval of time that must elapse before auto low power and auto shut off. Auto low power 5 min. / ...
Page 764
17 machine administrator setting 17-8 océ cs620/cs650 pro power save setting screen will be displayed. ! Detail the following operation is equivalent to selecting [user setting \ 01 system setting \ 07 power save setting]. Please refer to page 16-18 for more information..
Page 765
Machine administrator setting 17 océ cs620/cs650 pro 17-9 02 time and date setting set the current date and time, the summer time, and also the time difference. The default setting for the summer time is off. 1 follow the procedure on page 17-4 to display the machine administrator setting menu scree...
Page 766
17 machine administrator setting 17-10 océ cs620/cs650 pro 03 weekly timer setting \ 01 weekly timer on/off set enable and disable the weekly timer function. Conditions required to use the weekly timer - the power plug is inserted into the socket (the weekly timer is not operational when the power p...
Page 767
Machine administrator setting 17 océ cs620/cs650 pro 17-11 3 touch [weekly timer on] to activate weekly timer, or touch [weekly timer off] to deactivate weekly timer. The selected key will be highlighted. – the default setting is [weekly timer off]. Touching [weekly timer on] will enable the weekly ...
Page 768
17 machine administrator setting 17-12 océ cs620/cs650 pro 03 weekly timer setting \ 02 timer setting use this function to set the on/off times in hours and minutes for each day of the week or set the collective time for the entire week, i.E., the same on/off time for a certain day of the week. 2 no...
Page 769
Machine administrator setting 17 océ cs620/cs650 pro 17-13 3 set the collective time for the entire week. – touch [block set] to display the weekly timer on/off time collective setting screen. – touch to highlight the day(s) of the week to be set. More than one can be selected at a time. – enter the...
Page 770
17 machine administrator setting 17-14 océ cs620/cs650 pro – when setting sunday off-time, monday on-time is highlighted again. – repeat these steps to specify on and off times through monday to sunday. Even if on/off times are specified here, [timer action on/off set] (see page 17-15) still needs t...
Page 771
Machine administrator setting 17 océ cs620/cs650 pro 17-15 03 weekly timer setting \ 03 timer action on/off set use this function to set the timer on/off for a given day of a given month. Set the on-off condition for specific days individually or collectively for all mondays through sundays of the g...
Page 772
17 machine administrator setting 17-16 océ cs620/cs650 pro 3 to collectively set the on/off data for the entire month by the day of the week, touch [on] or [off] for the desired day at the bottom of the screen. If you touch an already-highlighted key, it will not be changed. – if any change is made ...
Page 773
Machine administrator setting 17 océ cs620/cs650 pro 17-17 5 touch [ok] to complete the setting. – to cancel the change, touch [cancel]. In either case, the weekly timer setting menu screen will be restored. 6 if further changes are required, touch the desired key..
Page 774
17 machine administrator setting 17-18 océ cs620/cs650 pro 03 weekly timer setting \ 04 lunch hour off setting select the paper type setting of the tray which is automatically selected when ats functions. When the paper type that is not specified with this function is designated to the tray that is ...
Page 775
Machine administrator setting 17 océ cs620/cs650 pro 17-19 3 touch [function valid] to activate the lunch hour off function. – enter off-time using the touch panel keypad and touch [ok], then enter restart time and touch [set]. – touch [function invalid] to deactivate the lunch hour off function. 4 ...
Page 776
17 machine administrator setting 17-20 océ cs620/cs650 pro 03 weekly timer setting \ 05 timer interrupt password set use this password setting mode to establish a four-digit password required for using the timer interrupt function. 1 follow the procedure on page 17-4 to display the machine administr...
Page 777
Machine administrator setting 17 océ cs620/cs650 pro 17-21 5 if further changes are required, touch the desired key. 2 note when the password setting is 0000, timer interrupt can be used simply by pressing [power save] on the control panel, then on. In this case, you will be asked to enter the durat...
Page 778
17 machine administrator setting 17-22 océ cs620/cs650 pro 04 operation prohibit set \ 01 lock/delete mode memory lock/unlock or delete a mode memory that has been programmed. The settings of a locked mode memory cannot be changed. 1 follow the procedure on page 17-4 to display the machine administr...
Page 779
Machine administrator setting 17 océ cs620/cs650 pro 17-23 4 lock/unlock a mode memory. – the programmed name is displayed on the right side of the mode memory number, when the setting is already programmed. Touch the key on the left side of the desired mode memory number. Use the arrow keys to scro...
Page 780
17 machine administrator setting 17-24 océ cs620/cs650 pro 04 operation prohibit set \ 02 change prohibit setting specify whether to permit or prohibit the modification of the following settings. Specify whether to permit or prohibit the modification of the following settings. - change send address:...
Page 781
Machine administrator setting 17 océ cs620/cs650 pro 17-25 3 touch to highlight [permission] or [prohibition] for each item. 4 touch [ok] to complete the setting. – to cancel the change, touch [cancel]. In either case, the reset setting menu screen will be restored. 5 if further changes are required...
Page 782
17 machine administrator setting 17-26 océ cs620/cs650 pro 04 operation prohibit set \ 03 scanner prohibit setting permit/prohibit to transmit scanned data to the following device. - e-mail - hdd - ftp - smb - queue - manual input 1 follow the procedure on page 17-4 to display the machine administra...
Page 783
Machine administrator setting 17 océ cs620/cs650 pro 17-27 4 touch [ok] to complete the setting. – to cancel the change, touch [cancel]. In either case, the operation prohibit setting menu screen will be restored. 5 if further changes are required, touch the desired key..
Page 784
17 machine administrator setting 17-28 océ cs620/cs650 pro 05 expert adjustment \ 01 aes level adjustment change the density level of [color]/[black] to be applied when selecting [auto] for [image quality \ copy density] on the copy screen. 1 follow the procedure on page 17-4 to display the machine ...
Page 785
Machine administrator setting 17 océ cs620/cs650 pro 17-29 5 if further changes are required, touch the desired key..
Page 786
17 machine administrator setting 17-30 océ cs620/cs650 pro 05 expert adjustment \ 02 erase adjustment specify the detailed setting for erase operations used when reading the originals. - 01 non-image area erase select to delete or not the outside area of the original from the following three ways: –...
Page 787
Machine administrator setting 17 océ cs620/cs650 pro 17-31 1 follow the procedure on page 17-4 to display the machine administrator setting menu screen. 2 touch [01 system setting], [05 expert adjustment], and then [02 erase adjustment]. The erase adjustment menu screen will be displayed. 3 touch [0...
Page 788
17 machine administrator setting 17-32 océ cs620/cs650 pro 5 touch [02 erase operating setting]. – touch [auto] to automatically select the appropriate settings for the original placed on the original glass for either mode. Touch any key from five exposure levels to manually select the density level...
Page 789
Machine administrator setting 17 océ cs620/cs650 pro 17-33 8 touch [ok] to complete the setting. – to cancel the change, touch [cancel]. In either case, the expert adjustment menu screen will be restored. 9 if further changes are required, touch the desired key..
Page 790
17 machine administrator setting 17-34 océ cs620/cs650 pro 05 expert adjustment \ 03 printer adjustment \ 01 restart timing adjustment perform this adjustment to control the restart timing. This operation is equivalent to selecting [adjustment \ 01 machine adjustment \ 01 printer adjustment \ 01 res...
Page 791
Machine administrator setting 17 océ cs620/cs650 pro 17-35 the restart timing adjustment screen will be displayed. ! Detail please refer to page 14-6 for the details on the subsequent operations..
Page 792
17 machine administrator setting 17-36 océ cs620/cs650 pro 05 expert adjustment \ 03 printer adjustment \ 02 centering adjustment perform this adjustment to control image centering centring to the direction of paper feed. This operation is equivalent to selecting [adjustment \ 01 machine adjustment ...
Page 793
Machine administrator setting 17 océ cs620/cs650 pro 17-37 ! Detail please refer to page 14-6 for the details on the subsequent operations..
Page 794
17 machine administrator setting 17-38 océ cs620/cs650 pro 05 expert adjustment \ 03 printer adjustment \ 03 fd-mag. Adjustment perform this adjustment to control the magnification to the direction of paper feed. This operation is equivalent to selecting [adjustment \ 01 machine adjustment \ 01 prin...
Page 795
Machine administrator setting 17 océ cs620/cs650 pro 17-39 ! Detail please refer to page 14-22 for the details on the subsequent operations..
Page 796
17 machine administrator setting 17-40 océ cs620/cs650 pro 05 expert adjustment \ 03 printer adjustment \ 04 cd-mag. Adjustment perform this adjustment to control the magnification perpendicular to the direction of paper feed. This operation is equivalent to selecting [adjustment \ 01 machine adjust...
Page 797
Machine administrator setting 17 océ cs620/cs650 pro 17-41 ! Detail please refer to page 14-11 for the details on the subsequent operations..
Page 798
17 machine administrator setting 17-42 océ cs620/cs650 pro 05 expert adjustment \ 03 printer adjustment \ 05 lead edge erase adjustment adjust the amount of image erase from the edge of the sheet. 1 follow the procedure on page 17-4 to display the machine administrator setting menu screen. 2 touch [...
Page 799
Machine administrator setting 17 océ cs620/cs650 pro 17-43 4 select a3 w/11" e 17" w paper, then press [start]. The sample pattern (no. 16) will be output. 5 measure the resultant restart timing. 6 if the desired result cannot be obtained, touch the [utility] tab. The lead edge erase adjustment scre...
Page 800
17 machine administrator setting 17-44 océ cs620/cs650 pro 05 expert adjustment \ 03 printer adjustment \ 06 registration loop adj. Adjust the amount of registered loop based on a paper feed unit, a bypass tray, and adu. 1 follow the procedure on page 17-4 to display the machine administrator settin...
Page 801
Machine administrator setting 17 océ cs620/cs650 pro 17-45 4 select a3 w/11" e 17" w paper, then press [start]. The sample pattern (no. 16) will be output. 5 check the sample pattern. 6 if the desired result cannot be obtained, touch the [utility] tab. The registration loop adjustment screen will be...
Page 802
17 machine administrator setting 17-46 océ cs620/cs650 pro 05 expert adjustment \ 03 printer adjustment \ 07 pre-registration adj. Adjust the amount to pre-register based on paper feed tray, a bypass tray, and adu. 1 follow the procedure on page 17-4 to display the machine administrator setting menu...
Page 803
Machine administrator setting 17 océ cs620/cs650 pro 17-47 4 select a3 w/11" e 17" w paper, then press [start]. The sample pattern (no. 16) will be output. 5 check the sample pattern. 6 if the desired result cannot be obtained, touch the [utility] tab. The pre-registration adjustment screen will be ...
Page 804
17 machine administrator setting 17-48 océ cs620/cs650 pro 05 expert adjustment \ 04 finisher adjustment adjust the settings related to the finisher. This operation is equivalent to selecting [adjustment \ 04 finisher adjustment] on the machine status screen. 1 follow the procedure on page 17-4 to d...
Page 805
Machine administrator setting 17 océ cs620/cs650 pro 17-49 ! Detail please refer to page 14-23 for the details on the subsequent operations..
Page 806
17 machine administrator setting 17-50 océ cs620/cs650 pro 05 expert adjustment \ 05 scanner adjustment adjust the settings related to the scanner. This operation is equivalent to selecting [adjustment \ 01 machine adjustment \ 02 scanner adjustment] on the machine status screen. 1 follow the proced...
Page 807
Machine administrator setting 17 océ cs620/cs650 pro 17-51 ! Detail please refer to page 14-14 for the details on the subsequent operations..
Page 808
17 machine administrator setting 17-52 océ cs620/cs650 pro 05 expert adjustment \ 06 process adjustment \ 01 front & back density specify the front & back density setting for cmyk, front, back, and postcard. 1 follow the procedure on page 17-4 to display the machine administrator setting menu screen...
Page 809
Machine administrator setting 17 océ cs620/cs650 pro 17-53 5 touch [return] to restore the process adjustment menu screen. 6 if further changes are required, touch the desired key..
Page 810
17 machine administrator setting 17-54 océ cs620/cs650 pro 05 expert adjustment \ 06 process adjustment \ 02 toner density sensor check the value of the toner density sensor in cmyk. 1 follow the procedure on page 17-4 to display the machine administrator setting menu screen. 2 touch [01 system sett...
Page 811
Machine administrator setting 17 océ cs620/cs650 pro 17-55 05 expert adjustment \ 06 process adjustment \ 03 toner quality/exposure adjust the toner quantity and exposure for each cmyk value. 1 follow the procedure on page 17-4 to display the machine administrator setting menu screen. 2 touch [01 sy...
Page 812
17 machine administrator setting 17-56 océ cs620/cs650 pro 5 repeat the adjustment steps from 3 to 4 until the desired result is obtained. 6 touch [ok] to complete the setting. – to cancel the change, touch [cancel]. In either case, the process adjustment menu screen will be restored. 7 if further c...
Page 813
Machine administrator setting 17 océ cs620/cs650 pro 17-57 05 expert adjustment \ 07 quality adjustment \ 01 printer gamma offset adj. Manually adjust the settings related to printer gamma offset. Manually adjust the cmyk values separately for line 1, line 2, dot 1, dot 2, contone, and ed. 1 follow ...
Page 814
17 machine administrator setting 17-58 océ cs620/cs650 pro 4 select a4 v/8.5" e 11" v paper, then press [start] on the control panel. The sample pattern will be output. The printer gamma offset adjustment screen will be restored. 5 touch [next] or [previous] to display the relevant screen on which y...
Page 815
Machine administrator setting 17 océ cs620/cs650 pro 17-59 05 expert adjustment \ 07 quality adjustment \ 02 printer gamma offset auto adj. Automatically adjust the settings related to printer gamma offset. Automatically adjust the cmyk values separately for line 1, line 2, dot 1, dot 2, contone, an...
Page 816
17 machine administrator setting 17-60 océ cs620/cs650 pro 3 touch [copy] tab. The copy screen will be displayed. 4 select a4 v/8.5" e 11" v paper, then press [start] on the control panel. The test chart will be output. The printer gamma offset automatic adjustment screen will be restored. 5 touch [...
Page 817
Machine administrator setting 17 océ cs620/cs650 pro 17-61 6 place the test chart on the original glass. – place the test chart face down on the original glass with green arrow pointing at the left side as shown below, and put about 10 sheets of blank copy paper on top of the chart. Close the adf/or...
Page 818
17 machine administrator setting 17-62 océ cs620/cs650 pro 05 expert adjustment \ 07 quality adjustment \ 03 printer gamma sensor adj. Automatically adjust the settings related to printer gamma sensor. Adjust line 1, line 2, dot 1, dot 2, contone, and ed. 1 follow the procedure on page 17-4 to displ...
Page 819
Machine administrator setting 17 océ cs620/cs650 pro 17-63 4 select a4 v/8.5" e11" v paper, then press [start] on the control panel. The test chart will be output. The printer gamma offset automatic adjustment screen will be restored. 5 touch the desired item key to highlight it. 6 place the test ca...
Page 820
17 machine administrator setting 17-64 océ cs620/cs650 pro 8 if you want to make readjustments, press [readjust] to display the popup menu to confirm whether to readjust or not. 9 repeat the adjustment steps from 3 to 8 until the desired result is obtained. – touching [adj. Data reset] will display ...
Page 821
Machine administrator setting 17 océ cs620/cs650 pro 17-65 05 expert adjustment \ 07 quality adjustment \ 04 image quality stability set priority to either the output speed for copying and printing operations or the image quality stability in a copying or printing job. Adjustment operations can be s...
Page 822
17 machine administrator setting 17-66 océ cs620/cs650 pro 4 adjustment operations can be set to the jobs whose priority is set to [stability]. 5 touch [ok] to complete the setting. – to cancel the change, touch [cancel]. In either case, the quality adjustment menu screen will be restored. 6 if furt...
Page 823
Machine administrator setting 17 océ cs620/cs650 pro 17-67 05 expert adjustment \ 07 quality adjustment \ 05 custom screen select line 1 or line 2 for the line screen. When [line 2] is selected, further selection can be made for the low line screen (type 2). For the dot screen select line 1 or line ...
Page 824
17 machine administrator setting 17-68 océ cs620/cs650 pro 3 specify [type 1] or [type 2] separately for screens whose priority is set to [line 2] or [dot 2]. 4 touch [ok] to complete the setting. – to cancel the change, touch [cancel]. To cancel the change, touch [cancel]. 5 if screen type was chan...
Page 825
Machine administrator setting 17 océ cs620/cs650 pro 17-69 05 expert adjustment \ 08 execute adjust operation execute adjustment operations for [automatic gamma adj.], [color registration adj.], [toner refresh mode], and [belt refresh mode]. This operation is equivalent to selecting [adjustment \ 03...
Page 826
17 machine administrator setting 17-70 océ cs620/cs650 pro 4 touch [ok] to complete the operation. – to cancel the change, touch [cancel]. In either case, the expert adjustment menu screen will be restored. 5 if further changes are required, touch the desired key..
Page 827
Machine administrator setting 17 océ cs620/cs650 pro 17-71 06 list/count use this function to print out the list selected from the following items. - mode memory list programmed contents of mode memory - user management list home position settings selected by user - use management list information c...
Page 828
17 machine administrator setting 17-72 océ cs620/cs650 pro 3 touch any key to print the list. 4 touch [copy] tab to display the copy screen. – press start on the control panel to start printing the selected list. To suspend printing, press [stop]. Touch [utility] tab to return to the list print scre...
Page 829
Machine administrator setting 17 océ cs620/cs650 pro 17-73 07 size setting use this function to select the detected paper type of the original and the minimum size of the original placed on the original glass. - orig. Glass size detect specify the size system of the original to be detected on the or...
Page 830
17 machine administrator setting 17-74 océ cs620/cs650 pro the size setting menu screen will be displayed. 3 touch [01 orig. Glass size detect]. – touch the desired key to highlight it. 4 touch [ok] to complete the setting. – to cancel the change, touch [cancel]. In either case, the size setting men...
Page 831
Machine administrator setting 17 océ cs620/cs650 pro 17-75 5 touch [02 adf original size detect]. – touch the desired key to highlight it. 6 touch [ok] to complete the setting. – to cancel the change, touch [cancel]. In either case, the size setting menu screen will be restored. 7 touch [03 orig.Gla...
Page 832
17 machine administrator setting 17-76 océ cs620/cs650 pro 9 touch [04 k size]. – touch [k size on] or [k size off] to highlight it. 10 touch [ok] to complete the setting. – to cancel the change, touch [cancel]. In either case, the size setting menu screen will be restored. 11 touch [05 adf/orig. Gl...
Page 833
Machine administrator setting 17 océ cs620/cs650 pro 17-77 13 touch [06 pi size priority]. – touch the desired size key to highlight it. 14 touch [ok] to complete the setting. – to cancel the change, touch [cancel]. In either case, the size setting menu screen will be restored. 15 if further changes...
Page 834
17 machine administrator setting 17-78 océ cs620/cs650 pro 17.3 02 administrator register use this function to register the machine administrator name and the extension number which are displayed on the left side of the utility/counter screen. 1 follow the procedure on page 17-4 to display the machi...
Page 835
Machine administrator setting 17 océ cs620/cs650 pro 17-79 3 touch [name input] to display the machine administrator name input screen. Use the touch panel keypad to register the machine administrator name. The eight characters including a hyphen (-) can be entered. 4 touch [extension number input],...
Page 836
17 machine administrator setting 17-80 océ cs620/cs650 pro 17.4 03 scanner send address add, change or delete the destination of transmission for the image scanned by this machine. Also register up to 5 templates which can optionally be used as a title or body text when transmitting scanned data. 01...
Page 837
Machine administrator setting 17 océ cs620/cs650 pro 17-81 3 add, change or delete the e-mail destination address. – to add the e-mail destination address: touch [e-mail], and touch [add] to display the input destination address screen. Touch [address] and display the screen for input. Repeat this o...
Page 838
17 machine administrator setting 17-82 océ cs620/cs650 pro – to change the e-mail destination address: touch [e-mail]. Touch the search key, [other], [common], or the arrow keys [+] and [,] to display the register name to be changed, and touch to highlight it. Touch [change] to display the input des...
Page 839
Machine administrator setting 17 océ cs620/cs650 pro 17-83 – to delete the e-mail destination address: touch [e-mail]. Touch the search key, [other], [common], or the arrow keys [+] and [,] to display the register name to be deleted, and touch to highlight it. Touch [delete]. The delete confirmation...
Page 840
17 machine administrator setting 17-84 océ cs620/cs650 pro touch [box name] and display the screen for input. Repeat this operation for [register name] and [search character]. Set daily use by touching [on] or [off]. Touch [ok] to restore the register/edit destination address screen. – to change the...
Page 841
Machine administrator setting 17 océ cs620/cs650 pro 17-85 set daily use by touching [on] or [off]. Touch [ok] to restore the register/edit destination address screen. – to delete the hdd destination address: touch [hdd]. Touch the search key, [other], [common], or the arrow keys [+] and [,] to disp...
Page 842
17 machine administrator setting 17-86 océ cs620/cs650 pro 5 add, change or delete the ftp destination address. – to add the ftp destination address: touch [ftp], and touch [add] to display the input destination address screen. Touch [register name] and display the screen for input. Repeat this oper...
Page 843
Machine administrator setting 17 océ cs620/cs650 pro 17-87 – to change the ftp destination address: touch [ftp]. Touch the search key, [other], [common], or the arrow keys [+] and [,] to display the register name to be changed, and touch to highlight it. Touch [change] to display the input destinati...
Page 844
17 machine administrator setting 17-88 océ cs620/cs650 pro – to delete the ftp destination address: touch [ftp]. Touch the search key, [other], [common], or the arrow keys [+] and [,] to display the register name to be deleted, and touch to highlight it. Touch [delete]. The delete confirmation popup...
Page 845
Machine administrator setting 17 océ cs620/cs650 pro 17-89 6 add, change or delete the smb destination address. – to add the smb destination address: touch [smb], and touch [add] to display the input destination address screen. Touch [register name] and display the screen for input. Repeat this oper...
Page 846
17 machine administrator setting 17-90 océ cs620/cs650 pro – to change the smb destination address: touch [smb]. Touch the search key, [other], [common], or the arrow keys[+] and [,] to display the register name to be changed, and touch to highlight it. Touch [change] to display the input destinatio...
Page 847
Machine administrator setting 17 océ cs620/cs650 pro 17-91 – to delete the smb destination address touch [smb]. Touch the search key, [other], [common], or the arrow keys [+] and [,] to display the register name to be deleted, and touch to highlight it. Touch [delete]. The delete confirmation popup ...
Page 848
17 machine administrator setting 17-92 océ cs620/cs650 pro touch [group name], input the group name on the input screen, and then touch [ok]. Touch [e-mail] to display the e-mail destination list screen. Touch the search key, [other], [common], or the arrow keys [+] and [,] to display the register n...
Page 849
Machine administrator setting 17 océ cs620/cs650 pro 17-93 – to change group touch [group]. Touch the arrow keys [+] and [,] to display the register name to be changed, and touch to highlight it. Touch [change] to display the destination list screen. Touch [e-mail], [hdd], [ftp], or [smb] to select ...
Page 850
17 machine administrator setting 17-94 océ cs620/cs650 pro touch [ok] to restore the register/edit destination address screen. – to delete group touch [group]. Touch the arrow keys [+] and [,] to display the register name to be deleted, and touch to highlight it. Touch [delete]. The delete confirmat...
Page 851
Machine administrator setting 17 océ cs620/cs650 pro 17-95 02 e-mail title setting up to 5 e-mail titles can be registered, which can be used to transmit scanned data by e-mail. 1 follow the procedure on page 17-4 to display the machine administrator setting menu screen. 2 touch [01 scanner send add...
Page 852
17 machine administrator setting 17-96 océ cs620/cs650 pro 4 touch [ok] to complete the setting. – to cancel the change, touch [cancel]. In either case, the scan send address menu screen will be restored. 5 if further changes are required, touch the desired key..
Page 853
Machine administrator setting 17 océ cs620/cs650 pro 17-97 03 e-mail text setting 1 follow the procedure on page 17-4 to display the machine administrator setting menu screen. 2 touch [01 scanner send address], and then [03 e-mail text setting]. 3 input the e-mail text. – touch an appropriate key by...
Page 854
17 machine administrator setting 17-98 océ cs620/cs650 pro 17.5 04 user auth./account track use this function to select any function of user authentication and section authentication settings can be altered according to the user authentication and account track settings. 01 authentication method est...
Page 855
Machine administrator setting 17 océ cs620/cs650 pro 17-99 1 follow the procedure on page 17-4 to display the machine administrator setting menu screen. 2 touch [04 user auth./account track], and then [01 authentication method]. The authentication method setting screen will be displayed. 3 select th...
Page 856
17 machine administrator setting 17-100 océ cs620/cs650 pro 5 touch [next], and then select the desired key on the right side of "upper limit achieve movement". 6 touch [ok] to complete the setting. – to cancel the change, touch [cancel]. In either case, the user auth./account track menu screen will...
Page 857
Machine administrator setting 17 océ cs620/cs650 pro 17-101 02 user authentication set \ 01 management setting if authentication mode is enabled, [list] can be displayed on the user authentication setting screen and the user registration screen. When [list] is touched, user names/section names regis...
Page 858
17 machine administrator setting 17-102 océ cs620/cs650 pro 3 touch [display] or [not display] on the right side of the "user name list". 4 touch [initial-setting restrictions] to display the initial limit setting screen. – touch an appropriate key to specify the copy functions which you want to mak...
Page 859
Machine administrator setting 17 océ cs620/cs650 pro 17-103 5 touch [ok] to complete the setting. – to cancel the change, touch [cancel]. In either case, the user authentication setting screen will be restored. 6 if further changes are required, touch the desired key..
Page 860
17 machine administrator setting 17-104 océ cs620/cs650 pro 02 user authentication set \ 02 user register use this function to assign a number to each user, and set a user name, password and limit value to each number etc. The registered user setting is listed on the screen. Select the user setting ...
Page 861
Machine administrator setting 17 océ cs620/cs650 pro 17-105 3 follow the instructions below for adding, changing and deleting the user setting. – to change user settings: touch [next] or [previous] to display the user name to be changed and touch to highlight it. Touch [change] to display the change...
Page 862
17 machine administrator setting 17-106 océ cs620/cs650 pro touch [next] or [previous] to display the desired section name, touch to highlight it, then touch [ok]. Touch [color] or [black] in the "output permission" to select the type of printing operation made available to the user. Touch [upper li...
Page 863
Machine administrator setting 17 océ cs620/cs650 pro 17-107 touch [from address] to display the screen for entering the from address. Select an appropriate address or register a new address, and then touch [ok]. Touch [ok] to complete the setting. – to add user settings: touch [add] to display the a...
Page 864
17 machine administrator setting 17-108 océ cs620/cs650 pro touch [upper limit set] to display the upper limit setting screen. Touch an appropriate key to specify the copy functions which you want to make available to the user after authentication. Selecting [individual] in the "management system" e...
Page 865
Machine administrator setting 17 océ cs620/cs650 pro 17-109 – to delete user settings: touch [next] or [previous] to display the user name to be deleted and touch to highlight it. Touch [delete] to display the delete confirmation popup menu. Touch [yes] to delete, or touch [no] to cancel..
Page 866
17 machine administrator setting 17-110 océ cs620/cs650 pro – to change uniformly output permission, upper limit set and useable function: touch [package change] to display the reset confirmation popup screen. Touch [color] or [black] in the "output permission" to select the type of printing operati...
Page 867
Machine administrator setting 17 océ cs620/cs650 pro 17-111 4 touch [return] to restore the machine administrator setting menu screen. 5 if further changes are required, touch the desired key..
Page 868
17 machine administrator setting 17-112 océ cs620/cs650 pro 02 user authentication set \ 03 user counter reset individual counters for copying, scanning, and printing, for authenticated users and public users, or reset these counters collectively. 1 follow the procedure on page 17-4 to display the m...
Page 869
Machine administrator setting 17 océ cs620/cs650 pro 17-113 3 follow the instructions below to reset the counter. – to reset counter individually: touch [next] or [previous] to display the user name to reset the counter and touch to highlight it. Touch [public] to reset the counter of the public use...
Page 870
17 machine administrator setting 17-114 océ cs620/cs650 pro – to reset user counter uniformly: touch [clear (package)] to display the all reset counter confirmation popup menu. Touch [yes] to reset, or touch [no] to cancel. 4 touch [return] to restore the user authentication setting menu screen. 5 i...
Page 871
Machine administrator setting 17 océ cs620/cs650 pro 17-115 03 account track \ 01 account register use this function to assign a number to each section, and set a section name, password and limit value to each number. The registered section management setting is listed on the screen. Select the sect...
Page 872
17 machine administrator setting 17-116 océ cs620/cs650 pro 3 follow the instructions below for adding, changing and deleting the section management setting. – to change registered section settings: touch [change] to display the change registered section screen. Touch [section name] to display the i...
Page 873
Machine administrator setting 17 océ cs620/cs650 pro 17-117 touch [color] or [black] in the "output permission" to select the type of printing operation made available to the account. Touch [upper limit set] to display the upper limit setting screen. Touch an appropriate key to specify the copy func...
Page 874
17 machine administrator setting 17-118 océ cs620/cs650 pro – to add section settings: touch [add] to display the add registered section screen. Touch [section no.] to display the input screen. Enter the section number and touch [ok]. You may enter four digits for the section number. Touch [section ...
Page 875
Machine administrator setting 17 océ cs620/cs650 pro 17-119 for the details on entering texts in the input screen, see "how to input characters" on page 26-3. Touch [color] or [black] in the "output permission" to select the type of printing operation made available to the account. Touch [upper limi...
Page 876
17 machine administrator setting 17-120 océ cs620/cs650 pro – to delete registered section settings: touch [next] or [previous] to display the section name to be deleted and touch to highlight it. Touch [delete] to display the delete confirmation popup menu. Touch [yes] to delete, or touch [no] to c...
Page 877
Machine administrator setting 17 océ cs620/cs650 pro 17-121 – to change uniformly output permission, upper limit set and useable function: touch [package change] to display the reset confirmation popup screen. Touch [color] or [black] in the "output permission" to select the type of printing operati...
Page 878
17 machine administrator setting 17-122 océ cs620/cs650 pro 4 touch [return] to restore the machine administrator setting menu screen. 5 if further changes are required, touch the desired key..
Page 879
Machine administrator setting 17 océ cs620/cs650 pro 17-123 03 account track \ 02 account counter reset individual counters for copying, scanning, and printing, for authenticated accounts and public users, or reset these counters collectively. 1 follow the procedure on page 17-4 to display the machi...
Page 880
17 machine administrator setting 17-124 océ cs620/cs650 pro 3 follow the instruction below to reset the counter. – to reset counter individually: touch [delete] to display the delete confirmation popup menu. Touch [yes] to delete, or touch [no] to cancel. Touch [yes] to display the screen to select ...
Page 881
Machine administrator setting 17 océ cs620/cs650 pro 17-125 touch [clear (package)] to display the all reset counter confirmation popup menu. Touch [yes] to reset, or touch [no] to cancel. 4 touch [return] to restore the account track setting menu screen. 5 if further changes are required, touch the...
Page 882
17 machine administrator setting 17-126 océ cs620/cs650 pro 04 without authentication specify whether to make printing and pull scanning available without user authentication or account track. 1 follow the procedure on page 17-4 to display the machine administrator setting menu screen. 2 touch [04 u...
Page 883
Machine administrator setting 17 océ cs620/cs650 pro 17-127 4 touch [ok] to complete the setting. – to cancel the change, touch [cancel]. In either case, the user auth./account track setting screen will be restored. 5 if further changes are required, touch the desired key..
Page 884
17 machine administrator setting 17-128 océ cs620/cs650 pro 17.6 05 network setting 01 machine nic setting control the nic settings such as the ip address and line speed of the machine. 1 follow the procedure on page 17-4 to display the machine administrator setting menu screen. 2 touch [05 network ...
Page 885
Machine administrator setting 17 océ cs620/cs650 pro 17-129 3 specify the following items. – enter numeric values using the touch panel keypad. After entering a value, touch set. The next item becomes highlighted for setting. Continue in this manner. Ip address: enter the ip address of the machine. ...
Page 886
17 machine administrator setting 17-130 océ cs620/cs650 pro 02 e-mail initial setting specify the initial settings for e-mail. 1 follow the procedure on page 17-4 to display the machine administrator setting menu screen. 2 touch [05 network setting], and then [02 e-mail initial setting]. The e-mail ...
Page 887
Machine administrator setting 17 océ cs620/cs650 pro 17-131 4 touch [ok] to complete the setting. – to cancel the change, touch [cancel]. In either case, the network setting menu screen will be restored. 5 if further changes are required, touch the desired key..
Page 888
17 machine administrator setting 17-132 océ cs620/cs650 pro 17.7 06 common setting the following features can be provided by switching the setting. 2 note this setting is equivalent to the setting specified in [03 common setting] in the user setting. Feature description available options 1shot indic...
Page 889
Machine administrator setting 17 océ cs620/cs650 pro 17-133 1 follow the procedure on page 17-4 to display the machine administrator setting menu screen. 2 touch [06 common setting]. The common setting screen will be displayed. ! Detail the following operation is equivalent to selecting [user settin...
Page 890
17 machine administrator setting 17-134 océ cs620/cs650 pro 17.8 07 copy setting the following features can be provided by switching the setting. 2 note this setting is equivalent to the setting specified in [04 copy setting] in the user setting. Feature description available options fold & staple a...
Page 891
Machine administrator setting 17 océ cs620/cs650 pro 17-135 orig./out bind direction set set the machine to conform the binding di- rection of the originals and printed sets each other. On/off choose default tray when aps off select the tray to be automatically selected when aps is released. Aps tra...
Page 892
17 machine administrator setting 17-136 océ cs620/cs650 pro 1 follow the procedure on page 17-4 to display the machine administrator setting menu screen. 2 touch [07 copy setting]. The copy setting screen will be displayed. ! Detail the following operation is equivalent to selecting [user setting \ ...
Page 893
Machine administrator setting 17 océ cs620/cs650 pro 17-137 17.9 08 scan setting the following features can be provided by switching the setting. 2 note this setting is equivalent to the setting specified in [05 scan setting] in the user setting. Feature description available options file form defau...
Page 894
17 machine administrator setting 17-138 océ cs620/cs650 pro 1 follow the procedure on page 17-4 to display the machine administrator setting menu screen. 2 touch [08 scan setting]. The scan setting screen will be displayed. ! Detail the following operation is equivalent to selecting [user setting \ ...
Page 895
Machine administrator setting 17 océ cs620/cs650 pro 17-139 17.10 09 system connection 01 administrator use this function to call your service representative for maintenance. Your service representative is monitoring the machine status as needed basis. The monitored information will be useful for ma...
Page 896
17 machine administrator setting 17-140 océ cs620/cs650 pro 4 touch [return] to restore the system connection menu screen. 5 if further changes are required, touch the desired key..
Page 897
Machine administrator setting 17 océ cs620/cs650 pro 17-141 17.11 10 security setting 01 administrator password set the new machine administrator password. 1 follow the procedure on page 17-4 to display the machine administrator setting menu screen. 2 touch [10 security setting], and then [01 admini...
Page 898
17 machine administrator setting 17-142 océ cs620/cs650 pro 3 enter the new password. 4 touch [ok] to complete the setting. – to cancel the change, touch [cancel]. In either case, the security setting menu screen will be restored. 5 if further changes are required, touch the desired key..
Page 899
Machine administrator setting 17 océ cs620/cs650 pro 17-143 02 hdd lock password change the hdd lock password. The hdd lock password cannot be changed unless the security strengthen mode is set to on. 1 follow the procedure on page 17-4 to display the machine administrator setting menu screen. 2 tou...
Page 900
17 machine administrator setting 17-144 océ cs620/cs650 pro 4 touch [new password] to display the password input screen. Enter the new password and touch [ok]. – touch [check input] to enter the same new password, then touch [ok]. 5 touch [ok] to complete the setting. – to cancel the change, touch [...
Page 901
Machine administrator setting 17 océ cs620/cs650 pro 17-145 03 overwrite image data specify whether to overwrite image data. 1 follow the procedure on page 17-4 to display the machine administrator setting menu screen. 2 touch [10 security setting], and then [01 administrator password]. The overwrit...
Page 902
17 machine administrator setting 17-146 océ cs620/cs650 pro 04 security strengthen set set the security strengthen mode on/off. In order to set the security strengthen mode to on, it is required by your service representative to set a ce password and a machine administrator password to your machine....
Page 903
Machine administrator setting 17 océ cs620/cs650 pro 17-147 4 touch [ok] at the lower right side of the screen to display the confirmation popup screen. 5 touch [yes] to complete the setting. The machine power will be turned off, then on. – touch [no] to cancel the setting. Touch [cancel] at the low...
Page 904
17 machine administrator setting 17-148 océ cs620/cs650 pro.
Page 905
18 touch screen adjustment.
Page 907
Touch screen adjustment 18 océ cs620/cs650 pro 18-3 18 touch screen adjustment use this function to check the touch screen and realign the position of the touch sensor that may have shifted. 2 note the touch screen adjustment screen can be accessed also by pressing [4] of the control panel keypad wi...
Page 908
18 touch screen adjustment 18-4 océ cs620/cs650 pro 3 touch the "+" symbol at the upper right corner, then lower left corner on the screen. The present coordinates will be displayed in the message area of the screen. 4 check that the x coordinate and y coordinate displayed in the first line of the m...
Page 909
19 web utilities setting.
Page 911
Web utilities setting 19 océ cs620/cs650 pro 19-3 19 web utilities setting 19.1 web utilities outlines when the machine is connected with a pc over a network, the web browser activated on the pc provides the following functions. - volume track setting make the account track settings concerning the a...
Page 912
19 web utilities setting 19-4 océ cs620/cs650 pro follow the procedure below to access the web utilities of the machine using the web browser. 1 turn on the power to the pc connected with the machine over a network. 2 activate the web browser, then select [open] from the file menu. 3 enter the url (...
Page 913
Web utilities setting 19 océ cs620/cs650 pro 19-5 19.2 setting account track data make the account track settings concerning the administrator setting using the web browser on a pc. - adding account track add a new account track data (password, name, and limit value). - editing account track data ch...
Page 914
19 web utilities setting 19-6 océ cs620/cs650 pro 3 enter "admin" in the user name text box, and an 8-digit administrator in the password text box, then click on [ok]. The machine manager setting menu will be displayed. 4 click on [volume track setting]. The volume track setting menu will be display...
Page 915
Web utilities setting 19 océ cs620/cs650 pro 19-7 6 enter a new account track data. – section name (account name): up to 8 characters – password: up to 8 characters – name: up to 20 characters – upper limit setting: color up to 99999999 black up to 99999999 only effect individual management – manage...
Page 916
19 web utilities setting 19-8 océ cs620/cs650 pro 7 click on [registration]. The registered content will be displayed in the window. The new account track data will be transmitted to the machine immediately so that is valid for the user operations. 8 click on [back] to return to the volume track set...
Page 917
Web utilities setting 19 océ cs620/cs650 pro 19-9 2 note a duplicate password or name will be rejected with an error message. However, duplicating a password is possible using the administrator setting. The section name (account name) entry box accepts letters, numbers. Any symbols will be rejected ...
Page 918
19 web utilities setting 19-10 océ cs620/cs650 pro 19.2.2 editing account track data 1 open the web utilities window. 2 click on [machine manager setting]. The enter network password dialogue box will be displayed. 3 enter "admin" in the user name text box, and an 8-digit administrator password in t...
Page 919
Web utilities setting 19 océ cs620/cs650 pro 19-11 4 click on [volume track setting]. The volume track setting menu will be displayed. 5 click on [volume track data list]. The volume track data list will be displayed..
Page 920
19 web utilities setting 19-12 océ cs620/cs650 pro 6 change the volume track data. – click on the number of the data to be edited. The volume track data change window will be displayed..
Page 921
Web utilities setting 19 océ cs620/cs650 pro 19-13 – change the section name (account name), password, name, upper limit setting, management system, output permission, or useable function, as desired. For details in entering procedure, refer to page 8-6. – click on [registration]. The edited content...
Page 922
19 web utilities setting 19-14 océ cs620/cs650 pro 7 reset counter. – click on the check box(es) to select the account track data of the counter to be cleared. If all the counters are to be cleared, click on [select all]. – click on the radio button (a white circle) heading the "copy/printer count r...
Page 923
Web utilities setting 19 océ cs620/cs650 pro 19-15 – click on [apply] to immediately reset the counters to zero. The message "setting was changed" will be displayed. – click on [back] to return to the account track data list or any menu item to jump to the desired window..
Page 924
19 web utilities setting 19-16 océ cs620/cs650 pro 8 delete counter. – click on the check box(es) to select the account track data to be deleted. If all the data are to be cleared, click on [select all]. – click on the radio button (a white circle) heading the "delete (except for another user count)...
Page 925
Web utilities setting 19 océ cs620/cs650 pro 19-17 the message "setting was deleted" will be displayed. – click on [back] to return to the volume track data list or any menu item to jump to the desired window. 9 save counter. – click on [save this table as a file]..
Page 926
19 web utilities setting 19-18 océ cs620/cs650 pro – click on [save]..
Page 927
Web utilities setting 19 océ cs620/cs650 pro 19-19 – in the dialogue box, designate the folder for saving the data, then click on [save]. 2 note the account track data will be stored in csv format. The data cannot be saved while the machine is in operation. In this case, try this procedure again aft...
Page 928
19 web utilities setting 19-20 océ cs620/cs650 pro example: account track data list stored as a file the "public user" will be stored by the name of "public" in the last line..
Page 929
Web utilities setting 19 océ cs620/cs650 pro 19-21 19.3 remote panel setting when the machine is connected with a pc over a network, the web browser activated on the pc enables you to operate the machine. Specify the ip address of the pc to be used for remote panel function, using web utilities sett...
Page 930
19 web utilities setting 19-22 océ cs620/cs650 pro 3 enter "admin" in the user name text box, and an 8-digit administrator password in the password text box, then click on [ok]. The administrator setting menu will be displayed. 4 click on [remote panel setting]. The remote panel setting menu will be...
Page 931
Web utilities setting 19 océ cs620/cs650 pro 19-23 6 click on [registration]. The ip address will be applied to the machine immediately so that is valid for the user operations. 7 click on [administrator setup menu] to restore the administrator setting menu..
Page 932
19 web utilities setting 19-24 océ cs620/cs650 pro 19.4 setting scan transmission function follow the procedure below to register, change, or delete the address for the transmission of the scanned image data using the web browser. For details of the scan transmission setting, contact your service re...
Page 933
Web utilities setting 19 océ cs620/cs650 pro 19-25 3 enter "admin" in the user name text box, and an 8-digit administrator password in the password text box, then click on [ok]. The administrator setting menu will be displayed. 4 click on [scan transmission setting]. The scan transmission setting wi...
Page 934
19 web utilities setting 19-26 océ cs620/cs650 pro 5 register the e-mail, hdd, ftp, and smb, as required..
Page 935
Web utilities setting 19 océ cs620/cs650 pro 19-27 6 click on [registration] to complete the entry. The registered content will be displayed. Click on [back] to return to the scan transmission setting window. 7 display the entry list. Click on [entry list] of the desired item under the entry box to ...
Page 936
19 web utilities setting 19-28 océ cs620/cs650 pro 8 change the registered contents. Display the entry list of the desired item as described in step 7. Click on the entry name to be changed. The window for changing the selected item will be displayed. Change the contents as desired, then click on [r...
Page 937
Web utilities setting 19 océ cs620/cs650 pro 19-29 9 delete the registered contents. Display the entry list of the desired item as described in step 7. Click on the check box in the delete column of the item to be deleted, then click on [delete]. If all the data are to be cleared, click on [select a...
Page 938
19 web utilities setting 19-30 océ cs620/cs650 pro 19.5 transmitting machine setting file follow the procedure below to transmit the following setting file from the machine to a pc (export) using the web browser, edit the setting data on the pc, then return the file to the machine (import). Account ...
Page 939
Web utilities setting 19 océ cs620/cs650 pro 19-31 1 open the web utilities window. 2 click on [machine manager setting]. The enter network password dialogue box will be displayed. 3 enter "admin" in the user name text box, and an 8-digit administrator password in the password text box, then click o...
Page 940
19 web utilities setting 19-32 océ cs620/cs650 pro 5 export the machine setting file. Select the desired file type from the pull-down menu, then click on [export….] the file download dialogue box will be displayed. Click on [save]..
Page 941
Web utilities setting 19 océ cs620/cs650 pro 19-33 in the dialogue box, designate the folder for saving the machine setting file, then click on [save]. A dialogue box will be displayed when the saving operation is completed. Click on [close]. 6 edit the machine setting file. The machine setting file...
Page 942
19 web utilities setting 19-34 océ cs620/cs650 pro 7 import the machine setting file. Click on [browse…] to designate the machine setting file to be imported, then click on [import]. The result message will be displayed when the registration is completed. 2 note the file cannot be accessed when the ...
Page 943
Web utilities setting 19 océ cs620/cs650 pro 19-35 2 note if the registration cannot be completed successfully, error messages will be displayed as follows. Can’t transfer data (the machine is busy) try again to import the data after the machine operation in progress is completed. The data cannot be...
Page 944
19 web utilities setting 19-36 océ cs620/cs650 pro specifications for each machine setting file type account track data setting file: - begin the file with #ekc_tab. - max. 1,000 files can be edited. - a line should include password, name, and limit, separated by a tab. - use up to 8 digits numbers ...
Page 945
Web utilities setting 19 océ cs620/cs650 pro 19-37 smb data setting file: - begin the file name with #ip_smb. - a line should include name, address, filepath, loginname, password, reference, or daily being separated by a tab. - name should be 24 bytes or less. - address should be 63 bytes or less. -...
Page 946
19 web utilities setting 19-38 océ cs620/cs650 pro.
Page 947
20 security functions.
Page 949
Security functions 20 océ cs620/cs650 pro 20-3 20 security functions the control software version is as follows. Image control program (image control l1) version: a03u0y0-00i1-g00-11, a03u0y0-00l1-g00-12 about the firmware version display function the control software (image control program) version...
Page 950
20 security functions 20-4 océ cs620/cs650 pro 20.1 security modes the océ cs620/cs650 pro device has two security modes. Normal mode use this mode if the machine is used by a single person and there is a low possibility of illicit access and operations. This is the default mode when shipped from th...
Page 951
Security functions 20 océ cs620/cs650 pro 20-5 creating a secure environment for security, we recommend that supervisors and a machine administrator use security strengthen mode and establish an environment as follows. - qualifications to be a machine administrator a supervisor must select a reliabl...
Page 952
20 security functions 20-6 océ cs620/cs650 pro.
Page 953
21 security strengthen mode.
Page 955
Security strengthen mode 21 océ cs620/cs650 pro 21-3 21 security strengthen mode 21.1 description of security strengthen mode the following items will have enhanced security. - machine nic setting while the security strengthen mode is activated, available function is limited to cs remote care. - ext...
Page 956
21 security strengthen mode 21-4 océ cs620/cs650 pro 21.2 data protected by security strengthen mode the data protected by security strengthen mode is the document data stored in the machin. To turn security strengthen mode on/off the machine administrator can turn security strengthen mode on/off. I...
Page 957
22 machine administrator security functions.
Page 959
Machine administrator security functions 22 océ cs620/cs650 pro 22-3 22 machine administrator security functions the machine administrator turns security strengthen mode on/off. To do so, an 8-digit ce authentication password and machine administrator password must be set for the machine. Ask your a...
Page 960
22 machine administrator security functions 22-4 océ cs620/cs650 pro 22.1 turn security strengthen mode on/off the following is an explanation of how to turn security strengthen mode on/off. 2 note passwords are case sensitive. If a wrong password or fewer than 8 alphanumerical characters are entere...
Page 961
Machine administrator security functions 22 océ cs620/cs650 pro 22-5 3 enter the password. Use the touch screen keypad to enter the 8-digit machine administrator password, then touch [ok]. The machine administrator setting menu screen will be displayed. 4 touch [10 security setting]..
Page 962
22 machine administrator security functions 22-6 océ cs620/cs650 pro 5 touch [04 security strengthen set]. 6 turn security strengthen mode on or off if you want to turn security strengthen mode on, touch [on] to highlight it. If you want to turn it off, touch [off] to highlight it..
Page 963
Machine administrator security functions 22 océ cs620/cs650 pro 22-7 7 touch [ok]. The restart confirmation popup screen will appear 8 touch [yes]. The machine will restart and the new setting will be activated..
Page 964
22 machine administrator security functions 22-8 océ cs620/cs650 pro 22.2 hdd lock password while the security strengthen mode is turned on, a lock password (8 to 32 alphanumerical characters, case sensitive) can be set up on the hdd to protect the data stored on it. If the hdd itself is externally ...
Page 965
Machine administrator security functions 22 océ cs620/cs650 pro 22-9 1 press [utility/counter] on the control panel to display the utility screen. 2 touch [03 machine admin. Setting]. The input password screen will be displayed. 3 enter the password. Use the touch screen keypad to enter the 8-digit ...
Page 966
22 machine administrator security functions 22-10 océ cs620/cs650 pro 4 touch [10 security setting]. 5 touch [02 hdd lock password]. The hdd lock password menu screen will be displayed..
Page 967
Machine administrator security functions 22 océ cs620/cs650 pro 22-11 6 touch [current password] to enter the password currently used, then touch [ok]. The first password: 13-digit alphanumeric serial number of the main body 7 if authentication is succeeded, touch [new password] to enter the new pas...
Page 968
22 machine administrator security functions 22-12 océ cs620/cs650 pro 22.3 print audit log an audit log will be automatically created when the data saved in the machine have been accessed. All the audit log data can be output as follows. 2 note passwords are case sensitive. If a wrong password or fe...
Page 969
Machine administrator security functions 22 océ cs620/cs650 pro 22-13 3 enter the [password]. Use the touch screen keypad to enter the 8-digit machine administrator password, then touch [ok]. The machine administrator setting menu screen will be displayed. 4 touch [01 system setting]..
Page 970
22 machine administrator security functions 22-14 océ cs620/cs650 pro 5 touch [06 list/count]. The management list print screen will be displayed. 6 touch [audit log report], then touch [copy]. 7 press [start] on the control panel..
Page 971
Machine administrator security functions 22 océ cs620/cs650 pro 22-15 22.4 analyze audit log audit logs need to be analyzed by the machine administrator regularly (once per month) or when unauthorized access and tampering of data saved in the machine in security strengthen mode is noticed. The machi...
Page 972
22 machine administrator security functions 22-16 océ cs620/cs650 pro audit log information the audit log contains the following information. - date/time: date and time when an operation was made that results in the creation of a log entry. - id: the person who made the operation or who is subject t...
Page 973
Machine administrator security functions 22 océ cs620/cs650 pro 22-17 22.5 table of items saved in audit log the purpose of analyzing the audit log is to understand the following and implement countermeasures: whether or not data was accessed or tampered with - subject of attack - details of attack ...
Page 974
22 machine administrator security functions 22-18 océ cs620/cs650 pro specify unauthorized actions: password authentication if logs have ng as the result of password authentication (action: 01, 02), items protected by passwords may have been attacked. - failed password authentication (ng) log entrie...
Page 975
23 troubleshooting.
Page 977
Troubleshooting 23 océ cs620/cs650 pro 23-3 23 troubleshooting 23.1 if “please call service c-####” message is displayed a "please call service c-####" message indicates a machine condition that requires the attention of your service representative. The call for service screen usually displays the t...
Page 978
23 troubleshooting 23-4 océ cs620/cs650 pro to contact service representative 1 make note of the report code number "c-####" indicated in the second line of the message area. 2 turn off the sub power switch and main power switch. 3 unplug the machine. 4 contact your service representative and report...
Page 979
Troubleshooting 23 océ cs620/cs650 pro 23-5 limited use of the copier in trouble if the message shown below is displayed on the call for service screen, you may continue operating the copier on a limited function basis and utilize the trays and adu that are not affected by the trouble. To obtain thi...
Page 980
23 troubleshooting 23-6 océ cs620/cs650 pro 23.2 clearing mishandled paper when a paper misfeed occurs, the machine stops making copies and the jam position screen displays to indicate misfeed area(s). The [start] led turns red on the control panel, and copying operation cannot be continued until al...
Page 981
Troubleshooting 23 océ cs620/cs650 pro 23-7 to remove mishandled paper 1 touch illustration on the screen. The screen illustrating the method for the disposal action will be displayed. 2 follow the procedure on the screen to remove misfed paper. – touch [next] to go to the next page of a series of i...
Page 982
23 troubleshooting 23-8 océ cs620/cs650 pro 7 caution precaution for getting injured % be careful of removing staples stuck inside the machine so as not to get injured..
Page 983
Troubleshooting 23 océ cs620/cs650 pro 23-9 23.3 if [machine] tab blinks in orange if any trouble occurs in the machine, one of the following messages will be displayed in the message area and the [machine] tab will blink in orange. - paper misfeed: "mishandled paper" - tray empty: "please load ## p...
Page 984
23 troubleshooting 23-10 océ cs620/cs650 pro tray empty if the popup screen shown below is displayed after touching [detail check], the selected tray has become empty. Follow the procedure below to change the tray selection for the current job, or supply the empty tray with copy paper..
Page 985
Troubleshooting 23 océ cs620/cs650 pro 23-11 to change the tray selection 1 touch the desired tray key. 2 touch [ok] to restore the machine status screen. 3 press [start]. Copy paper will be delivered from newly selected tray to continue the printing operation. To supply the empty tray with paper 1 ...
Page 986
23 troubleshooting 23-12 océ cs620/cs650 pro inconformity in paper setting the machine automatically stops when copy paper in the selected tray should be replaced according to the paper setting specified in print data setting, and displays the following popup screen. Follow the procedure for each to...
Page 987
Troubleshooting 23 océ cs620/cs650 pro 23-13 23.4 if “memory full” message is displayed: memory overflow in certain modes, this machine uses memory to make operations convenient and smooth flowing. Occasional memory overflow may occur if the installed memory is inadequate for the copy conditions sel...
Page 988
23 troubleshooting 23-14 océ cs620/cs650 pro % touch [stop]. All the scanned data will be cleared to terminate the job..
Page 989
Troubleshooting 23 océ cs620/cs650 pro 23-15 23.5 if power off/on screen is displayed when any trouble affects the electrical signal of the copier, "please turn power off/on" will be displayed in the message area. Follow the procedure below to turn the machine power off then on. To turn machine powe...
Page 990
23 troubleshooting 23-16 océ cs620/cs650 pro 23.6 troubleshooting tips symptom remedy copier does not oper- ate when sub power switch is on check to be sure power plug is firmly inserted in electrical socket. Check to be sure main power switch is on. Check to see if weekly timer function is activate...
Page 991
Troubleshooting 23 océ cs620/cs650 pro 23-17 finisher/folding unit does not operate check for a paper misfeed and remove it, as required. Properly close finisher door/folding unit door. Add toner message is displayed new toner supply is needed. Follow instructions for adding toner. Call for pm is di...
Page 992
23 troubleshooting 23-18 océ cs620/cs650 pro using trimming, cop- ies cannot be trimmed check to see if the trim waste indicator lights in red on the ma- chine status screen. Empty the waste basket of saddle stitcher, or contact the ma- chine manager. Symptom remedy.
Page 993
24 maintenance.
Page 995
Maintenance 24 océ cs620/cs650 pro 24-3 24 maintenance 24.1 cleaning the machine in order to maintain optimum copy quality, always keep the following areas clean. 2 reminder never use paint solvents, such as benzene or thinners, to clean the following areas. Cleaning the original glass % raise the a...
Page 996
24 maintenance 24-4 océ cs620/cs650 pro cleaning the original cover keep the original cover clean; otherwise soil marks may be copied, resulting in dark lines on the copies. % raise the original cover, then clean it with a soft, dry cloth. Cleaning the machine external % clean the external surface o...
Page 997
Maintenance 24 océ cs620/cs650 pro 24-5 cleaning the control panel % clean the control panel with a soft, dry cloth. 2 reminder pressing too hard on the control panel or the touch panel may damage them. Never use a household detergent, glass cleaner, benzine, or thinner to clean the control panel an...
Page 998
24 maintenance 24-6 océ cs620/cs650 pro 24.2 checking copy count the utility menu screen allows you to view the current indication of the following counters as a list. - total count - full color count - single color count - black count - printer total count - copy total count - scanner total count t...
Page 999
Maintenance 24 océ cs620/cs650 pro 24-7 to check the counters 1 press [utility/counter] on the control panel. The utility menu screen will be displayed. 2 check the counter information. – the counter information is displayed on the left side of the screen. Touching [exit] will exit the utility mode ...
Page 1000
24 maintenance 24-8 océ cs620/cs650 pro 4 print the counter list. – touch [copy] tab to display the copy screen. Select the desired paper size, then press [start]. After the counter list is printed out, the utility mode will be released automatically and the previous screen will be restored..
Page 1001
Maintenance 24 océ cs620/cs650 pro 24-9 24.3 cleaning conveyance belt of saddle stitcher tray the conveyance belt of saddle stitcher tray should be kept clean, otherwise soil marks may be copied. Follow the procedure below to clean the conveyance belt. In order to maintain optimum copy quality, we r...
Page 1002
24 maintenance 24-10 océ cs620/cs650 pro 2 clean the surface of the two conveyance belts with a soft cloth dampened slightly with alcohol (cleaner). 3 move the conveyance belt to clean the whole length. – raise the two belts lightly, then pull them both frontward at the same time in order to show th...
Page 1003
Maintenance 24 océ cs620/cs650 pro 24-11 2 reminder be sure to clean the whole round of the conveyance belt. Never return the saddle stitcher tray to its original position with the tray stand opened..
Page 1004
24 maintenance 24-12 océ cs620/cs650 pro 24.4 if “trim receiver exchange” message is displayed this machine trims the printed sets using a cutting blade and its receiver, which may require replacement in a long period of use. When replacement is due, the "trim receiver exchange" message appears on t...
Page 1005
Maintenance 24 océ cs620/cs650 pro 24-13 24.5 preventive maintenance after a set number of copies (200,000 copies) have been made on your machine, preventive maintenance (pm) will be required for maintaining optimal performance. When preventive maintenance is due, a message and the pm icon ( ) will ...
Page 1006
24 maintenance 24-14 océ cs620/cs650 pro.
Page 1007
25 specifications.
Page 1009
Specifications 25 océ cs620/cs650 pro 25-3 25 specifications 25.1 main body specifications main body item description name océ cs620/cs650 pro type console type document holder stationary photoconductor opc luminous source xenon lamp copying system laser electrostatic transfer method developing syst...
Page 1010
25 specifications 25-4 océ cs620/cs650 pro in order to incorporate improvements, these product specifications are subject to change without notice. Document types: sheets, books (spread), three-dimensional objects size: max. 303 mm e 438 mm thickness: max. 30 mm, weight: 6.8 kg detectable sizes for ...
Page 1011
Specifications 25 océ cs620/cs650 pro 25-5 25.2 option specifications automatic document feeder df-609 paper feeder unit pf-601 (océ cs650 pro) item description name df-609 document feed methods standard original: single-sided, double-sided mixed original: single-sided, double-sided original paper t...
Page 1012
25 specifications 25-6 océ cs620/cs650 pro large capacity unit lu-202 (océ cs650 pro) large capacity stacker ls-501 (océ cs650 pro) item description name lu-202 function feed paper into main body configuration 1 paper tray paper sizes sra3 w, sra4 w/v, a3 w, b4 w, a4 w/ v, b5 /v, 13" e 19" w, 11" e ...
Page 1013
Specifications 25 océ cs620/cs650 pro 25-7 finisher fs-503 (océ cs650 pro) item description name fs-503 finisher type offset catch tray function straight delivery (collated, uncollated) offset delivery (collate and offset, uncollate and offset) staple delivery (corner staple, 2 staples) output tray ...
Page 1014
25 specifications 25-8 océ cs620/cs650 pro folding unit fd-501 (océ cs650 pro) saddle stitcher sd-501 (océ cs650 pro) item description name fd-501 function distributes output number of punch holes 2 or 4 hole diameter 6.5 ± 0.5 mm hole pitch 80 ± 0.5 mm (2/4 holes) 70 ± 0.5 mm; (29 mm ± 0.5) e 2 (sw...
Page 1015
Specifications 25 océ cs620/cs650 pro 25-9 finisher fs-607 (océ cs620) punch kit pk-512/513 (océ cs62 0) item description name fs-607 finisher type offset catch tray output tray primary (main), secondary (sub), and fold & staple trays function straight delivery (collated, uncollated) offset delivery...
Page 1016
25 specifications 25-10 océ cs620/cs650 pro output tray ot-502 (océ cs620 / cs650 pro) other options - original cover oc-506 - dehumidification fan heater ht-503/504 - hard disk unit hd-506 - relay unit ru-503/504 - image controller item description name ot-502 function paper output tray for main bo...
Page 1017
26 appendix.
Page 1019
Appendix 26 océ cs620/cs650 pro 26-3 26 appendix 26.1 how to input characters as touching the item where you can input characters, the character input screen appears. You can input alphanumerics and symbols. A character array is the same with the computer keyboards. About keys on the caracter input ...
Page 1020
26 appendix 26-4 océ cs620/cs650 pro about character input the followings describe basic steps to input characters on the character input screen. 1 touch the corresponding key to input the desired character. 2 touch [ok]. The character input screen closes. The input characters are displayed on the c...
Page 1021
Appendix 26 océ cs620/cs650 pro 26-5 26.2 index numerics 1.000 magnification mode 6-28 1shot indication time 16-43 , 17-132 2 in 1 8-18 2 position staple pitch adjustment 14-98 4 in 1 8-18 8 in 1 8-19 a a5/b6/a6 size paper 4-11 about colors 7-3 access key 5-4 accessibility 10-20 accessibility key 5-...
Page 1022
26 appendix 26-6 océ cs620/cs650 pro b-side prevent 7-21 built-in stamp 8-71 buzzer setting 16-29 bypass tray 4-8 c call for service screen 23-3 caution notations and labels 1-52 cd-mag. Adjustment 14-11 , 17-40 centering adjustment 14-6 , 14-16 , 17-36 change page print pos (booklet) 16-45 , 17-134...
Page 1023
Appendix 26 océ cs620/cs650 pro 26-7 double parallel 9-18 , 9-22 double parallel pos. Adj. 14-46 e editing account track data 19-10 e-mail initial setting 17-130 e-mail text setting 17-97 e-mail title setting 17-95 enhanced security mode audit log 21-3 normal mode 20-4 enlarge/reduce 6-30 erase adju...
Page 1024
26 appendix 26-8 océ cs620/cs650 pro hole-punch vertical pos. 14-35 horizontcal position adj. 14-88 hsb model 7-5 hsb value 7-26 hue 7-7 , 7-26 hue (h) 7-5 i image centering 8-59 image distinction level 7-11 , 7-38 image overlay 8-89 image quality setting 16-55 image quality stability 14-21 , 17-65 ...
Page 1025
Appendix 26 océ cs620/cs650 pro 26-9 multi folder (punch) adj. 14-32 multi half fold 9-30 , 9-45 multi tri-fold 9-30 , 9-47 multi-folding mode tray 2-15 multi-page enlargement 8-39 multi-sheet bypass tray 2-4 munsell color system 7-5 n neg./positive reverse 8-44 network setting 17-128 next job stapl...
Page 1026
26 appendix 26-10 océ cs620/cs650 pro mode 5-18 positioning the original on original glass 5-19 post inserter 9-24 power led 5-4 power off/on screen 23-15 power save key 5-4 power save led 2-27 power save setting 16-24 , 17-7 power source 1-61 pre-registration adj. 17-46 preset zoom 6-31 preset zoom...
Page 1027
Appendix 26 océ cs620/cs650 pro 26-11 saturation (s) 7-5 scan initial setting 16-41 scan prohibit (pull out tray) 16-46 , 17-135 scan setting 16-48 , 17-137 scanner adjustment 14-14 , 17-50 scanner prohibit setting 17-26 scanner send address 17-80 screen 16-55 screen initial setting 16-57 screen typ...
Page 1028
26 appendix 26-12 océ cs620/cs650 pro tab paper 6-21 thickness 6-14 thin line enhancement 16-50 time and date setting 16-27 , 17-9 timer action on/off set 17-15 timer interrupt password set 17-20 timer setting 17-12 toner access door 2-4 toner density sensor 17-54 toner quality/exposure 17-55 toner ...
Page 1029
Appendix 26 océ cs620/cs650 pro 26-13 zoom (proportional) 6-29.
Page 1030
26 appendix 26-14 océ cs620/cs650 pro.
Page 1031
Océ cs620/cs650 pro 1-1 1 introduction/safety information 1.1 energy star® ..................................................................................... 1-5 1.2 license .............................................................................................. 1-6 1.3 available features ....
Page 1032
1-2 océ cs620/cs650 pro 4.8 removing finished sets from large capacity stacker ls-501...... 4-48 5 before making copies 5.1 control panel and basic screens ..................................................... 5-3 5.1.1 control panel .....................................................................
Page 1033
Océ cs620/cs650 pro 1-3 6.6 paper setting ................................................................................... 6-43 6.6.1 selecting paper size automatically: auto paper select ............... 6-44 6.6.2 turning on/off the rotation .........................................................
Page 1034
1-4 océ cs620/cs650 pro 8.11 reversing color in image: neg./positive reverse ........................ 8-44 8.12 repeating original image on one sheet: image repeat............... 8-46 8.12.1 setting repeat times automatically ............................................... 8-46 8.12.2 specifying rep...
Page 1035
Océ cs620/cs650 pro 1-5 9.5.2 folding copies.............................................................................. 9-30 9.6 using folder/finisher functions manually...................................... 9-33 9.7 using finisher fs-607 .............................................................
Page 1036
1-6 océ cs620/cs650 pro 12 screen setting outlines 12.1 machine status screen setting outlines ........................................ 12-3 12.2 utility screen setting outlines......................................................... 12-8 13 paper setting 13.1 paper setting outlines ..................
Page 1037
Océ cs620/cs650 pro 1-7 14.5.8 03 multi folder (fold) adj. \ 06 gate fold position adj.............. 14-52 14.6 04 finisher adjustment (ls-501) ................................................. 14-55 14.6.1 05 stacker adjustment \ 01 paper width adjustment ............... 14-55 14.6.2 05 stacker adj...
Page 1038
1-8 océ cs620/cs650 pro 16.3 02 initial setting ............................................................................. 16-39 16.4 03 common setting....................................................................... 16-43 16.5 04 copy setting ..................................................
Page 1039
Océ cs620/cs650 pro 1-9 21.1 description of security strengthen mode..................................... 21-3 21.2 data protected by security strengthen mode .............................. 21-4 22 machine administrator security functions 22.1 turn security strengthen mode on/off.......................
Page 1040
1-10 océ cs620/cs650 pro.
Page 1041
1-1 numerics 1.000 magnification mode 6-28 1shot indication time 16-43 , 17-132 2 in 1 8-18 2 position staple pitch adjustment 14-98 4 in 1 8-18 8 in 1 8-19 a a5/b6/a6 size paper 4-11 about colors 7-3 access key 5-4 accessibility 10-20 accessibility key 5-4 account counter 17-123 account register 17...
Page 1042
1-2 buzzer setting 16-29 bypass tray 4-8 c call for service screen 23-3 caution notations and labels 1-52 cd-mag. Adjustment 14-11 , 17-40 centering adjustment 14-6 , 14-16 , 17-36 change page print pos (booklet) 16-45 , 17-134 change password 16-63 change prohibit setting 17-24 change user 16-18 ch...
Page 1043
1-3 e editing account track data 19-10 e-mail initial setting 17-130 e-mail text setting 17-97 e-mail title setting 17-95 enhanced security mode audit log 21-3 normal mode 20-4 enlarge/reduce 6-30 erase adjustment 17-30 erase operating setting 17-30 exchanging toner recovery box 4-30 execute adjust ...
Page 1044
1-4 hsb model 7-5 hsb value 7-26 hue 7-7 , 7-26 hue (h) 7-5 i image centering 8-59 image distinction level 7-11 , 7-38 image overlay 8-89 image quality setting 16-55 image quality stability 14-21 , 17-65 image repeat 8-46 image/type 6-7 incomplete job 11-9 inconformity in paper setting 23-12 initial...
Page 1045
1-5 multi half fold 9-30 , 9-45 multi tri-fold 9-30 , 9-47 multi-folding mode tray 2-15 multi-page enlargement 8-39 multi-sheet bypass tray 2-4 munsell color system 7-5 n neg./positive reverse 8-44 network setting 17-128 next job staple setting 16-18 non-image area erase 8-42 , 17-30 non-image area ...
Page 1046
1-6 positioning the original on original glass 5-19 post inserter 9-24 power led 5-4 power off/on screen 23-15 power save key 5-4 power save led 2-27 power save setting 16-24 , 17-7 power source 1-61 pre-registration adj. 17-46 preset zoom 6-31 preset zoom setting 16-22 preventive maintenance 24-13 ...
Page 1047
1-7 saturation (s) 7-5 scan initial setting 16-41 scan prohibit (pull out tray) 16-46 , 17-135 scan setting 16-48 , 17-137 scanner adjustment 14-14 , 17-50 scanner prohibit setting 17-26 scanner send address 17-80 screen 16-55 screen initial setting 16-57 screen type 7-41 secondary (sub) tray 9-10 ,...
Page 1048
1-8 tab paper 6-21 thickness 6-14 thin line enhancement 16-50 time and date setting 16-27 , 17-9 timer action on/off set 17-15 timer interrupt password set 17-20 timer setting 17-12 toner access door 2-4 toner density sensor 17-54 toner quality/exposure 17-55 toner recovery box door 2-4 toner recove...
Page 1049
1-9 zoom (proportional) 6-29.
Page 1050: Reader'S Comment Sheet
Océ cs620/cs650 pro reader's comment sheet questions have you found this manual to be accurate? O yes o no were you able to operate the product, after reading this manual? O yes o no does this manual provide sufficient background information? O yes o no is the format of this manual convenient in siz...
Page 1051
Océ cs620/cs650 pro thank you for evaluating this manual. If you have other comments or concerns, please explain or suggest improvements overleaf or on a separate sheet. Comments: ------------------------------------------------------------------------------------------------- ----------------------...
Page 1052
Océ cs620/cs650 pro addresses of local océ organisations océ-australia ltd. P.O. Box 363 ferntree gully mdc vic 3165 australia http://www.Oce.Com.Au/ océ-Österreich gmbh postfach 95 1233 vienna austria http://www.Oce.At/ océ-belgium n.V./s.A. J. Bordetlaan 32 1140 brussel belgium http://www.Oce.Be/ ...
Page 1053
Océ cs620/cs650 pro océ-deutschland gmbh solinger straße 5-7 45481 mülheim/ruhr germany http://www.Oce.De/ océ-hong kong and china head office 12/f 1202 the lee gardens 33 hysan avenue causeway bay hong kong http://www.Oce.Com.Hk/ océ-hungaria kft. 1241 budapest pf.: 237 hungary http://www.Oce.Hu/ o...
Page 1054: Note:
Note: the web site http://www.Oce.Com gives the current addresses of the local océ organisations and distributors. Océ-poland ltd. Sp.Z o.O. Ul. Bitwy warszawskiej 1920 r. Nr. 7 02-366 warszawa poland http://www.Oce.Com.Pl/ océ-lima mayer, s.A. Av. José gomes ferreira, 11 piso 2 - miraflores 1497-13...
Page 1055: Note:
Océ cs620/cs650 pro note: the addresses of local océ organisations for information about the wide format printing systems and the production printing systems can be different from the addresses above. Refer to the web site http://www.Oce.Com for the addresses you need..

