Core i7 core 2 quad core 2 duo core 2 extreme pentium dual-core pentium d pentium 4 celeron d amd socket am2+/am2/754/939/940 cpu athlon 64 athlon 64 x2 dual-core athlon x2 dual-core athlon 64 fx opteron dual-core opteron phenom sempron ※ please read this manual thoroughly prior to installation http...
1) common components ① cooler(cnps9900 led) ④ four (4) socket 775 clip support fixing bolts (silver) ⑤ one (1) clip support (top) one (1) backplate (bottom) for socket 775 ⑥ one (1) socket 775 clip ② thermal grease (zm-stg1) ③ user’s manual 2) socket 775 (intel) components 1 1. Precautions 2. Compon...
1) installation requirements ① space requirements the cooler’s installation requires unobstructed space with dimensions of 142 mm (width), 96 mm (length), 165 mm (height) and the cpu as a central reference point. Please check if components such as odd and psu protrude into the required space. ② air ...
③ plastic band removal please remove this plastic band before installing the cooler. The band’s purpose is to protect the cooler during transport. 3 during installation or removal, please take precautions to avoid excessive impact on the cooler. Please hold the cooler with both hands as shown in the...
2) installation on intel socket 775 / 1366 ① - Ⓐ socket 775 clip support and backplate installation align the socket 775 clip support (top) and backplate (bottom) with the motherboard installation holes and secure with socket 775 clip support fixing bolts (silver). Socket 775 clip support fixing bol...
② thermal grease application clear off any particles or residue from the cpu’s surface then spread (outwards from center) a thin but thorough layer of thermal grease on the cpu and the base of the cooler. 5 ① - Ⓑ socket 1366 clip support installation socket 1366 clip support socket 1366 washer socke...
④ cooler installation align the center of the cooler with the center of the cpu, and fix by tightening the bolts on the clip onto the clip support. The clip must be installed lying flat, without leaning at a slant in any direction. The pwm fan’s operation will vary depending on the motherboard’s bio...
3) installation on amd socket am2+/am2/754/939/940 ① thermal grease application clear off any particles or residue from the cpu’s surface then spread (outwards from center) a thin but thorough layer of thermal grease on the cpu and the base of the cooler. ② clip installation install the amd clip ont...
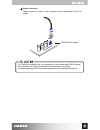
④ power connection please connect the cooler’s 4-pin connector to the motherboard’s cpu fan header. The pwm fan’s operation will vary depending on the motherboard’s bios settings. After installation, the pwm control mode must be activated in the bios. For details regarding pwm control mode, please r...


