- DL manuals
- Keithley
- Multimeter
- DMM7510
- Calibration Manual
Keithley DMM7510 Calibration Manual
Summary of DMM7510
Page 1
Www.Tek.Com/keithley model dmm7510 7½ digit graphical sampling multimeter calibration and adjustment manual dmm7510-905-01 rev. B / february 2016 *pdmm7510-905-01b* dmm7510-905-01b a t ektr onix company a g re a t e r m e a s u re o f co n fi d e n c e.
Page 2: Model Dmm7510
Calibration and adjustment manual © 2016, keithley instruments cleveland, ohio, u.S.A. All rights reserved. Any unauthorized reproduction, photocopy, or use of the information herein, in whole or in part, without the prior written approval of keithley instruments is strictly prohibited. Tsp ® , tsp-...
Page 3: Safety Precautions
Safety precautions the following safety precautions should be observed before using this product and any associated instrumentation. Although some instruments and accessories would normally be used with nonhazardous voltages, there are situations where hazardous conditions may be present. This produ...
Page 4
For safety, instruments and accessories must be used in accordance with the operating instructions. If the instruments or accessories are used in a manner not specified in the operating instructions, the protection provided by the equipment may be impaired. Do not exceed the maximum signal levels of...
Page 5: Table Of Contents
Introduction ............................................................................................................... 1-1 welcome .............................................................................................................................. 1-1 introduction to this manual .......
Page 6
Table of contents model dmm7510 error! No text of specified style in document. Calibration and adjustment manual temperature and relative humidity ............................................................................................ 3-2 line power.................................................
Page 7: Welcome
In this section: welcome .................................................................................. 1-1 introduction to this manual ....................................................... 1-1 extended warranty ................................................................... 1-2 contact in...
Page 8: Extended Warranty
Section 1: introduction model dmm7510 calibration and adjustment manual 1-2 dmm7510-905-01 rev. B / february 2016 extended warranty additional years of warranty coverage are available on many products. These valuable contracts protect you from unbudgeted service expenses and provide additional years...
Page 9: Introduction
In this section: introduction .............................................................................. 2-1 factory service ......................................................................... 2-2 verification test requirements ................................................... 2-2 autoca...
Page 10: Factory Service
Section 2: performance verification model dmm7510 calibration and adjustment manual 2-2 dmm7510-905-01 rev. B / february 2016 factory service to return the instrument to keithley instruments for repair: • call the repair department at 1-800-833-9200 or send an email to rmarequest@tektronix.Com for a...
Page 11
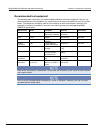
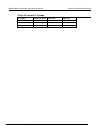
Model dmm7510 calibration and adjustment manual section 2: performance verification dmm7510-905-01 rev. B / february 2016 2-3 recommended test equipment the following table summarizes the recommended calibration verification equipment. You can use alternate equipment if that equipment has specificat...
Page 12: Autocalibration
Section 2: performance verification model dmm7510 calibration and adjustment manual 2-4 dmm7510-905-01 rev. B / february 2016 autocalibration autocalibration removes measurement errors that are caused by the performance drift on the components used in this dmm as a result of temperature and time. Au...
Page 13
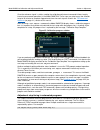
Model dmm7510 calibration and adjustment manual section 2: performance verification dmm7510-905-01 rev. B / february 2016 2-5 to run autocalibration from the front panel: 1. Press the menu key. 2. Under system, select calibration. 3. Select start acal. A prompt is displayed. Select yes. A progress b...
Page 14
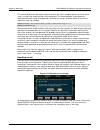
Section 2: performance verification model dmm7510 calibration and adjustment manual 2-6 dmm7510-905-01 rev. B / february 2016 from the front panel: 1. Press the menu key. 2. Under system, select calibration. 3. Select scheduling action. To have the instrument: prompt you to run autocalibration: se...
Page 15
Model dmm7510 calibration and adjustment manual section 2: performance verification dmm7510-905-01 rev. B / february 2016 2-7 using scpi commands: for the present internal temperature, send: :system:temperature:internal? For the temperature difference, send: :acal:lastrun:temperature:difference? For...
Page 16
Section 2: performance verification model dmm7510 calibration and adjustment manual 2-8 dmm7510-905-01 rev. B / february 2016 calculating resistance reading limits resistance reading limits must be recalculated based on the actual calibration resistance values supplied by the equipment manufacturer....
Page 17
Model dmm7510 calibration and adjustment manual section 2: performance verification dmm7510-905-01 rev. B / february 2016 2-9 if the model dmm7510 is not within specifications and is not under warranty, see the adjustment procedures in adjustment (on page 3-1) for information about adjusting the ins...
Page 18
Section 2: performance verification model dmm7510 calibration and adjustment manual 2-10 dmm7510-905-01 rev. B / february 2016 verify dc voltage accuracy for the 100 mv to 1000 v ranges to verify 100 mv to 1000 v dc voltage accuracies, you will: • apply accurate dc voltages from the calibrator to th...
Page 19
Model dmm7510 calibration and adjustment manual section 2: performance verification dmm7510-905-01 rev. B / february 2016 2-11 10. Press the menu key. 11. Select calculations. 12. Select rel acquire. 13. Source positive and negative full-scale and half-scale voltages and allow for proper settling, a...
Page 20
Section 2: performance verification model dmm7510 calibration and adjustment manual 2-12 dmm7510-905-01 rev. B / february 2016 verify the dc voltage 1000 v range description verification point lower limit upper limit full scale (+) 1.0000000e+03 9.9997200e+02 1.0000280e+03 half scale (+) 5.000000+02...
Page 21
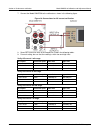
Model dmm7510 calibration and adjustment manual section 2: performance verification dmm7510-905-01 rev. B / february 2016 2-13 to verify ac voltage accuracy: 1. Connect the model dmm7510 hi and lo input connectors to the calibrator as shown in the following figure. Figure 2: connections for ac volta...
Page 22
Section 2: performance verification model dmm7510 calibration and adjustment manual 2-14 dmm7510-905-01 rev. B / february 2016 verify the ac voltage 1 v range input frequency lower limit upper limit 1 3.0e+01 9.991000e-01 1.000900e+00 1 1.0e+03 9.991000e-01 1.000900e+00 1 5.0e+04 9.981000e-01 1.0019...
Page 23
Model dmm7510 calibration and adjustment manual section 2: performance verification dmm7510-905-01 rev. B / february 2016 2-15 verify ac voltage accuracy for the 700 v range use shielded low capacitance cabling. For the 700 v range, avoid cable capacitances of >150 pf. Excessive capacitance may resu...
Page 24
Section 2: performance verification model dmm7510 calibration and adjustment manual 2-16 dmm7510-905-01 rev. B / february 2016 4. On the model dmm7510, press the function key and select ac voltage. 5. On the home screen, select the button next to range and select 700 v. 6. Press the menu key. 7. Sel...
Page 25
Model dmm7510 calibration and adjustment manual section 2: performance verification dmm7510-905-01 rev. B / february 2016 2-17 verify the digitize voltage 100 mv to 1000 v ranges use shielded low-thermal connections when testing the 100 mv and 1 v ranges to avoid errors caused by noise or thermal ef...
Page 26
Section 2: performance verification model dmm7510 calibration and adjustment manual 2-18 dmm7510-905-01 rev. B / february 2016 verify the digitize voltage 100 mv range description input lower limit upper limit perform relative offset 0.0 n/a n/a full scale (+) 0.1 9.99680e-02 1.00032e-01 half scale ...
Page 27
Model dmm7510 calibration and adjustment manual section 2: performance verification dmm7510-905-01 rev. B / february 2016 2-19 frequency verification to verify frequency accuracy, you will: • apply accurate frequencies from the function generator to the terminals on the front panel of the model dmm7...
Page 28
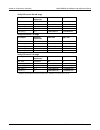
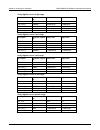
Section 2: performance verification model dmm7510 calibration and adjustment manual 2-20 dmm7510-905-01 rev. B / february 2016 verify the frequency use the following values to verify the performance of the model dmm7510. Actual values depend on published specifications (see example reading limit cal...
Page 29
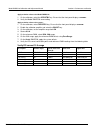
Model dmm7510 calibration and adjustment manual section 2: performance verification dmm7510-905-01 rev. B / february 2016 2-21 figure 6: connections for thermocouple verification 2. On the model dmm7510, press the function key and select dc voltage. 3. Press the menu key. 4. Select settings. 5. Set ...
Page 30
Section 2: performance verification model dmm7510 calibration and adjustment manual 2-22 dmm7510-905-01 rev. B / february 2016 19. Set the calibrator to the simulated thermocouple voltage you want (from the table above), first correcting for the offset voltage measured in step 14. For example, if th...
Page 31
Model dmm7510 calibration and adjustment manual section 2: performance verification dmm7510-905-01 rev. B / february 2016 2-23 equation for 0 °c to 850 °c temperature range r rtd = r 0 (1 + at + bt 2 ) where: • r rtd is the calculated resistance of the rtd • r 0 is the known rtd resistance at 0 °c •...
Page 32
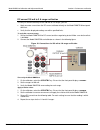
Section 2: performance verification model dmm7510 calibration and adjustment manual 2-24 dmm7510-905-01 rev. B / february 2016 figure 7: connections for 4-wire rtd accuracy verification 2. For 3-wire accuracy, connect the model dmm7510 input and sense terminals to the calibrator as shown in the foll...
Page 33
Model dmm7510 calibration and adjustment manual section 2: performance verification dmm7510-905-01 rev. B / february 2016 2-25 3. On the model dmm7510, press the function key and select temperature. 4. Press the menu key. 5. Select settings. 6. Select transducer. 7. Set the type to either 4-wire rtd...
Page 34
Section 2: performance verification model dmm7510 calibration and adjustment manual 2-26 dmm7510-905-01 rev. B / february 2016 resistance verification use the following information to verify the performance of the model dmm7510 resistance functions. Dry circuit resistance verification to verify the ...
Page 35
Model dmm7510 calibration and adjustment manual section 2: performance verification dmm7510-905-01 rev. B / february 2016 2-27 figure 9: characterize the calibrator verify dry circuit accuracy use the values in the tables following the steps below to verify the performance of the model dmm7510. Actu...
Page 36
Section 2: performance verification model dmm7510 calibration and adjustment manual 2-28 dmm7510-905-01 rev. B / february 2016 figure 10: connections for dry circuit accuracy verification 2. Set the calibrator for 4-wire resistance with external sense on. 3. On the model dmm7510, press the function ...
Page 37
Model dmm7510 calibration and adjustment manual section 2: performance verification dmm7510-905-01 rev. B / february 2016 2-29 range nominal calibrator value (Ω) actual calibrator value (Ω) lower limit (Ω) upper limit (Ω) 100 0 –8.00e-03 8.00e-03 100.0000 9.9996340e01 9.997934e+01 1.000133e+02 1000 ...
Page 38
Section 2: performance verification model dmm7510 calibration and adjustment manual 2-30 dmm7510-905-01 rev. B / february 2016 verify 4-wire resistance accuracy to verify 4-wire resistance accuracy: 1. Connect the model dmm7510 input and sense terminals to the calibrator as shown in the following fi...
Page 39
Model dmm7510 calibration and adjustment manual section 2: performance verification dmm7510-905-01 rev. B / february 2016 2-31 you can use either the front-panel controls or remote interface commands to set measurement parameters for verification. For calibration, you must use remote interface comma...
Page 40
Section 2: performance verification model dmm7510 calibration and adjustment manual 2-32 dmm7510-905-01 rev. B / february 2016 4-wire resistance verification with offset compensation off the values and limits in the following tables are for example only. You must calculate test limits based on the a...
Page 41
Model dmm7510 calibration and adjustment manual section 2: performance verification dmm7510-905-01 rev. B / february 2016 2-33 2. Set the calibrator for 2-wire resistance with external sense off. 3. On the model dmm7510, press the function key and select 2w res. 4. On the home screen, select the but...
Page 42
Section 2: performance verification model dmm7510 calibration and adjustment manual 2-34 dmm7510-905-01 rev. B / february 2016 dc current verification the model dmm7510 dc current ranges can be verified using several methods, depending on the level of measurement uncertainty required. This manual de...
Page 43
Model dmm7510 calibration and adjustment manual section 2: performance verification dmm7510-905-01 rev. B / february 2016 2-35 figure 15: dc current verification 10 µa to 100 ma range to verify model dmm7510 accuracy for each range: 1. Set the calibrator to source zero current. 2. Set the reference ...
Page 44
Section 2: performance verification model dmm7510 calibration and adjustment manual 2-36 dmm7510-905-01 rev. B / february 2016 test limit calculation for 10 µa to 100 ma ranges the following tables list nominal test current for 10 µa to 100 ma ranges. Test limits must be calculated relative to actua...
Page 45
Model dmm7510 calibration and adjustment manual section 2: performance verification dmm7510-905-01 rev. B / february 2016 2-37 dc current 100 ma to 3 a range verification to verify dc current accuracy on the 100 ma to 3 a ranges, you will: • apply accurate current from the dc current calibrator dire...
Page 46
Section 2: performance verification model dmm7510 calibration and adjustment manual 2-38 dmm7510-905-01 rev. B / february 2016 verify dc current 100 ma range description calibrator setpoint (a) lower limit upper limit uut zero standby rel n/a full scale (+) 0.1 9.9982000e-02 1.0001800e-01 half scale...
Page 47
Model dmm7510 calibration and adjustment manual section 2: performance verification dmm7510-905-01 rev. B / february 2016 2-39 digitize current verification the following topics describe how to verify digitized dc current on the model dmm7510. Digitize dc current verification 10 µa to 3 a ranges to ...
Page 48
Section 2: performance verification model dmm7510 calibration and adjustment manual 2-40 dmm7510-905-01 rev. B / february 2016 verify digitize current 10 µa range description calibrator setpoint (a) lower limit upper limit uut zero 0 rel n/a full scale (+) 0.000010 9.99765e-06 1.00024e-05 half scale...
Page 49
Model dmm7510 calibration and adjustment manual section 2: performance verification dmm7510-905-01 rev. B / february 2016 2-41 verify digitize current 1 a range description calibrator setpoint (a) lower limit upper limit uut zero 0 rel n/a full scale (+) 1 9.99390e-01 1.00061e+00 half scale (+) 0.5 ...
Page 50
Section 2: performance verification model dmm7510 calibration and adjustment manual 2-42 dmm7510-905-01 rev. B / february 2016 7. Connect the model dmm7510 to the calibrator as shown in the following figure. Figure 18: connections for ac current verification 8. Source ac current for each of the freq...
Page 51
Model dmm7510 calibration and adjustment manual section 2: performance verification dmm7510-905-01 rev. B / february 2016 2-43 verify ac current 3 a range description verification point lower limit upper limit 2 a at 40 hz 2.000 1.994500e+00 2.005500e+00 2 a at 1 khz 2.000 1.994500e+00 2.005500e+00 ...
Page 52
Section 2: performance verification model dmm7510 calibration and adjustment manual 2-44 dmm7510-905-01 rev. B / february 2016 2. Set the decade capacitor box to 0 f. 3. On the model dmm7510, press the function key, select the measure functions tab, and select capacitance. 4. Press the menu key. 5. ...
Page 53
Model dmm7510 calibration and adjustment manual section 2: performance verification dmm7510-905-01 rev. B / february 2016 2-45 verify the capacitance description verification point lower limit (f) upper limit (f) 1 nf range cable rel 3.00e-10 n/a n/a 10 % 1 nf range 1.0000e-10 9.7000e-11 1.0300e-10 ...
Page 54
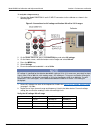
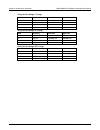
Section 2: performance verification model dmm7510 calibration and adjustment manual 2-46 dmm7510-905-01 rev. B / february 2016 figure 21: front panel 4-wire shorting plug orientation 8. Verify that the 1 Ω range is within specification (see the following table). 9. Repeat verification for the 10 Ω t...
Page 55: Rear-Panel Verification
Model dmm7510 calibration and adjustment manual section 2: performance verification dmm7510-905-01 rev. B / february 2016 2-47 verify dc voltage zero values range lower limit upper limit 1000 –5.00e-03 5.00e-03 100 –5.00e-04 5.00e-04 10 –1.20e-05 1.20e-05 1 –2.00e-06 2.00e-06 rear-panel verification...
Page 56
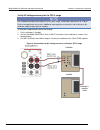
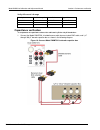
Section 2: performance verification model dmm7510 calibration and adjustment manual 2-48 dmm7510-905-01 rev. B / february 2016 figure 22: connections for dc current verification 10 a range.
Page 57
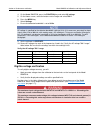
Model dmm7510 calibration and adjustment manual section 2: performance verification dmm7510-905-01 rev. B / february 2016 2-49 apply a relative offset to the model dmm7510: 1. On the calibrator, select the opr/stby key. Ensure that the front panel displays standby. 2. Verify the model dmm7510 zero r...
Page 58
Section 2: performance verification model dmm7510 calibration and adjustment manual 2-50 dmm7510-905-01 rev. B / february 2016 digitize current 10 a range verification ensure cabling is designed to conduct 10 a without significant voltage drop. In general, cables for the 10 a range steps should be m...
Page 59
Model dmm7510 calibration and adjustment manual section 2: performance verification dmm7510-905-01 rev. B / february 2016 2-51 7. Select settings. 8. Set the sample rate to 1000. 9. Set the aperture to auto or 1 ms. 10. Set the count to 100. Verify the model dmm7510 zero: 1. On the calibrator, selec...
Page 60
Section 2: performance verification model dmm7510 calibration and adjustment manual 2-52 dmm7510-905-01 rev. B / february 2016 ac current is specified for the detector bandwidth setting of 3 hz. 3 hz measures accurately for input signals from 3 hz to 10 khz, with reading rates of ≈ 0.5 readings/s. T...
Page 61
Model dmm7510 calibration and adjustment manual section 2: performance verification dmm7510-905-01 rev. B / february 2016 2-53 verify ac current 10 a range description verification point lower limit upper limit 40 hz 10.000 9.955000e+00 1.004500e+01 1 khz 10.000 9.955000e+00 1.004500e+01 5 khz 10.00...
Page 62: Introduction
In this section: introduction .............................................................................. 3-1 environmental conditions ......................................................... 3-1 warmup period ......................................................................... 3-2 adjustme...
Page 63: Environmental Conditions
Section 3: adjustment model dmm7510 calibration and adjustment manual 3-2 dmm7510-905-01 rev. B / february 2016 environmental conditions to ensure accurate results, the environment must meet the following conditions. Temperature and relative humidity conduct the adjustment procedures in a test envir...
Page 64: Recommended Test Equipment
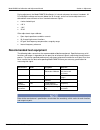
Model dmm7510 calibration and adjustment manual section 3: adjustment dmm7510-905-01 rev. B / february 2016 3-3 during adjustment, the model dmm7510 calibrates its internal references to external standards. All dc and digitize voltage and current (below the 10 a range), and all resistance adjustment...
Page 65: Initial Instrument Setup
Section 3: adjustment model dmm7510 calibration and adjustment manual 3-4 dmm7510-905-01 rev. B / february 2016 general adjustment considerations • model dmm7510 dcv performance is sensitive to errors from thermoelectric potentials generated by test cables and connections. Be sure to use high-qualit...
Page 66
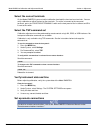
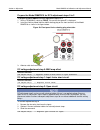
Model dmm7510 calibration and adjustment manual section 3: adjustment dmm7510-905-01 rev. B / february 2016 3-5 select the correct terminals on the model dmm7510, you must adjust calibration from both the front and rear terminals. You can verify calibration on either the front or rear terminals. To ...
Page 67
Section 3: adjustment model dmm7510 calibration and adjustment manual 3-6 dmm7510-905-01 rev. B / february 2016 calibration adjustment is performed by connecting reference signals to the model dmm7510 and sending a series of adjustment commands using one of the remote interfaces. The adjustment proc...
Page 68
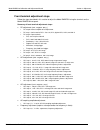
Model dmm7510 calibration and adjustment manual section 3: adjustment dmm7510-905-01 rev. B / february 2016 3-7 • ac current step 1: 0.5 a 1 khz, ac current 10 a range zero • ac current step 2: 2 a to 10 a 1 khz, ac current 10 a range full-scale see the following topics for detailed instructions. Pr...
Page 69
Section 3: adjustment model dmm7510 calibration and adjustment manual 3-8 dmm7510-905-01 rev. B / february 2016 rear dc adjustment step 2: open circuit to run rear dc adjustment step 2: 1. Remove the 4-wire short from the inputs. Cables cannot be attached to the model dmm7510 during this step. At th...
Page 70
Model dmm7510 calibration and adjustment manual section 3: adjustment dmm7510-905-01 rev. B / february 2016 3-9 2. Ensure that the calibrator current output is set to normal. 3. On the calibrator, set the source to 2.0 a. Note that calibration adjustment step 3 allows 2 a ±10 % for the source level....
Page 71
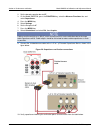
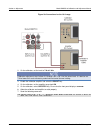
Section 3: adjustment model dmm7510 calibration and adjustment manual 3-10 dmm7510-905-01 rev. B / february 2016 figure 28: connections for the 10 a range 2. On the calibrator, set the level to 7 a at 1 khz. Calibration adjustment step 2 allows 2 a through 10 a, ±10 % for the source level. It is bes...
Page 72
Model dmm7510 calibration and adjustment manual section 3: adjustment dmm7510-905-01 rev. B / february 2016 3-11 front-terminal adjustment steps follow the steps described in this section to adjust the model dmm7510 using the terminals on the model dmm7510 front panel. Summary of front-terminal adju...
Page 73
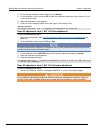
Section 3: adjustment model dmm7510 calibration and adjustment manual 3-12 dmm7510-905-01 rev. B / february 2016 prepare the model dmm7510 for dcv adjustment steps 0 to 2 to prepare the model dmm7510 for dcv adjustment steps 0 to 2: 1. Set the terminals switch to front. Ensure that the green f is di...
Page 74
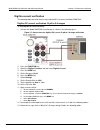
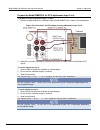
Model dmm7510 calibration and adjustment manual section 3: adjustment dmm7510-905-01 rev. B / february 2016 3-13 prepare the model dmm7510 for dcv adjustment steps 3 to 5 to prepare to run dcv adjustment steps 3, 4, and 5: 1. Connect a cable between the calibrator and the model dmm7510 as shown in t...
Page 75
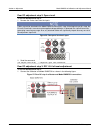
Section 3: adjustment model dmm7510 calibration and adjustment manual 3-14 dmm7510-905-01 rev. B / february 2016 dc voltage adjustment step 5: 10 kΩ to run dcv adjustment step 5: 1. Retain the connections made in prepare the model dmm7510 for dcv adjustment steps 3 to 5 (on page 3-13). 2. Allow the ...
Page 76
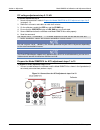
Model dmm7510 calibration and adjustment manual section 3: adjustment dmm7510-905-01 rev. B / february 2016 3-15 2. Allow the instrument and cables to settle for 30 seconds. 3. On the calibrator, source 10 mv 1.0 khz. 4. Enable the opr key. For cal.Ac.Adjust steps 1 to 16, the identified source valu...
Page 77
Section 3: adjustment model dmm7510 calibration and adjustment manual 3-16 dmm7510-905-01 rev. B / february 2016 ac voltage adjustment step 6: 10 v at 1.0 khz to run acv adjustment step 6: 1. On the calibrator, source 10 v at 1 khz. 2. Allow the calibrator and cable to settle properly. 3. Send the c...
Page 78
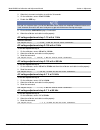
Model dmm7510 calibration and adjustment manual section 3: adjustment dmm7510-905-01 rev. B / february 2016 3-17 prepare the model dmm7510 for aci adjustment steps 11 to 16 to prepare the model dmm7510 for aci adjustment steps 11 to 16: connect the model dmm7510 to the calibrator as shown in the fol...
Page 79
Section 3: adjustment model dmm7510 calibration and adjustment manual 3-18 dmm7510-905-01 rev. B / february 2016 ac current adjustment step 14: 100 ma at 1 khz to run aci adjustment step 14: 1. On the calibrator, source 100 ma at 1 khz. 2. Enable the opr key. 3. Allow the calibrator and cable to set...
Page 80
Model dmm7510 calibration and adjustment manual section 3: adjustment dmm7510-905-01 rev. B / february 2016 3-19 2. On the calibrator, source 1.0 v at 10 hz. 3. Enable the opr key. 4. Allow the instrument and cables to settle for 30 seconds. Ac coupling adjustment step 17 send the command: cal.Adjus...
Page 81
Section 3: adjustment model dmm7510 calibration and adjustment manual 3-20 dmm7510-905-01 rev. B / february 2016 save calibration and set the adjustment dates use the following commands to save and lock calibration adjustments. Cal.Save() cal.Lock() calibration is temporary until you send the cal.Sa...
Page 82
Model dmm7510 calibration and adjustment manual section 3: adjustment dmm7510-905-01 rev. B / february 2016 3-21 once the reference signal is stable, sending the calibration adjustment command initiates lengthy internal measurement operations in the model dmm7510. These steps can take from a few sec...
Page 83
Section 3: adjustment model dmm7510 calibration and adjustment manual 3-22 dmm7510-905-01 rev. B / february 2016 this command performs adjustment step 0, and when the step is complete, places the done with step 0 string in the communications message queue. The control program should follow the comma...
Page 84
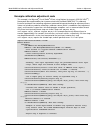
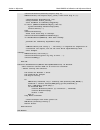
Model dmm7510 calibration and adjustment manual section 3: adjustment dmm7510-905-01 rev. B / february 2016 3-23 example calibration adjustment code this example is for microsoft ® visual studio ® vb.Net, using national instruments visa (ni-visa tm ) namespace messagebasedsession to communicate with...
Page 85
Section 3: adjustment model dmm7510 calibration and adjustment manual 3-24 dmm7510-905-01 rev. B / february 2016 console.Writeline("starting adjust step 2") dmm7510.Write("cal.Adjust.Dc(2) print(""done with step 2"")") ' check message available bit (16). ' delay between status polling. ' give feedba...
Page 86: Tsp Commands
In this section: tsp commands ........................................................................ 4-1 tsp commands introduction this section contains detailed information on the model dmm7510 remote calibration commands. Acal.Count this attribute returns the number of times autocalibration has ...
Page 87: Acal.Lastrun.Internaltemp
Section 4: tsp command reference model dmm7510 calibration and adjustment manual 4-2 dmm7510-905-01 rev. B / february 2016 acal.Lastrun.Internaltemp this attribute returns the internal temperature of the instrument when autocalibration was run. Type tsp-link accessible affected by where saved defaul...
Page 88: Acal.Lastrun.Tempdiff
Model dmm7510 calibration and adjustment manual section 4: tsp command reference dmm7510-905-01 rev. B / february 2016 4-3 acal.Lastrun.Tempdiff this attribute returns the difference between the internal temperature and the temperature when autocalibration was last run. Type tsp-link accessible affe...
Page 89: Acal.Lastrun.Time
Section 4: tsp command reference model dmm7510 calibration and adjustment manual 4-4 dmm7510-905-01 rev. B / february 2016 acal.Lastrun.Time this attribute returns the date and time when autocalibration was last run. Type tsp-link accessible affected by where saved default value attribute (r) yes no...
Page 90: Acal.Nextrun.Time
Model dmm7510 calibration and adjustment manual section 4: tsp command reference dmm7510-905-01 rev. B / february 2016 4-5 acal.Nextrun.Time this attribute returns the date and time when the next autocalibration is scheduled to be run. Type tsp-link accessible affected by where saved default value a...
Page 91: Acal.Revert()
Section 4: tsp command reference model dmm7510 calibration and adjustment manual 4-6 dmm7510-905-01 rev. B / february 2016 acal.Revert() this function returns autocalibration constants to the previous constants. Type tsp-link accessible affected by where saved default value function yes usage acal.R...
Page 92: Acal.Schedule()
Model dmm7510 calibration and adjustment manual section 4: tsp command reference dmm7510-905-01 rev. B / february 2016 4-7 example acal.Run() autocalibration starts running. When it is complete, an information message is generated in the event log. Also see acal.Schedule() (on page 4-7) autocalibrat...
Page 93
Section 4: tsp command reference model dmm7510 calibration and adjustment manual 4-8 dmm7510-905-01 rev. B / february 2016 details autocalibration does not start until all actions that are active on the instrument are complete. When the scheduled time occurs, the autocalibration run command is place...
Page 94: Cal.Adjust.Ac()
Model dmm7510 calibration and adjustment manual section 4: tsp command reference dmm7510-905-01 rev. B / february 2016 4-9 cal.Adjust.Ac() this function starts the specified ac adjustment step. Type tsp-link accessible affected by where saved default value function yes usage cal.Adjust.Ac(step) cal....
Page 95: Cal.Adjust.Count
Section 4: tsp command reference model dmm7510 calibration and adjustment manual 4-10 dmm7510-905-01 rev. B / february 2016 this command generates an error if: • calibration is locked • the step is out of sequence • the step does not complete successfully • the value that is passed is invalid for th...
Page 96: Cal.Adjust.Date
Model dmm7510 calibration and adjustment manual section 4: tsp command reference dmm7510-905-01 rev. B / february 2016 4-11 cal.Adjust.Date this attribute contains the date when the instrument was last adjusted. Type tsp-link accessible affected by where saved default value attribute (rw) yes not ap...
Page 97: Cal.Adjust.Dc()
Section 4: tsp command reference model dmm7510 calibration and adjustment manual 4-12 dmm7510-905-01 rev. B / february 2016 cal.Adjust.Dc() this function starts the specified dc adjustment step. Type tsp-link accessible affected by where saved default value function yes usage cal.Adjust.Dc(step) cal...
Page 98: Cal.Adjust.Internaltemp
Model dmm7510 calibration and adjustment manual section 4: tsp command reference dmm7510-905-01 rev. B / february 2016 4-13 cal.Adjust.Internaltemp this attribute returns the internal temperature of the instrument when calibration was last adjusted. Type tsp-link accessible affected by where saved d...
Page 99: Cal.Adjust.Rear.Dc()
Section 4: tsp command reference model dmm7510 calibration and adjustment manual 4-14 dmm7510-905-01 rev. B / february 2016 this command generates an error if: • calibration is locked • the step is out of sequence • the step does not complete successfully • the value that is passed is invalid for th...
Page 100: Cal.Adjust.Tempdiff
Model dmm7510 calibration and adjustment manual section 4: tsp command reference dmm7510-905-01 rev. B / february 2016 4-15 this command generates an error if: • calibration is locked • the step is out of sequence • the step does not complete successfully • the value that is passed is invalid for th...
Page 101: Cal.Lock()
Section 4: tsp command reference model dmm7510 calibration and adjustment manual 4-16 dmm7510-905-01 rev. B / february 2016 cal.Lock() this function prevents access to instrument calibration. Type tsp-link accessible affected by where saved default value function yes usage cal.Lock() details calibra...
Page 102: Cal.Password
Model dmm7510 calibration and adjustment manual section 4: tsp command reference dmm7510-905-01 rev. B / february 2016 4-17 cal.Password this attribute sets the password that you send when you unlock calibration. Type tsp-link accessible affected by where saved default value attribute (w) yes not ap...
Page 103: Cal.Save()
Section 4: tsp command reference model dmm7510 calibration and adjustment manual 4-18 dmm7510-905-01 rev. B / february 2016 cal.Save() this function saves the calibration constants. Type tsp-link accessible affected by where saved default value function yes usage cal.Save() details this command stor...
Page 104: Cal.Unlock()
Model dmm7510 calibration and adjustment manual section 4: tsp command reference dmm7510-905-01 rev. B / february 2016 4-19 cal.Unlock() this attribute unlocks calibration operations. Type tsp-link accessible affected by where saved default value function no usage cal.Unlock(password) password a str...
Page 105: Cal.Verify.Date
Section 4: tsp command reference model dmm7510 calibration and adjustment manual 4-20 dmm7510-905-01 rev. B / february 2016 cal.Verify.Date this attribute contains the date of the last calibration verification. Type tsp-link accessible affected by where saved default value attribute (rw) yes not app...
Page 106
Model dmm7510 calibration and adjustment manual section 4: tsp command reference dmm7510-905-01 rev. B / february 2016 4-21 example 1 cal.Verify.Date = os.Time({year=2014, month=9, day=5}) print(cal.Verify.Date) set the verify calibration date to september 5, 2014. Verify the date. Example output: s...
Page 107
Specifications are subject to change without notice. All keithley trademarks and trade names are the property of keithley instruments. All other trademarks and trade names are the property of their respective companies. Keithley instruments corporate headquarters • 28775 aurora road • cleveland, ohi...

