- DL manuals
- 3Com
- Switch
- 3CRWX120695A
- Reference manual
3Com 3CRWX120695A Reference manual
Summary of 3CRWX120695A
Page 1
Http://www.3com.Com/ part no. 10015905 published june 2007 wireless lan mobility system wireless switch manager reference manual wx4400 3crwx440095a wx2200 3crwx220095a wx1200 3crwx120695a wxr100 3crwxr10095a.
Page 2
3com corporation 350 campus drive marlborough, ma usa 01752-3064 copyright © 2007, 3com corporation. All rights reserved. No part of this documentation may be reproduced in any form or by any means or used to make any derivative work (such as translation, transformation, or adaptation) without writt...
Page 3: Ontents
C ontents a bout t his g uide conventions 17 documentation 18 documentation comments 19 1 i nstalling 3wxm hardware requirements 21 hardware requirements for 3wxm client 21 hardware requirements for 3wxm monitoring service 21 software requirements 23 preparing for installation 23 user privileges 24 ...
Page 4
Menu bar options 40 tool bar options 42 status counters 44 copying, pasting, and deleting objects 45 copy and paste in the organizer panel 46 copy and paste replace in the organizer panel 46 copy and paste in the content panel 46 enabling keyboard shortcut mnemonics (windows xp only) 47 3 g etting s...
Page 5
Converting auto daps into statically configured aps 72 creating a network domain 72 5 p lanning the 3c om m obility s ystem rf planning overview 75 accessing the rf planning tools 76 creating or modifying a site 78 creating or modifying buildings in a site 80 creating or modifying floors 82 importin...
Page 6: Wx S
Showing rf coverage 157 placing rf measurement points 158 using rf interactive measurement mode 160 reading the rf measurement table 160 generating rf network design information 162 6 c onfiguring wx s ystem p arameters wx switch configuration objects 165 adding a wx switch to the network plan 169 c...
Page 7
Creating a port group 193 changing a port group 194 viewing and changing management settings 195 viewing management service settings 195 changing management service settings 195 configuring snmp 196 viewing and setting log and trace settings 207 viewing log settings 207 changing log settings 207 vie...
Page 8
Changing a cos-to-dscp mapping 242 setting a range of dscp values to a single cos value 243 resetting cos mapping to their default values 243 7 c onfiguring w ireless p arameters viewing and configuring wireless services 245 wireless service parameters 246 viewing wireless services 251 configuring a...
Page 9
Changing radio settings 292 viewing and changing rf detection settings 293 viewing rf detection settings 293 adding an entry to the permitted vendor oui list 293 adding an entry to the permitted ssid list 294 adding an entry to the ignore list 295 adding an entry to the rogue list 295 adding an entr...
Page 10: Wx S
Viewing web aaa network access rules 327 creating a web aaa network access rule 328 viewing and configuring last-resort network access rules 330 viewing last-resort network access rules 330 creating a last-resort network access rule 330 viewing and configuring wx administrator access rules 332 viewi...
Page 11: Wx S
Enabling replacement of remote switches 357 replacing a switch 358 10 m anaging wx s ystem i mages and c onfigurations wx file management options 359 devices tab 360 task list options 361 toolbar options 364 synchronizing local and network changes 365 reviewing switch configuration changes 365 accep...
Page 12
12 m anaging c ertificates overview 383 processing certificates 384 managing certificates 385 reviewing certificate details 385 deleting certificates 385 distributing certificates to wx switches 386 13 c onfiguring and a pplying p olicies how changes are managed 387 viewing policies 387 creating a p...
Page 13
Using predefined event filters 412 filtering events by content 413 filtering events by severity 415 filtering events by facility 415 creating and saving filters 416 deleting filters 416 exporting filtered data 416 16 g enerating r eports configuration requirements 418 overview 419 generating an inve...
Page 14
Alarm summary 442 client summary 442 traffic summary 442 using the status summary view 443 status monitor or status summary details 444 using the alarm summary view 446 alarm summary details 447 additional alarm options 451 using the client summary view 453 client details 454 additional client optio...
Page 15: 3Wxm P
19 o ptimizing a n etwork p lan importing rf measurements 485 importing the measurements 485 applying the rf measurements to the floor plan 487 locating and fixing coverage holes 488 locating a coverage hole 488 fixing a coverage hole 490 computing and placing new maps 490 adding new maps that are a...
Page 16
Backing up a plan 514 changing backup settings 514 restoring a plan from a backup 514 copying a plan backup from one server to another 515 deleting a plan backup 515 c o btaining s upport for y our 3c om p roducts register your product to gain service benefits 517 solve problems online 517 purchase ...
Page 17: Bout
A bout t his g uide this manual shows you how to plan, configure, deploy, and manage a mobility system wireless lan (wlan) using the 3com wireless switch manager (3wxm). Read this manual if you are a network administrator or a person responsible for managing a wlan. If release notes are shipped with...
Page 18
18 a bout t his g uide this manual uses the following text and syntax conventions: documentation the 3wxm documentation set includes the following documents. Wireless switch manager (3wxm) release notes these notes provide information about the 3wxm software release, including new features and bug f...
Page 19
Documentation comments 19 wireless switch manager reference manual (this guide) this manual shows you how to plan, configure, deploy, and manage a mobility system wireless lan (wlan) using the 3com wireless switch manager (3wxm). Wireless switch manager user’s guide this guide shows you how to plan,...
Page 20
20 a bout t his g uide example: wireless lan switch and controller configuration guide part number 730-9502-0071, revision b page 25 please note that we can only respond to comments and questions about 3com product documentation at this e-mail address. Questions related to technical support or sales...
Page 21: Nstalling
1 i nstalling 3wxm this chapter describes how to install 3com wireless switch manager (3wxm). Hardware requirements hardware requirements for 3wxm client table 3 shows the minimum and recommended requirements to run the 3wxm client on windows and linux platforms. Hardware requirements for 3wxm monit...
Page 22
22 c hapter 1: i nstalling 3wxm table 5 contains general recommended guidelines for hardware requirements and memory allocation based on the number of radios and wx switches your server will support. A larger number of wx switches implies more connections and data processing, and consequently, more ...
Page 23
Software requirements 23 software requirements 3wxm client and 3wxm monitoring services are each supported on the following operating systems: microsoft windows server 2003 microsoft windows xp with service pack 1 (sp1) or later microsoft windows 2000 with service pack 4 suse linux 9.1 and red hat w...
Page 24
24 c hapter 1: i nstalling 3wxm user privileges before you install 3wxm, make sure that you are logged in as a user who has permission to install software, or as an administrator. After installing 3wxm, configure 3wxm access privileges for the user accounts on the machine and access privileges for t...
Page 25
Installing 3wxm 25 installing 3wxm to install the 3com wireless switch manager, follow the instructions for your operating system below. Installing 3wxm on windows systems to install 3wxm on a windows system: the 3wxm install program installs either just the 3wxm client, or both the 3wxm client and ...
Page 26
26 c hapter 1: i nstalling 3wxm 4 click the view button. The 3com wireless switch manager (3wxm) information screen appears. 5 click the install button. The installation begins. During the installation, the 3com wireless switch manager installation wizard minimizes. 6 when the installation is comple...
Page 27
Installing 3wxm 27 installing 3wxm on linux systems the same 3wxm install program installs either 3wxm client, 3wxm services, or both. To install 3wxm on a linux system: unpack the files use the installation wizard unpacking files to unpack files on linux systems: 1 log in as superuser. 2 insert the...
Page 28
28 c hapter 1: i nstalling 3wxm near the end of the installation process, the installer displays the service ports 3wxm services will use: 443—https server port 162—snmp trap receiver port you can change one or both port numbers to prevent conflicts with other applications on the same host. Multiple...
Page 29
Installing web-start client 29 installing web-start client 3wxm version 5.0 provides a java-based version of the 3wxm client, the web-start client. The web-start client simplifies installation and upgrade of the client. Because the client and server versions must match, an upgrade to 3wxm services r...
Page 30
30 c hapter 1: i nstalling 3wxm upgrading 3wxm to upgrade 3wxm, install a newer version of 3wxm over a previous version. You do not need to uninstall the previous version before installing a newer version. Before upgrading, make a backup of the config-db directory in the 3wxm installation directory....
Page 31
Uninstalling 3wxm on windows systems 31 3 click uninstall. The 3wxm uninstall options dialog appears. By default, 3wxm removes the following options: network plans access control monitoring service database (if the monitoring service was installed along with the client on this machine) license infor...
Page 32
32 c hapter 1: i nstalling 3wxm to prevent an item from being uninstalled, click on the checkbox next to the item to remove the checkmark. 4 click continue. The uninstall program reports its progress. When the uninstall process is complete, the uninstall program reports that the items were successfu...
Page 33: Orking
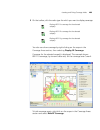
2 w orking with the 3wxm u ser i nterface this chapter describes how to use the 3com wireless switch manager (3wxm) interface. Overview when you start 3wxm client and log into 3wxm services, the network plan is displayed by the 3wxm client. Toolbar organizer panel content panel alerts panel lock ico...
Page 34
34 c hapter 2: w orking with the 3wxm u ser i nterface the network plan is the workspace in 3wxm you use to design and manage a 3com network. The network plan defines the following: network equipment (wx switches, maps, and third-party access points) network site, including floor plans, rf character...
Page 35
Display panels 35 organizer panel the organizer panel provides a tree-like view of the 3com equipment and site data managed by 3wxm. The organizer panel can contain the following object trees, depending on the option selected on the tool bar: policies (displayed by the policies tool bar option) — th...
Page 36
36 c hapter 2: w orking with the 3wxm u ser i nterface the tree that is displayed depends on the active tool bar option. (see “tool bar options” on page 42.) to expand the view of an object in the tree, click on the plus sign next to the object. For example, to display the buildings in a site, click...
Page 37
Display panels 37 when you click a link to open a configuration wizard, if there are unsaved changes, 3wxm prompts you to apply or cancel the changes. Click apply to save the buffered changes and open the wizard. The save, apply, finish, and ok buttons do not send configuration changes to the wx swi...
Page 38
38 c hapter 2: w orking with the 3wxm u ser i nterface task list panel the task list panel displays lists of tasks related to the object selected in the organizer panel. Click a task to open the configuration wizard required to perform that task. The task list panel is located to the right of the co...
Page 39
Display panels 39 some wizards contain multiple pages. Click the next and previous buttons at the bottom of a wizard to navigate through the pages. The finish button saves the changes. If applicable, saving the changes also results in the newly configured object appearing in a table in the content p...
Page 40
40 c hapter 2: w orking with the 3wxm u ser i nterface panel sizes and window arrangements are associated with 3wxm usernames. When you close 3wxm, 3wxm remembers the panel sizes and window arrangements you assigned and restores them the next time you run 3wxm. Menu bar options table 7 lists the opt...
Page 41
Menu bar options 41 tools preferences change 3wxm user preferences. Certificates manage certificates events display the events log. The log includes events generated by 3wxm services and events generated by the managed wx switches in the network plan. To filter the message list, use the filters tab....
Page 42
42 c hapter 2: w orking with the 3wxm u ser i nterface tool bar options table 8 lists the options available from the tool bar of the main 3wxm window. Click on an option to open the data or tabs for that option. Some tool bar options fill the content panel. Others fill the entire window area under t...
Page 43
Tool bar options 43 verification display the config verification and network verification tabs. The verification tabs enable you to troubleshoot configuration issues on wx switches in the network plan or in the live network. To display more information about an error or warning message, click on the...
Page 44
44 c hapter 2: w orking with the 3wxm u ser i nterface status counters table 9 lists the counters displayed at the bottom of the main 3wxm window. To obtain more information, place the cursor over a counter and click. Table 9 status counters alert category description config lists the number of outs...
Page 45
Copying, pasting, and deleting objects 45 copying, pasting, and deleting objects copy, paste, and delete objects in the organizer panel or in the content panel. In the organizer panel, right-click on an object to display a menu with the following options: copy—copy the selected object and its child ...
Page 46
46 c hapter 2: w orking with the 3wxm u ser i nterface copy and paste in the organizer panel to create a new object in the organizer panel: 1 select the object you want to copy in the organizer panel. 2 right-click on the object and select copy. 3 select the parent object where you want the copy to ...
Page 47
Enabling keyboard shortcut mnemonics (windows xp only) 47 3 click the paste icon ( ). A configuration wizard appears. 4 edit settings to make the new object unique from the object you copied, then click ok or finish to save the changes and close the configuration wizard. Enabling keyboard shortcut m...
Page 48
48 c hapter 2: w orking with the 3wxm u ser i nterface 4 clear the box labeled hide underlined letters for keyboard navigation until i press the alt key. Clearing this option allows programs to show the underlined character for mnemonics in 3wxm. 5 click ok. 6 in the display properties dialog box, c...
Page 49: Etting
3 g etting s tarted this chapter contains information about starting 3com wireless switch manager (3wxm), restricting access to 3wxm, creating and managing network plans, and defining a mobility domain. Starting 3wxm the following steps describe how to start 3wxm. You must install a license key and ...
Page 50
50 c hapter 3: g etting s tarted 2 in the 3wxm services connection dialog box, enter the ip address of the machine on which 3wxm services is installed. 3 if you or the 3wxm administrator configured 3wxm access control, enter your username and password. 4 click next. If the 3wxm service is installed ...
Page 51
Starting 3wxm 51 switch to an existing network plan. Open one of the sample plans included with 3wxm or a plan that you or another 3wxm user has saved on the 3wxm services host. To open an existing network plan, use the switch plan page under services > plan management and select the network plan fr...
Page 52
52 c hapter 3: g etting s tarted 6 if you are installing a licensed copy, select standard base product and click next. Go to step 7. If you are installing an evaluation copy: a select time limited evaluation and click next. B click finish and go to step 15. 7 type the license key that was supplied w...
Page 53
Starting 3wxm 53 12 click the get activation key to access the product activation key for your upgrade license. Register your upgrade license in order to obtain its activation key. 13 copy the activation key for the upgrade license from the web page and paste it into the activation key box of the ac...
Page 54
54 c hapter 3: g etting s tarted restricting access to 3wxm by default, all users who have been successfully authenticated to a system with 3wxm installed on it can run 3wxm. You can restrict the users allowed to access 3wxm on a system and define their access privileges by creating three types of 3...
Page 55
Restricting access to 3wxm 55 creating an administrator account before you can restrict user access to 3wxm, you must create an administrator account. After creating an administrator account, you can create provision or monitor accounts. To create an administrator account: 1 select tools > 3wxm serv...
Page 56
56 c hapter 3: g etting s tarted creating provision or monitor accounts after creating an administrator account, you can create provision or monitor accounts. To create a provision or monitor account: 1 select services > setup to access the 3wxm services setup page. 2 click access control in the lef...
Page 57: Orking
4 w orking with n etwork p lans a network plan is the workspace in 3wxm you use to design a 3com network. In a network plan, you define components of the network (wx switches, map access points, and optional third-party access points). Regardless of whether you intend to use physical planning featur...
Page 58
58 c hapter 4: w orking with n etwork p lans creating a network plan to create a network plan: 1 select services > plan management to access the 3wxm plan management page. 2 click new plan in the left column to display the new plan page. 3 in the network plan name box, type a name for the network pl...
Page 59
Managing network plans 59 upload wireless switch—add a wx switch that is already deployed in the live network to the network plan. (see “uploading a wx switch into the network plan” on page 71.) convert auto aps—convert maps that were configured by an auto-ap profile into statically configured maps....
Page 60
60 c hapter 4: w orking with n etwork p lans saving a network plan with a new name you can save a network plan with a new name by using the save as feature. To save a network plan with a new name: 1 select services > plan management to access the 3wxm plan management page. 2 click save as in the lef...
Page 61
Managing network plans 61 4 click switch plan in the left column to display a list of available network plans. 5 select the network plan you want to open and click switch. If any changes were made to the currently loaded network plan, you are prompted to save them and close the file. The switch netw...
Page 62
62 c hapter 4: w orking with n etwork p lans if you do not want to replace the objects in the open plan with their like-named objects in the other plan, click cancel. 3wxm does not import any objects from the plan. If you do want to replace the objects, click import. 3wxm imports the objects into th...
Page 63
Managing network plans 63 sharing a network plan since the 3wxm plan repository resides on a networked server (the host running 3wxm services), you can easily share access to network plans among hosts running the 3wxm client. When you make changes to a network plan, 3wxm locks the part of the plan y...
Page 64
64 c hapter 4: w orking with n etwork p lans defining a mobility domain a mobility domain is a collection of wx switches that work together to support roaming users. One of the wx switches is defined as a seed device, which distributes information to the other wx switches defined in the mobility dom...
Page 65
Defining a mobility domain 65 the client uses the same authorization parameters for the new session as for the old session. For example, changing the encryption-type or vlan-name parameter might cause a new session to be recorded, rather than a roam within the same session. A disassociated session h...
Page 66
66 c hapter 4: w orking with n etwork p lans traffic ports used by mss when deploying a 3com wireless network, you might attach 3com equipment to subnets that have firewalls or access controls between them. 3com equipment uses various protocol ports to exchange information. To ensure full operation ...
Page 67
Defining a mobility domain 67 creating a mobility domain the create mobility domain wizard requires you to select the switches to place in the mobility domain and to select the seed switch. Add the switches to the network plan before you configure the mobility domain. 1 select the configuration tool...
Page 68
68 c hapter 4: w orking with n etwork p lans creating a wx switch to create a wx switch: 1 select the configuration tool bar option. 2 in the organizer panel, select the network plan name. 3 in the task list panel, select wireless switch. 4 go to “using the create wireless switch wizard” on page 173...
Page 69
Creating a third-party ap 69 12 in the radio type drop-down list, select one of the following: 11a, 11b, 11g. The choices available depend on the selection you made in step 11. 13 click next. 14 verify the radio slot number and radio type. For a dual-radio access point, 802.11b/g radios have a slot ...
Page 70
70 c hapter 4: w orking with n etwork p lans changing the country code the country code determines the valid radio types as well as channel numbers and power settings for map radios. The country code is one of the parameters you set when you create a network plan. If you need to change the country c...
Page 71
Uploading a wx switch into the network plan 71 5 select the scope: mobility domain wx switch radio profile individual map radio to select a radio profile, display it first by clicking on the plus sign next to the wx switch. To select an individual radio, display it first by displaying its radio prof...
Page 72
72 c hapter 4: w orking with n etwork p lans 10 if 3wxm displayed error or warning messages, select the verification tool bar option and go to “verifying configuration changes” on page 377. Converting auto daps into statically configured aps distributed maps that are not configured on any wx switche...
Page 73
Creating a network domain 73 to simplify configuration, 3wxm assumes that the extent of the network domain is the same as extent of the entire network plan. 3wxm also automatically sets the seed affinities on each switch as described in table 11. 3com recommends that you allow 3wxm to automatically ...
Page 74
74 c hapter 4: w orking with n etwork p lans.
Page 75: Lanning
5 p lanning the 3c om m obility s ystem the 3com wireless switch manager (3wxm) planning tools help you plan your mobility system. This chapter discusses the building wizard and describes how to create a site, create or modify buildings, import or draw floor details, specify the rf characteristics o...
Page 76
76 c hapter 5: p lanning the 3c om m obility s ystem accessing the rf planning tools to access the rf planning tools, select the rf planning tool bar option and do one of the following: if you are creating a new building, click on the site name in the organizer panel and select create building in th...
Page 77
Rf planning overview 77 change the grid size. Zoom in. Zoom out. Fit view in window. Print the view displayed in the floor display area. Toggle ap label. Copy selected objects. Paste selected objects. Undo last change. Redo last change. Group selected objects. Ungroup selected objects. Select all vi...
Page 78
78 c hapter 5: p lanning the 3c om m obility s ystem creating or modifying a site a site is a folder that contains the buildings in the network plan. A site usually represents a campus of geographically colocated buildings. If your network plan encompasses multiple campuses, create a site for each c...
Page 79
Creating or modifying a site 79 1 in the site name box, type a name for the site (1 to 80 alphanumeric characters, with no spaces or tabs). 2 to change the country code, select setup country code in the task list panel, then in the change country code dialog, select the country where the network is ...
Page 80
80 c hapter 5: p lanning the 3c om m obility s ystem creating or modifying buildings in a site to create or modify a building in a site: 1 select the rf planning tool bar option. 2 in the organizer panel, click the site name. 3 do one of the following: if you are creating a new building, click on th...
Page 81
Creating or modifying buildings in a site 81 1 in the building name box, type the name of the building (1 to 30 alphanumeric characters, with no spaces or tabs). 2 in the task list panel, under other, click edit building. The edit building dialog box is displayed. 3 in the number of floors box, spec...
Page 82
82 c hapter 5: p lanning the 3c om m obility s ystem 3wxm adjusts the default attenuations based on your selection. 10 to change the default attenuation for radios, type the number of db in the 802.11a (db) box or 802.11b/g (db) box. From the content panel of the building, you can edit the propertie...
Page 83
Importing or drawing floor details 83 4 to change the floor name, type the new name in the floor name box (1 to 60 alphanumeric characters, with no tabs). Each floor name in a building must be unique. 5 to change the default attenuation for radios, type the number of db in the 802.11a (db) box or 80...
Page 84
84 c hapter 5: p lanning the 3c om m obility s ystem 3wxm cannot import files in visio format. However, you can export a visio file to a dxf or jpg file, then import that file into 3wxm. You can also draw a floor plan in 3wxm if you do not have a drawing of your floor in one of the supported file fo...
Page 85
Importing or drawing floor details 85 delete all workspaces or paper layouts that are not required. If the drawing contains multiple paper layouts, delete all but the last one (which cannot be deleted) and delete the contents of that layout. Check for externally referenced files. 3wxm requires the d...
Page 86
86 c hapter 5: p lanning the 3c om m obility s ystem if you decide to delete a grouped object, ensure that the object does not contain objects to which you will need to assign rf values. Turn visible, unlock, and unfreeze all layers. Then delete unnecessary layers. (locking a layer keeps the layer v...
Page 87
Importing or drawing floor details 87 create rf-specific layers and move walls, windows, doors, and other objects that affect rf propagation from other layers into the new layers. For example, create a new layer called rf-extwalls for external walls, and move all external wall objects into that laye...
Page 88
88 c hapter 5: p lanning the 3c om m obility s ystem the operating tips in the previous table refer to specific command names in autocad. The commands are mentioned in 3wxm documentation as a guide for finding the appropriate commands or options in your cad application. However, the best source of i...
Page 89
Importing or drawing floor details 89 figure 1 floor plan after importing at this point, you can edit the floor contents. Go to “cropping the paper space”, next, to begin. Cropping the paper space you can crop the paper space of a drawing to remove unneeded space and objects around the floor. For ex...
Page 90
90 c hapter 5: p lanning the 3c om m obility s ystem 5 read the warning. To complete the crop, click yes. To cancel the crop request, click no. If you click yes, all objects and paper space outside the area you selected are removed and the image is resized to fill the removed space. Figure 1 on page...
Page 91
Importing or drawing floor details 91 adjusting the scale of a drawing if you imported a dwg or dxf drawing, you might need to adjust the scale of the drawing because the units used in these drawings might not have a one-to-one correspondence to meters and feet. To adjust the scale of the drawing, y...
Page 92
92 c hapter 5: p lanning the 3c om m obility s ystem origin point.
Page 93
Importing or drawing floor details 93 in this example, the origin point has been moved to an interior shaft. Working with layers most drawings contain multiple layers of information. 3wxm allows you to hide, add and delete individual layers. You also can add and remove objects and move objects from ...
Page 94
94 c hapter 5: p lanning the 3c om m obility s ystem for best performance and simpler planning, 3com recommends that you hide or remove unnecessary layers and remove unnecessary objects. The clean layout option automatically deletes all objects that meet the cleanup criteria, which you can modify. (...
Page 95
Importing or drawing floor details 95 adding or removing a layer to add a new layer to a drawing, do the following: 1 right-click the list of layers in the organizer panel. 2 select add layer from the menu that is displayed. 3wxm adds the new layer to the list and highlights its name so you can edit...
Page 96
96 c hapter 5: p lanning the 3c om m obility s ystem to clean up a drawing 1 display the floor plan in the content panel. 2 in the task list panel, under rf planning, click clean layout. The floor plan clean up wizard appears. 3 in the remove lines and remove objects group boxes, click next to any i...
Page 97
Importing or drawing floor details 97 6 to change the maximum size of objects to be removed, type the new horizontal and vertical dimensions in the x-axis and y-axis boxes. 3wxm removes all objects that fit within both the specified axes. 7 in the layer list group box, select the layers you want to ...
Page 98
98 c hapter 5: p lanning the 3c om m obility s ystem 10 perform one of the following: click finish to accept the changes. Click previous to change the cleanup constraints. Go back to step 2 on page 81. Click cancel to cancel the changes..
Page 99
Importing or drawing floor details 99 drawing floor objects manually you can use the free draw palette to add objects to your floor drawing that are not related to rf obstacles (for example, a conference room table). The tools for drawing non-rf objects work the same as the tools for drawing rf obje...
Page 100
100 c hapter 5: p lanning the 3c om m obility s ystem specifying the rf characteristics of a floor 3wxm uses rf attenuation information in the floor plan when calculating how many maps you need and where to place them to provide the wireless coverage required for the floor. The rf attenuation inform...
Page 101
Specifying the rf characteristics of a floor 101 converting objects into rf obstacles you have several options when creating rf obstacles: convert all objects in a layer of a cad drawing into rf obstacles. Convert all objects in an area of the drawing into rf obstacles. Convert multiple objects in t...
Page 102
102 c hapter 5: p lanning the 3c om m obility s ystem to create rf obstacles by grouping objects you can group several objects in a drawing to specify them as one rf obstacle. For example, if a wall consists of several lines, the lines can be grouped. If you subsequently ungroup the objects, the rf ...
Page 103
Specifying the rf characteristics of a floor 103 3 in the attenuation factor boxes, specify the attenuation factor for 802.11a and 802.11b/g technology (0 to 100 db). The default is the typical attenuation factor for the material chosen. 4 click finish to save the changes and close the dialog box. I...
Page 104
104 c hapter 5: p lanning the 3c om m obility s ystem using an object other than a line to represent the dimensions of an rf obstacle does not materially affect the calculation of rf attenuation. When 3wxm calculates attenuation along any vector passing through the obstacle, it counts rf attenuation...
Page 105
Specifying the rf characteristics of a floor 105 to use this method, perform the following tasks: 1 in 3wxm, identify the major rf obstacles and assign an attenuation value to them. You can select any attenuation value. 3wxm will use the rf measurement data from the site survey to correct the attenu...
Page 106
106 c hapter 5: p lanning the 3c om m obility s ystem site survey recommendations this manual does not describe how to use the site survey application. For this information, consult the ekahau site survey documentation. When conducting the survey, use the following best practices for optimal results...
Page 107
Specifying the rf characteristics of a floor 107 5 click yes next to file. 6 in the file format listbox, select ekahau. 7 click choose to navigate to the csv file that contains the los points. 8 click next. The mac addresses of the los points appear..
Page 108
108 c hapter 5: p lanning the 3c om m obility s ystem 9 click next to the mac address of each los point you want to import. The mac addresses are associated with specific radio types. Select the mac addresses for the radio types you want to use in the network. 10 click finish. 11 place the los point...
Page 109
Specifying the rf characteristics of a floor 109 when you place an los point onto the floor plan, the icon disappears from the organizer panel. To create los points in 3wxm 1 display the floor plan in the content panel. 2 in the task list panel, click tools. 3 under site survey, click the icon. 4 on...
Page 110
110 c hapter 5: p lanning the 3c om m obility s ystem 5 in the name box, type a name for the los point and click next. 6 in the ap model listbox, select the type or model of ap you plan to use for the portable ap. If the model is not listed, select ap (dual radio) for a dual-radio ap or ap (single r...
Page 111
Specifying the rf characteristics of a floor 111 9 in the channel number listbox, specify the channel number on which the ap radio will be operating. 10 in the transmit power listbox, specify the radio transmit power of the ap. 11 in the mac address box, type the mac address you want to use for this...
Page 112
112 c hapter 5: p lanning the 3c om m obility s ystem to move an los point to move an los icon, click-and-drag to select the icon and move it to its new location. To temporarily remove an los point onto the objects to place tab to temporarily remove an los point from the floor without deleting it, c...
Page 113
Specifying the rf characteristics of a floor 113 4 select the scope for which you want generate a site survey order. You can specify the network plan, an individual site, an individual building, or an individual floor. 5 select the language for the site survey order: english german 6 to specify the ...
Page 114
114 c hapter 5: p lanning the 3c om m obility s ystem 9 select a floor to display los point information for that floor. Scroll down to view the mac address assignments for the los points. Use the instructions in the ekahau site survey initial setup section of the work order to set up the survey. Whe...
Page 115
Specifying the rf characteristics of a floor 115 4 click yes next to file. 5 in the format listbox, select ekahau. 6 click choose to navigate to the csv file that contains the rf measurement data. 7 in the map name field, specify the map name. The map name must match the name specified in the site s...
Page 116
116 c hapter 5: p lanning the 3c om m obility s ystem applying the rf measurements to the floor plan 1 under site survey in the task list panel, click optimize. A wizard appears, listing the progress of the request. The total number of rf measurements that did not intersect any object line lists the...
Page 117
Defining wireless coverage areas 117 defining wireless coverage areas you must define which areas of your enterprise require wireless network coverage. In 3wxm, you plan for both coverage and capacity requirements in a particular area on the floor. Capacity requirements are determined by the number ...
Page 118
118 c hapter 5: p lanning the 3c om m obility s ystem each floor plan must have at least one wiring closet, if the floor will use maps that are directly connected to their wx switches. However, a floor is not required to have a wiring closet if maps will be indirectly attached through the network. I...
Page 119
Defining wireless coverage areas 119 7 to add a wx switch you previously created to the wiring closet, click the wx switch in the available devices box, then click the add button to move it to the current devices box. To remove a wx switch from the wiring closet, click the wx switch in the current d...
Page 120
120 c hapter 5: p lanning the 3c om m obility s ystem figure 5 shows an example of shared coverage areas. Figure 5 supported shared coverage areas example the coverage areas shown in figure 6 cannot share coverage and are not supported by 3wxm. (however, separate, nonshared coverage areas can overla...
Page 121
Defining wireless coverage areas 121 drawing a coverage area 3wxm supports concave polygons, which have an internal angle greater than 180 degrees. When drawing a polygon, make sure that two sides of the polygon do not intersect each other, as shown in figure 7. Also make sure start and end points a...
Page 122
122 c hapter 5: p lanning the 3c om m obility s ystem the create coverage area wizard appears. Object action (parallelogram) 1 click at a vertex, and drag the cursor to the next vertex. 2 click again, and drag the cursor until the parallelogram takes the shape you want. 3 click to finish. (polygon) ...
Page 123
Defining wireless coverage areas 123 go to “specifying the wireless technology for a coverage area”. Specifying the wireless technology for a coverage area (to draw a coverage area, see “drawing a coverage area” on page 121.) to specify wireless technology for a coverage area: 1 in the technology li...
Page 124
124 c hapter 5: p lanning the 3c om m obility s ystem specifying coverage area properties to specify coverage area properties: 1 in the name box for each technology, type a name for the coverage area (1 to 60 characters long, with no tabs). 2 in the rate [mb/s] list for each technology, select the a...
Page 125
Defining wireless coverage areas 125 specifying floor properties for the coverage area you can optionally specify floor properties for the coverage area (if they are different from the defaults for the floor): 1 to change the ceiling height, specify the new height in the height of the ceiling box. 2...
Page 126
126 c hapter 5: p lanning the 3c om m obility s ystem specifying default device settings for the coverage area you can optionally specify the wx switch or map models that 3wxm uses when calculating the devices to include in the coverage area. 1 to change the wx switch model, select the model from th...
Page 127
Defining wireless coverage areas 127 if the maps are directly connected to the wx, ensure that utp cat 5 cabling distances between the map and the wx in the wiring closet do not exceed 100 meters (330 feet). An indirectly attached map requires power over ethernet (poe) from a source other than a wx ...
Page 128
128 c hapter 5: p lanning the 3c om m obility s ystem 2 to change the map connection type for the redundant connection, select direct or distributed from the map connection type list. Wx4400 switches support indirect map connections only. 3 to change the number of redundant connections for the distr...
Page 129
Defining wireless coverage areas 129 configuring capacity calculation for data 3wxm can perform multiple calculations for map placement. One is based on coverage only. Another is based on capacity for data traffic, using the data capacity parameters. 3wxm compares the results of the calculations and...
Page 130
130 c hapter 5: p lanning the 3c om m obility s ystem configuring capacity calculation for voice 3wxm can perform multiple calculations for map placement. One is based on coverage only. Another is based on capacity for voice over ip service, using the capacity for voice parameters. 3wxm compares the...
Page 131
Defining wireless coverage areas 131 3 in the active handsets per ap list, specify the number of voice over ip phones that you want each map to handle. 4 in the expected handset count list, specify the number of voice over ip phones you expect to be in the coverage area. 5 in the handset oversubscri...
Page 132
132 c hapter 5: p lanning the 3c om m obility s ystem specifying mobility domain, radio profile, and wiring closet associations to specify association information for the coverage area: 1 in the mobility domain list, select the mobility domain that contains the maps used for this coverage area. 2 in...
Page 133
Defining wireless coverage areas 133 4 select the coverage area you want to edit and click properties. The coverage area properties dialog for the selected coverage area appears. (you can also display this dialog by displaying the floor plan, selecting coverage areas in the organizer panel, then rig...
Page 134
134 c hapter 5: p lanning the 3c om m obility s ystem 5 under the general tab, you can do the following: in the name box, edit the name of the coverage area (1 to 60 characters long, with no tabs). In the technology list, select one of the following: 802.11a 802.11b 802.11g 802.11a and 802.11b 802.1...
Page 135
Defining wireless coverage areas 135 in the active handsets per ap list, specify the number of voice over ip phones that you want each map to handle. In the expected handset count list, specify the number of voice over ip phones you expect to be in the coverage area. In the handset oversubscription ...
Page 136
136 c hapter 5: p lanning the 3c om m obility s ystem 8 under the constraints tab, you can do the following: to change the ceiling height, specify the new height in the height of the ceiling box. To change the height where maps are mounted, specify the new mounting height in the ap placement height ...
Page 137
Placing third-party access points 137 to use the same wx switch for redundant connections, select use the same wx for redundancy. This option places both of a map’s wired connections on the same wx switch. For optimal resiliency, 3com recommends the use of different wx switches for redundancy. To ch...
Page 138
138 c hapter 5: p lanning the 3c om m obility s ystem moving a third-party ap icon to its floor location if you added a third-party access point while using the configuration tool bar option, the access point is on the objects to place tab. 1 in rf planning, navigate to the floor plan. 2 in the orga...
Page 139
Placing third-party access points 139 5 in the name box, type a name for the access point. You can use 1 to 32 characters, with no punctuation except the following: period (.), hyphen (-), or underscore (_). 6 optionally, in the manufacturer id box, type the manufacturer identification for the acces...
Page 140
140 c hapter 5: p lanning the 3c om m obility s ystem 12 in the ap model drop-down list, select one of the following: ap (dual radio)—802.11a and 802.11b or 802.11b/g ap (single radio)—802.11a, 802.11b, or 802.11g 13 in the radio type drop-down list, select one of the following: 11a, 11b, 11g. The c...
Page 141
Placing third-party access points 141 15 verify the radio slot number and radio type. For a dual-radio access point, 802.11b/g radios have a slot number of 1. 802.11a radios have a slot number of 2. 16 in the channel number list, select the channel number for the radio. 17 in the transmit power box,...
Page 142
142 c hapter 5: p lanning the 3c om m obility s ystem placing installed and auto-configured maps you can place maps that are already installed on the floor into the network plan. To do this, you upload the wx configuration into 3wxm, associate the map with a coverage area, then place them on the flo...
Page 143
Computing map placement 143 computing map placement after providing information about floor plans, rf obstacles, and wireless coverage requirements, 3wxm can design the 3com wireless network for this floor using the following process: compute and place maps (see “computing and placing map access poi...
Page 144
144 c hapter 5: p lanning the 3c om m obility s ystem if you are modifying an existing coverage area with deployed maps or if you need to preserve manual changes made to the current configuration, you can lock the maps. Locked maps cannot be moved or deleted during the compute and place process. You...
Page 145
Computing map placement 145 5 to change the height where maps are mounted, specify the new mounting height in the ap placement height box. 6 to change the wx switch model, select the model from the wx model list. 7 to change the map connection type, select the type from the ap connection type list: ...
Page 146
146 c hapter 5: p lanning the 3c om m obility s ystem 13 to update all of the constraints for the selected coverage areas, select update all constraints. By default, 3wxm applies only changed constraint values to the selected areas. This default behavior preserves any constraint changes you make to ...
Page 147
Computing map placement 147 to compute and place maps 1 display the floor plan in the content panel. 2 in the task list panel, click rf planning. 3 under rf planning, click compute and place. The compute and place wizard appears. 4 to remove a coverage area from map placement and computation, clear ...
Page 148
148 c hapter 5: p lanning the 3c om m obility s ystem 10 go to “to review coverage area computation”. To review coverage area computation 1 review the number of maps required for each coverage area, and the overriding criterion used (coverage or capacity). 2 click finish to apply the changes. Icons ...
Page 149
Computing map placement 149 to see the rf coverage area for an area, right-click on the area (either in the organizer panel or on the floor) and select display rf coverage. If the area supports more than one radio technology, you also need to select the technology. The choices available depend on th...
Page 150
150 c hapter 5: p lanning the 3c om m obility s ystem you must now compute the optimal power. See “computing optimal power” on page 154. Locking and unlocking coverage areas after creating a coverage area, 3wxm automatically locks the area. Unlock the coverage area if you need to move or resize it. ...
Page 151
Computing map placement 151 locking and unlocking maps after computing and placing the necessary maps for a coverage area, you can move them to fine-tune the wireless coverage. If you need to fix a map location on the floor, lock its current location when you recompute the necessary coverage. A dual...
Page 152
152 c hapter 5: p lanning the 3c om m obility s ystem under rf planning, click assign channels. The channel assignment wizard appears, showing the current channel assignment constraints. 3 to change the starting floor for channel assignment, select the floor from the begin on floor list. By default,...
Page 153
Computing map placement 153 9 click finish to accept the channel assignments. The new channel assignments are reflected in the coverage areas panel. 10 do one of the following: to verify the rf network, see “verifying the wireless network” on page 157. Click finish to save the changes and close the ...
Page 154
154 c hapter 5: p lanning the 3c om m obility s ystem the maps on a floor plan in rf planning are color coded to indicate their monitored status: green—up yellow—up (but with minor service degradation) orange—up (but with major service degradation) red—down blue—unknown a map with a blue background ...
Page 155
Computing map placement 155 3 to optimize the ap count, select optimize ap count. This option checks for coverage overlaps and removes a map if neighboring maps provide enough coverage to make the map unnecessary. This option applies only to coverage areas that are configured for coverage, not capac...
Page 156
156 c hapter 5: p lanning the 3c om m obility s ystem to resolve optimal power computation problems if power levels for one or more coverage areas could not be optimized, show the rf coverage at baseline association and minimum transmit rates for the coverage areas by doing the following: 1 in the s...
Page 157
Verifying the wireless network 157 verifying the wireless network you can use the following tools to help verify the wireless network: show rf coverage. Place rf measurement points. Use rf interactive measurement mode. Showing rf coverage looking at the rf coverage allows you to see if the entire ar...
Page 158
158 c hapter 5: p lanning the 3c om m obility s ystem 3 in the display rf coverage using listbox, select how you want to display the coverage: baseline association rate—coverage is shown based on the map radio baseline association rate. The baseline association rate is the typical data rate the radi...
Page 159
Verifying the wireless network 159 4 on the floor plan, click where you want the measurement point to be placed. The create rf measurement point dialog box appears. 5 in the description box, type a description for the measurement point (1 to 60 characters). 6 in the rssi options box, select display ...
Page 160
160 c hapter 5: p lanning the 3c om m obility s ystem 7 click ok to save the changes and close the box. 8 do one of the following: to use the rf interactive measurement mode, see “using rf interactive measurement mode”. To generate network design information, see “generating rf network design inform...
Page 161
Verifying the wireless network 161 table 15 shows the information available in the rf measurement table. Table 15 rf measurement information item value x distance in the x direction from the 0,0 coordinate (the upper left corner of the panel). Y distance in the y direction from the 0,0 coordinate (t...
Page 162
162 c hapter 5: p lanning the 3c om m obility s ystem generating rf network design information after 3wxm has calculated the number of maps required to provide wireless coverage, you can generate a work order report. The work order report provides all of the necessary information for the physical in...
Page 163
Generating rf network design information 163 4 specify whether to include the following information in the work order: rf coverage rssi projections display disabled maps (only available if rssi projections is selected) display rf coverage on entire floor (only available if rssi projections is select...
Page 164
164 c hapter 5: p lanning the 3c om m obility s ystem.
Page 165: Onfiguring
6 c onfiguring wx s ystem p arameters this chapter and chapters 7 and 8 describe how to view and configure wx switches using 3wxm. If you want to use 3wxm planning to configure switches for you as part of coverage planning, see “planning the 3com mobility system” on page 75. If you are planning to u...
Page 166
166 c hapter 6: c onfiguring wx s ystem p arameters table 16 wx switch object types category object type description system ports settings for individual ports. (see “viewing and changing port settings” on page 185.) port groups settings for port groups. (see “viewing and changing port groups” on pa...
Page 167
Wx switch configuration objects 167 system, cont. Vlans groups of physical ports configured as a distinct layer 2 broadcast domain. Each vlan has its own spanning tree protocol (stp) and internet group management protocol (igmp) settings. Optionally, a vlan can be associated with an ip interface. (s...
Page 168
168 c hapter 6: c onfiguring wx s ystem p arameters wireless, cont. Rf detection configuration parameters for rogue detection and countermeasures (see “viewing and changing rf detection settings” on page 293.) aaa local user database users configured on the wx switch instead of on the radius server ...
Page 169
Adding a wx switch to the network plan 169 adding a wx switch to the network plan you can use any of the following methods to add a wx switch to a network plan: allow 3wxm to create the switch as part of rf planning. Use the create wireless switch wizard. Copy and paste a switch that is already in t...
Page 170
170 c hapter 6: c onfiguring wx s ystem p arameters creating a new wx switch based on a configured switch in the network plan you can copy and modify a switch that is already in the network plan, by copying and pasting the switch in the organizer panel. 1 select the configuration tool bar option. 2 ...
Page 171
Adding a wx switch to the network plan 171 9 to modify the management interface, select the ip interface and vlan from the vlan/ip drop-down list. 10 to modify the enable password, edit the string in the enable password box. Use this option when you are creating a new switch in 3wxm. This option mod...
Page 172
172 c hapter 6: c onfiguring wx s ystem p arameters configuring basic and advanced settings clicking on an option in the task list panel opens a configuration wizard. Configuration wizards enable the configuration of basic settings for an object. After configuring the settings and close the wizard, ...
Page 173
Using the create wireless switch wizard 173 using the create wireless switch wizard 1 access the create wireless switch wizard: a select the configuration tool bar option. B in the organizer panel, select the network plan name. C in the task list panel, select the wireless switch task. 2 in the wx n...
Page 174
174 c hapter 6: c onfiguring wx s ystem p arameters use this option if you used the add button instead of the move button to place the ports in the vlan. For a port to be a member of more than one vlan, the port must be tagged. By default, ports are untagged. When you enable tagging, the default tag...
Page 175
Setting up a switch 175 setting up a switch after creating a switch, use the system setup wizard to configure the following essential operation and management parameters: snmp settings for monitoring of the switch by 3wxm vlans radius servers and server groups wireless services auto-dap profile sett...
Page 176
176 c hapter 6: c onfiguring wx s ystem p arameters a select the minimum level of security to allow for any snmp communication with the switch from the security level drop-down list: unsecured—snmp message exchanges are not secure. This is the default, and is the only value supported for snmpv1 and ...
Page 177
Setting up a switch 177 authenticated—snmp message exchanges are authenticated but are not encrypted. (this security level is the same as the authnopriv level described in snmpv3 rfcs.) encrypted—snmp message exchanges are authenticated and encrypted. (this security level is the same as the authpriv...
Page 178
178 c hapter 6: c onfiguring wx s ystem p arameters 10 configure wireless services. Wireless services that are already configured are listed. You can modify existing services and create new ones. To create a wireless service: a click create and select the type of service you want to create: 802.1x s...
Page 179
Modifying basic switch parameters 179 modifying basic switch parameters basic switch parameters are displayed in the content panel when you select a switch in the organizer panel. 1 select the configuration tool bar option. 2 in the organizer panel, select the wx switch. Basic parameters for the swi...
Page 180
180 c hapter 6: c onfiguring wx s ystem p arameters use this option when you are creating a new switch in 3wxm. This option modifies the password in the network plan. However, if the switch is already deployed in the network, 3wxm cannot apply configuration changes to the switch unless the enable pa...
Page 181
Modifying basic switch parameters 181 changing timezone properties you can specify the number of hours (and optionally the minutes) that the real-time clock for the wx switch is offset from coordinated universal time (utc)—also known as greenwich mean time (gmt). The network time protocol (ntp) uses...
Page 182
182 c hapter 6: c onfiguring wx s ystem p arameters 15 in the end day list, select the day of the week when the time change ends. 16 in the end hour box, specify the hour (between 0 and 23) when the time change ends. 17 in the end minute box, specify the minute (between 0 and 59) when the time chang...
Page 183
Modifying basic switch parameters 183 converting auto daps into statically configured daps distributed maps that are not configured on any wx switches in the mobility domain can nonetheless be booted and managed by a switch if the switch has a profile for distributed maps, and has capacity to manage...
Page 184
184 c hapter 6: c onfiguring wx s ystem p arameters to remove an auto dap 1 select the configuration tool bar option. 2 in the organizer panel, select the wx switch. 3 in the task list panel, select remove auto daps. The remove auto dap wizard appears. The maps that were configured using a distribut...
Page 185
Viewing and changing port settings 185 viewing and changing port settings you can configure and display information for the following port parameters: name state type (network, map, or wired authentication) speed and autonegotiation power over ethernet (poe) state media type (gigabit ethernet ports ...
Page 186
186 c hapter 6: c onfiguring wx s ystem p arameters 4 to specify the operating mode of a 10/100 ethernet port, select half for half-duplex or full for full-duplex mode. 5 to enable poe on a 10/100 ethernet port, select poe enabled. Caution: if you enable poe on a port connected to a device other tha...
Page 187
Viewing and changing port settings 187 configuring a port for a directly connected ap a map access port directly connects the wx switch to a map. The port also can provide power to the map. A distributed map, which is connected to wx switches through intermediate layer 2 or layer 3 networks, does no...
Page 188
188 c hapter 6: c onfiguring wx s ystem p arameters if rf auto-tuning for power configuration is enabled, setting this value has no effect. The power level is controlled by rf auto-tuning. 10 click finish. Configure a port for wired authentication a wired authentication port is an ethernet port that...
Page 189
Viewing and changing port settings 189 2 select the fallthru authentication method from the fall through authentication list box. The wx switch uses the fallthru method to try to authenticate a client if the client name or mac address does not match the userglob or mac address glob in an 802.1x or m...
Page 190
190 c hapter 6: c onfiguring wx s ystem p arameters local eap-tls external radius server if you select peap, the eap sub-protocol is ms-chapv2. For other protocols, the eap sub-protocol is none. (for information, see “eap type (802.1x only)” on page 249.) e click next. F select the authentication an...
Page 191
Viewing and changing port settings 191 f to configure accounting, select enabled, select the record type (start-stop or stop-only), then select local or a radius server group for the accounting and click add. G click finish. If you selected none in step 2, you are finished with this procedure. If yo...
Page 192
192 c hapter 6: c onfiguring wx s ystem p arameters to use an existing rule, leave the rule in the list. C click next. D select the authentication and accounting method (radius server group or local database). (for information, see “aaa methods (radius server groups and the local user database)” on ...
Page 193
Viewing and changing port groups 193 viewing and changing port groups a port group is a set of physical ports that function together as a single link and provide load sharing and link redundancy. Only network ports can participate in a port group. The wx assigns traffic flows to ports based on the s...
Page 194
194 c hapter 6: c onfiguring wx s ystem p arameters 4 to add a port to the port group, select the member checkbox for the port. 5 to remove a port from a port group, clear the member checkbox for the port. 6 to change the membership of a port that is in another port group, select the member checkbox...
Page 195
Viewing and changing management settings 195 viewing and changing management settings by default, https is enabled on the wx, allowing you to use web management on port 443 for a secure session. If you disable https, you cannot use web management. 3wxm communications also use https, but 3wxm is not ...
Page 196
196 c hapter 6: c onfiguring wx s ystem p arameters you can specify from 0 to 86400 seconds (one day). The default is 3600 (one hour). If you specify 0, the idle timeout is disabled. The timeout interval is in 30-second increments. For example, the interval can be 0, or 30 seconds, or 60 seconds, or...
Page 197
Viewing and changing management settings 197 3 select the version(s) of snmp you want the switch to run: v1 v2c usm (snmpv3) 4 see the following sections for more configuration options. Configuring an snmp v1 or v2c community string 1 access the create community wizard: a select the configuration to...
Page 198
198 c hapter 6: c onfiguring wx s ystem p arameters configuring a usm (snmp v3) user 1 access the create usm user wizard: a select the configuration tool bar option. B in the organizer panel, click the plus sign next to the wx switch. C click the plus sign next to system. D select management service...
Page 199
Viewing and changing management settings 199 b if you select hex or ip, type the hexadecimal string or ip address in the value box and click next and go to step 5. Otherwise, click finish. 5 select the authentication type used to authenticate communications with the remote snmp engine: none—no authe...
Page 200
200 c hapter 6: c onfiguring wx s ystem p arameters configuring a notification profile a notification profile is a named list of all of the notification types that can be generated by a switch, and for each notification type, the action to take (drop or send) when an event occurs. 1 access the creat...
Page 201
Viewing and changing management settings 201 2 specify the target id. 3 type the ip address of the target. 4 specify the protocol port on which the target listens for snmp notifications. The default is 162. 5 click next. 6 select the notification profile that will use this target. Perform the follow...
Page 202
202 c hapter 6: c onfiguring wx s ystem p arameters 9 click next. If you selected v1 or v2c in step 7, go to step 10. If you selected usm in step 7, go to step 12. 10 for snmpv1 or snmpv2c, select or create the snmp community string. If a community string with access type read-write-notify, read-not...
Page 203
Viewing and changing management settings 203 b in the username box, type the name of the snmpv3 user. The name can be 1 to 32 alphanumeric characters, with no spaces or tabs. C select the access type. Read-notify—an snmp management application using the string can get object values on the switch but...
Page 204
204 c hapter 6: c onfiguring wx s ystem p arameters b in the retry count box, specify the number of times the mss snmp engine will resend a notification that has not been acknowledged by the target. You can specify from 0 to 3 retries. The default is 0. 16 click finish. Modifying a usm user, notific...
Page 205
Viewing and changing management settings 205 authenticated—snmp message exchanges are authenticated but are not encrypted. (this security level is the same as the authnopriv level described in snmpv3 rfcs.) encrypted—snmp message exchanges are authenticated and encrypted. (this security level is the...
Page 206
206 c hapter 6: c onfiguring wx s ystem p arameters if a usm user with access type read-write-notify, read-notify, or notify-only is already configured, you can select it. Otherwise, you must create a new one. You also can create a new usm user even if one is already configured. To create a new usm ...
Page 207
Viewing and setting log and trace settings 207 viewing and setting log and trace settings system logs provide information about system events that you can use to monitor and troubleshoot mss. Event messages for the wx switch and its attached maps can be stored or sent to the following destinations: ...
Page 208
208 c hapter 6: c onfiguring wx s ystem p arameters critical—you must resolve the critical condition. If you do not resolve the condition, the wx can reboot or shut down. Error—the wx is missing data or unable to form a connection. Warning—a possible problem exists. Notice—events that can cause syst...
Page 209
Viewing and setting log and trace settings 209 creating an external log server you can specify a syslog server. Syslog facilities are identifiers that allow a syslog server to handle different syslog messages from different sources. You can use a facility in the range of local 0 through local 7. 1 a...
Page 210
210 c hapter 6: c onfiguring wx s ystem p arameters 3 optionally, in the level box, specify the amount of information included in the trace output (0 to 10). 0 provides the minimum amount of information and 10 proves the maximum amount of information. The default is 5. 4 optionally, in the user name...
Page 211
Viewing and configuring ip services settings 211 creating a static route the ip routing table contains routes that mss uses for determining the external communication interfaces for a wx switch. When you add an ip interface to a vlan that is up, mss automatically adds corresponding entries to the ip...
Page 212
212 c hapter 6: c onfiguring wx s ystem p arameters create an ip alias you can map an ip address to a name by creating an ip alias. For example, if you create an ip alias carmel for ip address 10.20.30.40, you could type telnet carmel rather than telnet 10.20.30.40. You can use ip aliases in conjunc...
Page 213
Viewing and configuring ip services settings 213 b in the organizer panel, click the plus sign next to the wx switch. C click the plus sign next to system. D select ip services. E in the task list panel, select dns server. 4 type the server address in the ip address box. 5 select whether the server ...
Page 214
214 c hapter 6: c onfiguring wx s ystem p arameters 5 click ok. 6 to change the interval at which an ntp server is polled, specify its value in seconds (16 to 1024) in the update interval box. The default is 64 seconds. Configuring arp the address resolution protocol (arp) table maps ip addresses to...
Page 215
Viewing and configuring vlans 215 viewing and configuring vlans a virtual lan (vlan) is a layer 2 broadcast domain that can span multiple wired or wireless lan segments. Each vlan is a separate logical network, and, if you configure ip interfaces on the vlans, mss treats each vlan as a separate ip s...
Page 216
216 c hapter 6: c onfiguring wx s ystem p arameters specify the vlan name, not the number. If both attributes are used, the wx uses the vlan name in the vlan-name attribute. Roaming and vlans wx switches in a mobility domain contain a user’s traffic within the vlan the user is assigned to. For examp...
Page 217
Viewing and configuring vlans 217 2 in the vlan name box, type the name of the vlan (1 to 16 alphabetic characters long, with no spaces or tabs). You cannot use a number as the first character in a vlan name. Vlan names must be globally unique across a mobility domain to ensure the intended user con...
Page 218
218 c hapter 6: c onfiguring wx s ystem p arameters mss does not support assigning the system ip address of a switch to an address received through the dhcp client. 3com recommends that you use the dhcp client only on wxr100 switches that you plan to configure using the drop-ship method. 9 select in...
Page 219
Viewing and configuring vlans 219 4 to add a port or port group to the vlan and remove previous vlan membership, select the port or port group and click move. To select multiple contiguous objects, press shift while selecting. To select multiple noncontiguous objects, press control while clicking. O...
Page 220
220 c hapter 6: c onfiguring wx s ystem p arameters the ieee 802.1d spanning tree specifications refer to networking devices that forward layer 2 traffic as bridges. In this context, a wx switch is a bridge. Where this manual or the product interface uses the term bridge, you can assume the term is ...
Page 221
Viewing and configuring vlans 221 changing stp port settings in a vlan 1 access the vlan table: a select the configuration tool bar option. B in the organizer panel, click the plus sign next to the wx switch. C click the plus sign next to system. D select vlans. 2 in the content panel, select the vl...
Page 222
222 c hapter 6: c onfiguring wx s ystem p arameters port fast convergence bypasses both the listening and learning stages and immediately places a port in the forwarding state. Use port fast convergence on network ports that are directly connected to servers, hosts, or other mac stations. Do not use...
Page 223
Viewing and configuring vlans 223 to enable fast convergence features: 1 access the vlan table: a select the configuration tool bar option. B in the organizer panel, click the plus sign next to the wx switch. C click the plus sign next to system. D select vlans. 2 to switch to an alternate port if t...
Page 224
224 c hapter 6: c onfiguring wx s ystem p arameters 5 in the version list, select version 1 or version 2 of igmp. 6 if igmp queriers are not on the subnet (for example, multicast routers), select querier enabled. 3com recommends that you use the pseudo-querier only when the vlan contains local multi...
Page 225
Viewing and configuring vlans 225 the router and receiver ports that the wx learns based on multicast traffic age out if they are unused. If necessary, you can statically configure multicast router ports or multicast receiver ports on the wx. You can only add network ports as static multicast router...
Page 226
226 c hapter 6: c onfiguring wx s ystem p arameters restricting layer 2 traffic among clients in a vlan by default, clients within a vlan are able to communicate with one another directly at layer 2. You can enhance network security by restricting layer 2 forwarding among clients in the same vlan. W...
Page 227
Viewing and configuring vlans 227 restricting layer 3 traffic among clients in a vlan to restrict layer 3 traffic among clients in the same vlan, use an acl. You can configure the acl yourself or use the restrict l3 traffic option in 3wxm. 1 access the vlan table: a select the configuration tool bar...
Page 228
228 c hapter 6: c onfiguring wx s ystem p arameters c click the plus sign next to system. D select vlans. 2 in the tunnel affinity box, specify the numeric value (1 to 10) that the wx will advertise to other wx switches in the mobility domain for the vlan. The default is 5. A higher tunnel affinity ...
Page 229
Viewing and configuring vlans 229 by default, all addresses except the host address of the vlan, the network broadcast address, and the subnet broadcast address are included in the range. If you specify the range, the start address must be lower than the stop address, and all addresses must be in th...
Page 230
230 c hapter 6: c onfiguring wx s ystem p arameters viewing and configuring acls an access control list (acl) filters packets to restrict or permit network usage by certain users, network devices, or traffic types. You can also assign a class of service (cos) level, which allows priority handling, t...
Page 231
Viewing and configuring acls 231 creating an acl the create acl wizard enables you to configure aces with the following parameters: match criteria: source ip address destination ip address protocol source protocol port destination protocol port differentiated services code point (dscp) value or type...
Page 232
232 c hapter 6: c onfiguring wx s ystem p arameters 3 click add rule. A new ace (acl rule) appears above the implicit deny all rule that is at the end of every acl. Each acl has a rule at the end that denies all source and destination ip addresses. This rule provides security be ensuring that the on...
Page 233
Viewing and configuring acls 233 the following table lists commonly used ip protocol numbers. 7 to specify the tcp or udp source port: a click on the down arrow in the source port column. B select the comparison operator from the operator drop-down list: less than greater than equal not equal range ...
Page 234
234 c hapter 6: c onfiguring wx s ystem p arameters d if you selected range as the comparison operator, type or select the ending port number of the range in the range end box. The number must be higher than the port number in the port number box. E click ok. 8 specify the tcp or udp destination sou...
Page 235
Viewing and configuring acls 235 8 (minimum delay)—packets with minimum delay tos defined are filtered. By default, the tos value is -1 (any). In addition to these specific values, you can specify a number from 1 to 15 that is the sum of tos option values. For example, to select minimum delay and ma...
Page 236
236 c hapter 6: c onfiguring wx s ystem p arameters capture option, to redirect matching packets to the cpu (applies to aces used for web portal access) to change the hit sample rate the hit sample rate specifies the time interval, in seconds, at which the packet counter is sampled for each security...
Page 237
Viewing and configuring acls 237 3 select or type the icmp message type in the type box. (see table 17.) 4 select or type the icmp message code in the code box. (see table 17.) 5 click ok. To disable the capture option: if an ace has the capture option, you can disable the option by selecting the ac...
Page 238
238 c hapter 6: c onfiguring wx s ystem p arameters adding a new ace to a configured acl to add a new ace to a configured acl: 1 access the acl table: a select the configuration tool bar option. B in the organizer panel, click the plus sign next to the wx switch. C click the plus sign next to system...
Page 239
Viewing and configuring acls 239 5 to map an acl to a port: a in the port list, select the port or port group to which you want to map the acl. You cannot map an acl to a map port or a wired authentication port. B in the direction list, select in to filter incoming packets or out to filter outgoing ...
Page 240
240 c hapter 6: c onfiguring wx s ystem p arameters deleting an acl to delete an acl: 1 access the acl table: a select the configuration tool bar option. B in the organizer panel, click the plus sign next to the wx switch. C click the plus sign next to system. D select acls. 2 select any ace in the ...
Page 241
Viewing and changing cos mappings 241 viewing and changing cos mappings mss supports layer 2 and layer 3 classification and marking of traffic, to help provide end-to-end qos throughout the network. Qos support includes support of wi-fi multimedia (wmm), which provides wireless qos for time-sensitiv...
Page 242
242 c hapter 6: c onfiguring wx s ystem p arameters changing a dscp-to-cos mapping to change the mapping between a dscp value in an ingress packet and its internal cos value: 1 access the qos tables: a select the configuration tool bar option. B in the organizer panel, click the plus sign next to th...
Page 243
Viewing and changing cos mappings 243 setting a range of dscp values to a single cos value to set a range of dscp values to a single cos value: 1 access the qos tables: a select the configuration tool bar option. B in the organizer panel, click the plus sign next to the wx switch. C click the plus s...
Page 244
244 c hapter 6: c onfiguring wx s ystem p arameters.
Page 245: Onfiguring
7 c onfiguring w ireless p arameters this chapter describes how to view and configure the following wireless parameters for wx switches: service set identifiers (ssids), which are managed by service profiles radio profiles, which assign ieee 802.11 settings and a service profile to radios auto-dap p...
Page 246
246 c hapter 7: c onfiguring w ireless p arameters wireless service parameters a wireless service consists of the following parameters: service profile access rules service profiles a service profile configures an ssid. Table 18 lists the parameters. For parameters that are assigned default values b...
Page 247
Viewing and configuring wireless services 247 custom web portal login page subdirectory path and filename of an html page customized for login to the ssid blank (default page with 3com logo is used) security modes for encrypted ssids only, the types of encryption supported: robust security network (...
Page 248
248 c hapter 7: c onfiguring w ireless p arameters you do not need to select the values for all these parameters when you configure a service. The service profile wizards help you configure the essential parameters and assign appropriate values to the rest. Some of the parameters that 3wxm automatic...
Page 249
Viewing and configuring wireless services 249 for eap with transport layer security (eap-tls) clients, the format is username@domain_name. For example, sydney@example.Com specifies the user sydney in the domain name example.Com. The *@marketing.Example.Com glob specifies all users in the marketing d...
Page 250
250 c hapter 7: c onfiguring w ireless p arameters peap offload—protected eap with microsoft challenge handshake authentication protocol version 2 (ms-chap-v2). Select this protocol for wireless clients. Uses tls for encryption and data integrity checking. Provides ms-chap-v2 mutual authentication. ...
Page 251
Viewing and configuring wireless services 251 the methods you select for authentication are also used for authorization. You also can configure accounting for start-stop or stop-only messages. The authentication method(s) for accounting can be but are not required to be the same as the method(s) for...
Page 252
252 c hapter 7: c onfiguring w ireless p arameters editing the name is optional if this is the first service of this type you are configuring on the switch. 4 type the ssid name in the ssid box. 5 click next. 6 select the security modes you want the ssid to support. You can select one or more of the...
Page 253
Viewing and configuring wireless services 253 the vlan and other authorization attributes can be assigned to users in the local database, on remote servers, or in the service profile of the ssid the user logs into. The vlan you select here is used only if a vlan attribute is not configured for the u...
Page 254
254 c hapter 7: c onfiguring w ireless p arameters 3 edit the service name in the name box. Editing the name is optional if this is the first service of this type you are configuring on the switch. 4 type the ssid name in the ssid box. 5 select the ssid type from the ssid type box: encrypted—traffic...
Page 255
Viewing and configuring wireless services 255 aes (ccmp)—usually used with rsn (wpa2) tkip—usually used with wpa wep-104—used with dynamic wep wep-40—used with dynamic wep 13 click next. 14 if you selected rsn or wpa in step 10, you can select whether to use dynamically generated keys, or static key...
Page 256
256 c hapter 7: c onfiguring w ireless p arameters 21 if you selected mac access in step 8, select or create the mac address globs you want to allow to access the voice vlan. Otherwise, go to step 23. To create a new rule: a click create. B specify the mac address glob in the matching mac glob box. ...
Page 257
Viewing and configuring wireless services 257 c select wireless services. D in the task list panel, select web-portal service profile. 2 read the description of the wizard on the first page, then click next. 3 edit the service name in the name box. Editing the name is optional if this is the first s...
Page 258
258 c hapter 7: c onfiguring w ireless p arameters 12 click next. 13 if you selected static wep in step 7, specify wep keys. Otherwise, click next and go to step 15. For each key (up to four), type the key value in the corresponding key box. By default, data in unicast and multicast packets are encr...
Page 259
Viewing and configuring wireless services 259 (for information, see “aaa methods (radius server groups and the local user database)” on page 250.) if you selected local as an authentication method, go to step 19. Otherwise, go to step 21. 19 click next. 3wxm lists the users in the local database of ...
Page 260
260 c hapter 7: c onfiguring w ireless p arameters configuring an open access service to configure an open access service: 1 access the open access service profile wizard: a in the organizer panel, click on the plus sign next to the wx switch on which you want to configure the service profile. B cli...
Page 261
Viewing and configuring wireless services 261 11 select the encryption algorithms to use: aes (ccmp)—usually used with rsn (wpa2) tkip—usually used with wpa wep-104—used with dynamic wep wep-40—used with dynamic wep 12 click next. 13 if you selected static wep in step 7, specify wep keys. Otherwise,...
Page 262
262 c hapter 7: c onfiguring w ireless p arameters configuring a custom service if none of the other service types is appropriate, you can use the custom service profile wizard to configure the service. The screens and options that are displayed depend on the access types and other elections you mak...
Page 263
Viewing and configuring wireless services 263 beacon fall through access for descriptions, see table 18 on page 246. The service profile tab also has the following settings: web-portal acl—specifies the name of the acl mss uses to filter a web-portal user’s traffic during authentication. This option...
Page 264
264 c hapter 7: c onfiguring w ireless p arameters where applicable, the service profile wizards allow you to specify the default vlan of the ssid but do not allow configuration of the other default attributes. To change the default vlan, select it from the vlan-name box. To set other default attrib...
Page 265
Viewing and configuring wireless services 265 static cos—when enabled, marks all traffic on the ssid with the same cos value (the static cos value). This option is automatically enabled for vocera voice service profiles but is disabled for all other service profile types. Static cos value—cos value ...
Page 266
266 c hapter 7: c onfiguring w ireless p arameters web-portal session timeout—specifies how many seconds mss waits after a web-portal client enters the disassociated state before terminating the client’s session. This can be useful if you want to allow a client connecting through web portal webaaa t...
Page 267
Viewing and configuring wireless services 267 802.11g—1.0, 2.0, 5.5, 6.0, 9.0, 11.0, 12.0, 18.0, 24.0, 36.0, 48.0, 54.0 the default depends on the radio type: 802.11a—6.0, 12.0, and 24.0 802.11b—1.0, and 2.0 802.11g—1.0, 2.0, 5.5, and 11.0 supported rates—rates that are not mandatory but that the ra...
Page 268
268 c hapter 7: c onfiguring w ireless p arameters success page—name of the web page served to the user’s browser when the user’s computer successfully completes all of the soda agent checks. Logout page—name of the web page served to the user’s browser when the user logs out of the soda-protected n...
Page 269
Viewing and configuring wireless services 269 3 select the type of access rule assigned to the service profile: 802.1x access rules—for 802.1 service profiles mac access rules—for voice service profiles web access rules—for web-portal (webaaa) service profiles last resort access rules—for open servi...
Page 270
270 c hapter 7: c onfiguring w ireless p arameters to configure access rules only, select access rules and go to “modifying access rules” on page 271. Modifying encryption settings 1 select the security modes you want the ssid to support. You can select one or more of the following: rsn (wpa2) wpa s...
Page 271
Viewing and configuring wireless services 271 10 click next. If the access type is web portal, the aces (acl rules) that 3wxm will configure for the web-portal service are listed. The aces are required to allow dhcp traffic while blocking all other traffic while a user is being authenticated. These ...
Page 272
272 c hapter 7: c onfiguring w ireless p arameters specify the user glob or mac address glob. (for syntax information, see “access rules” on page 248.) to modify an existing rule, select the rule and click properties. (for information, see the procedure for configuring the type of service profile yo...
Page 273
Viewing and configuring radio profiles 273 the radio profiles appear in the content panel. Each row in the table shows settings for an individual radio profile. To display all settings for a radio profile, select the radio profile and click properties. Creating a radio profile to create a radio prof...
Page 274
274 c hapter 7: c onfiguring w ireless p arameters 2 in the radio profiles table, select the radio profile to which the radios are currently mapped. 3 click properties. 4 click the radio selection tab. 5 in the current members list, select the radios you want to return to the default radio profile. ...
Page 275
Viewing and configuring radio profiles 275 although the interfering device is not connected to your network, the device might be causing rf interference with map radios. Rogue—radios use countermeasures against devices classified by mss as rogues, but do not use countermeasures against devices class...
Page 276
276 c hapter 7: c onfiguring w ireless p arameters fragment threshold—frame length (256 to 2346 bytes) at which the long-retry-count is applicable instead of the short-retry-count. The default is 2,346 bytes. Max. Tx msdu lifetime—maximum amount of time, from 500 ms to 250,000 ms (250 seconds), the ...
Page 277
Viewing and configuring radio profiles 277 tx. Power tuning interval—interval at which rf auto-tuning decides whether to change the power level on radios. You can specify from 1 to 65535 seconds. The default is 300 seconds. Power ramp interval—interval at which power is increased or decreased, in 1 ...
Page 278
278 c hapter 7: c onfiguring w ireless p arameters radio selection tab the radio selection tab lists the radios managed by the radio profile. A radio can be managed by only one radio profile. To add a radio to the radio profile, select the radio in the available members list. Click add to move the r...
Page 279
Viewing and changing the auto-dap profile 279 viewing and changing the auto-dap profile you can use an auto-dap profile to deploy unconfigured distributed maps. A distributed map that does not have a configuration on a wx switch can receive its configuration from the auto-dap profile instead. The au...
Page 280
280 c hapter 7: c onfiguring w ireless p arameters when blink mode is enabled, the health and radio leds on models alternately blink green and amber, allowing you to visually identify a map. (on an ap2750, the 11a led blinks on and off.) by default, blink mode is disabled. 4 if you are configuring d...
Page 281
Viewing and configuring maps 281 converting auto daps into statically configured daps see “converting auto daps into statically configured aps” on page 72. Removing auto daps see “removing auto daps” on page 183. Viewing and configuring maps maps contain radios that provide networking between your w...
Page 282
282 c hapter 7: c onfiguring w ireless p arameters viewing the configured maps to view the configured maps: 1 select the configuration tool bar option. 2 in the organizer panel, click the plus sign next to the wx switch. 3 click the plus sign next to wireless. 4 select access points. The maps that a...
Page 283
Viewing and configuring maps 283 c click the plus sign next to wireless. D select access points. E in the task list panel, select distributed ap. 2 in the name box, type a name (1 to 16 alphanumeric characters, with no spaces or tabs). 3 in the dap number box, specify the wx switch connection number...
Page 284
284 c hapter 7: c onfiguring w ireless p arameters b in the radio profile list, select the profile to which the radio belongs. (for more information, see “viewing and configuring radio profiles” on page 272.) c in the channel number list, select the channel number for the radio. If rf auto-tuning fo...
Page 285
Viewing and configuring maps 285 you cannot configure any gigabit ethernet port, or port 7 or 8 on a wx1200 switch, or port 1 on a wxr100 switch, as a map port. To manage a map on a wx4400 switch, configure a distributed map connection on the switch. (see “creating a distributed map” on page 282.) t...
Page 286
286 c hapter 7: c onfiguring w ireless p arameters 10 configure the radios: a to enable the radio, select enabled. B in the radio profile list, select the profile to which the radio belongs. (for more information, see “viewing and configuring radio profiles” on page 272.) c in the channel number lis...
Page 287
Viewing and configuring maps 287 bias is the priority of one wx connection over other wx connections to a single map for booting, configuration, and data transfer. A configuration with a high bias has priority over a configuration for the same map with low bias. The default is high. If the bias for ...
Page 288
288 c hapter 7: c onfiguring w ireless p arameters changing the map model to change the model number of an map 1 access the change ap model wizard: a select the configuration tool bar option. B in the organizer panel, click the plus sign next to the wx switch. C click the plus sign next to wireless....
Page 289
Viewing and configuring maps 289 changing the map-wx security mode to change the map-wx security mode for all distributed maps, select the value from the security mode drop-down list: none—management traffic between distributed maps and the wx is not encrypted, even for maps that support encryption....
Page 290
290 c hapter 7: c onfiguring w ireless p arameters 7 to enter or correct the fingerprint, enter or edit the value in the fingerprint box. 8 if you are configuring dual-homing support, in the bias list, select high or low. Bias is the priority of one wx connection over other wx connections to a singl...
Page 291
Viewing and configuring maps 291 13 to configure settings for a radio, click the 802.11g radio or 802.11a radio tab. A to enable the radio, select enabled. B if the map model supports external antennas, select the location and model from the antenna location and antenna type boxes. To meet regulator...
Page 292
292 c hapter 7: c onfiguring w ireless p arameters f in the transmit power box, specify the transmit power for the radio. If rf auto-tuning for power configuration is enabled, setting this value has no effect. The power level is controlled by rf auto-tuning. A to change the maximum power level rf au...
Page 293
Viewing and changing rf detection settings 293 (for information about the radio parameters in the table, see step 10 on page 286. For information about the radio parameters in the radio properties wizard, see step 13 on page 291.) 3 if you edit settings in the table, click save. If you configure set...
Page 294
294 c hapter 7: c onfiguring w ireless p arameters c click the plus sign next to wireless. D select rf detection. 2 in the task list panel, select vendor ouis. 3 select the device type(s): client ap 4 select the vendor from the vendor drop-down list. 5 select the specific ouis you want to allow for ...
Page 295
Viewing and changing rf detection settings 295 adding an entry to the ignore list to add an entry to the ignore list: 1 access the rf detection settings: a select the configuration tool bar option. B in the organizer panel, click the plus sign next to the wx switch. C click the plus sign next to wir...
Page 296
296 c hapter 7: c onfiguring w ireless p arameters enabling countermeasures to enable countermeasures: 1 access the rf detection settings: a select the configuration tool bar option. B in the organizer panel, click the plus sign next to the wx switch. C click the plus sign next to wireless. D select...
Page 297
Viewing and changing rf detection settings 297 enabling map signatures a map signature is a set of bits in a management frame sent by a map that identifies that map to mss. If someone attempts to spoof management packets from a 3com map, mss can detect the spoof attempt. 1 access the rf detection se...
Page 298
298 c hapter 7: c onfiguring w ireless p arameters.
Page 299: Onfiguring
8 c onfiguring a uthentication , a uthorization , and a ccounting p arameters this chapter describes how to view and configure the following authentication, authorization, and accounting (aaa) parameters for wx switches: local database entries for aaa processing of administrator and network client a...
Page 300
300 c hapter 8: c onfiguring a uthentication , a uthorization , and a ccounting p arameters you can create two types of users in the local database: named users — these users are authenticated by username and password and are assigned to specific vlans. Users include administrators and network users...
Page 301
Creating and managing users in the local user database 301 creating a named user to create a named user: 1 access the create named user wizard: a select the configuration tool bar option. B in the organizer panel, click the plus sign next to the wx switch. C click the plus sign next to aaa. D select...
Page 302
302 c hapter 8: c onfiguring a uthentication , a uthorization , and a ccounting p arameters 9 repeat step 5 through step 7 for each attribute value you want to change. 10 click finish. Creating a user group and assigning users to it to create a user group and assign users to it: 1 access the create ...
Page 303
Creating and managing users in the local user database 303 creating a mac user to create a mac user: 1 when creating mac address users, you configure authentication access the create mac user wizard: a select the configuration tool bar option. B in the organizer panel, click the plus sign next to th...
Page 304
304 c hapter 8: c onfiguring a uthentication , a uthorization , and a ccounting p arameters creating a mac user group and assigning users to it to create a mac user group and assign users to it: 1 access the create mac user group wizard: a select the configuration tool bar option. B in the organizer...
Page 305
Creating and managing users in the local user database 305 authorization attributes authorization attributes can be assigned to users in the local database or on remote servers. The attributes, which include access control list (acl) filters, vlan membership, encryption type, session time-out period...
Page 306
306 c hapter 8: c onfiguring a uthentication , a uthorization , and a ccounting p arameters filter-id (network access mode only) inbound or outbound acl to apply to the user. If configured in the wx switch’s local database, this attribute can be an access control list (acl) to filter outbound or inb...
Page 307
Creating and managing users in the local user database 307 mobility-profile (network access mode only) mobility profile attribute for the user. (for more information, see “viewing and changing mobility profiles” on page 342.) mobility-profile is a 3com vendor-specific attribute (vsa). The vendor id ...
Page 308
308 c hapter 8: c onfiguring a uthentication , a uthorization , and a ccounting p arameters session-timeout (network access mode only) maximum number of seconds for the user’s session. Number between 0 and 4,294,967,296 seconds (approximately 136.2 years). Ssid (network access mode only) ssid the us...
Page 309
Creating and managing users in the local user database 309 time-of-day (network access mode only) day(s) and time(s) during which the user is permitted to log into the network. After authorization, the user’s session can last until either the time-of-day range or the session-timeout duration (if set...
Page 310
310 c hapter 8: c onfiguring a uthentication , a uthorization , and a ccounting p arameters url (network access mode only) url to which the user is redirected after successful webaaa. Web url, in standard format. For example: http://www.Example.Com you must include the http:// portion. Vlan-name (ne...
Page 311
Viewing and configuring radius settings 311 viewing and configuring radius settings remote authentication dial-in user service (radius) is a client-server security protocol that provides authentication, authorization, and accounting for network users and devices. A radius server stores user profiles...
Page 312
312 c hapter 8: c onfiguring a uthentication , a uthorization , and a ccounting p arameters 2 in the name box, type the name of an existing radius server (1 to 64 alphanumeric characters, with no spaces or tabs). Do not use the same name for a radius server and a radius server group. 3 in the ip add...
Page 313
Viewing and configuring radius settings 313 changing the password applies both to mac users and to last-resort users. All mac address-authenticated users or last-resort users must share the same authorization password on the radius server. 13 click next. Modifying a radius server to modify a radius ...
Page 314
314 c hapter 8: c onfiguring a uthentication , a uthorization , and a ccounting p arameters changing the password applies both to mac users and to last-resort users. All mac address-authenticated users or last-resort users must share the same authorization password on the radius server. 10 click ok....
Page 315
Viewing and configuring radius settings 315 6 to reorder the servers, select a server and click up or down. If load balancing is enabled, the first aaa request goes to the first radius server in the list. The second aaa request goes to the second radius server in the list, and so on, until the end o...
Page 316
316 c hapter 8: c onfiguring a uthentication , a uthorization , and a ccounting p arameters 2 in the timeout box, specify how long wx switch must wait (1 to 65,535 seconds) for a radius server to respond before retransmitting. The default is 5 seconds. 3 in the retry count box, specify the number of...
Page 317
Viewing and configuring global 802.1x settings 317 configuring radius system accounting you can configure radius system accounting in 3wxm. When system accounting is enabled, an accounting-on message (acct-status-type = 7) is sent to the specified radius server group when the wx switch starts, and a...
Page 318
318 c hapter 8: c onfiguring a uthentication , a uthorization , and a ccounting p arameters 3 click the plus sign next to aaa. 4 select 802.1x. The global 802.1x settings appear. Changing global 802.1x settings to change global 802.1x settings: 1 access the 802.1x settings: a select the configuratio...
Page 319
Viewing and configuring global 802.1x settings 319 to support ssids that have both 802.1x and static wep clients, mss sends a maximum of two id requests, even if this parameter is set to a higher value. Setting the parameter to a higher value does affect all other types of eap messages. 8 to enable ...
Page 320
320 c hapter 8: c onfiguring a uthentication , a uthorization , and a ccounting p arameters 14 to specify the number of seconds mss retains session information for bonded auth™ (bonded authentication) purposes for an authenticated machine while waiting for the 802.1x client on the machine to start (...
Page 321
Viewing and configuring 802.1x network access rules 321 creating an 802.1x network access rule if the network user name matches the userglob in an 802.1x access rule, the wx switch attempts to authenticate the client using 802.1x. 1 access the create 802.1x network access wizard: a select the config...
Page 322
322 c hapter 8: c onfiguring a uthentication , a uthorization , and a ccounting p arameters for eap with transport layer security (eap-tls) clients, the format is username@domain_name. For example, sydney@example.Com specifies the user sydney in the domain name example.Com. The *@marketing.Example.C...
Page 323
Viewing and configuring 802.1x network access rules 323 7 if the authentication rule is disabled, select enabled. When a rule is disabled, 3wxm does not add it to the configuration. 8 select the authentication method(s) in the available radius server groups list and click add. An authentication meth...
Page 324
324 c hapter 8: c onfiguring a uthentication , a uthorization , and a ccounting p arameters viewing and configuring mac network access rules mac network access rules allow users onto the network by authenticating their mac addresses instead of their user names. During log on, if the username does no...
Page 325
Viewing and configuring mac network access rules 325 2 specify whether the rule is for wireless access to an ssid or access through a wired authentication port: if the rule is for access to an ssid, do one of the following: to match on any ssid name, leave the value any in the ssid box. To match onl...
Page 326
326 c hapter 8: c onfiguring a uthentication , a uthorization , and a ccounting p arameters mss tries the methods in the order they appear in the current radius server groups list. To reorder the methods, select a method and click up or down. If you specify a radius server group as the first method ...
Page 327
Viewing and configuring webaaa network access rules 327 viewing and configuring webaaa network access rules web aaa allows network users to access the network by logging on a web page. When a user attempts to access a web page over the network, the wx switch intercepts the http or https request and ...
Page 328
328 c hapter 8: c onfiguring a uthentication , a uthorization , and a ccounting p arameters creating a web aaa network access rule to create a web aaa network access rule: 1 access the create web network access wizard: a select the configuration tool bar option. B in the organizer panel, click the p...
Page 329
Viewing and configuring webaaa network access rules 329 for eap with transport layer security (eap-tls) clients, the format is username@domain_name. For example, sydney@example.Com specifies the user sydney in the domain name example.Com. The *@marketing.Example.Com glob specifies all users in the m...
Page 330
330 c hapter 8: c onfiguring a uthentication , a uthorization , and a ccounting p arameters 11 select the accounting method(s) in the available radius server groups list and click add. The options and processing are the same as those for authentication methods. (see step 7.) 12 click finish. Viewing...
Page 331
Viewing and configuring last-resort network access rules 331 2 specify whether the rule is for wireless access to an ssid or access through a wired authentication port: if the rule is for access to an ssid, do one of the following: to match on any ssid name, leave the value any in the ssid box. To m...
Page 332
332 c hapter 8: c onfiguring a uthentication , a uthorization , and a ccounting p arameters 7 to enable this accounting rule for the ssid, select enabled. By default, accounting rules you configure in 3wxm are disabled, which means 3wxm does not add the rules to the switch’s configuration. 8 select ...
Page 333
Viewing and configuring wx administrator access rules 333 creating an access rule for console access to create an access rule for console access: 1 access the create console admin user wizard: a select the configuration tool bar option. B in the organizer panel, click the plus sign next to the wx sw...
Page 334
334 c hapter 8: c onfiguring a uthentication , a uthorization , and a ccounting p arameters 7 to enable this accounting rule for the ssid, select enabled. By default, accounting rules you configure in 3wxm are disabled, which means 3wxm does not add the rules to the configuration. 8 select one of th...
Page 335
Viewing and configuring wx administrator access rules 335 mss tries the methods in the order they appear in the current radius server groups list. To reorder the methods, select a method and click up or down. If you specify a radius server group as the first method and a user is denied access by the...
Page 336
336 c hapter 8: c onfiguring a uthentication , a uthorization , and a ccounting p arameters viewing and configuring aaa support for third-party ap users a wx switch can provide network access for users associated with a third-party ap that has authenticated the users with radius. You can connect a t...
Page 337
Viewing and configuring aaa support for third-party ap users 337 for the userglob, type a full or partial username to be matched during authentication (1 to 80 alphanumeric characters, with no spaces or tabs). The format of a user glob depends on the client type and eap method. For windows domain cl...
Page 338
338 c hapter 8: c onfiguring a uthentication , a uthorization , and a ccounting p arameters configuring a radius proxy for a client to configure a radius proxy for a client: 1 access the create radius proxy client wizard: a select the configuration tool bar option. B in the organizer panel, click th...
Page 339
Viewing and changing location policy rules 339 viewing and changing location policy rules during the login process, the aaa authorization process is started immediately after clients are authenticated to use the wx switch. During authorization, mss assigns the user to a vlan and applies optional use...
Page 340
340 c hapter 8: c onfiguring a uthentication , a uthorization , and a ccounting p arameters creating a location policy rule to create a location policy rule: 1 access the create location rule wizard: a select the configuration tool bar option. B in the organizer panel, click the plus sign next to th...
Page 341
Viewing and changing location policy rules 341 9 select the distributed maps for which the location policy is applied and click add. 10 click next. 11 in the action list, select one of the following: permit—allows access if the conditions in the location policy rule are matched. If you select permit...
Page 342
342 c hapter 8: c onfiguring a uthentication , a uthorization , and a ccounting p arameters viewing and changing mobility profiles mobility profile™ attributes allow or deny access to the network for a specific user or group of users. When you create a mobility profile, you specify which map ports, ...
Page 343
Viewing and changing mobility profiles 343 4 in the ports drop-down list, select the ports to include in the mobility profile: all—include all map or wired authentication ports. Selected—include a selected list of ports. None—include no ports. If you select selected, select the individual ports in t...
Page 344
344 c hapter 8: c onfiguring a uthentication , a uthorization , and a ccounting p arameters.
Page 345: Onfiguring
9 c onfiguring wx s witches r emotely you can use 3wxm services running in your corporate network to configure wx switches in remote offices. The following remote configuration scenarios are supported: drop ship—3wxm services running in the corporate network can configure a wxr100 switch shipped dir...
Page 346
346 c hapter 9: c onfiguring wx s witches r emotely how remote wx configuration works drop ship (wxr100 only) 1 the wxr100 is shipped directly to the remote office where it will be deployed. 2 the network administrator at the corporate office preconfigures the switch in a 3wxm network plan. The swit...
Page 347
How remote wx configuration works 347 figure 9 shows the location of the fn switch and the led. Figure 9 fn switch on wxr100 5 because the fn switch was pressed while the switch was starting, the wxr100 configures the following items to enable itself to contact 3wxm services: ports 1 and 2 in the de...
Page 348
348 c hapter 9: c onfiguring wx s witches r emotely if the serial number does not match and the auto-config ip subnet matching option is disabled, 3wxm cannot give the switch a configuration. 3wxm generates a verification warning (on the network verification tab). The warning lists the serial number...
Page 349
3wxm requirements 349 8 3wxm receives the configuration request, and looks in the currently open network plan for a switch configuration with the same model and serial number as the one in the configuration request. If the network plan contains a configuration with a matching model and serial number...
Page 350
350 c hapter 9: c onfiguring wx s witches r emotely staging a wx switch for configuration by 3wxm the auto-config option must be enabled on a wx switch in order for the switch to try to contact 3wxm services for configuration. The auto-config option is automatically enabled on an unconfigured wxr100...
Page 351
Staging a wx switch for configuration by 3wxm 351 3 enable the auto-config option: w x1200# set auto-config enable success: change accepted. 4 save the configuration changes: w x1200# save config success: configuration saved. 5 power off or restart the switch. Example 2: deployment site has no dhcp ...
Page 352
352 c hapter 9: c onfiguring wx s witches r emotely example 3: deployment site has dns but no dhcp the deployment site in this example does not have a dhcp server but does have a local dns server. The configuration is similar to example 1, but includes dns configuration information instead of an ip ...
Page 353
Staging a wx switch for configuration by 3wxm 353 example 4: deployment site has dhcp but local dns domain differs from corporate dns domain the deployment site in this example has a dhcp server, so the dhcp client is enabled. Static ip address and default router (gateway) information are not requir...
Page 354
354 c hapter 9: c onfiguring wx s witches r emotely preconfiguring a switch in 3wxm if you know the serial number, use the following procedure to set up the configuration in 3wxm. 1 start 3wxm services. 2 start a 3wxm client and connect to 3wxm services. 3 select services > setup from the menu bar i...
Page 355
Preconfiguring a switch in 3wxm 355 uploading a partially configured switch and completing its configuration with 3wxm even if you do not know the serial number of a wx switch, you still can configure the switch in 3wxm. When the switch contacts 3wxm for a configuration, 3wxm generates a warning mes...
Page 356
356 c hapter 9: c onfiguring wx s witches r emotely replacing a switch and reusing its configuration if a remote switch that is configured by 3wxm fails, you can install a new switch in its place and use 3wxm to configure the switch with the replaced configuration. This method of switch replacement ...
Page 357
Replacing a switch and reusing its configuration 357 if the switch is a wxr100, the person at the remote office also inserts a paperclip or similar object into the fn hole of the wxr100 to press the fn switch. Normally, the fn led (the right led above port 1) remains solidly lit for 3 seconds after ...
Page 358
358 c hapter 9: c onfiguring wx s witches r emotely replacing a switch this task is performed by someone at the remote office and does not require a network administrator. 3com recommends that you read through the entire procedure before beginning. To replace a switch 1 remove the power cord from th...
Page 359: Anaging
10 m anaging wx s ystem i mages and c onfigurations this chapter describes the management of wx system files. It includes information about uploading a wx switch configuration into 3wxm, verifying configuration information, synchronizing local and network changes, deploying wx switches from a networ...
Page 360
360 c hapter 10: m anaging wx s ystem i mages and c onfigurations devices tab the devices tab allows you to manage configuration changes for wx switches in the network plan. To access the devices tab, do one of the following: select the devices tool bar option. In the alerts panel, click on local ch...
Page 361
Devices tab 361 task list options the task list panel in the devices tab has the following pages: change management device operations table 24 lists the tasks you can select on the devices tab. Table 24 devices tasks task option task group task description change management local changes review disp...
Page 362
362 c hapter 10: m anaging wx s ystem i mages and c onfigurations other refresh refresh the data for the selected device. Network changes review display the configuration changes that have occurred in the network for the selected switch. (see “reviewing switch configuration changes” on page 365.) ac...
Page 363
Devices tab 363 device operations images image install install the selected mss image onto wx switches. (see “distributing system images” on page 369.) schedule install schedule installation of the selected mss image onto wx switches in the future. (see “distributing system images” on page 369.) ima...
Page 364
364 c hapter 10: m anaging wx s ystem i mages and c onfigurations toolbar options table 25 lists the options on the toolbar of the devices tab. Other refresh refresh the data for the selected device. Upload wx add a wx switch to the network plan by copying its configuration from a live switch in the...
Page 365
Synchronizing local and network changes 365 synchronizing local and network changes whenever configuration changes occur to a switch, 3wxm alerts you that changes have occurred. If a configuration change occurs on a switch in the network or in the network plan, so that the network and network plan a...
Page 366
366 c hapter 10: m anaging wx s ystem i mages and c onfigurations accepting network changes to accept network changes: 1 select the devices tool bar option. 2 at the bottom of the task list panel, select change management. 3 select one or more wx switches. To select multiple switches, press shift (f...
Page 367
Synchronizing local and network changes 367 to immediately deploy local changes 1 select the devices tool bar option. 2 at the bottom of the task list panel, select change management. 3 select one or more wx switches. To select multiple switches, press shift (for contiguous switches) or control (for...
Page 368
368 c hapter 10: m anaging wx s ystem i mages and c onfigurations 4 in the task list panel in the local changes group, click schedule deploy. The schedule deploy dialog box appears. 5 edit the start date and time. (the date and time are based on the date and time on the machine where 3wxm services i...
Page 369
Distributing system images 369 distributing system images you can use 3wxm to upgrade or downgrade the system image (mss software) on wx switches. System images include switch software and map software. Using the image repository use the image repository to add or delete wx system images. The image ...
Page 370
370 c hapter 10: m anaging wx s ystem i mages and c onfigurations before you can distribute an image, you must add it to the image repository. (see “using the image repository” on page 369.) to immediately install an image on wx switches 1 select the devices tool bar option. 2 at the bottom of the t...
Page 371
Rebooting wx switches or map access points 371 rebooting wx switches or map access points you can use 3wxm to reboot wx switches and maps. To reboot wx switches and the maps they are managing 1 select the devices tool bar option. 2 at the bottom of the task list panel, select device operations. 3 in...
Page 372
372 c hapter 10: m anaging wx s ystem i mages and c onfigurations enabling or disabling management of a switch by 3wxm the devices tab lists managed switches and unmanaged switches separately. Managed switches can be deployed to the network and can be monitored by 3wxm services. Unmanaged switches c...
Page 373
Viewing the operation log 373 viewing the operation log the operation log displays information about the operations you perform using the devices options. To display the operation log 1 select the devices tool bar option. 2 at the bottom of the task list panel, select device operations. 3 in the tas...
Page 374
374 c hapter 10: m anaging wx s ystem i mages and c onfigurations importing and exporting switch configuration files you can import or export switch configuration files in extensible markup language (xml) format. The import option enables you to create a wx switch in the network plan by importing co...
Page 375
Importing and exporting switch configuration files 375 7 click import. The status of the import process appears in the status column. 8 click close to save the changes. 9 enable 3wxm to manage the switch. (see “modifying basic switch parameters” on page 179.) to export a configuration 1 select tools...
Page 376
376 c hapter 10: m anaging wx s ystem i mages and c onfigurations modifying configuration change polling options by default, 3wxm client polls wx switches in the network every 15 minutes for network changes, and displays a popup message if changes are detected. The popup message is in addition to no...
Page 377: Erifying
11 v erifying c onfiguration c hanges 3wxm uses a set of rules to verify wx switch configurations. Changes to a switch’s configuration in 3wxm or in the live network are automatically evaluated by comparing the changes to the rules. If the evaluation detects any error or warning conditions, the info...
Page 378
378 c hapter 11: v erifying c onfiguration c hanges toolbar options table 27 lists the options on the toolbar of the verification panel. Filtering the message list by default, all warning and error messages are listed. You can use the following options to filter the message list: show errors—error m...
Page 379
Resolving an error or warning 379 to resolve an error or warning 1 select the error or warning message in the message column. 2 read the information in the error/warning details section. For some errors and warnings, this section contains information about how to resolve the error or warning. 3 if a...
Page 380
380 c hapter 11: v erifying c onfiguration c hanges to globally disable a warning or error 1 select an instance of the warning or error message. 2 in the resolutions section, click disable this rule for all instances. As soon as you click on this option, all instances of the message disappear from t...
Page 381
Resolving an error or warning 381 3com recommends that you do not deploy a network plan that contains configuration errors. Allowing configuration errors to be deployed to the network can affect network stability. 3 click close to place the changes into effect and close the dialog box. Disabling and...
Page 382
382 c hapter 11: v erifying c onfiguration c hanges 6 reenable the rule or instances: to reenable a rule all of whose instances are disabled, click on the checkbox in the enabled column. The disable all instances option is deselected. To reenable an individual instance of a rule, click on the checkb...
Page 383: Anaging
12 m anaging c ertificates a digital certificate is a form of electronic identification for computers. This chapter describes processing and managing certificates, and distributing pks #12 files. Overview a digital certificate is a form of electronic identification for computers. The 3com mobility s...
Page 384
384 c hapter 12: m anaging c ertificates before installing a new certificate, verify that the wx switch is set to the correct date, time, and time zone. Otherwise, certificates might not be installed correctly. For more information about certificates on the wx, see the wireless lan switch and contro...
Page 385
Managing certificates 385 2 do one of the following: click accept to allow the connection to the wx switch. If you did not select either of the options in step 1, when you click accept, a secure connection with these certificate credentials is allowed for this session until you close the network pla...
Page 386
386 c hapter 12: m anaging c ertificates distributing certificates to wx switches you can use 3wxm to distribute certificates from pkcs #12 files to one or more wx switches. Although you can distribute one pkcs #12 file to many wx switches, as a best practice, you should install a unique certificate...
Page 387: Onfiguring
13 c onfiguring and a pplying p olicies a policy is a set of wx configuration parameters that you can define once in 3wxm and then apply to multiple wx switches. When you apply a policy to a set of wx switches, all parameter settings in the policy are applied to the switches and update the settings ...
Page 388
388 c hapter 13: c onfiguring and a pplying p olicies creating a policy to create a policy: 1 access the create policy wizard. A select the policies tool bar option. B in the task list panel, select policy. 2 in the policy name box, type a name for the policy. This name will appear in the organizer ...
Page 389
Configuring feature settings in a policy 389 configuring feature settings in a policy to configure feature settings in a policy: 1 if you have not already done so, use the procedure in “creating a policy” on page 388 to configure a policy and select the switches to which you want to apply the policy...
Page 390
390 c hapter 13: c onfiguring and a pplying p olicies table 28 feature categories for this feature area see... System features ip services “viewing and configuring ip services settings” on page 210 vlans, spanning trees and port groups “viewing and configuring vlans” on page 215 “changing stp port s...
Page 391: Anaging
14 m anaging a larms a fault or alarm (these two terms are used interchangeably) is generated by a trap, a rule, a status, or a threshold-exceeded event. 3wxm includes a feature to make it easier to manage faults (alarms) that occur in the system. The fault management system also monitors certain tr...
Page 392
392 c hapter 14: m anaging a larms perform the following steps to set up the fault management system: 1 click setup in the options located on the right side of the fault management panel. 2 select the type of alarms you want to enable by clicking the appropriate check box. Notice that there are seve...
Page 393
Classifying and organizing alarms 393 minor—the number of days after which any active minor will be aged. Informational—the number of days after which any active informational will be aged. 5 click save. Classifying and organizing alarms when a fault occurs in 3wxm, the fault management system offer...
Page 394
394 c hapter 14: m anaging a larms the events tab in the information pane provides additional details about a specific alarm, as shown in the screen below. Search capabilities you can sort system faults based on any of the columns in the table. 3wxm sorts fault events on the date of occurrence as to...
Page 395
Classifying and organizing alarms 395 menu items include the following options: all severities critical major minor info all categories system performance client security.
Page 396
396 c hapter 14: m anaging a larms network plan mobility domain mobility exchange 10/100 ethernet port gigabit ethernet port distributed ap ap radio site building floor network plan name(s) these options allow you to see a variety of specific alarms for each device in the network. Fault states each ...
Page 397
Managing faults 397 managing faults by performing various tasks, such as acknowledging, unacknowledging, and deleting faults; you can manage all of the various alarms in 3wxm. For some faults, 3wxm provides a predetermined task list that guides you through performing appropriate tasks and resolution...
Page 398
398 c hapter 14: m anaging a larms the alarms function displays information retrieved from the 3wxm service. 3wxm presents the data under the 3wxm tool bar option in the following views: alarm summary top 5 sources of alarms ids alarms dos alarms alarm summary the 3wxm fault management system displa...
Page 399
Managing faults 399 3 to view a table of all alarms in 3wxm, click details at the bottom right of the alarm summary screen (shown previously). Performing this action produces the same effect as clicking the tabular icon . From the alarm summary screen (shown previously), you can also choose to view ...
Page 400
400 c hapter 14: m anaging a larms viewing alarm summary information in pie chart format you can view alarm summary information via pie charts in two different formats: by category and by severity. 1 to view a summary of alarm information by category, from the list at the bottom left of the alarm su...
Page 401
Managing faults 401 top 5 sources of alarms sources are the separate wx switches in the network plan. 1 to view the top 5 sources of alarms in chart format, click the chart icon at the bottom left corner of the top 5 sources of alarms section of the 3wxm screen. Each bar in the graph shows the alarm...
Page 402
402 c hapter 14: m anaging a larms intrusion detection system (ids) alarms snmp notifications must be enabled on the wx switches. Table 28 lists the notification types for intrusion detection system (ids) and denial of service (dos) protection. (for more information about dos notification, see “deni...
Page 403
Managing faults 403 2 to view ids alarms in table format, click the table icon at the bottom left corner of the ids alarms section of the 3wxm screen. In the table view that displays (shown as follows), hypertext numbers link to filtered lists that contain only the alarms for that row and column tha...
Page 404
404 c hapter 14: m anaging a larms denial of service (dos) alarms snmp notifications must be enabled on the wx switches. Table 28 lists the notification types for intrusion detection system (ids) and denial of service (dos) protection. (for more information about ids notification, see “intrusion det...
Page 405
Storing faults and retrieving fault history 405 description object state 3 click on a row to view the details of a specific alarm in the tabular view. 4 after clicking on a row, 3wxm will display more information for the specific alarm in the lower pane. Click a row in the lower pane to view all of ...
Page 406
406 c hapter 14: m anaging a larms 5 click close in the lower right corner. Reporting faults 3wxm provides the capability to export fault data in the form of reports. You can generate the following reports: alarm summary—the alarm summary report provides the total number of current faults in the sys...
Page 407
Reporting faults 407 perform the following steps to generate an alarm summary report: 1 click alarm summary in the options located on the right side of the fault management panel under reports. The following alarm summary report dialog box appears: 2 select one of the following report scope types: n...
Page 408
408 c hapter 14: m anaging a larms alarm history report the alarm history report provides a list of all faults in the system that were active within a specified time period. 3wxm allows you to sort the faults by source, severity, or category. Perform the following steps to generate an alarm history ...
Page 409
Reporting faults 409 6 enter the date you would like the report to end in the end date field or navigate to the desired date from the calendar. 7 enter the desired end time in the field or navigate through the up or down arrows. 8 if necessary, browse to the desired output directory in the output di...
Page 410
410 c hapter 14: m anaging a larms.
Page 411: Sing
15 u sing the e vent l og 3wxm maintains a log of system events. The log contains messages generated by the following: wx switches in the network plan—messages generated by the wx switches in the network plan that are being monitored by the 3wxm service 3wxm services—messages generated by the 3wxm s...
Page 412
412 c hapter 15: u sing the e vent l og refreshing event data by default, the event data is refreshed whenever the 3wxm client generates a new message for itself, or receives a new message from the 3wxm services. To disable automatic refreshing of events, clear the auto-update checkbox and click app...
Page 413
Filtering event messages 413 filtering events by content when using the predefined filters, you can limit the events you see in event tab by specifying criteria such as ip address, date, or text in the log message. You can use advanced filters to further limit the events you see. To filter messages ...
Page 414
414 c hapter 15: u sing the e vent l og in the start box, click the arrow to use the calendar to specify the day, month, and year. Specify the end time. After—only events that occurred after a specified time in the start box, click the arrow to use the calendar to specify the day, month, and year. S...
Page 415
Filtering event messages 415 filtering events by severity you can limit the events you see in event tab based on event severity. 1 click on the severity tab. 2 select or clear the severity levels to display (the following descriptions are wx-based): emergency—the wx is unusable. Alert—action must be...
Page 416
416 c hapter 15: u sing the e vent l og creating and saving filters if you have specified additional criteria to filter the events, you can save the criteria as a stored custom filter. 1 in the stored filters group box, type a new filter name in the name box. 2 type a name for the filter (1 to 80 al...
Page 417: Enerating
16 g enerating r eports this chapter describes the reports you can generate with 3wxm: inventory mobility domain configuration wx configuration client summary client details client errors network usage (radio traffic) rf summary radio details network usage (port traffic) rogue details rogue summary ...
Page 418
418 c hapter 16: g enerating r eports configuration requirements some reports require specific monitoring options to be enabled in 3wxm services. Table 30 lists these requirements for each report type. Table 30 monitoring requirements for reports report monitoring option requirement configuration in...
Page 419
Overview 419 overview the reports option of the 3wxm toolbar enables you to generate reports for network clients, rf usage, rogue devices, and 3com equipment. Configuration reports: inventory mobility domain configuration wx configuration client monitoring reports: client summary client details clie...
Page 420
420 c hapter 16: g enerating r eports generating an inventory report the inventory report lists the wx switches and map access points in a specific mobility domain or that do not belong to a mobility domain. To generate an inventory report 1 select the reports tool bar option. 2 in the reports list,...
Page 421
Generating a mobility domain configuration report 421 generating a mobility domain configuration report the mobility domain configuration report lists information for all the wx switches in a mobility domain, including the vlans, radio and service profiles, and radius server groups and servers confi...
Page 422
422 c hapter 16: g enerating r eports generating a wx configuration report the wx configuration report lists configuration details for a wx switch. 1 select the reports toolbar option. 2 in the reports list, select wx configuration. 3 in the report scope instance drop-down list, select the switch fo...
Page 423
Generating a client summary report 423 generating a client summary report the client summary report lists current client sessions. 1 select the reports tool bar option. 2 in the reports list, select client summary. 3 select the scope type of the report from the report scope type drop-down list: mobi...
Page 424
424 c hapter 16: g enerating r eports 7 click generate. 8 when the report is generated, click the report link to view it. The client summary report contains the following sections: session summary total num sessions average snr average rssi ssid summary access type summary top bandwidth sessions low...
Page 425
Generating a client errors report 425 9 to prevent 3wxm from replacing an existing report of the same type with this new report, click next to overwrite existing files to deselect this option. 10 click generate. 11 when the report is generated, click the report link to view it. The client details re...
Page 426
426 c hapter 16: g enerating r eports 7 to prevent 3wxm from replacing an existing report of the same type with this new report, click next to overwrite existing files to deselect this option. 8 click generate. 9 when the report is generated, click the report link to view it. The client errors repor...
Page 427
Generating an rf summary report 427 7 to prevent 3wxm from replacing an existing report of the same type with this new report, click next to overwrite existing files to deselect this option. 8 click generate. 9 when the report is generated, click the report link to view it. The network usage report ...
Page 428
428 c hapter 16: g enerating r eports 7 to prevent 3wxm from replacing an existing report of the same type with this new report, click next to overwrite existing files to deselect this option. 8 click generate. 9 when the report is generated, click the report link to view it. The rf summary report c...
Page 429
Generating a traffic report 429 generating a traffic report this network usage report shows port traffic statistics. 1 select the reports tool bar option. 2 in the reports list, select network usage (port traffic). 3 select the scope type of the report from the report scope type drop-down list: netw...
Page 430
430 c hapter 16: g enerating r eports generating a rogue details report the rogue details report lists detailed information about rogue devices. 1 select the reports tool bar option. 2 in the reports list, select rogue details. 3 click add to add a report filter. The filter configuration fields are ...
Page 431
Generating a rogue summary report 431 5 select the time period for the report: 1 hour 24 hours 7 days 30 days 6 to specify the rogue type, click on the value field in the report filter area of the dialog, and select one of the following from the drop-down list: rogue interfering ad-hoc all (this opt...
Page 432
432 c hapter 16: g enerating r eports generating a site survey order the site survey order contains the locations and mac addresses of the line-of-site (los) points for use when conducting a site survey, and also provides a gif image of the floor. For the site survey order to be meaningful, you must...
Page 433
Generating a work order 433 generating a work order a work order provides all of the necessary information for the physical installation of the 3com mobility system. A work order shows where the map access points should be installed, wx initial setup configuration information, and projected rssi inf...
Page 434
434 c hapter 16: g enerating r eports the origin reference point used in work orders to indicate map placement is the upper left corner of the coverage area. (typically, this origin point will not match the origin point used on the floor plan itself.) generating an alarm summary the alarm summary re...
Page 435
Generating a security alarm report 435 site building floor 4 select the instance for which you want the report. For example, if the scope is building, select the building. 5 edit or select the start and end dates and times for the history. 6 to select or change the output directory for the report, c...
Page 436
436 c hapter 16: g enerating r eports generating an alarm report for client ouis the client oui report provides information about client-related alarms. 1 select the reports tool bar option. 2 in the reports list, select client oui. 3 to select or change the output directory for the report, click ch...
Page 437: Onitoring
17 m onitoring the n etwork this chapter describes how to use the 3wxm monitoring service. It includes information about monitoring service requirements, accessing monitored data, using the explore, status summary, client monitor, rf monitor, and rf trends windows, and accessing realtime performance...
Page 438
438 c hapter 17: m onitoring the n etwork requirements for monitoring to enable the 3wxm service to monitor network data, you or the 3wxm service administrator must specify the wx switches to monitor. The 3wxm service collects data from the switches and updates the information in the views under the...
Page 439
Accessing monitored data 439 distributed networks with remote sites distributed networks with remote sites have a large number, possibly hundreds, of smaller switches, such as wxr100 or wx1200 devices, spread across a variety of sites; for example, branch offices or a chain of stores. Each site has ...
Page 440
440 c hapter 17: m onitoring the n etwork 3 when you select the details button in the dashboard panel, 3wxm will display monitored data for the selected view. Using the monitor view when you open the monitor view, you will notice several different sections or “views.” each view is a different way to...
Page 441
Using the monitor view 441 3wxm automatically selects the appropriate graphical display for the type of data, and displays the data using one of the following graphs: line graph pie chart bar chart stacked-bar charts while 3wxm collects graphical or tabular data, it might take longer to display data...
Page 442
442 c hapter 17: m onitoring the n etwork alarm summary the alarm summary view is located in the upper right corner of the content panel and shows the current alarms for the selected scope. The alarms are organized by category and alarm type. 3wxm displays the following types of alarms, or faults: s...
Page 443
Using the status summary view 443 3wxm shows only traffic data for the following scopes: wx switch mobility domain network plan using the status summary view the status summary view shows the operational status and property details of equipment such as wx switches, map access points, and map radios....
Page 444
444 c hapter 17: m onitoring the n etwork status monitor or status summary details the status monitor panel, or status summary details, shows more detailed information for the devices. There are two ways to navigate to the status monitor view. In the previous screen, the blue numbers in the table ar...
Page 445
Using the status summary view 445 the following states reveal the complete status of an object: admin state locked unlocked operational state up (enabled) down (disabled) usage state active idle busy availability status failed degraded powered off offline not installed alarm status critical major mi...
Page 446
446 c hapter 17: m onitoring the n etwork using the alarm summary view the alarm summary view shows alarms organized by category and alarm type. The default view is the graphical representation of alarms. Click the tabular icon or the graph icon to switch between the chart and table views. The follo...
Page 447
Using the alarm summary view 447 alarm summary details there are three ways to view alarm summary details. Like the status summary table, blue numbers are hyperlinks. Click on a hyperlink to view the details for that item. You can also click the details button to switch from the alarm summary view t...
Page 448
448 c hapter 17: m onitoring the n etwork by clicking the details button, the display will show the alarms dashboard, and your results will be unfiltered. 3wxm will display all of the alarms in tabular format. The results will be similar to those shown in the following screen..
Page 449
Using the alarm summary view 449 click on a row to view the details of a specific alarm in the tabular view (shown in the following screen)..
Page 450
450 c hapter 17: m onitoring the n etwork after clicking on a row, 3wxm will display more information for the specific alarm in the lower pane. Click a row in the lower pane to view all of the details for the alarm. 3wxm will display a window similar to the one shown in the following screen. The ala...
Page 451
Using the alarm summary view 451 client security network plan mobility domain mobility exchange 10/100 ethernet port gigabit ethernet port distributed ap ap radio site building floor network plan name(s) these options allow you to see a variety of specific alarms for each device in the network. Addi...
Page 452
452 c hapter 17: m onitoring the n etwork add to rogue list add to ignore list create third-party ap the options are either active or inactive for each alarm. Click on an active option to see more information. Inactive options will be gray. The following screen provides a sample of the alarm setup o...
Page 453
Using the client summary view 453 using the client summary view the client summary view displays information for the following client information: clients by wx clients by radio clients by ssid clients by access type clients by time top clients click the tabular icon or the graph icon to switch betw...
Page 454
454 c hapter 17: m onitoring the n etwork client details click the details button to switch the from the graphical or tabular representation to the client monitor dashboard. In the client monitor dashboard, you can examine current and trending data for client sessions and launch various actions on a...
Page 455
Using the client summary view 455 additional client options additional client options are available from the client monitor dashboard. These options are located in the task panel on the right side of the screen (shown below) and include the following: view client session session details top clients ...
Page 456
456 c hapter 17: m onitoring the n etwork the options are either active or inactive for each alarm. Some data might not be available depending on the scope and the server setup options, but you can retrieve and view details of current sessions. Click on an active option to see more information. Inac...
Page 457
Using the client summary view 457 the following screen provides a sample of the top clients option..
Page 458
458 c hapter 17: m onitoring the n etwork finding a client when the network level polling is disabled, perform the following actions to monitor one or more clients. 1 from the client monitor, choose manage > find client in the task panel to display the find client search dialog (shown below). 2 ente...
Page 459
Using the client summary view 459 you can access the locate client, terminate client, and find aeroscout tag options in the same manner. Locating the user display the user’s approximate location by performing the following steps: 1 on the find client(s) result screen, click the locate client task (u...
Page 460
460 c hapter 17: m onitoring the n etwork 4 to refresh the list of maps that detect the client, click the (refresh listeners) button 5 to change the maps used for calculating the client’s location, click the listeners tab and select or deselect maps from the list, then click the (locate) button. Cli...
Page 461
Using the client summary view 461 refreshing client data 3wxm refreshes client monitor data at regular intervals (every 5 minutes by default). The administrator can specify the refresh rate using the client monitor polling interval. (see “changing monitoring settings” on page 510.) click the refresh...
Page 462
462 c hapter 17: m onitoring the n etwork 2 choose manage > rf link test in the task panel to run a link test and display the link test results dialog, as shown below. 3 click the refresh button to perform another link test and repopulate the rf link test table with new data. Using the traffic summa...
Page 463
Using the traffic summary view 463 the following options are available for radio, ap, floor, building, and site: 1 hour (radio) 24 hour (radio) 7 days (radio) 30 days (radio) 1 hour (traffic) 24 hour (traffic) 7 days (traffic) 30 days (traffic) the following screens provide samples of the same infor...
Page 464
464 c hapter 17: m onitoring the n etwork traffic details click the details button to switch the view from the traffic monitor dashboard to the traffic details view. The following screen is a sample of the data available for traffic - 1 hour in the traffic monitor view..
Page 465
Using the traffic summary view 465 additional traffic options additional traffic options are available from the traffic monitor dashboard. These options are located on the right side of the screen and include the following: trends bytes & packets in/out packets details reports traffic other options ...
Page 466
466 c hapter 17: m onitoring the n etwork voice monitoring with traffic views 3wxm 6.0 now includes monitoring functions which can assist with voice deployments. Qos statistics, including per-queue tx and rx counts, can be accessed through the traffic monitor dashboard, allowing you to perform real-...
Page 467
On-demand statistics monitoring 467 on-demand statistics monitoring each of the monitor dashboard views offers a way to see on-demand statistics. For example, selecting a session from the client monitor panel launches the current statistics for that session. Viewing performance data 3wxm opens a sep...
Page 468
468 c hapter 17: m onitoring the n etwork traffic reports network usage (port traffic) network usage (radio traffic) rf statistics rf summary radio details rogue reports rogue details rogue summary alarm reports alarm summary alarm history security client oui rf planning reports site survey order wo...
Page 469: Etecting
18 d etecting and c ombatting r ogue d evices this chapter discusses how to manage rogue devices that try to use your wireless network. Information includes an overview of detection features, enabling countermeasures, using the rogue detection tab, displaying a rogue’s geographical location, ignorin...
Page 470
470 c hapter 18: d etecting and c ombatting r ogue d evices rogue detection requirements rogue detection in 3wxm has the following requirements. The enable rogue detection option must be selected on the monitoring settings section of the 3wxm services setup dialog. (see “changing monitoring settings...
Page 471
Rogue detection requirements 471 to use countermeasures, they must be enabled. You can enable them on an individual radio profile basis. (see “viewing and configuring radio profiles” on page 272.) mobility domain requirement rf detection requires the mobility domain to be completely up. If a mobilit...
Page 472
472 c hapter 18: d etecting and c ombatting r ogue d evices rogue detection lists rogue detection lists specify the third-party devices and ssids that mss allows on the network, and the devices mss classifies as rogues. You can configure the following rogue detection lists: permitted ssid list—a lis...
Page 473
Rogue detection lists 473 map radio detects wireless packet. No yes yes source mac in ssid in permitted ignore list? Device is not a threat. Ssid list? Yes oui in permitted vendor list? No source mac in attack list? No generate an alarm. Classify device as a rogue. No yes issue countermeasures (if e...
Page 474
474 c hapter 18: d etecting and c ombatting r ogue d evices displaying rogue information to display rogue information, select the alarms option in the main 3wxm tool bar, and filter the information so that only alarms related to rogue devices are displayed. To do this, adjust the selection criteria ...
Page 475
Displaying rogue information 475 ad-hoc clients—wireless clients who are configured to communicate wirelessly outside of the network infrastructure. Ad-hoc clients are not necessarily malicious, but they do steal bandwidth from your infrastructure users. Ad-hoc clients are further categorized into r...
Page 476
476 c hapter 18: d etecting and c ombatting r ogue d evices table 35 describes the fields that appear on the alarm details tab for a rogue. Table 36 describes the fields that appear on the events tab for a rogue. Table 35 alarm details for rogues field description type the alarm type; for example, r...
Page 477
Displaying rogue information 477 to display additional details for a rogue, select the rogue in the alarm list, then click event details in the task list panel. Table 36 describes the fields that appear in the listeners table for the rogue. Table 37 listeners columns column description ap map whose ...
Page 478
478 c hapter 18: d etecting and c ombatting r ogue d evices displaying rogue client information to display details about the clients of rogue devices, select the rogue in the alarm list, then click view clients in the task list panel. Table 38 lists the information displayed on about clients of rogu...
Page 479
Displaying the geographical location of a rogue 479 3 to change the maps used for calculating the location of a rogue, click the listeners tab and select or deselect maps from the list, then click the (locate) button. To display the location of a client associated with the rogue: 1 select the rogue ...
Page 480
480 c hapter 18: d etecting and c ombatting r ogue d evices 3 to change the maps used for calculating the location of a client, click the listeners tab and select or deselect maps from the list, then click the (locate) button. Rogue client’s approximate location.
Page 481
Ignoring friendly third-party devices 481 ignoring friendly third-party devices by default, when countermeasures are enabled, mss considers any third-party transmitter to be a rogue device and can send countermeasures to prevent clients from using that device. To prevent mss from sending countermeas...
Page 482
482 c hapter 18: d etecting and c ombatting r ogue d evices adding a device to the rogue list the rogue list is a list of ap mac addresses belonging to a switch. 3wxm will attack the ap mac addresses in the rogue list whenever they are present on the network. 1 in the list of rogues on the alarm scr...
Page 483
Converting a rogue into a third party ap 483 3 enter the information for the ap and place the icon for the ap in its floor location, if applicable. (see “placing third-party access points” on page 137.) when you have finished, the ap appears under objects to place in rf planning. To display the list...
Page 484
484 c hapter 18: d etecting and c ombatting r ogue d evices adding clients belonging to a rogue to the black list the client black list is a list of mac addresses belonging to wireless clients who are not allowed on the network. Mss prevents clients on the list from accessing the network through a w...
Page 485: Ptimizing
19 o ptimizing a n etwork p lan after deploying a network plan to the 3com equipment in your live network, optimize the plan based on rf information from the network. The rf information can be from a site survey or from map radios. Site survey—rf measurements come from a site survey file generated b...
Page 486
486 c hapter 19: o ptimizing a n etwork p lan 4 you can choose to import measurements from the network, a site survey file, or both: a if you want to use rf neighborhood information imported from a map in the network, click yes next to network. B if you want to import measurements from a site survey...
Page 487
Importing rf measurements 487 applying the rf measurements to the floor plan to apply the rf measurements to the floor plan: 1 under site survey in the task list panel, click optimize. A wizard appears, listing the progress of the request. The total number of rf measurements that did not intersect a...
Page 488
488 c hapter 19: o ptimizing a n etwork p lan the measurements reflect how well the measuring maps can hear one another, and do not directly measure how well clients can hear the maps. For example, if the maps are mounted on the ceiling, attenuation of their signals to one another might be less than...
Page 489
Locating and fixing coverage holes 489 5 on the toolbar, click the radio type for which you want to display coverage: you also can show coverage by right-clicking on the scope in the coverage areas section, then selecting display rf coverage. Coverage for the selected scope(s) is displayed. This exa...
Page 490
490 c hapter 19: o ptimizing a n etwork p lan fixing a coverage hole after importing rf measurements, optimizing, and displaying coverage, observe any wireless coverage holes in the network. Use any of the following methods to fix any coverage holes: lock the maps in place, and use the compute and p...
Page 491: Hanging
A c hanging 3wxm p references this chapter discusses how to set 3com wireless switch manager (3wxm) client preferences. It describes how to reset preferences values and change options for network synchronization, user interface, persistence, tools, certificate management, rf planning, and 3wxm loggi...
Page 492
492 c hapter a: c hanging 3wxm p references changing network synchronization options by default, 3wxm checks for configuration changes, events, and status changes on wx switches. You can configure checking (also called polling) for configuration changes in the network made with the cli, web view, or...
Page 493
Changing tools options 493 3 to enable a confirmation prompt after closing a wizard, select the warn checkbox. To disable the confirmation prompt, clear the warn checkbox. By default, if you close a wizard, a pop-up box appears, asking whether you want to close the wizard. (changes are lost if you c...
Page 494
494 c hapter a: c hanging 3wxm p references for windows systems, the default telnet executable file is c:\windows\system32\telnet.Exe. For linux systems, the default is /usr/bin/telnet. You can also click browse to navigate the computer filesystem. 4 to change the web browser executable file or loca...
Page 495
Changing options for rf planning 495 changing options for rf planning you can change the following rf planning options: typical transmit power for clients in the 3com network. Color schemes for showing rf information configuring the transmit power of a typical client to change the transmit power of ...
Page 496
496 c hapter a: c hanging 3wxm p references to change a color 1 select tools > preferences. The preferences dialog box appears. 2 click the rf tab. 3 select one of the following tabs: 802.11a channel colors 802.11b/g channel colors rf obstacle colors data rate colors rssi band colors snr band colors...
Page 497
Changing options for rf planning 497 4 do one of the following: change another color. Click another preferences tab. Click close to close the preferences dialog box. Defining a color by changing hsb properties you can define colors by changing the hue, saturation, and brightness (hsb). Hue is the co...
Page 498
498 c hapter a: c hanging 3wxm p references 5 click ok to accept the color. The rf planning options tab in the preferences dialog box is active. 6 do one of the following: change another color. Click another preferences tab. Click close to close the preferences dialog box. Defining a color by changi...
Page 499
Changing 3wxm logging options 499 changing 3wxm logging options you can change the severity and type of 3wxm events that are logged. By default, the event logging level is set to critical, and all events are logged. These log settings apply to log messages generated by 3wxm. They do not apply to log...
Page 500
500 c hapter a: c hanging 3wxm p references.
Page 501: Hanging
B c hanging 3wxm s ervices p references this chapter discusses how to change 3wxm services preferences. This chapter describes how to change monitoring service preferences. To change 3wxm client preferences, see “changing 3wxm preferences” on page 491. To configure access control for the 3wxm client...
Page 502
502 c hapter b: c hanging 3wxm s ervices p references a page is opened in your web browser, displaying the 3wxm services setup page. When you click save to implement changes you make on a 3wxm services page, 3wxm services verifies the changes. If the changes are valid, the service implements the cha...
Page 503
Starting or stopping the 3wxm services 503 starting or stopping 3wxm services on windows systems you can start 3wxm services from within 3wxm or from windows services. 1 display the services window. Here is an example of the services window in windows xp. (the window might look differently on your s...
Page 504
504 c hapter b: c hanging 3wxm s ervices p references starting or stopping 3wxm services on linux systems you can start or stop the service by configuring the service as a daemon. After 3wxm services is started, you must enable the 3wxm client to access the service. (see “connecting to 3wxm services...
Page 505
Connecting to 3wxm services 505 the 3wxm services connection dialog appears. 2 enter the ip address or fully-qualified hostname of the machine on which the service is installed. If the service is installed on the same machine as the one you are using to run 3wxm, enter 127.0.0.1 as the ip address. T...
Page 506
506 c hapter b: c hanging 3wxm s ervices p references verify that the service has been started. If the service is running, verify that the certificate on the server is still valid (for example, is not out of date). H ttp 403: forbidden this message can indicate that the username and password are inv...
Page 507
Verifying that the 3wxm client is receiving service data 507 when you use this option, the certificate check dialog box is not shown again for the certificate, even if the certificate becomes out of date. 2 click accept. To reject the certificate and refuse the connection, click reject. The 3wxm end...
Page 508
508 c hapter b: c hanging 3wxm s ervices p references changing service settings the service settings control the connection parameters, key store information, and access control to 3wxm services. The port numbers used by 3wxm services must not be used by other applications on the machine where the 3...
Page 509
Changing wx connection settings 509 6 to change the password that protects access to the key store file, edit the value in the password box. 7 to specify the file type for the key store file, select one of the following: pkcs12 — public-key cryptography standard number 12, the standard format used b...
Page 510
510 c hapter b: c hanging 3wxm s ervices p references when both the accept all certificates and accept self-signed certificates options are disabled, 3wxm services accepts only-ca generated certificates. 7 to specify a key store filename and a password to protect access to that file: a enter the fil...
Page 511
Changing monitoring settings 511 the monitoring options require snmp traps to be enabled on the monitored wx switches and also require 3wxm services to be configured as a notification target (trap receiver) for each of the switches. The data for some reports also requires monitoring options to be en...
Page 512
512 c hapter b: c hanging 3wxm s ervices p references 5 to change settings for client-session data collection: a select enable client session collection. This option is enabled by default. B to change the number of minutes between data queries, change the value in the polling interval box. You can s...
Page 513
Accessing the 3wxm services log 513 accessing the 3wxm services log 1 select services > setup, if 3wxm services is not already displayed in a browser window. 2 select maintenance, then select log. Managing network plans 3wxm services regularly backs up network plans, at configurable intervals. In ad...
Page 514
514 c hapter b: c hanging 3wxm s ervices p references backing up a plan to immediately create a backup 1 select services > backup & restore. If 3wxm services is already open in the browser window, select plan management, then select backup & restore. 2 type a name for the backup in the backup name b...
Page 515
Managing network plans 515 copying a plan backup from one server to another copy a plan to another server by copying the backup file for that plan to the other server, then restoring the plan on the other server from the backup. To copy a network plan backup from one server to another 1 select servi...
Page 516
516 c hapter b: c hanging 3wxm s ervices p references.
Page 517: Btaining
C o btaining s upport for y our 3c om p roducts 3com offers product registration, case management, and repair services through esupport.3com.Com . You must have a user name and password to access these services, which are described in this appendix. Register your product to gain service benefits to ...
Page 518
518 a ppendix c: o btaining s upport for y our 3c om p roducts purchase extended warranty and professional services to enhance response times or extend your warranty benefits, you can purchase value-added services such as 24x7 telephone technical support, software upgrades, onsite assistance, or adv...
Page 519
Contact us 519 contact us 3com offers telephone, internet, and e-mail access to technical support and repair services. To access these services for your region, use the appropriate telephone number, url, or e-mail address from the table in the next section. Telephone technical support and repair to ...
Page 520
520 a ppendix c: o btaining s upport for y our 3c om p roducts country telephone number country telephone number asia, pacific rim — telephone technical support and repair australia hong kong india indonesia japan malaysia new zealand 1800 075 316 2907 0456 000 800 440 1193 001 803 852 9825 03 3507 ...
Page 521
Contact us 521 latin america — telephone technical support and repair antigua argentina aruba bahamas barbados belize bermuda bonaire brazil cayman chile colombia costa rica curacao ecuador dominican republic 1 800 988 2112 0 810 444 3com 1 800 998 2112 1 800 998 2112 1 800 998 2112 52 5 201 0010 1 ...
Page 522
522 a ppendix c: o btaining s upport for y our 3c om p roducts.
Page 523: Ndex
I ndex numbers 3com knowledgebase tool 517 3com professional services 518 3com resources, directory 519 3wxm creating provision or monitor accounts 56 restricting access to 54 software requirements 23 uninstalling 32 user accounts, deleting 56 3wxm client, installing 25, 27 3wxm monitoring service, ...
Page 524
524 i ndex directory of 3com resources 519 distributed map, auto-ap profile 279 distributed maps, mapping acls to 238 distributing system images 369 distributing wx software images 369 dns (domain name service) 66 dns (domain name system), configuring 212 drawing, cropping, paper space 89 e e-mail s...
Page 525
I ndex 525 link notification 186 link redundancy 193 load balancing, radius server group 314 load sharing, configuring 193 local changes deploying 367 reviewing 365, 366 scheduling deployment 367 synchronizing 365 verifying 377 local configuration changes deploying 366 undoing 366 local user databas...
Page 526
526 i ndex port link notification 186 port fast convergence 222 port groups definition 193 link redundancy 193 ports mapping acls to 238 network 185 wired authentication 188 power, optimal 154 preferences certificate management 494 logging 499 network synchronization 492 resetting all preferences 49...
Page 527
I ndex 527 ssl management ports for 3wxm 66 for web view 66 starterkit 51 starting 3wxm 49 starting monitoring service 502 static multicast ports, configuring 224 static routes, configuring 211 status colors 507 status summary, colors 507 stp (spanning tree protocol) backbone fast convergence 222 co...
Page 528
528 i ndex wx-wx security, enabling 67 x x.509 certificate types 383.


