- DL manuals
- Native Instruments
- Telephone
- Maschine
- Getting Started
Native Instruments Maschine Getting Started
Summary of Maschine
Page 1
Getting started.
Page 2
The information in this document is subject to change without notice and does not represent a commitment on the part of native instruments gmbh. The software described by this document is subject to a license agreement and may not be copied to other media. No part of this publication may be copied, ...
Page 3
Germany native instruments gmbh schlesische str. 28 d-10997 berlin germany info@native-instruments.De www.Native-instruments.De usa native instruments north america, inc. 5631 hollywood boulevard los angeles, ca 90028 usa sales@native-instruments.Com www.Native-instruments.Com © native instruments g...
Page 4: 1. Welcome to Maschine!
Maschine getting started – 1. Welcome to maschine! Thank you for buying maschine! Maschine is essentially the synergy of the maschine controller hardware and the maschine software combining the advantages of both worlds for making music, live as well as in the studio. The intuitive, hands-on qualiti...
Page 5: 2. Installation and Setup
Maschine getting started – 5 2. Installation and setup 2.1 what´s in the box after opening the maschine package you will find the following items: the maschine controller the installer dvds this getting started manual the service center quick start guide usb cable the serial number card 2.2 the masc...
Page 6
Maschine getting started – 6 % this lightbulb icon indicates that a marginal note contains useful extra information. This information may often help you to solve a task more efficiently, but does not necessarily apply to the setup or operating system you are using. However, it should be worth readin...
Page 7
Maschine getting started – 7 2.3 installing maschine this chapter will guide you through the maschine installation procedure step by step. The installation includes all components of maschine: the maschine application, the sound library and the controller editor application. 2.3.1 installing maschin...
Page 8
Maschine getting started – 8 2.3.2 installing the maschine software on mac os x place the installation dvd-rom in your computer’s dvd-rom drive. Its icon will ap- pear in the mac os x finder. Double-click the maschine dvd icon to display the content of the dvd. Double-click the installer file named ...
Page 9
Maschine getting started – 9 2.4 activating maschine when you start the maschine software for the first time, you will be asked to activate maschine using the service center. Please refer to the service center quick start guide for all information on that matter. 2.5 connecting the maschine controll...
Page 10: 3. Overview
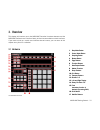
Maschine getting started – 10 3. Overview this chapter will introduce you to the maschine controller’s hardware elements and the maschine software’s user interface. Nearly all functions are available on both interfaces. If you need to look up a certain user interface element’s name, you can return t...
Page 11
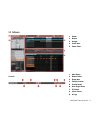
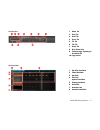
Maschine getting started – 11 3.2 software the header 1 header 2 browser 3 arranger 4 control area 5 pattern editor 1 header 2 browser 3 arranger 4 control area 5 pattern editor 1 menu button 2 browser button 3 display area 4 transport controls 5 connect button 6 audio engine button 7 cpu meter 8 vo...
Page 12
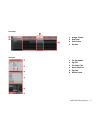
Maschine getting started – 12 the arranger the browser 1 arranger timeline 2 group slots 3 scene column 4 clip area 1 arranger timeline 2 group slots 3 scene column 4 clip area 1 file type selector 2 tag filter 3 text search field 4 search result list 5 tag editor 6 audition control 1 file type sele...
Page 13
Maschine getting started – 13 the control area the pattern editor 1 master tab 2 group tab 3 sound tab 4 source tab 5 fx1 tab 6 fx2 tab 7 output tab 8 quick browse area 9 parameter pages, depending on the selected tab 10 page selector 1 master tab 2 group tab 3 sound tab 4 source tab 5 fx1 tab 6 fx2...
Page 14
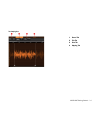
Maschine getting started – 1 the sampling area 1 record tab 2 edit tab 3 slice tab 4 mapping tab 1 record tab 2 edit tab 3 slice tab 4 mapping tab.
Page 15: 4. Creating A Pattern
Maschine getting started – 15 4. Creating a pattern in order to get you started with maschine, let´s lay out a basic pattern with some drums, a bassline and a melody. On the way, you will learn how to create sounds and groups and how to add effects (fx) to them. 4.1 finding samples in the browser th...
Page 16
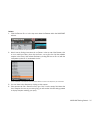
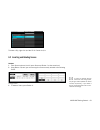
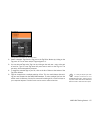
Maschine getting started – 16 software click the b rowser b utton in the top row to show the browser within the maschine window: click the browser button to open the browser. 2. We will start by finding a bass drum for our pattern: in the top row of the browser, click on l ib to select your library,...
Page 17
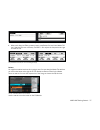
Maschine getting started – 17 the browser, displaying a list of samples that belong to the search result “kick.” 5. Now you can listen to the available bass drums by clicking on their names in the list and choose one you like. Searching samples by their names is not the only way to access the maschi...
Page 18
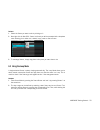
Maschine getting started – 18 software in the pattern editor, select sound 1 by clicking on it: a group with sound 1 selected 2. Double-click on the sample you want to use, in this case the bass drum. The display will now show the name of the sample instead of “sound 1.” if you do not like the sampl...
Page 19
Maschine getting started – 19 4.3 creating patterns now that you have assembled a nice drum kit, let’s record a pattern with it. 4.3.1 adjusting quantization using the grid the step grid property affects all pattern editing actions, including quantization (“note snap”). The default setting is 1/16th...
Page 20
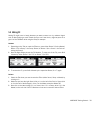
Maschine getting started – 20 4.3.2 adjusting pattern length hardware adjusting the length of pattern a1 by turning rotary encoder 1 to change the pattern length, press the pattern button, then turn rotary encoder 1. Dialing to the right will extend the pattern, dialing to the left will shorten it. ...
Page 21
Maschine getting started – 21 4.3.3 recording a pattern now that you have chosen the grid, let´s get going with the pattern, starting with some drums! Hardware the first possibility is to simply record some beats with the pads: press the play button, then the record button to enable record mode. Now...
Page 22
Maschine getting started – 22 to switch to another sound, use buttons 5 and 6 on the left top of the right display. A typical / kick line in step mode 4.3.5 note repeat another possibility is using note repeat. It is a really handy way to program beats: it plays the selected sound automatically at a...
Page 23
Maschine getting started – 23 software in the maschine software, set a step by clicking into the grid to the right of the respec- tive sound. Adding steps in the grid on the software to clear the step, right-click (on mac os x: control-click) it. You may also drag it to the right or left, or stretch...
Page 24
Maschine getting started – 2 hardware select your sound by hitting the pad it is assigned to. Now press the keyboard button. If you hit the pads now, you will hear that they all play the same sound, but with different pitches each. The pitch scale is divided in halftones, starting with pad 1 as the ...
Page 25
Maschine getting started – 25 4.5 mute & solo “muting” is used to bypass the audio signal of either a sound or a group, whereas “soloing” is pretty much the opposite: it mutes all other sounds and groups, so that you can listen to the selected sound or group alone. The combination of both is a usefu...
Page 26
Maschine getting started – 26 4.5.2 software solo to solo a sound, right-click (on mac os x: control-click) on the pad icon in the pattern editor: soloing the kick 909 sound to unsolo it, right-click (on mac: control-click) on the pad icon again. To solo a group, right-click (on mac: control-click) ...
Page 27
Maschine getting started – 27 mute to mute a sound, click on the pad icon in the pattern editor: muting a sound to unmute the sound, click on the pad icon again. To mute a group, click on the group icon in the arranger: muting a group to unmute the sound, click on the group icon again..
Page 28
Maschine getting started – 28 5. Using effects & routing now that we have created the pattern, let’s spice it up with some effects. Maschine provides a healthy selection of 20 effects (fx) that can be applied on sounds, groups and the master, all as insert effects. By using the routing system, effec...
Page 29
Maschine getting started – 29 gate the gate cuts parts of the input signal which fall below the input threshold. This can be used to rhythmically chop the signal and make it sound more “punchy.” 5.1.2 modulation chorus the chorus is useful to “thicken” signals and enhance the stereo content. It is m...
Page 30
Maschine getting started – 30 5.1.3 filtering filter filter with selectable characteristics that can be modulated via lfo or envelope fol- lower. Eq use the eq to boost or cut selective frequencies of the audio signal. 5.1.4 spatial and reverb reverb the reverb adds room information to the signal, m...
Page 31
Maschine getting started – 31 5.1.5 distortion saturator the saturator combines compression and saturation to increase the overall loudness and add additional harmonics. The contour control determines how closely it responds to the input volume. Distortion combining overdrive, feedback and modulatio...
Page 32
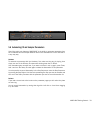
Maschine getting started – 32 5.2 applying fx to a sound you can apply two effects directly to each of the sounds of a group. Hardware press button to put the focus on the sound tab which gets selected on the left display, then hit the pad with the sound you want to apply the effect to. On the right...
Page 33
Maschine getting started – 33 software click on the sound tab to select the sound you want to apply effects to. The actual sound that you assign the fx to is always the one currently in focus; in the example underneath it´s the clap 909 sound. The sound tab with the clap 909 sound in focus 2. Choose...
Page 34
Maschine getting started – 3 5.3 applying fx to a group you can apply two effects directly to each group. The effects will then be applied to all the sounds in the group. Hardware in control mode, press button 3 to put the focus on the group tab which gets selected on the left display, then press th...
Page 35
Maschine getting started – 35 software click on the group tab to switch to the group level: the selected group tab 2. In the same way that fx get applied to the sound currently in focus, they get ap- plied to the group currently in focus, so make sure to have your group in focus in the arranger: the...
Page 36
Maschine getting started – 36 the list of available effects for the group 4. Play around with the parameters of the compressor to get used to it! 5.4 master fx you can apply two effects to the master so that all your sounds and all your groups to- gether are being sent into the effect. Hardware pres...
Page 37
Maschine getting started – 37 the list of available effects for the master on the right display 4. When you’ve found an effect you want to apply, press button 8 to load it into module fx1. Let´s take the eq here: use rotary encoders 1-8 to adjust the frequencies and get to know the eq. The parameter...
Page 38
Maschine getting started – 38 5.5 muting fx muting fx might come in handy whenever you want to return to a dry, unaltered signal: such as after applying so much reverb that you can´t hear the dry signal anymore or to get rid of the feedback while using the delay for example. Hardware depending on th...
Page 39
Maschine getting started – 39 muting the reverb 5.6 automating fx and sampler parameters one of the really cool features of maschine is the ability to automate parameters from the fx modules and the sampler modules both on the hardware and on the software in a very easy way. Hardware to automate a p...
Page 40
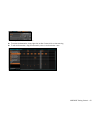
Maschine getting started – 0 the outer ring of the knobs, used for automation to remove the automation, simply right-click (on mac: control-click) on that outer ring. To edit the automation, drag the automation points in the automation lane. The automation lane ► ►.
Page 41
Maschine getting started – 1 5.7 the input module and advanced routing the routing features allow for a flexible way to handle routings within maschine and together with external instruments. Since the routing capabilities are quite powerful, we will focus on two common usage scenarios: routing exte...
Page 42
Maschine getting started – 2 hardware first choose an empty group by selecting it with one of the group buttons. Select an empty sound slot by pressing button and then one of the pads, let´s say pad 1. Press button 5 to select src (source). After that press and hold shift, followed by browse. By usi...
Page 43
Maschine getting started – 3 selecting the input module 4. You will now see two parameters: one knob for the level of the external input and a button that lets you select a source. Select ext in 1 as the source. Selecting the input source: ext in 1 5. Click on the fx1 module next to the input module...
Page 44
Maschine getting started – selecting the input source 5. To select an effect slot, press the control mode button and then select fx1 by press- ing button 6. 6. Press shift followed by browse: now you see the list of the available effects. 7. Choose the reverb, and load it using button 8. Switch back...
Page 45
Maschine getting started – 5 2. On the source tab (src), choose input and leave the source at internal: the src input tab 3. Now select the 909 kit group again and click the output tab (out) of the sound snare 909: the output tab 4. You can see the two aux sends, aux 1 and aux 2. In the dropdown men...
Page 46
Maschine getting started – 6 5.7.3 routing tips for a better overview, rename the sound you use as a send effect after the effects name. You can build your own multieffects this way: up to two fx per sound with 16 sounds per group allow up to 32 different fx in one group! Since you can save patterns...
Page 47
Maschine getting started – 7 6. Creating a song using scenes creating a song on maschine is easy and straightforward. The basic concept is this: groups and their patterns are combined in clips, a clip being a representation of a group with a specific pattern. The patterns are always named by their b...
Page 48
Maschine getting started – 8 4. To remove a clip, press button . 5. By pressing button 2, you can double the pattern length with the same content. Software select the scene you want to edit by clicking on the scene label in the arranger area. Selecting scene 1 2. Select the pattern you want to use i...
Page 49
Maschine getting started – 9 creating a clip to delete a clip, right-click (on mac os x: control-click) it. 6.2 inserting and deleting scenes hardware enter scene mode and lock it (press scene and button 1 at the same time). Using button 3 (insert) you can now copy the scene currently selected to th...
Page 50
Maschine getting started – 50 software select the scene you want to edit by clicking on it. Now right-click (on mac os x: control-click) and you will be presented with a dropdown menu allowing you to either cut (=delete), copy, paste or reset a scene. Editing options of a scene 3. To rearrange scene...
Page 51
Maschine getting started – 51 software in scene 1 click in the arranger timeline and drag to the right. The currently active loop will be highlighted. Release the mouse button in scene 2. Now you will hear scene 1 and scene 2 in sequence. A loop containing scenes 1 and 2 tip: scene surfing! By toggl...
Page 52: 7. Sampling
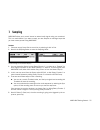
Maschine getting started – 52 7. Sampling maschine allows you to record internal or external audio signals using your soundcard. This is a useful feature if you want to record your own samples or rearrange loops that you have created yourself using maschine. Hardware choose an empty sound slot to re...
Page 53
Maschine getting started – 53 the record tab while a sample is being recorded 6. After the recording is finished, the right display will show you the recorded sample as a waveform. 7. If you record multiple samples, you can navigate between them by button 7 and button 8. This is called the recording...
Page 54
Maschine getting started – 5 entering the length in bars 6. Now hit start and, since the recording is going to be triggered by the sequencer, play. 7. After the recording stops, you will see the waveform of your sample: the waveform of the recorded sample 8. Under the bigger waveform representing th...
Page 55
Maschine getting started – 55 7.1 editing a sample hardware with button 2 you can reach the edit tab to edit the recorded sample. Change the start and end point of the sample with rotary encoder 1 and 2. Enable loop mode by pressing the right page button to navigate to the second page and then turn ...
Page 56
Maschine getting started – 56 the edit tab on the software 3. Since we recorded a drumloop in sync, there is no need to adjust start and end, but we have to enable loop by clicking on the e nable radio button. 4. The loop area is now highlighted: you can change the loop area by moving the handles in...
Page 57
Maschine getting started – 57 a loop in the edit tab 7.2 slicing a sample slicing a sample is useful if you want to rearrange loops or make them play correctly at another tempo. Let´s slice the drumloop we have just recorded! Hardware press button 3 to enter the slice tab. The slice tab on the hardw...
Page 58
Maschine getting started – 58 2. You can now see the slices of the sample represented by vertical lines in the wave- form on the right display. As we know the tempo is identical to our project tempo, we select “auto” using rotary encoder 1. 3. There are two slice modes: “trans” is detecting the slic...
Page 59
Maschine getting started – 59 2. You can see that our loop now has a couple of equally spread vertical lines in the waveform: this is where the slices are going to be applied. As we know the tempo is identical to our project tempo, click on a uto in the control area; the bpm value will remain unchan...
Page 60
Maschine getting started – 60 these notes represent the slices and trigger them in order to play the loop just like we recorded it. Try changing the tempo now, and you will hear that the loop automatically adjusts to the new tempo. 7.3 mapping samples since we sliced the sample of our recorded druml...
Page 61
Maschine getting started – 61 software select an empty sound slot, then click the sampling icon and enter the mapping tab by clicking on it: opening the map tab of the software 2. To add a new sample, select one from the browser and drag it into the mapping area. A zone will be created; you can drag...
Page 62: 8. Managing Projects
Maschine getting started – 62 8. Managing projects in this chapter we will show you how to use maschine efficiently: you will learn how to save different elements of projects independently so that you can easily use and find them for other projects. These functions are only available in the maschine...
Page 63
Maschine getting started – 63 8.1.2 saving a group to save a group, right-click (on mac os x: control-click) on the groups slot in the arranger and choose save as... From the dropdown menu: saving a group 8.1.3 saving a pattern to save a pattern, right-click (on mac os x: control-click) on the patte...
Page 64
Maschine getting started – 6 8.1.4 saving an fx preset to save an fx preset, click on the arrow in the fx module and choose save as… from the dropdown menu: saving an fx preset 8.1.5 tagging your files as described in section 4.1 “finding samples in the browser”, it is easy to find samples and other...
Page 65
Maschine getting started – 65 the tag editor at the bottom of the browser area 2. Select or deselect tags from the tag lists in the tag editor window by clicking on the tag name. A file can have multiple tags assigned to it. 3. You can add new tags to the tag lists by clicking on the add new… entry ...
Page 66
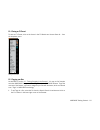
Maschine getting started – 66 8.2 exporting audio there are several ways to export audio files in maschine: from the file menu, choose export audio: selecting the region in the export window 2. In the export window’s r egion dropdown menu you can select the region you want to export: all scenes or t...
Page 67
Maschine getting started – 67 selecting the output in the export window 3. Now click on the s ettings button: here you can additionally select a bit depth, enable normalization and choose whether you wish to optimize the loop for looped playback (loop optimize)..
Page 68: 9. Tips For Playing Live
Maschine getting started – 68 9. Tips for playing live since maschine is a very hands-on tool for producing music as well as for performing live, we figured we would gather some tips for you to get you started playing live. If you are used to playing live, you may not need them, but maybe you will f...
Page 69
Maschine getting started – 69 9.4 use mute & solo and scenes and patterns with the lock function mute and solo is a good way to build up a live set especially on maschine as you can mute and solo groups and sounds at the same time. By locking the mute and solo func- tion, you have both hands free to...

